User Guide
Page 1
... a registered trademark owned by phone. Double-click the icon on your printer. Windows Server and Windows NT are provided with RESTRICTED RIGHTS. Dell™ Photo All-In-One Printer 966 User's Guide To order ink or supplies from Dell: 1. Information in this text: Dell, the DELL logo, Dell Picture Studio, and Dell Ink Management System are registered trademarks of...
... a registered trademark owned by phone. Double-click the icon on your printer. Windows Server and Windows NT are provided with RESTRICTED RIGHTS. Dell™ Photo All-In-One Printer 966 User's Guide To order ink or supplies from Dell: 1. Information in this text: Dell, the DELL logo, Dell Picture Studio, and Dell Ink Management System are registered trademarks of...
User Guide
Page 4
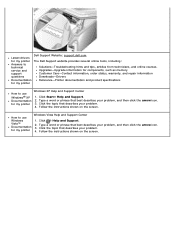
... Latest drivers for my printer The Dell Support website provides several online tools, including: Answers to use Windows® XP Documentation for my printer Windows XP Help and Support Center 1. Click Start® Help and Support. 2. Type a word or phrase that describes your problem, ...the arrow icon. 3. Click the topic that best describes your problem. 4. Vista™ Documentation for my printer How to use Windows Vista Help and Support Center Windows 1. Type a word or phrase that describes your problem, and then click the arrow icon. 3. Follow the instructions shown on...
... Latest drivers for my printer The Dell Support website provides several online tools, including: Answers to use Windows® XP Documentation for my printer Windows XP Help and Support Center 1. Click Start® Help and Support. 2. Type a word or phrase that describes your problem, ...the arrow icon. 3. Click the topic that best describes your problem. 4. Vista™ Documentation for my printer How to use Windows Vista Help and Support Center Windows 1. Type a word or phrase that describes your problem, and then click the arrow icon. 3. Follow the instructions shown on...
User Guide
Page 9
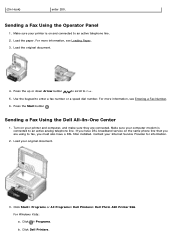
...Start button . Make sure your computer modem is on and connected to Fax. 5. For Windows Vista: a. Make sure your printer and computer, and make sure they are using to... document. 3. Press the up or down Arrow button to scroll to an active telephone line. 2. Click Dell Printers. If you have a DSL filter installed. Load your Internet Service Provider for information. 2. Click &#...174; Programs. b. (On Hook) enter 200. Sending a Fax Using the Dell All-In-One Center 1. Turn on the same phone line that you are connected. Sending a Fax ...
...Start button . Make sure your computer modem is on and connected to Fax. 5. For Windows Vista: a. Make sure your printer and computer, and make sure they are using to... document. 3. Press the up or down Arrow button to scroll to an active telephone line. 2. Click Dell Printers. If you have a DSL filter installed. Load your Internet Service Provider for information. 2. Click &#...174; Programs. b. (On Hook) enter 200. Sending a Fax Using the Dell All-In-One Center 1. Turn on the same phone line that you are connected. Sending a Fax ...
User Guide
Page 15
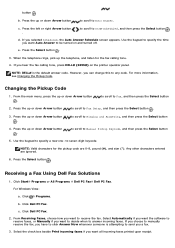
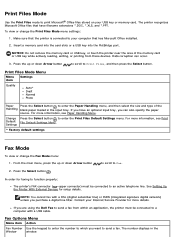
... button to scroll to On or Scheduled, and then press the Select button d. NOTE: Valid characters for the fax calling tone. 4. Click Dell PC Fax. If you choose to manually receive the fax, you a fax. 3. Select the check box beside Print incoming faxes if you selected...DELL# is attempting to be turned on the printer operator panel. to scroll to Ringing and Answering, and then press the Select button 4. Press the left or right Arrow button . For more information, see Changing the Pickup Code. Press the up or down Arrow button . to answer incoming faxes. For Windows...
... button to scroll to On or Scheduled, and then press the Select button d. NOTE: Valid characters for the fax calling tone. 4. Click Dell PC Fax. If you choose to manually receive the fax, you a fax. 3. Select the check box beside Print incoming faxes if you selected...DELL# is attempting to be turned on the printer operator panel. to scroll to Ringing and Answering, and then press the Select button 4. Press the left or right Arrow button . For more information, see Changing the Pickup Code. Press the up or down Arrow button . to answer incoming faxes. For Windows...
User Guide
Page 16
... to scroll to choose an option. 5. For more information, see Understanding Tray Linking. Click Dell Photo AIO Printer 966. 2. From the 2-Sided Print menu item, press the right or left or right Arrow button to 2 Sided Print. 5. For Windows Vista: a. Press the Back button . Press the up or down Arrow button to scroll...
... to scroll to choose an option. 5. For more information, see Understanding Tray Linking. Click Dell Photo AIO Printer 966. 2. From the 2-Sided Print menu item, press the right or left or right Arrow button to 2 Sided Print. 5. For Windows Vista: a. Press the Back button . Press the up or down Arrow button to scroll...
User Guide
Page 20
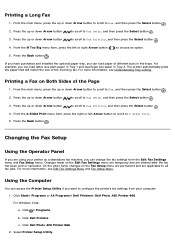
... date range for your report. 4. Click Start® Programs or All Programs® Dell PC Fax® Dell PC Fax. Click ® Programs. b. Select a date range for your report. 4. Click Dell PC Fax. 2. For Windows Vista: a. Click the print button in the upper-left corner of the dialog to ...print the fax report. For Windows Vista: a. c. Click Start® Programs or All Programs® Dell PC Fax® Dell PC Fax. Click Dell PC Fax. Using the Computer Creating a Report for Received and Incoming Faxes 1. From Receiving...
... date range for your report. 4. Click Start® Programs or All Programs® Dell PC Fax® Dell PC Fax. Click ® Programs. b. Select a date range for your report. 4. Click Dell PC Fax. 2. For Windows Vista: a. Click the print button in the upper-left corner of the dialog to ...print the fax report. For Windows Vista: a. c. Click Start® Programs or All Programs® Dell PC Fax® Dell PC Fax. Click Dell PC Fax. Using the Computer Creating a Report for Received and Incoming Faxes 1. From Receiving...
User Guide
Page 26
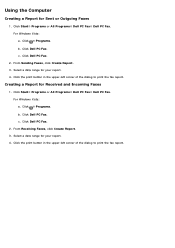
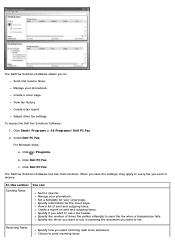
Click Start® Programs or All Programs® Dell Printers® Dell Photo AIO Printer 966. Click ® Programs. b. View an image of what will be accomplished using the operator panel). Select a quality setting for your copies (this section: Preview...-In-One Center. Lighten or darken your copies. Save an image on one page. Using the Dell Fax Solutions Software Manage photos (copy them , perform creative copying). For Windows Vista: a. Click Dell Photo AIO Printer 966. 2. Select Fax Now. Select a quality setting for your copies. E-mail an image or document. Print an ...
Click Start® Programs or All Programs® Dell Printers® Dell Photo AIO Printer 966. Click ® Programs. b. View an image of what will be accomplished using the operator panel). Select a quality setting for your copies (this section: Preview...-In-One Center. Lighten or darken your copies. Save an image on one page. Using the Dell Fax Solutions Software Manage photos (copy them , perform creative copying). For Windows Vista: a. Click Dell Photo AIO Printer 966. 2. Select Fax Now. Select a quality setting for your copies. E-mail an image or document. Print an ...
User Guide
Page 27
... number of sent and outgoing faxes. To access the Dell Fax Solutions Software: 1. Click Start® Programs or All Programs® Dell PC Fax. 2. Select Dell PC Fax. c. Specify information for your cover page....want incoming calls to be answered. The Dell Fax Solutions Software allows you to send the fax when a transmission fails. Manage your phonebook. Click Dell PC Fax. Manage your phonebook. Set ... send or receive. When you want to fax. Create a fax report. The Dell Fax Solutions Software has two main sections. Specify if you save the settings, they apply to...
... number of sent and outgoing faxes. To access the Dell Fax Solutions Software: 1. Click Start® Programs or All Programs® Dell PC Fax. 2. Select Dell PC Fax. c. Specify information for your cover page....want incoming calls to be answered. The Dell Fax Solutions Software allows you to send the fax when a transmission fails. Manage your phonebook. Click Dell PC Fax. Manage your phonebook. Set ... send or receive. When you want to fax. Create a fax report. The Dell Fax Solutions Software has two main sections. Specify if you save the settings, they apply to...

User Guide
Page 28
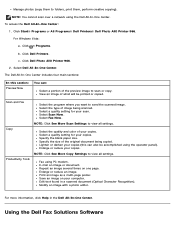
...Options, or Setup (depending on your printer settings in Printing Preferences depending on each tab, and change the settings as necessary. In Windows 2000, click Start® Settings® Printers. Click Printers. 2. Block junk faxes. You can change your desired output quality. To... access Printing Preferences when a document is open : 1. In Windows XP, click Start® Settings® Control Panel® Printers and Other Hardware® Printers and Faxes. In Windows Vista: a. Click ® Control Panel. NOTE: Changes made to create. To...
...Options, or Setup (depending on your printer settings in Printing Preferences depending on each tab, and change the settings as necessary. In Windows 2000, click Start® Settings® Printers. Click Printers. 2. Block junk faxes. You can change your desired output quality. To... access Printing Preferences when a document is open : 1. In Windows XP, click Start® Settings® Control Panel® Printers and Other Hardware® Printers and Faxes. In Windows Vista: a. Click ® Control Panel. NOTE: Changes made to create. To...
User Guide
Page 30
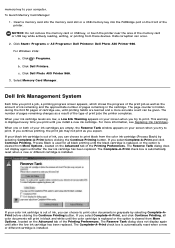
For Windows Vista: a. Click Dell Photo AIO Printer 966. 3. The number of pages remaining changes as the amount of ink ...cartridge is cleared from these devices. When one or both of your ink cartridges are empty, the Reserve Tank window appears on the Advanced tab of the Printing Preferences. If your screen when you can occur. 2. c. If ...or the option is out of the printer. Click Start® Programs or All Programs® Dell Printers® Dell Photo AIO Printer 966. When your ink cartridge levels are learned and a more information, see Replacing Ink Cartridges. Select ...
For Windows Vista: a. Click Dell Photo AIO Printer 966. 3. The number of pages remaining changes as the amount of ink ...cartridge is cleared from these devices. When one or both of your ink cartridges are empty, the Reserve Tank window appears on the Advanced tab of the Printing Preferences. If your screen when you can occur. 2. c. If ...or the option is out of the printer. Click Start® Programs or All Programs® Dell Printers® Dell Photo AIO Printer 966. When your ink cartridge levels are learned and a more information, see Replacing Ink Cartridges. Select ...

User Guide
Page 31
...double-click My Computer from your computer. 5. In Windows Vista, click ® Computer. c. When the printer software installation screen appears, click Personal Installation or Network Installation. Click ® Programs. b. Click Dell Printers. Insert the Drivers and Utilities CD, and ...not appear: a. Click Start® Programs or All Programs® Dell Printers® Dell Photo AIO Printer 966. Click Dell Photo AIO Printer 966. 2. Click Uninstall Dell Photo AIO Printer 966. 3. Follow the instructions on the screen. In Windows XP, click Start® My Computer. d.
...double-click My Computer from your computer. 5. In Windows Vista, click ® Computer. c. When the printer software installation screen appears, click Personal Installation or Network Installation. Click ® Programs. b. Click Dell Printers. Insert the Drivers and Utilities CD, and ...not appear: a. Click Start® Programs or All Programs® Dell Printers® Dell Photo AIO Printer 966. Click Dell Photo AIO Printer 966. 2. Click Uninstall Dell Photo AIO Printer 966. 3. Follow the instructions on the screen. In Windows XP, click Start® My Computer. d.
User Guide
Page 36
...menu. See Setting Up the Printer With External Devices for more information, see Print Default File Default Settings Menu. If you are using the Dell Fax to send a fax from these devices. Change Press the Select button to enter the Paper Handling menu, and then select the size and...: Do not remove the memory card or USB key, or touch the printer near the area of the Handling blank paper loaded in the Window window. The printer recognizes Microsoft Office files that has Microsoft Office installed. 2. Data corruption can also specify the paper source. For more details.
...menu. See Setting Up the Printer With External Devices for more information, see Print Default File Default Settings Menu. If you are using the Dell Fax to send a fax from these devices. Change Press the Select button to enter the Paper Handling menu, and then select the size and...: Do not remove the memory card or USB key, or touch the printer near the area of the Handling blank paper loaded in the Window window. The printer recognizes Microsoft Office files that has Microsoft Office installed. 2. Data corruption can also specify the paper source. For more details.
User Guide
Page 37
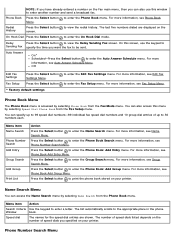
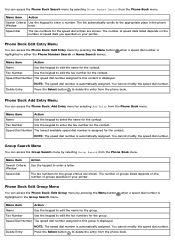
...Search menu. Phone Number Search Menu Speed dial The names for the speed dial entries are displayed on your printer. You can also access this window to enter the On Hook Dial mode. For more information, see Phone Book Add Entry Menu. You can specify up to 99 speed dial... scrolls to enter the Auto Answer Schedule menu. Auto Answer On* Scheduled-Press the Select button to the appropriate place in the phone Window book. For more information, see Phone Book Redial History Press the Select button screen. The last five numbers dialed are shown.
...Search menu. Phone Number Search Menu Speed dial The names for the speed dial entries are displayed on your printer. You can also access this window to enter the On Hook Dial mode. For more information, see Phone Book Add Entry Menu. You can specify up to 99 speed dial... scrolls to enter the Auto Answer Schedule menu. Auto Answer On* Scheduled-Press the Select button to the appropriate place in the phone Window book. For more information, see Phone Book Redial History Press the Select button screen. The last five numbers dialed are shown.
User Guide
Page 38
... Book menu. Phone Book Add Entry Menu You can access the Phone Book: Add Entry menu by pressing the Menu button highlighted in the phone Window book. Fax Number Use the keypad to enter a letter. Phone Book Edit Entry Menu You can access the Phone Book: Edit Entry menu by selecting... from the phone book. Speed Dial Number The speed dial number assigned to delete the entry from the Phone Book menu. Menu item Search Criteria Window Speed dial Action Use the keypad to enter the fax number for the contact. Phone Book Edit Group Menu You can access the Phone Book...
... Book menu. Phone Book Add Entry Menu You can access the Phone Book: Add Entry menu by pressing the Menu button highlighted in the phone Window book. Fax Number Use the keypad to enter a letter. Phone Book Edit Entry Menu You can access the Phone Book: Edit Entry menu by selecting... from the phone book. Speed Dial Number The speed dial number assigned to delete the entry from the Phone Book menu. Menu item Search Criteria Window Speed dial Action Use the keypad to enter the fax number for the contact. Phone Book Edit Group Menu You can access the Phone Book...

User Guide
Page 39
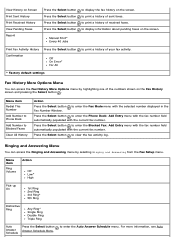
... Settings Menu You can access the Edit Fax Settings menu by selecting Edit Fax Settings from the Fax Mode menu. Menu item Name Fax number window Name Search Phone Number Search Redial History Speed Dial Number Action Use the keypad to enter the fax numbers for the group. For more information...
... Settings Menu You can access the Edit Fax Settings menu by selecting Edit Fax Settings from the Fax Mode menu. Menu item Name Fax number window Name Search Phone Number Search Redial History Speed Dial Number Action Use the keypad to enter the fax numbers for the group. For more information...
User Guide
Page 41
... Setup menu. to print a history of sent faxes. Press the Select button to Blocked Faxes Clear All History Action Press the Select button Fax Number Window. Menu item Ring Volume Action Off Low* High Pick-up On 1st Ring 2nd Ring 3rd Ring* 5th Ring Distinctive Ring Any Ring* Single Ring...
... Setup menu. to print a history of sent faxes. Press the Select button to Blocked Faxes Clear All History Action Press the Select button Fax Number Window. Menu item Ring Volume Action Off Low* High Pick-up On 1st Ring 2nd Ring 3rd Ring* 5th Ring Distinctive Ring Any Ring* Single Ring...
User Guide
Page 44
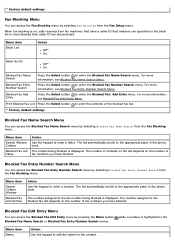
... Add Entry Press the Select button to enter the Blocked Fax Name Search menu. Menu item Search Window Criteria Blocked Fax List Value Action Use the keypad to enter a number. Menu item Search Criteria Window Blocked Fax List Number Action Use the keypad to enter a letter. Print Blocked Fax List Press the...
... Add Entry Press the Select button to enter the Blocked Fax Name Search menu. Menu item Search Window Criteria Blocked Fax List Value Action Use the keypad to enter a number. Menu item Search Criteria Window Blocked Fax List Number Action Use the keypad to enter a letter. Print Blocked Fax List Press the...
User Guide
Page 56
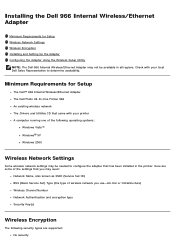
...Network Settings Wireless Encryption Installing and Setting Up the Adapter Configuring the Adapter Using the Wireless Setup Utility NOTE: The Dell 966 Internal Wireless/Ethernet Adapter may need: Network Name, also known as SSID (Service Set ID) BSS (Basic Service ...Windows Vista™ Windows® XP Windows 2000 Wireless Network Settings Some wireless network settings may be available in the printer. Installing the Dell 966 Internal Wireless/Ethernet Adapter Minimum Requirements for Setup The Dell™ 966 Internal Wireless/Ethernet Adapter The Dell Photo All-In-One Printer 966...
...Network Settings Wireless Encryption Installing and Setting Up the Adapter Configuring the Adapter Using the Wireless Setup Utility NOTE: The Dell 966 Internal Wireless/Ethernet Adapter may need: Network Name, also known as SSID (Service Set ID) BSS (Basic Service ...Windows Vista™ Windows® XP Windows 2000 Wireless Network Settings Some wireless network settings may be available in the printer. Installing the Dell 966 Internal Wireless/Ethernet Adapter Minimum Requirements for Setup The Dell™ 966 Internal Wireless/Ethernet Adapter The Dell Photo All-In-One Printer 966...
User Guide
Page 70
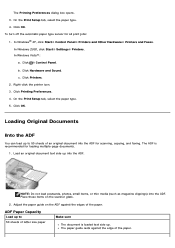
In Windows® XP, click Start® Control Panel® Printers and Other Hardware® Printers and Faxes. Click ® Control Panel. Click Printing Preferences. 4. On the ... You can load up into the ADF. Adjust the paper guide on the scanner glass. 2. In Windows Vista™: a. ADF Paper Capacity Load up to 50 sheets of the paper. Click Hardware and Sound. c. In Windows 2000, click Start® Settings® Printers. Place these items on the ADF against the edge...
In Windows® XP, click Start® Control Panel® Printers and Other Hardware® Printers and Faxes. Click ® Control Panel. Click Printing Preferences. 4. On the ... You can load up into the ADF. Adjust the paper guide on the scanner glass. 2. In Windows Vista™: a. ADF Paper Capacity Load up to 50 sheets of the paper. Click Hardware and Sound. c. In Windows 2000, click Start® Settings® Printers. Place these items on the ADF against the edge...

User Guide
Page 75
...ink cartridges when they are not aligned at the left margin, or when vertical or straight lines appear wavy. Load plain paper. In Windows Vista: a. Click ® Control Panel. c. Click Printers. Aligning Ink Cartridges Your printer automatically prompts you to align ink cartridges ... formed or are installed or replaced. Press the up or down Arrow button to scroll to Align Cartridges. 5. Load plain paper. 2. In Windows 2000, click Start® Settings® Printers. 9. For more information, see Loading Paper. 2. Press the up or down Arrow button to...
...ink cartridges when they are not aligned at the left margin, or when vertical or straight lines appear wavy. Load plain paper. In Windows Vista: a. Click ® Control Panel. c. Click Printers. Aligning Ink Cartridges Your printer automatically prompts you to align ink cartridges ... formed or are installed or replaced. Press the up or down Arrow button to scroll to Align Cartridges. 5. Load plain paper. 2. In Windows 2000, click Start® Settings® Printers. 9. For more information, see Loading Paper. 2. Press the up or down Arrow button to...


