User Guide
Page 16
... a Fax on Both Sides of the incoming fax. Select Printer Setup Utility. If you have purchased and installed the optional paper tray, you are using your computer. 1. Press the up or down Arrow button to scroll to configure the printer's fax settings from ... different sizes in Tray 2. On the other hand, changes on the Edit Fax Settings menu are temporary and are applicable to 2 Sided Print. 5. For more information, see Edit Fax Settings Menu and Fax Setup Menu. Click ® Programs. b. Click Dell Photo AIO Printer 966. 2. For Windows Vista: a. Click Start®...
... a Fax on Both Sides of the incoming fax. Select Printer Setup Utility. If you have purchased and installed the optional paper tray, you are using your computer. 1. Press the up or down Arrow button to scroll to configure the printer's fax settings from ... different sizes in Tray 2. On the other hand, changes on the Edit Fax Settings menu are temporary and are applicable to 2 Sided Print. 5. For more information, see Edit Fax Settings Menu and Fax Setup Menu. Click ® Programs. b. Click Dell Photo AIO Printer 966. 2. For Windows Vista: a. Click Start®...

User Guide
Page 17
...use two detection patterns, call your phone line has distinctive ring service activated. The default code is installed, choose from which tray the printer picks paper. Choose whether you want to answer incoming faxes automatically or at a scheduled time. Specify a fax number to which pattern...detection pattern using DTMF). Choose whether to scan the entire document before the machine receives the incoming fax. If an optional second paper tray is DELL# (3355#). On this tab: Dialing and Sending You can assign a speed dial number to 89 individual contacts and 10 ...
...use two detection patterns, call your phone line has distinctive ring service activated. The default code is installed, choose from which tray the printer picks paper. Choose whether you want to answer incoming faxes automatically or at a scheduled time. Specify a fax number to which pattern...detection pattern using DTMF). Choose whether to scan the entire document before the machine receives the incoming fax. If an optional second paper tray is DELL# (3355#). On this tab: Dialing and Sending You can assign a speed dial number to 89 individual contacts and 10 ...

User Guide
Page 21
...operator panel or the printer software to produce quality documents. For more information, see Understanding the Operator Panel. Tray that holds the paper as it exits the printer. NOTE: If you use a DSL modem for your computer, you can ...print from memory cards or a PictBridge-enabled camera. Tray that holds blank paper. NOTE: The printer (whether it . Understanding the Printer Parts Number: Part: 1 Automatic Document Feeder (ADF) 2 Printer unit 3 Operator panel 4 Paper tray 5 Optional paper tray 6 Paper exit tray Description: Part that your printer to a computer ...
...operator panel or the printer software to produce quality documents. For more information, see Understanding the Operator Panel. Tray that holds the paper as it exits the printer. NOTE: If you use a DSL modem for your computer, you can ...print from memory cards or a PictBridge-enabled camera. Tray that holds blank paper. NOTE: The printer (whether it . Understanding the Printer Parts Number: Part: 1 Automatic Document Feeder (ADF) 2 Printer unit 3 Operator panel 4 Paper tray 5 Optional paper tray 6 Paper exit tray Description: Part that your printer to a computer ...

User Guide
Page 22
NOTE: The Express Service Code is serial in all countries. 12 Supplies Reorder Label To order ink cartridges or paper, visit www.dell.com/supplies. 13 FAX connector ( - NOTE: Do not connect additional devices to the printer without using a digital line filter.... open the Memory Card Manager. bottom connector), and then insert the supplied yellow terminator for additional devices exit tray 10 ADF input tray Tray that holds your printer when you use support.dell.com or contact technical support. upper connector), and do not connect a DSL (digital subscriber line) or...
NOTE: The Express Service Code is serial in all countries. 12 Supplies Reorder Label To order ink cartridges or paper, visit www.dell.com/supplies. 13 FAX connector ( - NOTE: Do not connect additional devices to the printer without using a digital line filter.... open the Memory Card Manager. bottom connector), and then insert the supplied yellow terminator for additional devices exit tray 10 ADF input tray Tray that holds your printer when you use support.dell.com or contact technical support. upper connector), and do not connect a DSL (digital subscriber line) or...
User Guide
Page 32
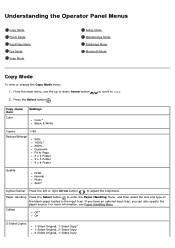
... the size and type of the blank paper loaded in the input tray. Collate Off* On 2-Sided Copies 1-Sided Original, 1-Sided Copy* 1-Sided Original, 2-Sided Copy 2-Sided Original, 1-Sided Copy Paper Handling Press the Select button to Copy. For more information, see Paper Handling Menu. Copy menu item Color Settings... Photo Auto* Lighter/Darker Press the left or right Arrow button to adjust the brightness. If you have an optional input tray, you can also specify the paper source. From the main menu, use the up or down Arrow button 2. Press the Select button . Understanding the Operator ...
... the size and type of the blank paper loaded in the input tray. Collate Off* On 2-Sided Copies 1-Sided Original, 1-Sided Copy* 1-Sided Original, 2-Sided Copy 2-Sided Original, 1-Sided Copy Paper Handling Press the Select button to Copy. For more information, see Paper Handling Menu. Copy menu item Color Settings... Photo Auto* Lighter/Darker Press the left or right Arrow button to adjust the brightness. If you have an optional input tray, you can also specify the paper source. From the main menu, use the up or down Arrow button 2. Press the Select button . Understanding the Operator ...
User Guide
Page 35
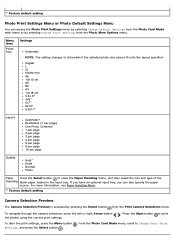
For more information, see Paper Handling Menu. * Factory default setting Camera Selection Preview The Camera Selection Preview is accessed by selecting Change Print Settings from the Print Camera Selections menu. If you have an optional input tray, you can access the Photo Print Settings menu by selecting Change ...the Select button . Menu item Photo Size Settings Automatic NOTE: The setting changes to enter the Paper Handling menu, and then select the size and type of the Handling blank paper loaded in the input tray. Hagaki L 2L 60x80 mm A6 10x15 cm A5 B5 A4 13x18 cm 3.5x 5" 4x6"...
For more information, see Paper Handling Menu. * Factory default setting Camera Selection Preview The Camera Selection Preview is accessed by selecting Change Print Settings from the Print Camera Selections menu. If you have an optional input tray, you can access the Photo Print Settings menu by selecting Change ...the Select button . Menu item Photo Size Settings Automatic NOTE: The setting changes to enter the Paper Handling menu, and then select the size and type of the Handling blank paper loaded in the input tray. Hagaki L 2L 60x80 mm A6 10x15 cm A5 B5 A4 13x18 cm 3.5x 5" 4x6"...
User Guide
Page 36
...application, the printer must be connected to send a fax from these devices. The printer recognizes Microsoft Office files that have an optional input tray, you purchase a digital line filter. Press the Select button . From the main menu, press the up or down Arrow button to scroll...: Do not remove the memory card or USB key, or touch the printer near the area of the Handling blank paper loaded in the Window window. If you are using the Dell Fax to a computer with a DSL (digital subscriber line) or ISDN (integrated signature digital network) unless you can occur...
...application, the printer must be connected to send a fax from these devices. The printer recognizes Microsoft Office files that have an optional input tray, you purchase a digital line filter. Press the Select button . From the main menu, press the up or down Arrow button to scroll...: Do not remove the memory card or USB key, or touch the printer near the area of the Handling blank paper loaded in the Window window. If you are using the Dell Fax to a computer with a DSL (digital subscriber line) or ISDN (integrated signature digital network) unless you can occur...
User Guide
Page 42
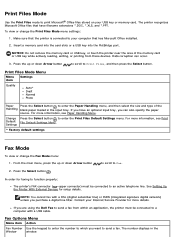
...selecting Fax Printing from the Fax Setup menu. Caller ID Pattern Pattern 1 (FSK)* Pattern 2 (DTMF) NOTE: The Caller ID detection pattern is DELL# (3355#). To change the code, use two detection patterns, call your fax number. Your Fax Name Use the keypad to display the Pickup ... Fax Footer On* Off 2-Sided Print 1 Sided Print* 2 Sided Print Paper Press the Select button to . * Factory default setting Fax Printing Menu You can also specify the paper source. If you have an optional input tray, you selected during initial setup. NOTE: The default code is determined by ...
...selecting Fax Printing from the Fax Setup menu. Caller ID Pattern Pattern 1 (FSK)* Pattern 2 (DTMF) NOTE: The Caller ID detection pattern is DELL# (3355#). To change the code, use two detection patterns, call your fax number. Your Fax Name Use the keypad to display the Pickup ... Fax Footer On* Off 2-Sided Print 1 Sided Print* 2 Sided Print Paper Press the Select button to . * Factory default setting Fax Printing Menu You can also specify the paper source. If you have an optional input tray, you selected during initial setup. NOTE: The default code is determined by ...
User Guide
Page 46
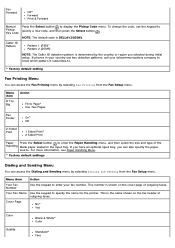
... Press the Select button to print a list of the blank paper loaded in the input tray from the Setup menu, Copy Mode Setup Mode Menu Menu item Action Paper Handling Press the Select button Paper Handling Menu. For more information, see Print File Default Settings Menu... menu. For more information, see Bluetooth Default Settings Menu. If you have an optional input tray, you can view or change the Paper Handling menu by selecting Paper Handling from the Paper Handling menu. For more information, see Scan Default Settings Menu. * Factory default settings Setup...
... Press the Select button to print a list of the blank paper loaded in the input tray from the Setup menu, Copy Mode Setup Mode Menu Menu item Action Paper Handling Press the Select button Paper Handling Menu. For more information, see Print File Default Settings Menu... menu. For more information, see Bluetooth Default Settings Menu. If you have an optional input tray, you can view or change the Paper Handling menu by selecting Paper Handling from the Paper Handling menu. For more information, see Scan Default Settings Menu. * Factory default settings Setup...

User Guide
Page 47
... Default Settings menu, Fax Printing menu, or Bluetooth Default Settings menu. You can load different sizes of paper into these two trays and choose the corresponding paper size options for printer with one input tray Menu Settings item Size Hagaki L 2L A6 10x15 cm A5 13x18 cm B5 A4 3x5 4x6 5x7 ...8.5x11 8.5x14 NOTE: Size is determined by the country you selected during initial setup. Paper Handling menu for printer with two input trays Menu item Settings SizeTray 1 Hagaki L 2L A6 A5 B5 A4 3x5" 4x6" 8.5x11" 8.5x14" NOTE: Size is determined by...
... Default Settings menu, Fax Printing menu, or Bluetooth Default Settings menu. You can load different sizes of paper into these two trays and choose the corresponding paper size options for printer with one input tray Menu Settings item Size Hagaki L 2L A6 10x15 cm A5 13x18 cm B5 A4 3x5 4x6 5x7 ...8.5x11 8.5x14 NOTE: Size is determined by the country you selected during initial setup. Paper Handling menu for printer with two input trays Menu item Settings SizeTray 1 Hagaki L 2L A6 A5 B5 A4 3x5" 4x6" 8.5x11" 8.5x14" NOTE: Size is determined by...
User Guide
Page 48
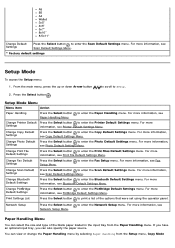
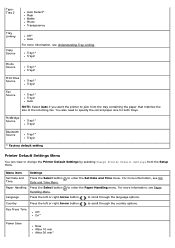
... Press the Select button Date and Time Menu. For more information, see Paper Press the left or right Arrow button to specify the correct paper size for both trays. For more information, see Understanding Tray Linking. PictBridge Source Tray1* Tray2 Bluetooth Source Tray1* Tray2 * Factory default...setting Printer Default Settings Menu You can view or change the Printer Default Settings by selecting Change Printer Default Settings from the tray containing the paper that matches the size of the incoming fax. to scroll through the country options. Key Press Tone Off On* Power...
... Press the Select button Date and Time Menu. For more information, see Paper Press the left or right Arrow button to specify the correct paper size for both trays. For more information, see Understanding Tray Linking. PictBridge Source Tray1* Tray2 Bluetooth Source Tray1* Tray2 * Factory default...setting Printer Default Settings Menu You can view or change the Printer Default Settings by selecting Change Printer Default Settings from the tray containing the paper that matches the size of the incoming fax. to scroll through the country options. Key Press Tone Off On* Power...
User Guide
Page 54
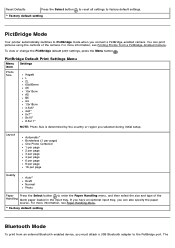
...Mode To print from an external Bluetooth-enabled device, you can print pictures using the controls of the Handling blank paper loaded in the input tray. Reset Defaults Press the Select button * Factory default setting to reset all settings to the PictBridge port. PictBridge ... Photo Size is determined by the country or region you connect a PictBridge-enabled camera. The You can also specify the paper source. If you have an optional input tray, you must attach a USB Bluetooth adapter to factory default settings. For more information, see Printing Photos From a PictBridge-...
...Mode To print from an external Bluetooth-enabled device, you can print pictures using the controls of the Handling blank paper loaded in the input tray. Reset Defaults Press the Select button * Factory default setting to reset all settings to the PictBridge port. PictBridge ... Photo Size is determined by the country or region you connect a PictBridge-enabled camera. The You can also specify the paper source. If you have an optional input tray, you must attach a USB Bluetooth adapter to factory default settings. For more information, see Printing Photos From a PictBridge-...
User Guide
Page 64
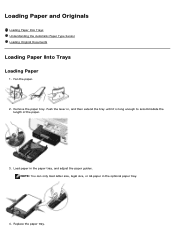
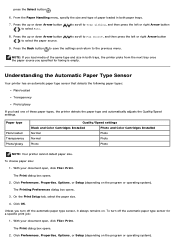
NOTE: You can only load letter size, legal size, or A4 paper in , and then extend the tray until it is long enough to accommodate the length of the paper. 3. Replace the paper tray. Push the lever in the optional paper tray. 4. Load paper in the paper tray, and adjust the paper guides. Loading Paper and Originals Loading Paper Into Trays Understanding the Automatic Paper Type Sensor Loading Original Documents Loading Paper Into Trays Loading Paper 1. Fan the paper. 2. Remove the paper tray.
NOTE: You can only load letter size, legal size, or A4 paper in , and then extend the tray until it is long enough to accommodate the length of the paper. 3. Replace the paper tray. Push the lever in the optional paper tray. 4. Load paper in the paper tray, and adjust the paper guides. Loading Paper and Originals Loading Paper Into Trays Understanding the Automatic Paper Type Sensor Loading Original Documents Loading Paper Into Trays Loading Paper 1. Fan the paper. 2. Remove the paper tray.
User Guide
Page 65
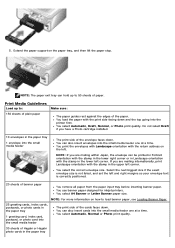
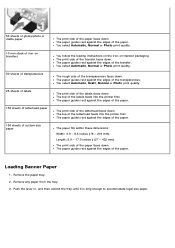
... lower right corner or in the paper tray Print Media Guidelines Load up to load banner paper, see Loading Banner Paper. 25 greeting cards, index cards, postcards, or photo cards in the paper tray 1 envelope into the small media feeder The print side of paper. You load the paper with the stamp in the upper...down and the top going into the small media feeder one at a time. If you have a Photo cartridge installed. 10 envelopes in the paper tray 1 greeting card, index card, postcard, or photo card into the small media feeder one at a time. You select A4 Banner or Letter Banner...
... lower right corner or in the paper tray Print Media Guidelines Load up to load banner paper, see Loading Banner Paper. 25 greeting cards, index cards, postcards, or photo cards in the paper tray 1 envelope into the small media feeder The print side of paper. You load the paper with the stamp in the upper...down and the top going into the small media feeder one at a time. If you have a Photo cartridge installed. 10 envelopes in the paper tray 1 greeting card, index card, postcard, or photo card into the small media feeder one at a time. You select A4 Banner or Letter Banner...
User Guide
Page 66
...-on transfers 50 sheets of transparencies 25 sheets of labels 150 sheets of letterhead paper 150 sheets of custom size paper The print side of the paper faces down . The paper guides rest against the edges of the paper. Remove the paper tray. 2. The rough side of the transparencies faces down . The print side of the labels...
...-on transfers 50 sheets of transparencies 25 sheets of labels 150 sheets of letterhead paper 150 sheets of custom size paper The print side of the paper faces down . The paper guides rest against the edges of the paper. Remove the paper tray. 2. The rough side of the transparencies faces down . The print side of the labels...

User Guide
Page 67
..., you can only load letter size, legal size, or A4 paper in Tray 1 (standard paper tray) and Tray 2 (optional tray), the printer selects print media from Tray 1 until it becomes empty, and then the printer automatically feeds print paper from Tray 2. NOTE: You can load a different size of paper for Print Jobs Using the Computer 1. Turn on the program or...
..., you can only load letter size, legal size, or A4 paper in Tray 1 (standard paper tray) and Tray 2 (optional tray), the printer selects print media from Tray 1 until it becomes empty, and then the printer automatically feeds print paper from Tray 2. NOTE: You can load a different size of paper for Print Jobs Using the Computer 1. Turn on the program or...
User Guide
Page 68
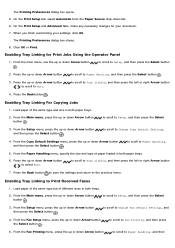
... the up or down Arrow button the Select button . to scroll to Tray Linking, and then press the left or right Arrow button 7. Load paper of the same type but of paper loaded in both paper trays. 6. From the Setup menu, press the up or down Arrow button ...the previous menu. to scroll to Fax Printing, and then press 5. to scroll to Paper Handling, 5. Load paper of the same type and size in both paper trays. 2. Enabling Tray Linking for your settings, click OK. Enabling Tray Linking For Copying Jobs 1. On the Print Setup tab, select Automatic from the...
... the up or down Arrow button the Select button . to scroll to Tray Linking, and then press the left or right Arrow button 7. Load paper of the same type but of paper loaded in both paper trays. 6. From the Setup menu, press the up or down Arrow button ...the previous menu. to scroll to Fax Printing, and then press 5. to scroll to Paper Handling, 5. Load paper of the same type and size in both paper trays. 2. Enabling Tray Linking for your settings, click OK. Enabling Tray Linking For Copying Jobs 1. On the Print Setup tab, select Automatic from the...
User Guide
Page 69
... or right Arrow button 8. Click Preferences, Properties, Options, or Setup (depending on . The Print dialog box opens. 2. From the Paper Handling menu, specify the size and type of paper loaded in both paper trays. 7. With your document open , click File® Print. Press the up or down Arrow button to select Auto. to scroll...
... or right Arrow button 8. Click Preferences, Properties, Options, or Setup (depending on . The Print dialog box opens. 2. From the Paper Handling menu, specify the size and type of paper loaded in both paper trays. 7. With your document open , click File® Print. Press the up or down Arrow button to select Auto. to scroll...

User Guide
Page 95
... pages. Resend your printer. If the paper jam is near the paper input tray: 1. Use a smaller amount of paper when printing multiple pages. Turn off the printer. 2. Remove the paper tray. 2. Press the Select button . 5. Replace the paper tray. 4. Make sure the paper is not wrinkled, torn, or damaged. Use only paper recommended for a paper jam. Lift the printer unit. Check...
... pages. Resend your printer. If the paper jam is near the paper input tray: 1. Use a smaller amount of paper when printing multiple pages. Turn off the printer. 2. Remove the paper tray. 2. Press the Select button . 5. Replace the paper tray. 4. Make sure the paper is not wrinkled, torn, or damaged. Use only paper recommended for a paper jam. Lift the printer unit. Check...

User Guide
Page 98
...Contact Customer Support. For more information, see Replacing Ink Cartridges. Otherwise, press the Cancel button , and then load plain paper. Unable to support.dell.com. Reload the originals that were scanned. Faxes in the wrong cartridge carrier. Unsupported Fax Mode The printer received incoming ...Arrow button to scroll to scan all the originals loaded into the ADF. the print job. Enable Tray Linking. The printer does not have an optional input paper tray and you are sending. Left cartridge error. Replace cartridge. The printer continues to print fax. Press...
...Contact Customer Support. For more information, see Replacing Ink Cartridges. Otherwise, press the Cancel button , and then load plain paper. Unable to support.dell.com. Reload the originals that were scanned. Faxes in the wrong cartridge carrier. Unsupported Fax Mode The printer received incoming ...Arrow button to scroll to scan all the originals loaded into the ADF. the print job. Enable Tray Linking. The printer does not have an optional input paper tray and you are sending. Left cartridge error. Replace cartridge. The printer continues to print fax. Press...


