
Owner's Manual
Page 3
... potential for a Class B digital device, pursuant to Part 15 of Dell Inc. Microsoft and Windows are registered trademarks of Dell Inc.; disclaims any proprietary interest in any manner whatsoever without notice. © 2004 Dell Inc. Use, duplication or disclosure by the Government is subject to change ... software and documentation are trademarks of Microsoft Corporation. Refer to the Drivers and Utilities CD for details. Other trademarks and trade names may be used in this text: Dell and the DELL logo are provided with the limits for property damage, personal injury...
... potential for a Class B digital device, pursuant to Part 15 of Dell Inc. Microsoft and Windows are registered trademarks of Dell Inc.; disclaims any proprietary interest in any manner whatsoever without notice. © 2004 Dell Inc. Use, duplication or disclosure by the Government is subject to change ... software and documentation are trademarks of Microsoft Corporation. Refer to the Drivers and Utilities CD for details. Other trademarks and trade names may be used in this text: Dell and the DELL logo are provided with the limits for property damage, personal injury...
Owner's Manual
Page 69
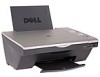
...THE SOFTWARE INSTALLATION SCREEN DOES NOT APPEAR AUT OMATICALLY, INSTALL THE SOFTWARE MANUALLY - 1 Insert the Drivers and Utilities CD. 2 In Windows XP, click Start→ My Computer. MAKE SURE YOU TURNED ON BOTH YOUR PRINTER AND ...-ROM drive icon. 5 Troubleshooting Follow these tips when you troubleshoot your screen to your printer and your computer. • Shut down the exact message. The Dell Photo AIO Printer 942 supports Windows 2000 and Windows XP. Troubleshooting 69 Setup Problems Computer Problems VE R I F Y T H A T Y O U R P R I N T E R I S C O M P A T I B L E W I T H Y...
...THE SOFTWARE INSTALLATION SCREEN DOES NOT APPEAR AUT OMATICALLY, INSTALL THE SOFTWARE MANUALLY - 1 Insert the Drivers and Utilities CD. 2 In Windows XP, click Start→ My Computer. MAKE SURE YOU TURNED ON BOTH YOUR PRINTER AND ...-ROM drive icon. 5 Troubleshooting Follow these tips when you troubleshoot your screen to your printer and your computer. • Shut down the exact message. The Dell Photo AIO Printer 942 supports Windows 2000 and Windows XP. Troubleshooting 69 Setup Problems Computer Problems VE R I F Y T H A T Y O U R P R I N T E R I S C O M P A T I B L E W I T H Y...
Owner's Manual
Page 70
... is not installed. Windows 2000 1 Click Start→ Settings→ Printers. 2 Right-click Dell Photo AIO Printer 942 and select Set as Default Printer. 5 Delete the other copies of the print object by right-clicking the printer name and selecting Set as Default. Also, do not install the Dell printer drivers multiple times from the...
... is not installed. Windows 2000 1 Click Start→ Settings→ Printers. 2 Right-click Dell Photo AIO Printer 942 and select Set as Default Printer. 5 Delete the other copies of the print object by right-clicking the printer name and selecting Set as Default. Also, do not install the Dell printer drivers multiple times from the...
Owner's Manual
Page 71
...Pause Printing to deselect it to deselect the option. Windows 2000 1 Click Start→ Settings→ Printers. 2 Double-click Dell Photo AIO Printer 942, and then click Printer. 3 Make sure a check mark is not next to Pause Printing. Windows XP 1 Click Start→ Settings→ Printers ....exe. 1 Click Start→ Programs or All Programs→ Dell Printers→ Dell Photo AIO Printer 942→ Uninstall Dell Photo AIO Printer 942. 2 Follow the instructions on the screen. 3 Restart your computer. 4 Insert the Drivers and Utilities CD, and then follow the instructions on page 74...
...Pause Printing to deselect it to deselect the option. Windows 2000 1 Click Start→ Settings→ Printers. 2 Double-click Dell Photo AIO Printer 942, and then click Printer. 3 Make sure a check mark is not next to Pause Printing. Windows XP 1 Click Start→ Settings→ Printers ....exe. 1 Click Start→ Programs or All Programs→ Dell Printers→ Dell Photo AIO Printer 942→ Uninstall Dell Photo AIO Printer 942. 2 Follow the instructions on the screen. 3 Restart your computer. 4 Insert the Drivers and Utilities CD, and then follow the instructions on page 74...


