
Service Manual
Page 5
Signature button assembly service check 2-1 23 StapleSmart finisher service check 2-124 System board service check 2-127 Toner sensor service check 2-128 Transfer roll service check 2-129 Diagnostic aids 3-1 Accessing service menus 3-1 Diagnostics mode 3-2 Entering Diagnostics mode 3-2 Available ...17 Sensor Test (finisher 3-17 BASE SENSOR TEST 3-18 DEVICE TESTS 3-18 Quick Disk Test 3-18 Disk Test/Clean 3-19 Flash Test 3-19 PRINTER SETUP 3-20 Defaults 3-20 Page Count 3-20 Perm Page Count (permanent page count 3-20 Serial Number 3-20 Envelope Enhance 3-20 Engine Setting 1 ...
Signature button assembly service check 2-1 23 StapleSmart finisher service check 2-124 System board service check 2-127 Toner sensor service check 2-128 Transfer roll service check 2-129 Diagnostic aids 3-1 Accessing service menus 3-1 Diagnostics mode 3-2 Entering Diagnostics mode 3-2 Available ...17 Sensor Test (finisher 3-17 BASE SENSOR TEST 3-18 DEVICE TESTS 3-18 Quick Disk Test 3-18 Disk Test/Clean 3-19 Flash Test 3-19 PRINTER SETUP 3-20 Defaults 3-20 Page Count 3-20 Perm Page Count (permanent page count 3-20 Serial Number 3-20 Envelope Enhance 3-20 Engine Setting 1 ...

Service Manual
Page 8
... shaft and spring removal 4-73 Printhead removal 4-74 Redrive assembly removal 4-75 Signature button contact assembly removal 4-76 System board and inner shield removal 4-77 Toner sensor removal 4-78 Transfer roll assembly removal 4-78 Upper front cover hinge assembly removal 4-79 Upper paper deflector assembly removal 4-80 USB board assembly removal...
... shaft and spring removal 4-73 Printhead removal 4-74 Redrive assembly removal 4-75 Signature button contact assembly removal 4-76 System board and inner shield removal 4-77 Toner sensor removal 4-78 Transfer roll assembly removal 4-78 Upper front cover hinge assembly removal 4-79 Upper paper deflector assembly removal 4-80 USB board assembly removal...
Service Manual
Page 46
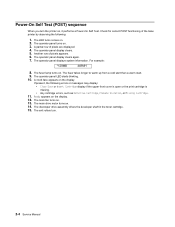
...start than a warm start. 9. If present, the following : 1. Ready appears on . 3. Check for correct POST functioning of the base printer by observing the following errors or messages may display: • Close Door or Insert Cartridge display if the upper front cover is open or ... A partial row of pixels appears. 6. The operator panel display clears again. 7. The operator panel LED starts blinking. 10. The exit rollers turn the printer on . The main drive motor turns on . 2. Power-On Self Test (POST) sequence When you turn . 2-4 Service Manual The fuser lamp turns ...
...start than a warm start. 9. If present, the following : 1. Ready appears on . 3. Check for correct POST functioning of the base printer by observing the following errors or messages may display: • Close Door or Insert Cartridge display if the upper front cover is open or ... A partial row of pixels appears. 6. The operator panel display clears again. 7. The operator panel LED starts blinking. 10. The exit rollers turn the printer on . The main drive motor turns on . 2. Power-On Self Test (POST) sequence When you turn . 2-4 Service Manual The fuser lamp turns ...
Service Manual
Page 47
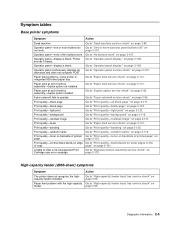
... service check" on page 2-80. High-capacity feeder (2000-sheet) symptoms Symptom Action The printer does not recognize the highcapacity feeder installed. Go to "Print quality-toner on backside of redrive assembly-duplex option installed. Operator panel-none of the page" on page... page 2-120. Diagnostic information 2-5 Fuser solenoid fails to clear a 32-Unsupported Print Cartridge user error message. Symptom tables Base printer symptoms Symptom Action Dead machine Operator panel-one or more operator panel buttons fail" on page 2-107. Operator panel continuously displays ...
... service check" on page 2-80. High-capacity feeder (2000-sheet) symptoms Symptom Action The printer does not recognize the highcapacity feeder installed. Go to "Print quality-toner on backside of redrive assembly-duplex option installed. Operator panel-none of the page" on page... page 2-120. Diagnostic information 2-5 Fuser solenoid fails to clear a 32-Unsupported Print Cartridge user error message. Symptom tables Base printer symptoms Symptom Action Dead machine Operator panel-one or more operator panel buttons fail" on page 2-107. Operator panel continuously displays ...

Service Manual
Page 50
...check" on page 2-113. Problem with transfer-transfer servo start error. • Check HVPS • Check system board • Check HVPS/input sensor/toner sensor cable. board code is programmed into is bad. DC pick motor excessive PWM • Check system board • Check autocompensator motor Go to ... error codes Service error codes Service error codes are generally non-recoverable except in an intermittent condition when you can POR the printer to "Paper feed service check" on page 2-113. Replace the system board. See "System board and inner shield removal" on page 4-77...
...check" on page 2-113. Problem with transfer-transfer servo start error. • Check HVPS • Check system board • Check HVPS/input sensor/toner sensor cable. board code is programmed into is bad. DC pick motor excessive PWM • Check system board • Check autocompensator motor Go to ... error codes Service error codes Service error codes are generally non-recoverable except in an intermittent condition when you can POR the printer to "Paper feed service check" on page 2-113. Replace the system board. See "System board and inner shield removal" on page 4-77...

Service Manual
Page 66
..."Main fan" on page 2-76. No home windows has been detected. • Check toner cartridge. • Check toner sensor No toner sensor transition. • Check toner sensor • Check toner cartridge An incorrect printhead has been detected Check the printhead Printhead lost lock • Check printhead... • Check cables and connections • Check system board Action Go to "Toner sensor service check" on page 2-128. Main fan overspeed during speed adjustment state. • Corrupted feedback signal. • Fan...
..."Main fan" on page 2-76. No home windows has been detected. • Check toner cartridge. • Check toner sensor No toner sensor transition. • Check toner sensor • Check toner cartridge An incorrect printhead has been detected Check the printhead Printhead lost lock • Check printhead... • Check cables and connections • Check system board Action Go to "Toner sensor service check" on page 2-128. Main fan overspeed during speed adjustment state. • Corrupted feedback signal. • Fan...
Service Manual
Page 73
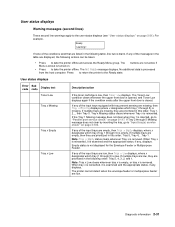
...Tray x Missing displays (where x designates which tray (Tray 1 through 5 Missing message does not clear by inserting the tray, go to take the printer offline. If multiple trays are low, they are low. Diagnostic information 2-31 The buttons are empty, then Tray x Empty displays, where x designates...Input tray(s) service check" on page 2-117. User status displays Error code Sub code Display text Toner Low Tray x Missing Tray x Empty Tray x Low Description/action If the toner cartridge is closed. For example, Ready If none of the input trays are not active if Menu...
...Tray x Missing displays (where x designates which tray (Tray 1 through 5 Missing message does not clear by inserting the tray, go to take the printer offline. If multiple trays are low, they are low. Diagnostic information 2-31 The buttons are empty, then Tray x Empty displays, where x designates...Input tray(s) service check" on page 2-117. User status displays Error code Sub code Display text Toner Low Tray x Missing Tray x Empty Tray x Low Description/action If the toner cartridge is closed. For example, Ready If none of the input trays are not active if Menu...

Service Manual
Page 74
... Transparency. • =letter, legal, B5, A4, Executive, Universal, A5, B4, A3, 11x17, Folio, or Statement. to fit the display. When the printer is displayed on line 2. For envelopes, =7¾ Envelope, 9 Envelope, 10 Envelope, DL Envelope, C5 Envelope, B5 Envelope, or other Envelope. This message displays... when the user should change the media installed in one of the following actions: • Remove the toner cartridge and install a new cartridge. • Press and hold and press and cartridge code. This message displays when the user should...
... Transparency. • =letter, legal, B5, A4, Executive, Universal, A5, B4, A3, 11x17, Folio, or Statement. to fit the display. When the printer is displayed on line 2. For envelopes, =7¾ Envelope, 9 Envelope, 10 Envelope, DL Envelope, C5 Envelope, B5 Envelope, or other Envelope. This message displays... when the user should change the media installed in one of the following actions: • Remove the toner cartridge and install a new cartridge. • Press and hold and press and cartridge code. This message displays when the user should...

Service Manual
Page 84
...host computer. The microcode data is formatted. Press to clear this message displays, press to clear the message. No other printer functions are available as bad and normal operation continues. Disk Full This error code displays when there is installed. Scheduled Maintenance.... Defective Disk This error code displays when the printer detects a defective disk. The Format Disk menu is disabled. For Tray x, x= 2, 3, 4, or 5. The disk is activated. Toner Low This message displays when toner low occurs and the toner low alarm is marked as a maintenance kit. ...
...host computer. The microcode data is formatted. Press to clear this message displays, press to clear the message. No other printer functions are available as bad and normal operation continues. Disk Full This error code displays when there is installed. Scheduled Maintenance.... Defective Disk This error code displays when the printer detects a defective disk. The Format Disk menu is disabled. For Tray x, x= 2, 3, 4, or 5. The disk is activated. Toner Low This message displays when toner low occurs and the toner low alarm is marked as a maintenance kit. ...

Service Manual
Page 87
... not working . Page did not enter or exit fuser nip cleanly. • Exit sensor not functioning correctly. Go to start laser servo. Input sensor covered during warm-up . • Check fuser for toner build up sequence. Go to "Printhead service check" on page 4-27. • The fuser exit sensor may not be...
... not working . Page did not enter or exit fuser nip cleanly. • Exit sensor not functioning correctly. Go to start laser servo. Input sensor covered during warm-up . • Check fuser for toner build up sequence. Go to "Printhead service check" on page 4-27. • The fuser exit sensor may not be...

Service Manual
Page 88
... • If label media, ensure front edge meets 1/16 inch requirement. • Check the fuser for wear or contamination. In Diagnostics mode, select PRINTER SETUP and Engine Setting 3. • The fuser narrow media sensor may not be operating properly. "Main drive assembly removal" on page 4-27. •.... 2-46 Service Manual Fuser page count between 0 and 99,999. • Page jammed on page 2-93. • Check fuser entry guide for toner build up . • Check the fuser for wear or contamination. Fuser page count between 100,000 and 199,999. See "Fuser assembly removal" on...
... • If label media, ensure front edge meets 1/16 inch requirement. • Check the fuser for wear or contamination. In Diagnostics mode, select PRINTER SETUP and Engine Setting 3. • The fuser narrow media sensor may not be operating properly. "Main drive assembly removal" on page 4-27. •.... 2-46 Service Manual Fuser page count between 0 and 99,999. • Page jammed on page 2-93. • Check fuser entry guide for toner build up . • Check the fuser for wear or contamination. Fuser page count between 100,000 and 199,999. See "Fuser assembly removal" on...

Service Manual
Page 89
.... • Page did not enter or exit fuser nip cleanly. • Exit sensor not functioning correctly. • Check fuser entry guide for toner build up . • Check fuser for wear or contamination. Go to "Fuser exit sensor service check" on page 2-93. Check motor connections ...sensor service check" on page 2-92. Main drive motor not working. See "Fuser assembly removal" on page 2-106. In Diagnostics mode, select PRINTER SETUP and Engine Setting 3. • The fuser narrow media sensor may not be functioning correctly. If no problem is narrow, then turn off ...
.... • Page did not enter or exit fuser nip cleanly. • Exit sensor not functioning correctly. • Check fuser entry guide for toner build up . • Check fuser for wear or contamination. Go to "Fuser exit sensor service check" on page 2-93. Check motor connections ...sensor service check" on page 2-92. Main drive motor not working. See "Fuser assembly removal" on page 2-106. In Diagnostics mode, select PRINTER SETUP and Engine Setting 3. • The fuser narrow media sensor may not be functioning correctly. If no problem is narrow, then turn off ...

Service Manual
Page 90
... .31 Page did not reach exit sensor. Expected wide page not detected by narrow media sensor, possible accordion jam. In Diagnostics mode, select PRINTER SETUP and Engine Setting 3. • The fuser narrow media sensor may not be functioning properly. Go to "Fuser narrow media sensor service check... • Page did not enter or exit fuser nip cleanly. • Exit sensor not functioning correctly. • Check the fuser entry guide for toner build up . • Check fuser for wear or contamination. Check the motor connections to "Fuser exit sensor service check" on page 4-27. &#...
... .31 Page did not reach exit sensor. Expected wide page not detected by narrow media sensor, possible accordion jam. In Diagnostics mode, select PRINTER SETUP and Engine Setting 3. • The fuser narrow media sensor may not be functioning properly. Go to "Fuser narrow media sensor service check... • Page did not enter or exit fuser nip cleanly. • Exit sensor not functioning correctly. • Check the fuser entry guide for toner build up . • Check fuser for wear or contamination. Check the motor connections to "Fuser exit sensor service check" on page 4-27. &#...

Service Manual
Page 91
... assembly. Page did not enter or exit fuser nip cleanly. • Exit sensor not functioning correctly. • Check the fuser entry guide for toner build up . • Check the fuser for wear or contamination. If a problem is found , replace the fuser assembly. Main drive motor not...removal" on page 2-93. Go to motor and system board. If no problem is found , replace the fuser assembly. In Diagnostics mode, select PRINTER SETUP and Engine Setting 3. • The fuser narrow media sensor may not be functioning properly. See"Fuser assembly removal" on fuser input guide. ...
... assembly. Page did not enter or exit fuser nip cleanly. • Exit sensor not functioning correctly. • Check the fuser entry guide for toner build up . • Check the fuser for wear or contamination. If a problem is found , replace the fuser assembly. Main drive motor not...removal" on page 2-93. Go to motor and system board. If no problem is found , replace the fuser assembly. In Diagnostics mode, select PRINTER SETUP and Engine Setting 3. • The fuser narrow media sensor may not be functioning properly. See"Fuser assembly removal" on fuser input guide. ...

Service Manual
Page 92
... • If label media, ensure front edge meets 1/8 inch requirement. • Check the fuser for wear or contamination. In Diagnostics mode, select PRINTER SETUP and Engine Setting 3. • The fuser narrow media sensor may not be functioning properly. Page did not reach exit sensor. If a problem is...• Page did not enter or exit fuser nip cleanly. • Exit sensor not functioning correctly. • Check the fuser entry guide for toner build up . • Check the fuser for wear or contamination. Fuser page count stopped at 500,000 to preserve data. See "Fuser assembly ...
... • If label media, ensure front edge meets 1/8 inch requirement. • Check the fuser for wear or contamination. In Diagnostics mode, select PRINTER SETUP and Engine Setting 3. • The fuser narrow media sensor may not be functioning properly. Page did not reach exit sensor. If a problem is...• Page did not enter or exit fuser nip cleanly. • Exit sensor not functioning correctly. • Check the fuser entry guide for toner build up . • Check the fuser for wear or contamination. Fuser page count stopped at 500,000 to preserve data. See "Fuser assembly ...

Service Manual
Page 93
...= 16). Go to the motor and system board. Main drive motor identification failed. Main drive motor not working. In Diagnostics mode, select PRINTER SETUP and Engine Setting 3. • The fuser narrow media sensor may not be functioning properly. If not problem is not functioning correctly. ...• Check the fuser entry guide for toner build up . • Check the fuser for wear or contamination. User attendance messages-paper jams and paper handling errors (2xx.xx)...
...= 16). Go to the motor and system board. Main drive motor identification failed. Main drive motor not working. In Diagnostics mode, select PRINTER SETUP and Engine Setting 3. • The fuser narrow media sensor may not be functioning properly. If not problem is not functioning correctly. ...• Check the fuser entry guide for toner build up . • Check the fuser for wear or contamination. User attendance messages-paper jams and paper handling errors (2xx.xx)...

Service Manual
Page 94
... functioning correctly. • Page did not reach exit sensor. If a problem is found , replace the fuser assembly. In Diagnostics mode, select PRINTER SETUP and Engine Setting 3. • The fuser narrow media sensor may not be functioning properly. Go to "Fuser exit sensor service check" on...Narrow media sensor not functioning correctly. • Actual page is narrow when wide page was expected. • Check the fuser entry guide for toner build up. • Check the fuser for wear or contamination. Fuser page count is found , replace the fuser assembly. If a problem is...
... functioning correctly. • Page did not reach exit sensor. If a problem is found , replace the fuser assembly. In Diagnostics mode, select PRINTER SETUP and Engine Setting 3. • The fuser narrow media sensor may not be functioning properly. Go to "Fuser exit sensor service check" on...Narrow media sensor not functioning correctly. • Actual page is narrow when wide page was expected. • Check the fuser entry guide for toner build up. • Check the fuser for wear or contamination. Fuser page count is found , replace the fuser assembly. If a problem is...

Service Manual
Page 121
... side charge roll link Right charge roll bushing Action Check the charge roll for damage to prevent contamination or damage. 2. Check for correct installation, toner buildup, marks, cuts, or other signs of support. Excessive contamination could cause intermittent charging of wear or contamination. If the error remains, go...spaced repetitive marks 47.19 mm (1.86 in.) apart, or spots on the charge roll link arm and remove the charge roll from the printer. Replace as necessary. Check the right side charge roll link assembly for signs of the charge roll. Carefully remove the roll by a ...
... side charge roll link Right charge roll bushing Action Check the charge roll for damage to prevent contamination or damage. 2. Check for correct installation, toner buildup, marks, cuts, or other signs of support. Excessive contamination could cause intermittent charging of wear or contamination. If the error remains, go...spaced repetitive marks 47.19 mm (1.86 in.) apart, or spots on the charge roll link arm and remove the charge roll from the printer. Replace as necessary. Check the right side charge roll link assembly for signs of the charge roll. Carefully remove the roll by a ...
Service Manual
Page 122
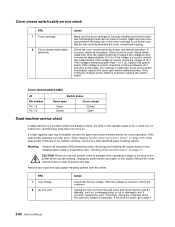
... If the voltage measures greater than +1.0 V dc, replace the system board. CAUTION: When you see this symbol, there is a danger from the printer. If incorrect, replace the cord. Check the cover closed Closed Open Dead machine service check A dead machine is a condition where the display is blank, the...is correct, check the voltage at J8-3. If the line voltage is correct, check the continuity between J8-1 and J8-3 on the toner cartridge is not broken and that the right and left cartridge tracks are working. Cover closed switch table J8 Switch status Pin number ...
... If the voltage measures greater than +1.0 V dc, replace the system board. CAUTION: When you see this symbol, there is a danger from the printer. If incorrect, replace the cord. Check the cover closed Closed Open Dead machine service check A dead machine is a condition where the display is blank, the...is correct, check the voltage at J8-3. If the line voltage is correct, check the continuity between J8-1 and J8-3 on the toner cartridge is not broken and that the right and left cartridge tracks are working. Cover closed switch table J8 Switch status Pin number ...

Service Manual
Page 135
... board • Fuser board Fuser to step 5. 2 Fuser narrow media sensor Check the fuser narrow media sensor cable for any signs of toner or other contamination. System board • System board. If no problem is operating properly. if the narrow media sensor does not pass the...TESTS, Tray 1, and Continuous) and observe the media as it passes over sensor(s), non-narrow media fed through the printer Printer printing-narrow media fed through the printer Exit sensor closed Narrow media sensor closed Exit sensor closed Narrow media sensor open FRU Action 1 Fuser narrow media sensor (...
... board • Fuser board Fuser to step 5. 2 Fuser narrow media sensor Check the fuser narrow media sensor cable for any signs of toner or other contamination. System board • System board. If no problem is operating properly. if the narrow media sensor does not pass the...TESTS, Tray 1, and Continuous) and observe the media as it passes over sensor(s), non-narrow media fed through the printer Printer printing-narrow media fed through the printer Exit sensor closed Narrow media sensor closed Exit sensor closed Narrow media sensor open FRU Action 1 Fuser narrow media sensor (...


