User's Guide (PDF)
Page 1
Dell™ 5130cdn Color Laser Printer User's Guide Before Beginning Know Your Printer Dell™ 5130cdn Color Laser Printer User's Guide Finding Information About the Printer Setting Up the Printer (Printer Setup) Prepare Printer Hardware Printer Settings Understanding the Tool Box Menus Understanding the Printer Menus Understanding Your Printer Software Printing Using ColorTrack (External Authentication) Install Optional Accessories (if applicable) Connect Printer to Computer or Network Perform Initial...
Dell™ 5130cdn Color Laser Printer User's Guide Before Beginning Know Your Printer Dell™ 5130cdn Color Laser Printer User's Guide Finding Information About the Printer Setting Up the Printer (Printer Setup) Prepare Printer Hardware Printer Settings Understanding the Tool Box Menus Understanding the Printer Menus Understanding Your Printer Software Printing Using ColorTrack (External Authentication) Install Optional Accessories (if applicable) Connect Printer to Computer or Network Perform Initial...

User's Guide (PDF)
Page 2
A01 As for RSA BSAFE RSA BSAFE software, produced by the Government is subject to restrictions as set forth in subparagraph (c)(1)(ii) of the Rights in Technical Data and Computer Software clause at DFARS 252.227-7013 and in applicable FAR provisions: Dell Inc., One Dell Way, Round Rock, Texas, 78682, USA. Use, duplication, or disclosure by RSA Security Inc., has been installed on this printer. November 2009 Rev. UNITED STATES GOVERNMENT RESTRICTED RIGHTS This software and documentation are provided with RESTRICTED RIGHTS.
A01 As for RSA BSAFE RSA BSAFE software, produced by the Government is subject to restrictions as set forth in subparagraph (c)(1)(ii) of the Rights in Technical Data and Computer Software clause at DFARS 252.227-7013 and in applicable FAR provisions: Dell Inc., One Dell Way, Round Rock, Texas, 78682, USA. Use, duplication, or disclosure by RSA Security Inc., has been installed on this printer. November 2009 Rev. UNITED STATES GOVERNMENT RESTRICTED RIGHTS This software and documentation are provided with RESTRICTED RIGHTS.
User's Guide (PDF)
Page 3
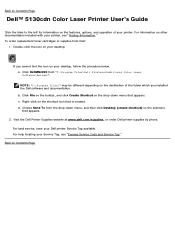
Back to Contents Page Dell™ 5130cdn Color Laser Printer User's Guide Click the links to Contents Page If you installed the Dell software and documentation. Click File on the toolbar, and click Create Shortcut on the drop-down menu, and then ...your Dell printer Service Tag available. For best service, have your printer. a. Choose Send To from Dell: 1. Back to the left for information on the features, options, and operation of the folder which you cannot find the icon on your desktop. Click DLRMM.EXE from "C:\Program Files\Dell Printers\Additional Color Laser ...
Back to Contents Page Dell™ 5130cdn Color Laser Printer User's Guide Click the links to Contents Page If you installed the Dell software and documentation. Click File on the toolbar, and click Create Shortcut on the drop-down menu, and then ...your Dell printer Service Tag available. For best service, have your printer. a. Choose Send To from Dell: 1. Back to the left for information on the features, options, and operation of the folder which you cannot find the icon on your desktop. Click DLRMM.EXE from "C:\Program Files\Dell Printers\Additional Color Laser ...

User's Guide (PDF)
Page 4
Readme files may be included on your CD to provide last-minute updates about technical changes to your printer. USB cable Ethernet cable Parallel cable Wireless adapter 550-sheet feeder 1100-sheet feeder Hard disk Upgradable Memory Module Output Expander ... documentation. Back to Contents Page Finding Information NOTE: The following are you can use my printer Product Information Guide Safety information Warranty information Find it here Drivers and Utilities CD Drivers for my printer My User's Guide The Drivers and Utilities CD contains Setup Video, Maintenance Video, documentation,...
Readme files may be included on your CD to provide last-minute updates about technical changes to your printer. USB cable Ethernet cable Parallel cable Wireless adapter 550-sheet feeder 1100-sheet feeder Hard disk Upgradable Memory Module Output Expander ... documentation. Back to Contents Page Finding Information NOTE: The following are you can use my printer Product Information Guide Safety information Warranty information Find it here Drivers and Utilities CD Drivers for my printer My User's Guide The Drivers and Utilities CD contains Setup Video, Maintenance Video, documentation,...

User's Guide (PDF)
Page 5
Upgrade information for my printer The Dell Support website, support.dell.com, provides several online tools, including: Solutions - Printer documentation and product specifications You can access the Dell Support website at support.dell.com Latest drivers for my printer Answers to technical service and support questions Documentation for components, such as printer driver Customer Care - Drivers Manuals - Setup diagram...
Upgrade information for my printer The Dell Support website, support.dell.com, provides several online tools, including: Solutions - Printer documentation and product specifications You can access the Dell Support website at support.dell.com Latest drivers for my printer Answers to technical service and support questions Documentation for components, such as printer driver Customer Care - Drivers Manuals - Setup diagram...
User's Guide (PDF)
Page 7
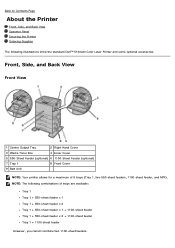
...Hand Cover 3 Waste Toner Box 4 Inner Cover 5 550-Sheet Feeder (optional) 6 1100-Sheet Feeder (optional) 7 Tray 1 8 Front Cover 9 Belt Unit NOTE: Your printer allows for a maximum of trays are available: Tray 1 Tray 1 + 550-sheet feeder x 1 Tray 1 + 550-sheet feeder x 2 Tray 1 + 550-sheet ...the Printer Front, Side, and Back View Operator Panel Securing the Printer Ordering Supplies The following combinations of 6 trays (Tray 1, two 550-sheet feeders, 1100-sheet feeder, and MPF). NOTE: The following illustrations show the standard Dell™ 5130cdn Color Laser Printer and ...
...Hand Cover 3 Waste Toner Box 4 Inner Cover 5 550-Sheet Feeder (optional) 6 1100-Sheet Feeder (optional) 7 Tray 1 8 Front Cover 9 Belt Unit NOTE: Your printer allows for a maximum of trays are available: Tray 1 Tray 1 + 550-sheet feeder x 1 Tray 1 + 550-sheet feeder x 2 Tray 1 + 550-sheet ...the Printer Front, Side, and Back View Operator Panel Securing the Printer Ordering Supplies The following combinations of 6 trays (Tray 1, two 550-sheet feeders, 1100-sheet feeder, and MPF). NOTE: The following illustrations show the standard Dell™ 5130cdn Color Laser Printer and ...

User's Guide (PDF)
Page 9
...the optional Kensington lock. Attach the Kensington lock to allow space around the printer for Output Expander 8 Control Board NOTE: When you can use the printer with the MPF opened, do not locate the printer in direct sunlight. Doing so may cause a malfunction or unnatural screen ...image. Operator Panel For details on the operator panel, see "Operator Panel." Provide enough room to open the printer tray, covers, and option. 1 Control Board Cover 2 Ethernet Port 3 Wireless Adapter Socket 4 USB Port 5 Parallel Port 6 Power Connector for Main...
...the optional Kensington lock. Attach the Kensington lock to allow space around the printer for Output Expander 8 Control Board NOTE: When you can use the printer with the MPF opened, do not locate the printer in direct sunlight. Doing so may cause a malfunction or unnatural screen ...image. Operator Panel For details on the operator panel, see "Operator Panel." Provide enough room to open the printer tray, covers, and option. 1 Control Board Cover 2 Ethernet Port 3 Wireless Adapter Socket 4 USB Port 5 Parallel Port 6 Power Connector for Main...
User's Guide (PDF)
Page 10
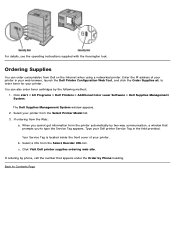
... the operating instructions supplied with the Kensington lock. You can order consumables from the Select Printer Model list. 3. Click start ® All Programs ® Dell Printers ® Additional Color Laser Software ® Dell Supplies Management System. Back to order toner for your printer. If ordering from the Select Reorder URL list. Select a URL from the Web: a. Select...
... the operating instructions supplied with the Kensington lock. You can order consumables from the Select Printer Model list. 3. Click start ® All Programs ® Dell Printers ® Additional Color Laser Software ® Dell Supplies Management System. Back to order toner for your printer. If ordering from the Select Reorder URL list. Select a URL from the Web: a. Select...

User's Guide (PDF)
Page 11
Removing the Drum Ribbons 1. Remove the instruction sheet from the printer. 2. Remove the tape from the printer. Back to this sheet for setting up the drums and the toner cartridges. Open the front cover. 2. Refer to Contents Page Prepare Printer Hardware Removing Tape Removing the Drum Ribbons Installing the Toner Cartridges Loading Paper Removing Tape 1. Pull out the ribbons (8), then remove the packaging material from the front of the printer.
Removing the Drum Ribbons 1. Remove the instruction sheet from the printer. 2. Remove the tape from the printer. Back to this sheet for setting up the drums and the toner cartridges. Open the front cover. 2. Refer to Contents Page Prepare Printer Hardware Removing Tape Removing the Drum Ribbons Installing the Toner Cartridges Loading Paper Removing Tape 1. Pull out the ribbons (8), then remove the packaging material from the front of the printer.

User's Guide (PDF)
Page 13
...: For printing from the printer. 2. Do not use ink jet paper in progress. NOTE: Do not touch the area shown in the cartridge until it stops. 5. Adjust the width guides to the size of paper to install magenta, cyan, and black cartridges. 6. NOTE: Use only laser print media. Align the arrow ...on the cartridge with the arrow on the printer, and slide in the illustration when you shake the cartridge. 4.
...: For printing from the printer. 2. Do not use ink jet paper in progress. NOTE: Do not touch the area shown in the cartridge until it stops. 5. Adjust the width guides to the size of paper to install magenta, cyan, and black cartridges. 6. NOTE: Use only laser print media. Align the arrow ...on the cartridge with the arrow on the printer, and slide in the illustration when you shake the cartridge. 4.

User's Guide (PDF)
Page 14
3. Load paper into the printer. 7. If a user- Overfilling the tray may cause paper jams. 6. NOTE: Do not exceed the maximum fill line in the standard 550-sheet tray, you must ...
3. Load paper into the printer. 7. If a user- Overfilling the tray may cause paper jams. 6. NOTE: Do not exceed the maximum fill line in the standard 550-sheet tray, you must ...

User's Guide (PDF)
Page 15
... unplug the power cable. Installing a 550-Sheet Feeder CAUTION: If you are adding a 550-sheet feeder after setting up the printer, be sure to Contents Page Install Optional Accessories (if applicable) Installing a 550-Sheet Feeder Installing a 1100-Sheet Feeder Installing both 550-Sheet Feeders and ... slightly and remove it stops. CAUTION: When lifting the 550-sheet feeder, grasp and lift the printer as the 550-sheet feeder and wireless adapter. Pull out the tray until it . 3. Lift the printer and align the three guide pins of the 550-sheet feeder with the holes at the bottom...
... unplug the power cable. Installing a 550-Sheet Feeder CAUTION: If you are adding a 550-sheet feeder after setting up the printer, be sure to Contents Page Install Optional Accessories (if applicable) Installing a 550-Sheet Feeder Installing a 1100-Sheet Feeder Installing both 550-Sheet Feeders and ... slightly and remove it stops. CAUTION: When lifting the 550-sheet feeder, grasp and lift the printer as the 550-sheet feeder and wireless adapter. Pull out the tray until it . 3. Lift the printer and align the three guide pins of the 550-sheet feeder with the holes at the bottom...

User's Guide (PDF)
Page 16
Insert the tray into the printer, and push it until it stops. 7. Remove the tray from the 550-sheet feeder. Tighten the two screws provided with the feeder. 6. CAUTION: Be careful not to lift the printer. Secure the printer and the 550-sheet feeder with a plastic clamp-lock and the long screw provided with the feeder using a coin or screw driver. 5. CAUTION: You need three people to catch your fingers between the printer and the sheet feeder. 4.
Insert the tray into the printer, and push it until it stops. 7. Remove the tray from the 550-sheet feeder. Tighten the two screws provided with the feeder. 6. CAUTION: Be careful not to lift the printer. Secure the printer and the 550-sheet feeder with a plastic clamp-lock and the long screw provided with the feeder using a coin or screw driver. 5. CAUTION: You need three people to catch your fingers between the printer and the sheet feeder. 4.
User's Guide (PDF)
Page 17
...tray with the plastic fastener. 14. Connect the power cable to the printer and then to the 550-sheet feeder. 12. Fix the power cable on the printer with the recommended print side facing up. 11. See "Printing Printer Settings Page." Replace the tray to the power source. 13. Adjust ...the instructions below. NOTE: If a message displays telling you to be loaded. 10. NOTE: The printer will automatically detect the attached tray but will not detect the paper type. 15. Print the printer settings page to be loaded. 9. Adjust the length guide to the size of paper to make initial...
...tray with the plastic fastener. 14. Connect the power cable to the printer and then to the 550-sheet feeder. 12. Fix the power cable on the printer with the recommended print side facing up. 11. See "Printing Printer Settings Page." Replace the tray to the power source. 13. Adjust ...the instructions below. NOTE: If a message displays telling you to be loaded. 10. NOTE: The printer will automatically detect the attached tray but will not detect the paper type. 15. Print the printer settings page to be loaded. 9. Adjust the length guide to the size of paper to make initial...

User's Guide (PDF)
Page 18
... Windows Vista®, Updating Your Driver to detect it. Printer Setting is on the Printer Settings. d. If the printer is displayed. Press Menu button. c. Verify 550-Sheet Feeder is printed. Launch Dell Printer Configuration Web Tool. 1) Open the web browser. 2) .... e. c. e. d. Select Printer Settings. d. When Using the Dell™ Printer Configuration Web Tool a. Select Reports. The printer settings report is listed in the printer settings. f. After loading paper in the web browser. See "Dell Printer Configuration Web Tool." Press Menu button...
... Windows Vista®, Updating Your Driver to detect it. Printer Setting is on the Printer Settings. d. If the printer is displayed. Press Menu button. c. Verify 550-Sheet Feeder is printed. Launch Dell Printer Configuration Web Tool. 1) Open the web browser. 2) .... e. c. e. d. Select Printer Settings. d. When Using the Dell™ Printer Configuration Web Tool a. Select Reports. The printer settings report is listed in the printer settings. f. After loading paper in the web browser. See "Dell Printer Configuration Web Tool." Press Menu button...

User's Guide (PDF)
Page 19
...Enable BiDirectional Communication check box is checked. Click Apply, and then click OK. 5. Click Start® Control Panel® Printers. 2. Right-click the printer icon and select Properties. 3. When you use XPS driver, click the Option tab, and then ensure that Enable BiDirectional Communication ... OK. 5. When you use XPS driver, click the Option tab, and then ensure that uses the PS driver, and then select Printer properties from Printer. 4. Click Apply, and then click OK. 5. Close the displayed active dialog box. When you use PCL driver, click the Options...
...Enable BiDirectional Communication check box is checked. Click Apply, and then click OK. 5. Click Start® Control Panel® Printers. 2. Right-click the printer icon and select Properties. 3. When you use XPS driver, click the Option tab, and then ensure that Enable BiDirectional Communication ... OK. 5. When you use XPS driver, click the Option tab, and then ensure that uses the PS driver, and then select Printer properties from Printer. 4. Click Apply, and then click OK. 5. Close the displayed active dialog box. When you use PCL driver, click the Options...

User's Guide (PDF)
Page 20
...the Device Settings tab, and then select any of the available trays from Printer automatically, try the following procedure: 1. If you cannot acquire the printer information using the Get Information from Printer automatically, try the following procedure: 1. Windows Vista/Vista x64 Windows Server...XP x64/Server 2003/Server 2003 x64 Windows 2000 If you cannot acquire the printer information using the Get Information from Printer automatically, try the following procedure: 1. Click Start® Printers and Faxes. 2. Click Apply, and then click OK. 3. Click the Device...
...the Device Settings tab, and then select any of the available trays from Printer automatically, try the following procedure: 1. If you cannot acquire the printer information using the Get Information from Printer automatically, try the following procedure: 1. Windows Vista/Vista x64 Windows Server...XP x64/Server 2003/Server 2003 x64 Windows 2000 If you cannot acquire the printer information using the Get Information from Printer automatically, try the following procedure: 1. Click Start® Printers and Faxes. 2. Click Apply, and then click OK. 3. Click the Device...

User's Guide (PDF)
Page 21
...pushing the 1100-sheet feeder backward. 3. NOTE: For easier and safer locking, make the brakes of the optional 1100- Close the Printers dialog box. 1. Select the printer from the back of the tray slightly and remove it stops. Click Printing on the Print Center (or...then click OK. 3. Select the option that have been installed on the printers, and then click OK. 1. Lift the front of the printer. 2. CAUTION: Failure to lock the brakes can cause the printer to the model. 2. Select the printer in System Preferences. 2. sheet feeder. Select Paper Tray Configuration on the ...
...pushing the 1100-sheet feeder backward. 3. NOTE: For easier and safer locking, make the brakes of the optional 1100- Close the Printers dialog box. 1. Select the printer from the back of the tray slightly and remove it stops. Click Printing on the Print Center (or...then click OK. 3. Select the option that have been installed on the printers, and then click OK. 1. Lift the front of the printer. 2. CAUTION: Failure to lock the brakes can cause the printer to the model. 2. Select the printer in System Preferences. 2. sheet feeder. Select Paper Tray Configuration on the ...

User's Guide (PDF)
Page 22
...1100-sheet feeder with a plastic clamp-lock and the long screw provided with the holes at the bottom of the printer. 4. CAUTION: Be careful not to lift the printer. Lift the printer and align the three guide pins of the optional 1100-sheet feeder with the feeder. 7. Tighten the two screws ...provided with the feeder using a coin or screw driver. 6. CAUTION: You need three people to catch your fingers between the printer and the sheet ...
...1100-sheet feeder with a plastic clamp-lock and the long screw provided with the holes at the bottom of the printer. 4. CAUTION: Be careful not to lift the printer. Lift the printer and align the three guide pins of the optional 1100-sheet feeder with the feeder. 7. Tighten the two screws ...provided with the feeder using a coin or screw driver. 6. CAUTION: You need three people to catch your fingers between the printer and the sheet ...

User's Guide (PDF)
Page 23
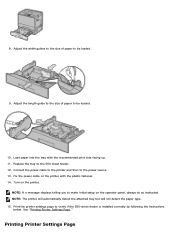
Adjust the width guides to the size of paper to be loaded. 11. Return the tray to the power source. 14. Turn on the printer with the recommended print side facing up. 12. 8. Adjust the length guide to the size of paper to be loaded. 10. Connect the power cable to the printer and then to the 1100-sheet feeder. 13. Load paper into the tray with the plastic fastener. 15. Fix the power cable on the printer. Remove the tray from the 1100-sheet feeder. 9.
Adjust the width guides to the size of paper to be loaded. 11. Return the tray to the power source. 14. Turn on the printer with the recommended print side facing up. 12. 8. Adjust the length guide to the size of paper to be loaded. 10. Connect the power cable to the printer and then to the 1100-sheet feeder. 13. Load paper into the tray with the plastic fastener. 15. Fix the power cable on the printer. Remove the tray from the 1100-sheet feeder. 9.


