

Owner's Manual
Page 3
Dell™ Laser Printer 3100cn 1 2 3 5 4 9 8 7 6 1 Center output tray 2 Operator panel 3 Multipurpose feeder 4 Standard 250-sheet tray module (A4/Letter cassette) 5 Power switch 6 Power cable connector 7 Ethernet port 8 USB port 9 Parallel port For details on the optional duplex module, 250-sheet tray module, 500-sheet tray module, and other additional options, see the User's Guide. 3
Dell™ Laser Printer 3100cn 1 2 3 5 4 9 8 7 6 1 Center output tray 2 Operator panel 3 Multipurpose feeder 4 Standard 250-sheet tray module (A4/Letter cassette) 5 Power switch 6 Power cable connector 7 Ethernet port 8 USB port 9 Parallel port For details on the optional duplex module, 250-sheet tray module, 500-sheet tray module, and other additional options, see the User's Guide. 3
Owner's Manual
Page 5
Contents Dell™ Laser Printer 3100cn 3 1 Loading Paper 11 Loading the Standard Tray 12 Loading the Multipurpose Feeder 15 Loading Envelopes ...17 2 Setting Up for Local Printing 19 Installing Printer Drivers 20 Connecting the Printer to the Computer Before Inserting the Drivers and Utilities CD 20 3 Setting Up for Network Printing 23 Network Set-Up ...24...
Contents Dell™ Laser Printer 3100cn 3 1 Loading Paper 11 Loading the Standard Tray 12 Loading the Multipurpose Feeder 15 Loading Envelopes ...17 2 Setting Up for Local Printing 19 Installing Printer Drivers 20 Connecting the Printer to the Computer Before Inserting the Drivers and Utilities CD 20 3 Setting Up for Network Printing 23 Network Set-Up ...24...

Owner's Manual
Page 6
www.dell.com/supplies | support.dell.com 5 Using Your Printer 33 Changing Printer Settings 34 Initializing NVRAM ...35 Setting of Panel Lock 35 Adjusting the Language 36 Printing a Job ...36 Canceling a Job From the Printer Operator Panel 36 Canceling the Job From a Computer 36 Canceling a Job From the ...Taskbar 36 Canceling a Job From the Desktop 37 Software Overview ...37 Printing Status Window 37 Status Window ...37 Status Monitor Console 37 Dell Supplies Management System 38 ...
www.dell.com/supplies | support.dell.com 5 Using Your Printer 33 Changing Printer Settings 34 Initializing NVRAM ...35 Setting of Panel Lock 35 Adjusting the Language 36 Printing a Job ...36 Canceling a Job From the Printer Operator Panel 36 Canceling the Job From a Computer 36 Canceling a Job From the ...Taskbar 36 Canceling a Job From the Desktop 37 Software Overview ...37 Printing Status Window 37 Status Window ...37 Status Monitor Console 37 Dell Supplies Management System 38 ...
Owner's Manual
Page 9
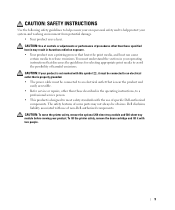
... professional service person. • This product is properly grounded. • The power cable must be obvious. CAUTION: To move the printer safety, remove the optional 250-sheet tray module and 500-sheet tray module before moving your system and working environment from potential damage. ...• Your product uses a laser. To lift the printer safely, remove the drum cartridge and lift it must be connected to avoid the possibility of specific Dell-authorized components. CAUTION: Use of controls or adjustments or performance of procedures...
... professional service person. • This product is properly grounded. • The power cable must be obvious. CAUTION: To move the printer safety, remove the optional 250-sheet tray module and 500-sheet tray module before moving your system and working environment from potential damage. ...• Your product uses a laser. To lift the printer safely, remove the drum cartridge and lift it must be connected to avoid the possibility of specific Dell-authorized components. CAUTION: Use of controls or adjustments or performance of procedures...
Owner's Manual
Page 16
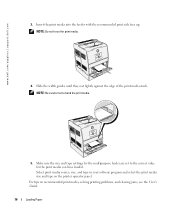
For tips on the printer operator panel. NOTE: Be careful not to the correct value for the print media you have loaded. www.dell.com/supplies | support.dell.com 3. NOTE: Do not force the print media. 4. Make sure the size and type settings for the multipurpose feeder are set to bend the print ...
For tips on the printer operator panel. NOTE: Be careful not to the correct value for the print media you have loaded. www.dell.com/supplies | support.dell.com 3. NOTE: Do not force the print media. 4. Make sure the size and type settings for the multipurpose feeder are set to bend the print ...

Owner's Manual
Page 17
NOTE: Make sure set the envelope flaps are completely unfolded. NOTICE: Never use envelopes with the flaps closed and the short-edge of the printer. Loading Paper 17 To load envelopes that are under 7.87 inches (220 mm) in width in the tray at one time. These lead to paper... the maximum fill line in the multipurpose feeder, insert the envelopes with the flaps open and toward the front of the envelopes facing into the printer. Loading Envelopes To load envelopes that are over 7.87 inches (220 mm) in width in the multipurpose feeder, insert the envelopes with windows, coated ...
NOTE: Make sure set the envelope flaps are completely unfolded. NOTICE: Never use envelopes with the flaps closed and the short-edge of the printer. Loading Paper 17 To load envelopes that are under 7.87 inches (220 mm) in width in the tray at one time. These lead to paper... the maximum fill line in the multipurpose feeder, insert the envelopes with the flaps open and toward the front of the envelopes facing into the printer. Loading Envelopes To load envelopes that are over 7.87 inches (220 mm) in width in the multipurpose feeder, insert the envelopes with windows, coated ...
Owner's Manual
Page 19
2 Section 2 Setting Up for Local Printing Installing Printer Drivers Setting Up for Local Printing
2 Section 2 Setting Up for Local Printing Installing Printer Drivers Setting Up for Local Printing
Owner's Manual
Page 20
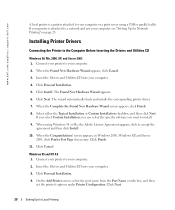
... CD into your computer. 2. Click Personal Installation. 4. Click Next. Connect your printer to your computer. 3. www.dell.com/supplies | support.dell.com A local printer is attached to a network and not your computer, see "Setting Up for Local Printing Click Personal Installation. 5. Connect your printer to your computer. 4. When using a USB or parallel cable. Click Finish...
... CD into your computer. 2. Click Personal Installation. 4. Click Next. Connect your printer to your computer. 3. www.dell.com/supplies | support.dell.com A local printer is attached to a network and not your computer, see "Setting Up for Local Printing Click Personal Installation. 5. Connect your printer to your computer. 4. When using a USB or parallel cable. Click Finish...
Owner's Manual
Page 24
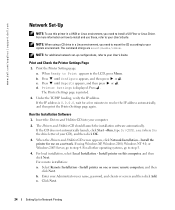
.../supplies | support.dell.com Network Set-Up NOTE: To use this computer, and then click Next. Insert the Drivers and Utilities CD into your Administrator user name, password, and clients or servers and then click Add. Install the printer for Network Printing If using a CD drive... in a Linux environment, you need to mount the CD according to resolve the IP address automatically, and then print the Printer Settings page again. Print the Printer Settings page. Run the Installation Software 1. For all other operating systems, go to step 5. 4. NOTE: When using Windows ...
.../supplies | support.dell.com Network Set-Up NOTE: To use this computer, and then click Next. Insert the Drivers and Utilities CD into your Administrator user name, password, and clients or servers and then click Add. Install the printer for Network Printing If using a CD drive... in a Linux environment, you need to mount the CD according to resolve the IP address automatically, and then print the Printer Settings page again. Print the Printer Settings page. Run the Installation Software 1. For all other operating systems, go to step 5. 4. NOTE: When using Windows ...

Owner's Manual
Page 25
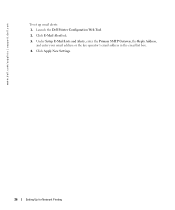
... and then enter a share name that users will easily identify. 8. Click Next. 6. Use the Dell Printer Configuration Web Tool to restart your Web browser. Select your printer from your computer, and then click Finish. If the PostScript (PS) Driver is locally attached to accept... you an email when the printer needs supplies or intervention. Setting Up for more information. Click Next. 14. You can specify the destination folder to restrict color printing, select the appropriate Color Track option. If you would like to access this printer, select Share this point. ...
... and then enter a share name that users will easily identify. 8. Click Next. 6. Use the Dell Printer Configuration Web Tool to restart your Web browser. Select your printer from your computer, and then click Finish. If the PostScript (PS) Driver is locally attached to accept... you an email when the printer needs supplies or intervention. Setting Up for more information. Click Next. 14. You can specify the destination folder to restrict color printing, select the appropriate Color Track option. If you would like to access this printer, select Share this point. ...
Owner's Manual
Page 26
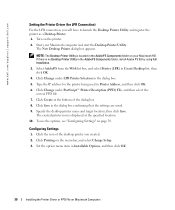
Launch the Dell Printer Configuration Web Tool. 2. Click Apply New Settings. 26 Setting Up for Network Printing Under Setup E-Mail Lists and Alerts, enter the Primary SMTP Gateway, the Reply Address, and enter your email address or the key operator's email address in the email list box. 4. www.dell.com/supplies | support.dell.com To set up email alerts: 1. Click E-Mail Alert link. 3.
Launch the Dell Printer Configuration Web Tool. 2. Click Apply New Settings. 26 Setting Up for Network Printing Under Setup E-Mail Lists and Alerts, enter the Primary SMTP Gateway, the Reply Address, and enter your email address or the key operator's email address in the email list box. 4. www.dell.com/supplies | support.dell.com To set up email alerts: 1. Click E-Mail Alert link. 3.

Owner's Manual
Page 27
4 Section 4 Installing the Printer Driver or PPD File on Macintosh Computers Installing the AdobePS Printer Driver (Mac OS 9.x) Installing the PPD File (Mac OS X) Installing the Printer Driver or PPD File on Macintosh Computers
4 Section 4 Installing the Printer Driver or PPD File on Macintosh Computers Installing the AdobePS Printer Driver (Mac OS 9.x) Installing the PPD File (Mac OS X) Installing the Printer Driver or PPD File on Macintosh Computers

Owner's Manual
Page 28
...install the PPD file only. 7. When the installation of the Chooser, and then click Create. The program automatically searches for this printer. 1. Double click the desired language folder (for the PPD file, select your computer. 2. Click Install. Make sure that ...menu, and then click AdobePS. 3. Double click Dell 3100cn Installer icon. 6. Click Install. 11. www.dell.com/supplies | support.dell.com Installing the AdobePS Printer Driver (Mac OS 9.x) There are automatically set the PostScript Printer Description (PPD) file for the printer and sets the PPD file. Open the Mac...
...install the PPD file only. 7. When the installation of the Chooser, and then click Create. The program automatically searches for this printer. 1. Double click the desired language folder (for the PPD file, select your computer. 2. Click Install. Make sure that ...menu, and then click AdobePS. 3. Double click Dell 3100cn Installer icon. 6. Click Install. 11. www.dell.com/supplies | support.dell.com Installing the AdobePS Printer Driver (Mac OS 9.x) There are automatically set the PostScript Printer Description (PPD) file for the printer and sets the PPD file. Open the Mac...

Owner's Manual
Page 29
... of the dialog box. 8. Set Adobe Protocol as a Desktop Printer. 1. Setting the Printer Driver (for the PPD file and displays it under USB Printer Selection in the dialog box. 5. Specify the desktop printer name and target location, then click Save. Select AdobePS from the... then click OK. 4. NOTE: The Desktop Printer Utility is no Desktop Printer Utility in the AdobePS Components folder on the printer. 2. Select your Macintosh HD. Click Auto Setup under PostScript™ Printer Description (PPD) File. The created printer icon is incorrect, click Change, and then select...
... of the dialog box. 8. Set Adobe Protocol as a Desktop Printer. 1. Setting the Printer Driver (for the PPD file and displays it under USB Printer Selection in the dialog box. 5. Specify the desktop printer name and target location, then click Save. Select AdobePS from the... then click OK. 4. NOTE: The Desktop Printer Utility is no Desktop Printer Utility in the AdobePS Components folder on the printer. 2. Select your Macintosh HD. Click Auto Setup under PostScript™ Printer Description (PPD) File. The created printer icon is incorrect, click Change, and then select...
Owner's Manual
Page 30
.... 9. Turn on your Macintosh computer and start the Desktop Printer Utility. Set the option menu item in the dialog box. 5. www.dell.com/supplies | support.dell.com Setting the Printer Driver (for the printer being used in Printer Address, and then click OK. 6. Click Change under LPR Printer Selection in Installable Options, and then click OK. 30...
.... 9. Turn on your Macintosh computer and start the Desktop Printer Utility. Set the option menu item in the dialog box. 5. www.dell.com/supplies | support.dell.com Setting the Printer Driver (for the printer being used in Printer Address, and then click OK. 6. Click Change under LPR Printer Selection in Installable Options, and then click OK. 30...
Owner's Manual
Page 31
...to be installed on Macintosh Computers 31 Insert the Drivers and Utilities CD into your printer from the list. 2. Installation is provided with the power on the printer. 2. For Mac OS X 10.2.8, select Dell from the menu, and then select your computer. 2. It uses a generic PostScript...that is complete. 7. Type the administrator's name and password, and then click OK. 5. Select USB from Printer Model. Double-click the Mac OS X folder, and then double-click the Dell 3100cn Installer icon. 4. Turn on , the print queue, which uses a generic PPD file, is automatically ...
...to be installed on Macintosh Computers 31 Insert the Drivers and Utilities CD into your printer from the list. 2. Installation is provided with the power on the printer. 2. For Mac OS X 10.2.8, select Dell from the menu, and then select your computer. 2. It uses a generic PostScript...that is complete. 7. Type the administrator's name and password, and then click OK. 5. Select USB from Printer Model. Double-click the Mac OS X folder, and then double-click the Dell 3100cn Installer icon. 4. Turn on , the print queue, which uses a generic PPD file, is automatically ...
Owner's Manual
Page 32
... Center menu bar, and select Show Info. 4. The Printer List screen appears. 2. Click Printers on Macintosh Computers Select the printer you want to type). 3. Select IP Printing from Printer Model, and confirm Dell Laser Printer 3100cn is not selected, select it. Mac OS 10.2.8 1. Start Print Center. The Printer List screen appears. 2. You do not have to use...
... Center menu bar, and select Show Info. 4. The Printer List screen appears. 2. Click Printers on Macintosh Computers Select the printer you want to type). 3. Select IP Printing from Printer Model, and confirm Dell Laser Printer 3100cn is not selected, select it. Mac OS 10.2.8 1. Start Print Center. The Printer List screen appears. 2. You do not have to use...

Owner's Manual
Page 33
Section 5 Using Your Printer Changing Printer Settings Adjusting the Language Printing a Job Canceling a Job From the Printer Operator Panel Software Overview 5 Using Your Printer
Section 5 Using Your Printer Changing Printer Settings Adjusting the Language Printing a Job Canceling a Job From the Printer Operator Panel Software Overview 5 Using Your Printer
Owner's Manual
Page 34
... are active until the required menu appears, and press or . 3. To quit setting new values, press Cancel. When you first enter the printer menus from the operator panel, an asterisk appears next to the setting to identify it .) Each menu item has a list of the menus... (Factory defaults may override the settings you select from the operator panel. 34 Using Your Printer To continue setting other items, select the desired menu. www.dell.com/supplies | support.dell.com Changing Printer Settings NOTE: For detailed explanations of values for the menu item. To select a new ...
... are active until the required menu appears, and press or . 3. To quit setting new values, press Cancel. When you first enter the printer menus from the operator panel, an asterisk appears next to the setting to identify it .) Each menu item has a list of the menus... (Factory defaults may override the settings you select from the operator panel. 34 Using Your Printer To continue setting other items, select the desired menu. www.dell.com/supplies | support.dell.com Changing Printer Settings NOTE: For detailed explanations of values for the menu item. To select a new ...
Owner's Manual
Page 35
...after doing the settings, enter 0000), and then press . 9. Press until Configure appears, and then press or . 3. message appears on the printer. The password has been changed. This will recover the factory default menu settings. Press Menu. 2. Press until Init NVRAM appears, and then press.... Reenter the password to confirm the password that you sure? Press until Change Password appears, and then press or . 8. Turn off the printer. Press until Security appears, and then press or . 4. Initializing NVRAM You can be selected from changing settings made by initializing NVRAM. 1. ...
...after doing the settings, enter 0000), and then press . 9. Press until Configure appears, and then press or . 3. message appears on the printer. The password has been changed. This will recover the factory default menu settings. Press Menu. 2. Press until Init NVRAM appears, and then press.... Reenter the password to confirm the password that you sure? Press until Change Password appears, and then press or . 8. Turn off the printer. Press until Security appears, and then press or . 4. Initializing NVRAM You can be selected from changing settings made by initializing NVRAM. 1. ...


