User Guide
Page 9
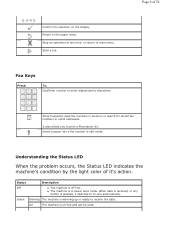
...the light color of 52 Confirm the selection on the display. Page 9 of it switches to on -line and can be used fax numbers in memory or search for stored fax numbers or email addresses. On The machine is pressed, it 's action. Start a job. Store frequently used . Stop an ...operation at any button is on -line automatically. Insert a pause into a fax number in power save mode. It also allows you to the upper menu. Status Description Off z The machine is in edit mode...
...the light color of 52 Confirm the selection on the display. Page 9 of it switches to on -line and can be used fax numbers in memory or search for stored fax numbers or email addresses. On The machine is pressed, it 's action. Start a job. Store frequently used . Stop an ...operation at any button is on -line automatically. Insert a pause into a fax number in power save mode. It also allows you to the upper menu. Status Description Off z The machine is in edit mode...
User Guide
Page 13
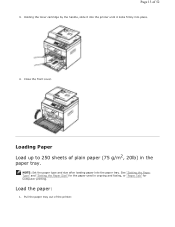
Loading Paper Load up to 250 sheets of the printer. NOTE: Set the paper type and size after loading paper into place. 4. See "Setting the Paper Type" and "Setting the Paper Size" for Computer printing. Load the paper: 1. Pull the paper tray out of plain paper (75 g/m2, 20lb) in copying and faxing, or "Paper Tab" for the paper used in the paper tray. Holding the toner cartridge by the handle, slide it into the printer until it locks firmly into the paper tray. Close the front cover. Page 13 of 52 3.
Loading Paper Load up to 250 sheets of the printer. NOTE: Set the paper type and size after loading paper into place. 4. See "Setting the Paper Type" and "Setting the Paper Size" for Computer printing. Load the paper: 1. Pull the paper tray out of plain paper (75 g/m2, 20lb) in copying and faxing, or "Paper Tab" for the paper used in the paper tray. Holding the toner cartridge by the handle, slide it into the printer until it locks firmly into the paper tray. Close the front cover. Page 13 of 52 3.
User Guide
Page 17
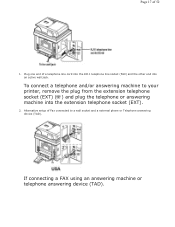
If connecting a FAX using an answering machine or telephone answering device (TAD). Alternative setup of 52 1. To connect a telephone and/or answering machine to a wall socket and a external phone or Telephone answering device (TAD). Plug one end of a telephone line cord into the RJ11 telephone line socket (FAX) and the other end into the extension telephone socket (EXT). 2. Page 17 of Fax connected to your printer, remove the plug from the extension telephone socket (EXT) ( ) and plug the telephone or answering machine into an active wall jack.
If connecting a FAX using an answering machine or telephone answering device (TAD). Alternative setup of 52 1. To connect a telephone and/or answering machine to a wall socket and a external phone or Telephone answering device (TAD). Plug one end of a telephone line cord into the RJ11 telephone line socket (FAX) and the other end into the extension telephone socket (EXT). 2. Page 17 of Fax connected to your printer, remove the plug from the extension telephone socket (EXT) ( ) and plug the telephone or answering machine into an active wall jack.

User Guide
Page 18
Page 18 of 52 NOTE: Set rings to answer to digit greater than the "Ring To Answer" setting for the telephone answering device (TAD). NOTE: Set rings to answer to digit greater than the "Ring To Answer" setting for the telephone answering device (TAD). NOTE: For additional information, see "Using an Answering machine" or "Using a Computer Modem". If connecting a FAX using a computer modem.
Page 18 of 52 NOTE: Set rings to answer to digit greater than the "Ring To Answer" setting for the telephone answering device (TAD). NOTE: Set rings to answer to digit greater than the "Ring To Answer" setting for the telephone answering device (TAD). NOTE: For additional information, see "Using an Answering machine" or "Using a Computer Modem". If connecting a FAX using a computer modem.
User Guide
Page 21
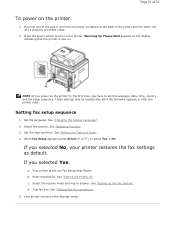
... other end into the power receptacle at the back of 52 To power on the printer for the first time, you power on the printer: 1. Select the country. If you selected No, your printer restores the fax settings as default. Enter machine ID. Plug one end of the power cord into ...a properly grounded outlet. 2. Set the date and time. Your printer prints out Fax Setup Help Report. See "Setting the Printer ID". NOTE: If you have to the Standby mode. See "Changing the Display Language". 2. If you selected Yes. d. Set...
... other end into the power receptacle at the back of 52 To power on the printer for the first time, you power on the printer: 1. Select the country. If you selected No, your printer restores the fax settings as default. Enter machine ID. Plug one end of the power cord into ...a properly grounded outlet. 2. Set the date and time. Your printer prints out Fax Setup Help Report. See "Setting the Printer ID". NOTE: If you have to the Standby mode. See "Changing the Display Language". 2. If you selected Yes. d. Set...
User Guide
Page 22
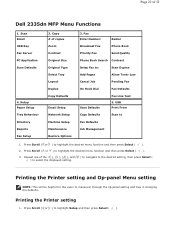
... Menu setting NOTE: This will be helpful for the users to Fax Defaults Job Management 1. Fax Enter Number: Redial Broadcast Fax Phone Book Priority Fax Send Quality Phone Book Search Contrast Delay Fax to highlight the desired menu function and then press Select ( ). 2. Printing the Printer setting 1. Copy # of the and ( ) to navigate to... Original Size Original Type Select Tray Layout Duplex Copy Defaults Email Setup Network Setup Machine Setup Maintenance Restore Options 3. Page 22 of 52 Dell 2335dn MFP Menu Functions 1. Setup Paper Setup Tray Behaviour Directory Reports...
... Menu setting NOTE: This will be helpful for the users to Fax Defaults Job Management 1. Fax Enter Number: Redial Broadcast Fax Phone Book Priority Fax Send Quality Phone Book Search Contrast Delay Fax to highlight the desired menu function and then press Select ( ). 2. Printing the Printer setting 1. Copy # of the and ( ) to navigate to... Original Size Original Type Select Tray Layout Duplex Copy Defaults Email Setup Network Setup Machine Setup Maintenance Restore Options 3. Page 22 of 52 Dell 2335dn MFP Menu Functions 1. Setup Paper Setup Tray Behaviour Directory Reports...
User Guide
Page 24
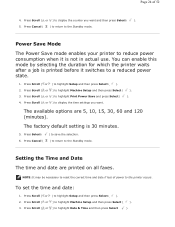
...the selection. ) to return to highlight Date & Time and then press Select ( ). You can enable this mode by selecting the duration for which the printer waits after a job is not in actual use. The factory default setting is 30 minutes. 5. To set the time and date: 1. Press Scroll (... or ) to the Standby mode. The available options are printed on all faxes. Press Scroll ( or ) to the printer occurs. Press Scroll ( or ) to a reduced power state. 1. Press Scroll ( or ) to the Standby mode. Setting the Time and ...
...the selection. ) to return to highlight Date & Time and then press Select ( ). You can enable this mode by selecting the duration for which the printer waits after a job is not in actual use. The factory default setting is 30 minutes. 5. To set the time and date: 1. Press Scroll (... or ) to the Standby mode. The available options are printed on all faxes. Press Scroll ( or ) to the printer occurs. Press Scroll ( or ) to a reduced power state. 1. Press Scroll ( or ) to the Standby mode. Setting the Time and ...

User Guide
Page 26
... return to highlight Day Light Saving and then press Select ( ). 4. Setting the Time Out Option You can set the time the printer waits before it restores the default copy or fax settings, if you want. Press Cancel ( ) to save the selection. ) to return to highlight Machine Setup and then press Select ( ). 3. Page...
... return to highlight Day Light Saving and then press Select ( ). 4. Setting the Time Out Option You can set the time the printer waits before it restores the default copy or fax settings, if you want. Press Cancel ( ) to save the selection. ) to return to highlight Machine Setup and then press Select ( ). 3. Page...

User Guide
Page 27
... ( ). 4. Press Scroll ( or ) to display the mode you press Start ( ) to begin copying or faxing, or Cancel ( ) to the Standby mode. Press Cancel ( ) to return to Fax mode. The available time options are 15, 30, 60 and 180 (seconds). You can switch this mode extends the... from 15, 30, 60 and 180 (seconds). Press Scroll ( or ) to highlight Default Mode and then press Select ( ). 4. Selecting Off means that the printer does not restore the default settings until you want . Press Select ( 6. Press Scroll ( or ) to highlight Machine Setup and then press Select ( ). 3. ...
... ( ). 4. Press Scroll ( or ) to display the mode you press Start ( ) to begin copying or faxing, or Cancel ( ) to the Standby mode. Press Cancel ( ) to return to Fax mode. The available time options are 15, 30, 60 and 180 (seconds). You can switch this mode extends the... from 15, 30, 60 and 180 (seconds). Press Scroll ( or ) to highlight Default Mode and then press Select ( ). 4. Selecting Off means that the printer does not restore the default settings until you want . Press Select ( 6. Press Scroll ( or ) to highlight Machine Setup and then press Select ( ). 3. ...

User Guide
Page 30
... this program to communicate with a Macintosh computer. You don't need to update your desk. allows your computer. z PS driver- z Dell Printer Configuration Web Tool- enables you to set up fax phonebook and the printer's other options from your computer to set the LDAP server attributes. allows you to monitor the status of toner remaining...
... this program to communicate with a Macintosh computer. You don't need to update your desk. allows your computer. z PS driver- z Dell Printer Configuration Web Tool- enables you to set up fax phonebook and the printer's other options from your computer to set the LDAP server attributes. allows you to monitor the status of toner remaining...
User Guide
Page 32
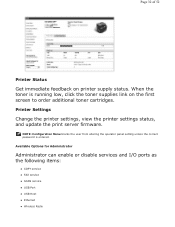
.... NOTE: Configuration Menu blocks the user from altering the operator panel setting unless the correct password is running low, click the toner supplies link on printer supply status. Available Options for Administrator Administrator can enable or disable services and I/O ports as the following items: z COPY service...
.... NOTE: Configuration Menu blocks the user from altering the operator panel setting unless the correct password is running low, click the toner supplies link on printer supply status. Available Options for Administrator Administrator can enable or disable services and I/O ports as the following items: z COPY service...
User Guide
Page 33
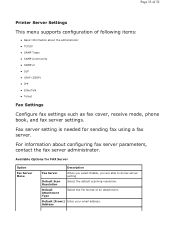
... When you select Enable, you are able to do fax server. Available Options for sending fax using a fax server. Address Default Attachment Type Select the file format of following items: z Basic Information about configuring fax server parameters, contact the fax server administrator. Page 33 of 52 Printer Server Settings This menu supports configuration of an attachment.
... When you select Enable, you are able to do fax server. Available Options for sending fax using a fax server. Address Default Attachment Type Select the file format of following items: z Basic Information about configuring fax server parameters, contact the fax server administrator. Page 33 of 52 Printer Server Settings This menu supports configuration of an attachment.
User Guide
Page 47
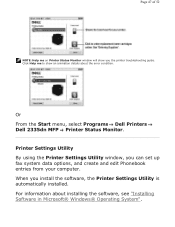
...; Operating System". Or From the Start menu, select Programs Dell Printers Dell 2335dn MFP Printer Status Monitor. Printer Settings Utility By using the Printer Settings Utility window, you install the software, the Printer Settings Utility is automatically installed. For information about the error condition. When you can set up fax system data options, and create and edit Phonebook entries...
...; Operating System". Or From the Start menu, select Programs Dell Printers Dell 2335dn MFP Printer Status Monitor. Printer Settings Utility By using the Printer Settings Utility window, you install the software, the Printer Settings Utility is automatically installed. For information about the error condition. When you can set up fax system data options, and create and edit Phonebook entries...
User Guide
Page 48
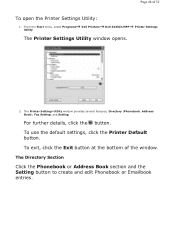
.... For further details, click the button. From the Start menu, select Programs Utility. Directory (Phonebook, Address Book), Fax Setting, and Setting. The Printer Settings Utility window provides several features; To exit, click the Exit button at the bottom of 52 To open the Printer Settings Utility: 1. Dell Printers Dell 2335dn MFP Printer Settings The Printer Settings Utility window opens. 2.
.... For further details, click the button. From the Start menu, select Programs Utility. Directory (Phonebook, Address Book), Fax Setting, and Setting. The Printer Settings Utility window provides several features; To exit, click the Exit button at the bottom of 52 To open the Printer Settings Utility: 1. Dell Printers Dell 2335dn MFP Printer Settings The Printer Settings Utility window opens. 2.

User Guide
Page 49
The printer setup contains the printer ID and printer fax number. Your can select Printger Setup, Toll Save, and Default Output Options. . The Setting Section Click the Setting section and select the power save from the drop-down list. Page 49 of 52 The Fax Setting Section Click each items underFax Setting to setup the fax configuration.
The printer setup contains the printer ID and printer fax number. Your can select Printger Setup, Toll Save, and Default Output Options. . The Setting Section Click the Setting section and select the power save from the drop-down list. Page 49 of 52 The Fax Setting Section Click each items underFax Setting to setup the fax configuration.
Dell™ 2335dn MFP User's Guide
Page 10
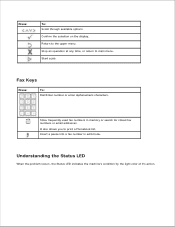
... Status LED When the problem occurs, the Status LED indicates the machine's condition by the light color of it's action. Store frequently used fax numbers in edit mode. Confirm the selection on the display. Stop an operation at any time, or return to print a Phonebook list. Insert... a pause into a fax number in memory or search for stored fax numbers or email addresses. Fax Keys Press: To: Dial/Enter number or enter alphanumeric characters. Return to the upper menu. Press: To: Scroll...
... Status LED When the problem occurs, the Status LED indicates the machine's condition by the light color of it's action. Store frequently used fax numbers in edit mode. Confirm the selection on the display. Stop an operation at any time, or return to print a Phonebook list. Insert... a pause into a fax number in memory or search for stored fax numbers or email addresses. Fax Keys Press: To: Dial/Enter number or enter alphanumeric characters. Return to the upper menu. Press: To: Scroll...

Dell™ 2335dn MFP User's Guide
Page 15
Pull the paper tray out of the paper stack. Load the paper: 1. Slide in copying and faxing, or "Paper Tab" for Computer printing. If you load paper that is longer than a standard (Letter or A4) size, such as Legal paper, press and ... the Paper Type" and "Setting the Paper Size" for the paper used in the paper length guide until it rests against the end of the printer. 2. Loading Paper Load up to its full length. 3.
Pull the paper tray out of the paper stack. Load the paper: 1. Slide in copying and faxing, or "Paper Tab" for Computer printing. If you load paper that is longer than a standard (Letter or A4) size, such as Legal paper, press and ... the Paper Type" and "Setting the Paper Size" for the paper used in the paper length guide until it rests against the end of the printer. 2. Loading Paper Load up to its full length. 3.

Dell™ 2335dn MFP User's Guide
Page 18
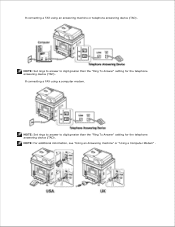
... Size" . To connect a telephone and/or answering machine to a wall socket and a external phone or Telephone answering device (TAD). Plug one end of Fax connected to your printer, remove the plug from the extension telephone socket (EXT) ( ) and plug the telephone or answering machine into an active wall jack. Making Connections Connecting...
... Size" . To connect a telephone and/or answering machine to a wall socket and a external phone or Telephone answering device (TAD). Plug one end of Fax connected to your printer, remove the plug from the extension telephone socket (EXT) ( ) and plug the telephone or answering machine into an active wall jack. Making Connections Connecting...
Dell™ 2335dn MFP User's Guide
Page 19
NOTE: For additional information, see "Using an Answering machine" or "Using a Computer Modem" . NOTE: Set rings to answer to digit greater than the "Ring To Answer" setting for the telephone answering device (TAD). If connecting a FAX using a computer modem. NOTE: Set rings to answer to digit greater than the "Ring To Answer" setting for the telephone answering device (TAD). If connecting a FAX using an answering machine or telephone answering device (TAD).
NOTE: For additional information, see "Using an Answering machine" or "Using a Computer Modem" . NOTE: Set rings to answer to digit greater than the "Ring To Answer" setting for the telephone answering device (TAD). If connecting a FAX using a computer modem. NOTE: Set rings to answer to digit greater than the "Ring To Answer" setting for the telephone answering device (TAD). If connecting a FAX using an answering machine or telephone answering device (TAD).

Dell™ 2335dn MFP User's Guide
Page 22
... you selected Yes . If you selected No , your printer restores the fax settings as default. Enter machine ID. Select the receive mode and ring to select Yes or No . d. CAUTION: Do not disassemble the printer when it may be needed also after the firmware upgrade .... 2. Press the power switch to the Standby mode. See "Selecting Country" . 3. Your printer prints out Fax Setup Help Report. Setting fax setup sequence 1. Test fax line. Set the date and time. See "Testing Fax line connection" . 5. See "Changing the Display Language" . 2. Warming Up Please Wait appears...
... you selected Yes . If you selected No , your printer restores the fax settings as default. Enter machine ID. Select the receive mode and ring to select Yes or No . d. CAUTION: Do not disassemble the printer when it may be needed also after the firmware upgrade .... 2. Press the power switch to the Standby mode. See "Selecting Country" . 3. Your printer prints out Fax Setup Help Report. Setting fax setup sequence 1. Test fax line. Set the date and time. See "Testing Fax line connection" . 5. See "Changing the Display Language" . 2. Warming Up Please Wait appears...


