Projector 1650 - User Guide
Page 2
.... Reproduction of these materials in any proprietary interest in this document is strictly forbidden. Model: Dell Projector 1550/1650 January 2018 Rev. Notes, Cautions, and Warnings NOTE: A NOTE indicates important information that helps you make better use of your projector CAUTION: A CAUTION indicates potential damage to either trademarks or registered trademarks of data if...
.... Reproduction of these materials in any proprietary interest in this document is strictly forbidden. Model: Dell Projector 1550/1650 January 2018 Rev. Notes, Cautions, and Warnings NOTE: A NOTE indicates important information that helps you make better use of your projector CAUTION: A CAUTION indicates potential damage to either trademarks or registered trademarks of data if...

Projector 1650 - User Guide
Page 3
Contents 1 About Your Dell Projector 4 Projector Box Contents 4 Projector Top and Bottom View 5 Projector Connections 6 Using Remote Control 8 2 Adjusting Projector Image 12 Adjusting Projected Zoom 12 Adjusting Projector Focus 13 Adjusting Image Size 14 3 Troubleshooting 19 Troubleshooting Tips 19 Guiding Signals 23 4 Maintenance 24 Changing the Lamp 24 Replacing Remote Control Batteries 26 5 Specifications 27 6 Additional Information 31 7 Contacting Dell 32 Contents | 3
Contents 1 About Your Dell Projector 4 Projector Box Contents 4 Projector Top and Bottom View 5 Projector Connections 6 Using Remote Control 8 2 Adjusting Projector Image 12 Adjusting Projected Zoom 12 Adjusting Projector Focus 13 Adjusting Image Size 14 3 Troubleshooting 19 Troubleshooting Tips 19 Guiding Signals 23 4 Maintenance 24 Changing the Lamp 24 Replacing Remote Control Batteries 26 5 Specifications 27 6 Additional Information 31 7 Contacting Dell 32 Contents | 3
Projector 1650 - User Guide
Page 4
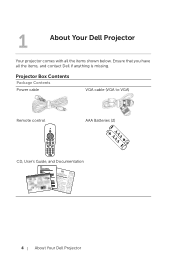
1 About Your Dell Projector Your projector comes with all the items, and contact Dell if anything is missing. Projector Box Contents Package Contents Power cable VGA cable (VGA to VGA) Remote control POWER MENU ASPECT SOURCE VOL VIDEO MODE MUTE KEYSTONE VOL PAGE AUTO ADJ. Ensure that you have all the items shown below. FREEZE BLANK ZOOM ZOOM INFO VGA VIDEO HDMI AAA Batteries (2) AAAAAA CD, User's Guide, and Documentation Informacion Importante 4 About Your Dell Projector
1 About Your Dell Projector Your projector comes with all the items, and contact Dell if anything is missing. Projector Box Contents Package Contents Power cable VGA cable (VGA to VGA) Remote control POWER MENU ASPECT SOURCE VOL VIDEO MODE MUTE KEYSTONE VOL PAGE AUTO ADJ. Ensure that you have all the items shown below. FREEZE BLANK ZOOM ZOOM INFO VGA VIDEO HDMI AAA Batteries (2) AAAAAA CD, User's Guide, and Documentation Informacion Importante 4 About Your Dell Projector
Projector 1650 - User Guide
Page 5
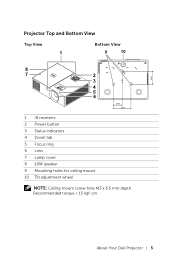
About Your Dell Projector 5 82.30 Projector Top and Bottom View Top View 1 Bottom View 9 10 8 7 2 3 4 5 6 55.00 110.00 1 IR receivers 2 Power button 3 Status indicators 4 Zoom tab 5 Focus ring 6 Lens 7 Lamp cover 8 10W speaker 9 Mounting holes for ceiling mount 10 Tilt adjustment wheel NOTE: Ceiling mount screw hole M3 x 6.5 mm depth. Recommended torque < 15 kgf-cm.
About Your Dell Projector 5 82.30 Projector Top and Bottom View Top View 1 Bottom View 9 10 8 7 2 3 4 5 6 55.00 110.00 1 IR receivers 2 Power button 3 Status indicators 4 Zoom tab 5 Focus ring 6 Lens 7 Lamp cover 8 10W speaker 9 Mounting holes for ceiling mount 10 Tilt adjustment wheel NOTE: Ceiling mount screw hole M3 x 6.5 mm depth. Recommended torque < 15 kgf-cm.
Projector 1650 - User Guide
Page 6
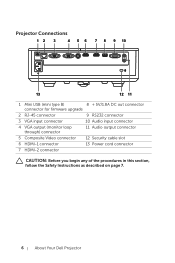
Projector Connections 12 3 4 56 78 9 10 13 12 11 1 Mini USB (mini type B) 8 + 5V/1.8A DC out connector connector for firmware upgrade 2 RJ-45 connector 9 RS232 connector 3 VGA input connector 10 Audio input connector 4 VGA output (monitor loop through) connector 11 Audio output connector 5 Composite Video connector 12 Security cable slot 6 HDMI-1 connector 13 Power cord connector 7 HDMI-2 connector CAUTION: Before you begin any of the procedures in this section, follow the Safety Instructions as described on page 7. 6 About Your Dell Projector
Projector Connections 12 3 4 56 78 9 10 13 12 11 1 Mini USB (mini type B) 8 + 5V/1.8A DC out connector connector for firmware upgrade 2 RJ-45 connector 9 RS232 connector 3 VGA input connector 10 Audio input connector 4 VGA output (monitor loop through) connector 11 Audio output connector 5 Composite Video connector 12 Security cable slot 6 HDMI-1 connector 13 Power cord connector 7 HDMI-2 connector CAUTION: Before you begin any of the procedures in this section, follow the Safety Instructions as described on page 7. 6 About Your Dell Projector
Projector 1650 - User Guide
Page 7
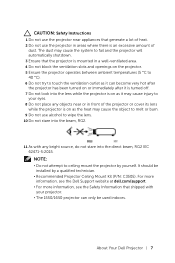
The dust may cause injury to your projector. • The 1550/1650 projector can become very hot after the projector has been turned on or immediately after it is an excessive amount of the projector or cover its lens while the projector is on as the heat may cause the object ...CAUTION: Safety Instructions 1 Do not use the projector near appliances that generate a lot of heat. 2 Do not use the projector in front of dust. It should be used indoors. About Your Dell Projector 7 For more information, see the Dell Support website at dell.com/support. • For more information, see...
The dust may cause injury to your projector. • The 1550/1650 projector can become very hot after the projector has been turned on or immediately after it is an excessive amount of the projector or cover its lens while the projector is on as the heat may cause the object ...CAUTION: Safety Instructions 1 Do not use the projector near appliances that generate a lot of heat. 2 Do not use the projector in front of dust. It should be used indoors. About Your Dell Projector 7 For more information, see the Dell Support website at dell.com/support. • For more information, see...
Projector 1650 - User Guide
Page 8
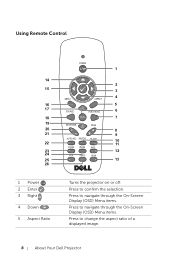
FREEZE BLANK 10 22 11 ZOOM ZOOM INFO 23 12 24 VGA VIDEO HDMI 25 13 26 1 Power 2 Enter 3 Right 4 Down 5 Aspect Ratio Turns the projector on or off. Using Remote Control POWER 1 14 2 15 3 MENU 4 ASPECT 16 5 17 SOURCE VOL VIDEO MODE 6 18 MUTE 7 19 KEYSTONE PAGE 20 VOL 8 21 9 AUTO ADJ. Press to change the aspect ratio of a displayed image. 8 About Your Dell Projector Press to navigate through the On-Screen Display (OSD) Menu items. Press to navigate through the On-Screen Display (OSD) Menu items. Press to confirm the selection.
FREEZE BLANK 10 22 11 ZOOM ZOOM INFO 23 12 24 VGA VIDEO HDMI 25 13 26 1 Power 2 Enter 3 Right 4 Down 5 Aspect Ratio Turns the projector on or off. Using Remote Control POWER 1 14 2 15 3 MENU 4 ASPECT 16 5 17 SOURCE VOL VIDEO MODE 6 18 MUTE 7 19 KEYSTONE PAGE 20 VOL 8 21 9 AUTO ADJ. Press to change the aspect ratio of a displayed image. 8 About Your Dell Projector Press to navigate through the On-Screen Display (OSD) Menu items. Press to navigate through the On-Screen Display (OSD) Menu items. Press to confirm the selection.
Projector 1650 - User Guide
Page 9
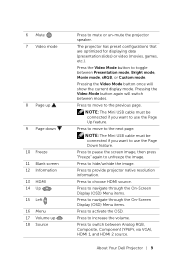
... connected if you want to toggle between modes. Press the Video Mode button to use the Page Up feature. Press to unfreeze the image. The projector has preset configurations that are optimized for displaying data (presentation slides) or video (movies, games, etc.). Press to pause the screen image, then press "... be connected if you want to the previous page. Press to move to use the Page Down feature. Press to mute or un-mute the projector speaker. Press to choose HDMI source. Press to provide projector native resolution information. About Your Dell Projector 9
... connected if you want to toggle between modes. Press the Video Mode button to use the Page Up feature. Press to unfreeze the image. The projector has preset configurations that are optimized for displaying data (presentation slides) or video (movies, games, etc.). Press to pause the screen image, then press "... be connected if you want to the previous page. Press to move to use the Page Down feature. Press to mute or un-mute the projector speaker. Press to choose HDMI source. Press to provide projector native resolution information. About Your Dell Projector 9

Projector 1650 - User Guide
Page 10
... the image. 24 Zoom - Auto adjust does not operate if the OSD is displayed. 23 Zoom + Press to choose Composite Video source. 10 About Your Dell Projector 19 Volume down VOL Press to decrease the volume. 20 Keystone adjustment Press to adjust image distortion caused by - tilting the...
... the image. 24 Zoom - Auto adjust does not operate if the OSD is displayed. 23 Zoom + Press to choose Composite Video source. 10 About Your Dell Projector 19 Volume down VOL Press to decrease the volume. 20 Keystone adjustment Press to adjust image distortion caused by - tilting the...
Projector 1650 - User Guide
Page 11
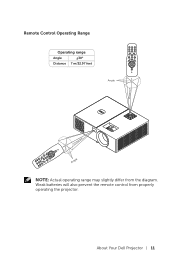
HDMI About Your Dell Projector 11 VGA VIDEO HDMI ZOOM ZOOM INFO AUTO ADJ. FREEZE BLANK KEYSTONE VOL PAGE Remote Control Operating Range Operating range Angle ±30° Distance 7 m/22.97 feet Angle VOL VIDEO MODE MUTE SOURCE MENU ASPECT POWER Distance POWER MENU SOURCE VOL KEYSTONE ASPECT MUTE VIDEO MODE AUTO ADJ. VOL ZOOM PAGE FREEZE VGA ZOOM BLANK INFO VIDEO Distance Angle NOTE: Actual operating range may slightly differ from properly operating the projector. Weak batteries will also prevent the remote control from the diagram.
HDMI About Your Dell Projector 11 VGA VIDEO HDMI ZOOM ZOOM INFO AUTO ADJ. FREEZE BLANK KEYSTONE VOL PAGE Remote Control Operating Range Operating range Angle ±30° Distance 7 m/22.97 feet Angle VOL VIDEO MODE MUTE SOURCE MENU ASPECT POWER Distance POWER MENU SOURCE VOL KEYSTONE ASPECT MUTE VIDEO MODE AUTO ADJ. VOL ZOOM PAGE FREEZE VGA ZOOM BLANK INFO VIDEO Distance Angle NOTE: Actual operating range may slightly differ from properly operating the projector. Weak batteries will also prevent the remote control from the diagram.

Projector 1650 - User Guide
Page 12
2 Adjusting Projector Image Adjusting Projected Zoom Raising the Projector Height 1 Raise the projector to the desired display angle, and use the front tilt adjustment wheel to fine-tune the display angle. 1 1 2 2 1 Front tilt adjustment wheel (Angle of tilt: 0 to fine-tune the display angle. Lowering the Projector Height 1 Lower the projector, and use the front tilt adjustment wheel to 5 degrees) 2 Fixed rubber foot 12 Adjusting Projector Image
2 Adjusting Projector Image Adjusting Projected Zoom Raising the Projector Height 1 Raise the projector to the desired display angle, and use the front tilt adjustment wheel to fine-tune the display angle. 1 1 2 2 1 Front tilt adjustment wheel (Angle of tilt: 0 to fine-tune the display angle. Lowering the Projector Height 1 Lower the projector, and use the front tilt adjustment wheel to 5 degrees) 2 Fixed rubber foot 12 Adjusting Projector Image

Projector 1650 - User Guide
Page 13
Adjusting Projector Focus 1 Rotate the focus ring until the image is clear. The projector focuses at distances ranging between as below: -> 1550: 51 ~ 397 inch (129 ~ 1008 cm) -> 1650: 54 ~ 402 inch (138 ~ 1020 cm) 1 2 1 Zoom tab 2 Focus ring Adjusting Projector Image 13
Adjusting Projector Focus 1 Rotate the focus ring until the image is clear. The projector focuses at distances ranging between as below: -> 1550: 51 ~ 397 inch (129 ~ 1008 cm) -> 1650: 54 ~ 402 inch (138 ~ 1020 cm) 1 2 1 Zoom tab 2 Focus ring Adjusting Projector Image 13

Projector 1650 - User Guide
Page 14
Adjusting Image Size 1550 310 inch (787 cm) Projector to screen distance 397 inch (1008 cm) 359 inch (911 cm) 282 inch (716 cm) 205 inch (520 cm) 128 inch (324 cm) 25(865in5cchm) 280 inch (711 cm) 23(459in4cchm) 220 inch (559 cm) 18(446in7cchm) 160 inch (406 cm) 13(333in8cchm) 83(2in11chcm) 100 inch (254 cm) 40 inch (102 cm) 33 inch (84 cm) 51 inch (129 cm) 14 Adjusting Projector Image
Adjusting Image Size 1550 310 inch (787 cm) Projector to screen distance 397 inch (1008 cm) 359 inch (911 cm) 282 inch (716 cm) 205 inch (520 cm) 128 inch (324 cm) 25(865in5cchm) 280 inch (711 cm) 23(459in4cchm) 220 inch (559 cm) 18(446in7cchm) 160 inch (406 cm) 13(333in8cchm) 83(2in11chcm) 100 inch (254 cm) 40 inch (102 cm) 33 inch (84 cm) 51 inch (129 cm) 14 Adjusting Projector Image

Projector 1650 - User Guide
Page 15
1650 370 inch (940 cm) Projector to screen distance 402 inch (1020 cm) 359 inch (911cm) 282 inch (716 cm) 206 inch (524 cm) 119 inch (302 cm) 30(878in2cchm) 330 inch (838 cm) 27(569in9cchm) 260 inch (660 cm) 21(654in9cchm) 190 inch (483 cm) 15(840in1cchm) 91(2in31chcm) 110 inch (279 cm) 50 inch (127 cm) 42 inch (107 cm) 54 inch (138 cm) Adjusting Projector Image 15
1650 370 inch (940 cm) Projector to screen distance 402 inch (1020 cm) 359 inch (911cm) 282 inch (716 cm) 206 inch (524 cm) 119 inch (302 cm) 30(878in2cchm) 330 inch (838 cm) 27(569in9cchm) 260 inch (660 cm) 21(654in9cchm) 190 inch (483 cm) 15(840in1cchm) 91(2in31chcm) 110 inch (279 cm) 50 inch (127 cm) 42 inch (107 cm) 54 inch (138 cm) Adjusting Projector Image 15

Projector 1650 - User Guide
Page 16
Adjusting Image Shape 1550 Projection Distance (cm) [A] Diagonal (inch/cm) [B] Image size Width (cm) [W] Min Zoom Height (cm) [H] Projector base to top of image (cm) [C] Projector base to bottom of image (cm) [D] 129 33 inch/84 cm 76 50 58 8 324 83 inch/211 cm 169 127 146 19 520 133... inch/655 cm 525 394 453 59 Projection Distance (cm) [A] Image size Diagonal (inch/cm) Width (cm) [B] [W] Max Zoom Height (cm) [H] Projector base to top of image (cm) [C] Projector base to bottom of image (cm) [D] 129 40 inch/102 cm 81 60 70 10 324 100 inch/254 cm 203 152...
Adjusting Image Shape 1550 Projection Distance (cm) [A] Diagonal (inch/cm) [B] Image size Width (cm) [W] Min Zoom Height (cm) [H] Projector base to top of image (cm) [C] Projector base to bottom of image (cm) [D] 129 33 inch/84 cm 76 50 58 8 324 83 inch/211 cm 169 127 146 19 520 133... inch/655 cm 525 394 453 59 Projection Distance (cm) [A] Image size Diagonal (inch/cm) Width (cm) [B] [W] Max Zoom Height (cm) [H] Projector base to top of image (cm) [C] Projector base to bottom of image (cm) [D] 129 40 inch/102 cm 81 60 70 10 324 100 inch/254 cm 203 152...

Projector 1650 - User Guide
Page 17
1650 Projection Distance (cm) [A] Diagonal (inch/cm) [B] Min Zoom Image size Width (cm) [W] Height (cm) [H] Projector base to top of image (cm) [C] Projector base to bottom of image (cm) [D] 138 42 inch/107 cm 90 56 63 7 302 91 inch/231 cm 197 123 138 15 524 158 ... 308 inch/782 cm 664 415 467 52 Projection Distance (cm) [A] Image size Diagonal (inch/cm) Width (cm) [B] [W] Max Zoom Height (cm) [H] Projector base to top of image (cm) [C] Projector base to bottom of image (cm) [D] 138 50 inch/127 cm 108 67 76 9 302 110 inch/279 cm 236 147 166...
1650 Projection Distance (cm) [A] Diagonal (inch/cm) [B] Min Zoom Image size Width (cm) [W] Height (cm) [H] Projector base to top of image (cm) [C] Projector base to bottom of image (cm) [D] 138 42 inch/107 cm 90 56 63 7 302 91 inch/231 cm 197 123 138 15 524 158 ... 308 inch/782 cm 664 415 467 52 Projection Distance (cm) [A] Image size Diagonal (inch/cm) Width (cm) [B] [W] Max Zoom Height (cm) [H] Projector base to top of image (cm) [C] Projector base to bottom of image (cm) [D] 138 50 inch/127 cm 108 67 76 9 302 110 inch/279 cm 236 147 166...

Projector 1650 - User Guide
Page 18
Height [C] Image Height [H] [D] Image Width [W] Image Diagonal [B] Projector Distance [A] 18 Adjusting Projector Image
Height [C] Image Height [H] [D] Image Width [W] Image Diagonal [B] Projector Distance [A] 18 Adjusting Projector Image

Projector 1650 - User Guide
Page 19
.../support. • Ensure that the lamp is enabled. For Dell computers, see your respective documentation. See "Adjusting Projector Image" on page 12. • Ensure that the pins of the connectors are not bent or broken. • Ensure that all ...Ensure that the colors of the test pattern are securely connected. If the problem persists, contact Dell. If images are using a Dell laptop computer, press (Fn+F8). 3 Troubleshooting Troubleshooting Tips If you experience problems with your projector, see "Changing the Lamp" on page 24). • Use the Test Pattern in ...
.../support. • Ensure that the lamp is enabled. For Dell computers, see your respective documentation. See "Adjusting Projector Image" on page 12. • Ensure that the pins of the connectors are not bent or broken. • Ensure that all ...Ensure that the colors of the test pattern are securely connected. If the problem persists, contact Dell. If images are using a Dell laptop computer, press (Fn+F8). 3 Troubleshooting Troubleshooting Tips If you experience problems with your projector, see "Changing the Lamp" on page 24). • Use the Test Pattern in ...
Projector 1650 - User Guide
Page 20
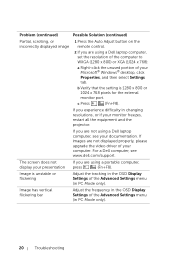
... computer, see www.dell.com/support. c Press (Fn+F8). Image has vertical flickering bar Adjust the frequency in the OSD Display Settings of your monitor freezes, restart all the equipment and the projector. Problem (continued) Possible Solution (continued) Partial, scrolling,... or incorrectly displayed image 1 Press the Auto Adjust button on the remote control. 2 If you are using a Dell laptop computer, set the resolution of the ...
... computer, see www.dell.com/support. c Press (Fn+F8). Image has vertical flickering bar Adjust the frequency in the OSD Display Settings of your monitor freezes, restart all the equipment and the projector. Problem (continued) Possible Solution (continued) Partial, scrolling,... or incorrectly displayed image 1 Press the Auto Adjust button on the remote control. 2 If you are using a Dell laptop computer, set the resolution of the ...
Projector 1650 - User Guide
Page 21
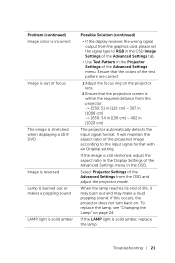
..." on . Ensure that the colors of the test pattern are correct. 1 Adjust the focus ring on the projector lens. 2 Ensure that the projection screen is solid amber Possible Solution (continued) • If the display receives... setting. When the lamp reaches its end of the Advanced Settings from the OSD and adjust the projector mode. Troubleshooting 21 Problem (continued) Image color is incorrect Image is out of focus The image ... or makes a popping sound LAMP light is within the required distance from the projector: -> 1550: 51 in [129 cm] ~ 397 in [1008 cm] -> 1650: 54 in [138 cm] ~ 402 in...
..." on . Ensure that the colors of the test pattern are correct. 1 Adjust the focus ring on the projector lens. 2 Ensure that the projection screen is solid amber Possible Solution (continued) • If the display receives... setting. When the lamp reaches its end of the Advanced Settings from the OSD and adjust the projector mode. Troubleshooting 21 Problem (continued) Image color is incorrect Image is out of focus The image ... or makes a popping sound LAMP light is within the required distance from the projector: -> 1550: 51 in [129 cm] ~ 397 in [1008 cm] -> 1650: 54 in [138 cm] ~ 402 in...


