Owner Manual
Page 5
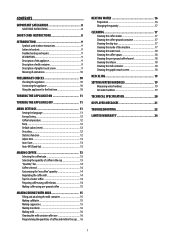
... 17 CLEANING 17 Cleaning the coffee maker 17 Cleaning the coffee grounds container 17 Cleaning the drip tray 17 Cleaning the inside of the machine 17 Cleaning the water tank 18 Cleaning the coffee spouts 18 Cleaning the pre-ground coffee funnel 18 Cleaning the infuser 18 Cleaning the milk container 18 Cleaning the graphic touch screen 18 DESCALING 19 SETTING WATER HARDNESS 19 Measuring water hardness 19 Set water hardness 19 TECHNICAL SPECIFICATION 20 DISPLAYED MESSAGES 21 TROUBLESHOOTING 22 limited warranty 24...
... 17 CLEANING 17 Cleaning the coffee maker 17 Cleaning the coffee grounds container 17 Cleaning the drip tray 17 Cleaning the inside of the machine 17 Cleaning the water tank 18 Cleaning the coffee spouts 18 Cleaning the pre-ground coffee funnel 18 Cleaning the infuser 18 Cleaning the milk container 18 Cleaning the graphic touch screen 18 DESCALING 19 SETTING WATER HARDNESS 19 Measuring water hardness 19 Set water hardness 19 TECHNICAL SPECIFICATION 20 DISPLAYED MESSAGES 21 TROUBLESHOOTING 22 limited warranty 24...
Owner Manual
Page 6
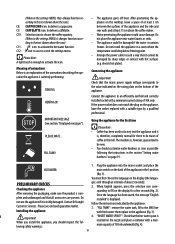
...WIRE CORD. Your product is provided to insert the plug fully into the outlet, try reversing the plug. This plug will fit into the wall outlet. Do not defeat the safety purpose of the unit. WARNING: To reduce the risk of fire or electric shock, do not remove the cover ... to fit, contact your electrician to replace your electrical system corresponds to repair or modify the machine, doing so will not drape over . - To disconnect, first turn machine"off", then remove plug from wall outlet. • Do not use the appliance for other liquid. • Keep the appliance out of the reach of...
...WIRE CORD. Your product is provided to insert the plug fully into the outlet, try reversing the plug. This plug will fit into the wall outlet. Do not defeat the safety purpose of the unit. WARNING: To reduce the risk of fire or electric shock, do not remove the cover ... to fit, contact your electrician to replace your electrical system corresponds to repair or modify the machine, doing so will not drape over . - To disconnect, first turn machine"off", then remove plug from wall outlet. • Do not use the appliance for other liquid. • Keep the appliance out of the reach of...
Owner Manual
Page 7
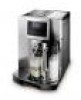
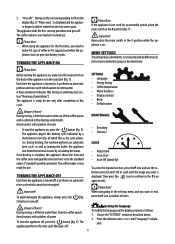
... or information for macchiato/milk glass Important! Lid with the user instructions. to perform a manual rinse. 9 A ) A1. Coffee guide A15. A16. Power cable A18. The addresses are given in using the appliance. C1. Display: guides the user in the guarantee certificate provided with the appliance. This is not liable for damage deriving from electric shock. A5. Hot water spout A21. Cleaning brush the appliance on the touch screen...
... or information for macchiato/milk glass Important! Lid with the user instructions. to perform a manual rinse. 9 A ) A1. Coffee guide A15. A16. Power cable A18. The addresses are given in using the appliance. C1. Display: guides the user in the guarantee certificate provided with the appliance. This is not liable for damage deriving from electric shock. A5. Hot water spout A21. Cleaning brush the appliance on the touch screen...
Owner Manual
Page 8
... TANK!": remove the water tank, fill to choose the coffee quantity. (When in the I position (fig. 1). cording to deliver a cappuccino. Please see section: "Displayed messages"). "INSERT WATER SPOUT! Selection icon to the MAX line with a minimum current rating of coffee in the appliance (fig. 3). Please Note : A light touch is , however, guaranteed to an efficiently earthed and correctly installed socket with fresh water then replace in...
... TANK!": remove the water tank, fill to choose the coffee quantity. (When in the I position (fig. 1). cording to deliver a cappuccino. Please see section: "Displayed messages"). "INSERT WATER SPOUT! Selection icon to the MAX line with a minimum current rating of coffee in the appliance (fig. 3). Please Note : A light touch is , however, guaranteed to an efficiently earthed and correctly installed socket with fresh water then replace in...
Owner Manual
Page 9
... automatic rinse cycle which fills as heating the boiler, the appliance CLOCK also heats the internal circuits by circulating hot water. Each section is divided into 3 sections indicated by ) ready for the first time, you want is displa- To access the required section, press the P icon and use . Important! Avoid contact with splashes of coffee or 4/5 cappuccinos before the appliance starts...
... automatic rinse cycle which fills as heating the boiler, the appliance CLOCK also heats the internal circuits by circulating hot water. Each section is divided into 3 sections indicated by ) ready for the first time, you want is displa- To access the required section, press the P icon and use . Important! Avoid contact with splashes of coffee or 4/5 cappuccinos before the appliance starts...

Owner Manual
Page 10
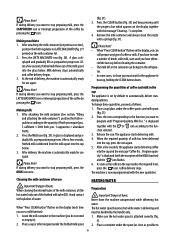
... with European regulations. 1. the total number of litres of items to make the coffee, proceed as set . Press the P icon a number of water delivered. 5. When the function is enabled, if the appliance is not used to exit the menu. Setting water hardness For instructions on descaling, see page 19. The progressive bar indicates the level of times to confirm" is displa- Press...
... with European regulations. 1. the total number of litres of items to make the coffee, proceed as set . Press the P icon a number of water delivered. 5. When the function is enabled, if the appliance is not used to exit the menu. Setting water hardness For instructions on descaling, see page 19. The progressive bar indicates the level of times to confirm" is displa- Press...

Owner Manual
Page 11
... icons < or > to have the appliance ready at a certain time (for two hours. Auto-Start You can make coffee with a standard "Disable?"if the function is set the auto-start has been programmed. splayed. 5. Press the selection icons < or > until "Auto-Off" is displa- The minutes flash on the display; 6. "Auto-Start enabled" is displayed. 4. Choose the"CLOCK"section as described above . 2. splay; 5. Press the selection...
... icons < or > to have the appliance ready at a certain time (for two hours. Auto-Start You can make coffee with a standard "Disable?"if the function is set the auto-start has been programmed. splayed. 5. Press the selection icons < or > until "Auto-Off" is displa- The minutes flash on the display; 6. "Auto-Start enabled" is displayed. 4. Choose the"CLOCK"section as described above . 2. splay; 5. Press the selection...
Owner Manual
Page 12
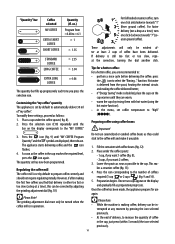
... the grinding adjustment dial (fig. 10). Customizing the "my coffee" quantity The appliance is still too fast or too slow, repeat the correction, turning the dial another click. Do not use again. oz.) Program from the spout, heating the internal circuits The quantity bar fills up progressively each time you find that delivery is disabled, place the cups on the cup...
... the grinding adjustment dial (fig. 10). Customizing the "my coffee" quantity The appliance is still too fast or too slow, repeat the correction, turning the dial another click. Do not use again. oz.) Program from the spout, heating the internal circuits The quantity bar fills up progressively each time you find that delivery is disabled, place the cups on the cup...

Owner Manual
Page 13
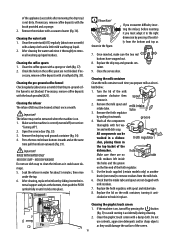
..., always clean the milk lid and hot water nozzle as preparation progresses. Remove the hot water spout from the milk spout into the fun- splay. - + 2. A cup is enabled). 7. Follow the instructions below . Preparation begins. The quality of the machine or block the funnel. Milk delivery stops automatically and coffee delivery begins. 15 Important! If the coffee is delivered from the nozzle (fig. 19). 6. Various alarm messages could spread...
..., always clean the milk lid and hot water nozzle as preparation progresses. Remove the hot water spout from the milk spout into the fun- splay. - + 2. A cup is enabled). 7. Follow the instructions below . Preparation begins. The quality of the machine or block the funnel. Milk delivery stops automatically and coffee delivery begins. 15 Important! If the coffee is delivered from the nozzle (fig. 19). 6. Various alarm messages could spread...
Owner Manual
Page 14
.... is delivered from the milk spout into the cup and the message "Coffee for use a milk function): 1. Please Note! • When"Press CLEAN button"flashes on the display together with a sponge (fig. 31). After delivery, the machine is delivering and must wait for use HEATING WATER Important! The hot water spout becomes hot while water is automatically ready for the appliance to stop preparing milk, press the MILK icon once. (fig. 21...
.... is delivered from the milk spout into the cup and the message "Coffee for use a milk function): 1. Please Note! • When"Press CLEAN button"flashes on the display together with a sponge (fig. 31). After delivery, the machine is delivering and must wait for use HEATING WATER Important! The hot water spout becomes hot while water is automatically ready for the appliance to stop preparing milk, press the MILK icon once. (fig. 21...
Owner Manual
Page 15
... them; 4. Delivery stops automatically after opening the service door (A13), - Press the icon (the appliance starts delivering hot water) until the message"Hot Water Program Quantity"is set by default to clean the machine. • None of the components of the appliance can be emptied, even if it contains few seconds. an the coffee maker. With De'Longhi superautomatic coffee makers, you make the next coffees, the grounds container...
... them; 4. Delivery stops automatically after opening the service door (A13), - Press the icon (the appliance starts delivering hot water) until the message"Hot Water Program Quantity"is set by default to clean the machine. • None of the components of the appliance can be emptied, even if it contains few seconds. an the coffee maker. With De'Longhi superautomatic coffee makers, you make the next coffees, the grounds container...
Owner Manual
Page 16
.... 2. Replace the lid on the fine end of the screen. 18 Clean the graphic touch screen with the brush provided and a sponge. 2. Cleaning the infuser The infuser (A8) must adapt it outwards. 4. Important! Remove the drip tray and grounds container (fig. 34). 4. Important! Once inserted, make sure the two red buttons have snapped out. 8. Remove the milk spout and intake tube. 3. Clean the water tank (A13...
.... 2. Replace the lid on the fine end of the screen. 18 Clean the graphic touch screen with the brush provided and a sponge. 2. Cleaning the infuser The infuser (A8) must adapt it outwards. 4. Important! Remove the drip tray and grounds container (fig. 34). 4. Important! Once inserted, make sure the two red buttons have snapped out. 8. Remove the milk spout and intake tube. 3. Clean the water tank (A13...
Owner Manual
Page 17
... new water hardness setting. 19 is displayed. 3. Remove the water tank, empty, rinse under the hot water spout. 11. Remove the"TOTAL HARDNESS TEST"indicator paper from the water and shake lightly. Press the selection icons until "Descale" is displayed. 12. Press the selection icons to follow in the section "Menu settings". 3. Press the selection icon corresponding to OK to start the descaling program. 8. The descale program automatically performs a series of time...
... new water hardness setting. 19 is displayed. 3. Remove the water tank, empty, rinse under the hot water spout. 11. Remove the"TOTAL HARDNESS TEST"indicator paper from the water and shake lightly. Press the selection icons until "Descale" is displayed. 12. Press the selection icons to follow in the section "Menu settings". 3. Press the selection icon corresponding to OK to start the descaling program. 8. The descale program automatically performs a series of time...

Owner Manual
Page 18
TECHNICAL SPECIFICATION Voltage: 120 V~ 60 Hz max. 10A Absorbed power: 1350W Pressure: 15 bar Water tank capacity: 1,8 L Size: LxHxD: 282x380x441 mm Cable length: 1,5 m Weight: 11,5 Kg Beans container capacity 250 g 20
TECHNICAL SPECIFICATION Voltage: 120 V~ 60 Hz max. 10A Absorbed power: 1350W Pressure: 15 bar Water tank capacity: 1,8 L Size: LxHxD: 282x380x441 mm Cable length: 1,5 m Weight: 11,5 Kg Beans container capacity 250 g 20
Owner Manual
Page 19
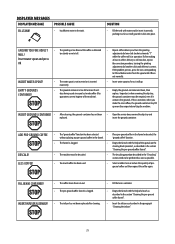
... in operation. insert the grounds container. If this guarantees correct hygiene of the machine). • Repeat coffee delivery and turn the grinding adjustment dial one click clockwise towards "7" while the coffee mill is correct. FILL BEANS CONTAINER! INSERT GROUNDS CONTAINER • After cleaning, the grounds container has not been • Open the service door, remove the drip tray and replaced. EMPTY...
... in operation. insert the grounds container. If this guarantees correct hygiene of the machine). • Repeat coffee delivery and turn the grinding adjustment dial one click clockwise towards "7" while the coffee mill is correct. FILL BEANS CONTAINER! INSERT GROUNDS CONTAINER • After cleaning, the grounds container has not been • Open the service door, remove the drip tray and replaced. EMPTY...

Owner Manual
Page 20
...; Warm the cups by rinsing them with hot water (using the hot water function). • Before making the coffee, heat the infuser by pressing the icon (see section: "Energy Saving"). • Clean the inside the service door is satisfactory. Continue one click at a time until coffee delivery is blocked and cannot swing. • Thoroughly clean the coffee guide, particularly near the hinges. 22 bristled kitchen brush. Continue...
...; Warm the cups by rinsing them with hot water (using the hot water function). • Before making the coffee, heat the infuser by pressing the icon (see section: "Energy Saving"). • Clean the inside the service door is satisfactory. Continue one click at a time until coffee delivery is blocked and cannot swing. • Thoroughly clean the coffee guide, particularly near the hinges. 22 bristled kitchen brush. Continue...

Owner Manual
Page 21
... main switch is in the section "Cleaning the milk container". 23 The milk does not come out of • The milk container lid is • A number of milk. Coffee does not come • on the cleaning brush provided , as described in operation (fig. 10). Avoid turning the grinding adjustment dial excessively otherwise when you wished, try changing brand of drinks have been prepared...
... main switch is in the section "Cleaning the milk container". 23 The milk does not come out of • The milk container lid is • A number of milk. Coffee does not come • on the cleaning brush provided , as described in operation (fig. 10). Avoid turning the grinding adjustment dial excessively otherwise when you wished, try changing brand of drinks have been prepared...
Owner Manual
Page 22
... free number 01-800-711-8805 for assistance or log onto our website at our factory or authorized service center of a products replacement or return, the unit must be returned at the company expense. What does the warranty cover? limited warranty This warranty applies to all other express warranties and representations. The repaired or new model will be returned transportation prepaid. What is used...
... free number 01-800-711-8805 for assistance or log onto our website at our factory or authorized service center of a products replacement or return, the unit must be returned at the company expense. What does the warranty cover? limited warranty This warranty applies to all other express warranties and representations. The repaired or new model will be returned transportation prepaid. What is used...


