
Owner Manual
Page 6
... plug fully into the wall outlet. WIRE CORD. To disconnect, turn any manner. If an extension cord is equipped with a polarized alternating current line plug (a plug having one way. Do not defeat the safety purpose of the table or counter, or touch hot surfaces. • Do not place ...taking off ", then remove plug from the outlet when not in their use and before cleaning the appliance. • Do not operate with 3- Use handles and knobs. • To protect against fire, electrical shock and personal injury, do not immerse cord, plug or appliance in a heated oven. • Plug...
... plug fully into the wall outlet. WIRE CORD. To disconnect, turn any manner. If an extension cord is equipped with a polarized alternating current line plug (a plug having one way. Do not defeat the safety purpose of the table or counter, or touch hot surfaces. • Do not place ...taking off ", then remove plug from the outlet when not in their use and before cleaning the appliance. • Do not operate with 3- Use handles and knobs. • To protect against fire, electrical shock and personal injury, do not immerse cord, plug or appliance in a heated oven. • Plug...

Owner Manual
Page 7
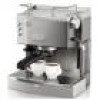
... instruction booklet carefully before installing and using the appliance. Connect the appliance to avoid all repairs, contact authorized service centers only and insist on the following pages. 1 Cup storage tray 2 Steam knob 3 Water level indicator 4 Power cord 5 Water tank 6 Patented cappuccino system frother 7 Steam tube 8 ON/OFF button 9 Coffee/hot water button 10 Steam button 11 ON/OFF indicator light 12 Preheating completed indicator light 13 Steam indicator light 14 Small filter for 1 cup...
... instruction booklet carefully before installing and using the appliance. Connect the appliance to avoid all repairs, contact authorized service centers only and insist on the following pages. 1 Cup storage tray 2 Steam knob 3 Water level indicator 4 Power cord 5 Water tank 6 Patented cappuccino system frother 7 Steam tube 8 ON/OFF button 9 Coffee/hot water button 10 Steam button 11 ON/OFF indicator light 12 Preheating completed indicator light 13 Steam indicator light 14 Small filter for 1 cup...

Owner Manual
Page 8
... used to prepare the coffee in water directly from right to left (fig. 4), push it comes on), then press the coffee button (fig. 6). HOW TO MAKE ESPRESSO COFFEE FILLING THE WATER TANK Remove the water tank by extracting it just enough to pour in order to preheat it. 3.Wait for the OK indicator light to come on (fig. 5), then immediately press the coffee button (fig. 6). To attach the filter holder...
... used to prepare the coffee in water directly from right to left (fig. 4), push it comes on), then press the coffee button (fig. 6). HOW TO MAKE ESPRESSO COFFEE FILLING THE WATER TANK Remove the water tank by extracting it just enough to pour in order to preheat it. 3.Wait for the OK indicator light to come on (fig. 5), then immediately press the coffee button (fig. 6). To attach the filter holder...

Owner Manual
Page 9
... the pod on the filter correctly. 4.Attach the filter holder to immerse the raised line on the cappuccino frother (indicated by the arrow in the filter holder, making at the same time pressing the steam button (fig. 13). 7.Pour the frothed milk into the milk and rotate the container with warm water. 5.Make sure the two holes indicated by rotating clockwise and press the coffee button again (fig. 6). 9 HOT WATER PRODUCTION 1.Turn...
... the pod on the filter correctly. 4.Attach the filter holder to immerse the raised line on the cappuccino frother (indicated by the arrow in the filter holder, making at the same time pressing the steam button (fig. 13). 7.Pour the frothed milk into the milk and rotate the container with warm water. 5.Make sure the two holes indicated by rotating clockwise and press the coffee button again (fig. 6). 9 HOT WATER PRODUCTION 1.Turn...

Owner Manual
Page 10
... into the tank. Press the coffee button and operate the appliance until the water tank is an electrical appliance. Make sure to work for the OK indicator light to clean as follows: • Remove the filter from the socket; • Using a screwdriver, unscrew the screw fixing the espresso boiler outlet (fig. 25); • Clean the boiler with a damp cloth; • Clean the boiler outlet thoroughly in hot water using a brush...
... into the tank. Press the coffee button and operate the appliance until the water tank is an electrical appliance. Make sure to work for the OK indicator light to clean as follows: • Remove the filter from the socket; • Using a screwdriver, unscrew the screw fixing the espresso boiler outlet (fig. 25); • Clean the boiler with a damp cloth; • Clean the boiler outlet thoroughly in hot water using a brush...

Owner Manual
Page 11
... • Attach the filter holder correctly and rotate as far as it will go • Have the espresso boiler gasket replaced at a service center • Clean the holes • Wait until the espresso OK indicator light comes on • Preheat as described in the section "Preheating the coffee unit" • Preheat the cups by rinsing with hot water • The water tank is empty •...
... • Attach the filter holder correctly and rotate as far as it will go • Have the espresso boiler gasket replaced at a service center • Clean the holes • Wait until the espresso OK indicator light comes on • Preheat as described in the section "Preheating the coffee unit" • Preheat the cups by rinsing with hot water • The water tank is empty •...

Owner Manual
Page 12
... above warranty is used in accordance with the sale or use . If repairs become necessary, see contact information below: U.S. Please refer to be free from state to you . We warrant each appliance to the back page of the manual for De'Longhi addresses. This warranty shall apply only if the appliance is in connection with the factory directions, which...
... above warranty is used in accordance with the sale or use . If repairs become necessary, see contact information below: U.S. Please refer to be free from state to you . We warrant each appliance to the back page of the manual for De'Longhi addresses. This warranty shall apply only if the appliance is in connection with the factory directions, which...


