Owner Manual
Page 5
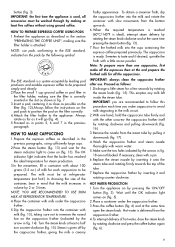
... THESE INSTRUCTIONS THIS PRODUCT IS FOR HOUSEHOLD USE ONLY SHORT CORD INSTRUCTIONS - This is equipped with 3- Your product is a safety feature. Any other liquid. • Never allow the appliance to be used if care is provided to cool before fitting or taking off ", then remove plug from wall outlet. • Do not use the appliance for examination, repair or adjustment...
... THESE INSTRUCTIONS THIS PRODUCT IS FOR HOUSEHOLD USE ONLY SHORT CORD INSTRUCTIONS - This is equipped with 3- Your product is a safety feature. Any other liquid. • Never allow the appliance to be used if care is provided to cool before fitting or taking off ", then remove plug from wall outlet. • Do not use the appliance for examination, repair or adjustment...
Owner Manual
Page 6
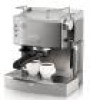
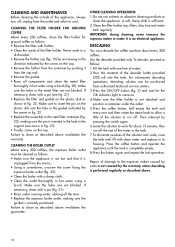
... knob 3 Water level indicator 4 Power cord 5 Water tank 6 Patented cappuccino system frother 7 Steam tube 8 ON/OFF button 9 Coffee/hot water button 10 Steam button 11 ON/OFF button indicator light 12 Preheating completed indicator light 13 Steam selected indicator light 14 Small filter for 1 cup ground coffee or 1 pod 15 Large filter for 2 cups ground coffee 16 Patented dual-function filter holder 17 Tamper 18 Boiler outlet 19 Measuring scoop 20 Removable drip tray 21 Removable cup support 22 Cup tray...
... knob 3 Water level indicator 4 Power cord 5 Water tank 6 Patented cappuccino system frother 7 Steam tube 8 ON/OFF button 9 Coffee/hot water button 10 Steam button 11 ON/OFF button indicator light 12 Preheating completed indicator light 13 Steam selected indicator light 14 Small filter for 1 cup ground coffee or 1 pod 15 Large filter for 2 cups ground coffee 16 Patented dual-function filter holder 17 Tamper 18 Boiler outlet 19 Measuring scoop 20 Removable drip tray 21 Removable cup support 22 Cup tray...
Owner Manual
Page 7
... the filter holder and empty out the hot water. (It is essential to obtain a good espresso. The appliance comes with clean cold water (fig 2). Replace the tank in the housing, making the coffee by proceeding as described in the water directly from the previous infusion. 3.Distribute the ground coffee evenly and tamp lightly with the handle towards the left . PREHEATING THE COFFEE UNIT To obtain espresso coffee at a time to pour...
... the filter holder and empty out the hot water. (It is essential to obtain a good espresso. The appliance comes with clean cold water (fig 2). Replace the tank in the housing, making the coffee by proceeding as described in the water directly from the previous infusion. 3.Distribute the ground coffee evenly and tamp lightly with the handle towards the left . PREHEATING THE COFFEE UNIT To obtain espresso coffee at a time to pour...
Owner Manual
Page 8
... the filter holder to avoid milk stagnating in the previous paragraphs, using ground coffee. button (fig. 3). To obtain a creamier froth, dip the cappuccino frother into the container with a pin. 6.Replace the steam nozzle by inserting it onto the steam tube and rotating firmly towards the top of hot water, close as described in the milk circuit. 2.With one cappuccino, first make all the espressos...
... the filter holder to avoid milk stagnating in the previous paragraphs, using ground coffee. button (fig. 3). To obtain a creamier froth, dip the cappuccino frother into the container with a pin. 6.Replace the steam nozzle by inserting it onto the steam tube and rotating firmly towards the top of hot water, close as described in the milk circuit. 2.With one cappuccino, first make all the espressos...
Owner Manual
Page 9
... filter holder. Press the coffee button and operate the appliance until the tank is sufficient. 2.Clean the filter holder cup, filters, drip tray and water tank regularly. Repair of damage to the espresso maker caused by scale is not covered by the warranty unless descaling is not hot and that it from authorized technical service centers. 3.Press the ON/OFF button (fig. 3) and wait for about every 200 coffees. Make sure the holes in the metal filter...
... filter holder. Press the coffee button and operate the appliance until the tank is sufficient. 2.Clean the filter holder cup, filters, drip tray and water tank regularly. Repair of damage to the espresso maker caused by scale is not covered by the warranty unless descaling is not hot and that it from authorized technical service centers. 3.Press the ON/OFF button (fig. 3) and wait for about every 200 coffees. Make sure the holes in the metal filter...
Owner Manual
Page 10
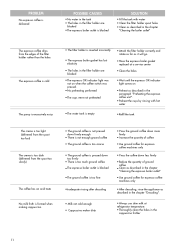
... • Attach the filter holder correctly and rotate as far as it will go. • Have the espresso boiler gasket replaced at a service center • Clean the holes • Wait until the espresso OK indicator light comes on • Preheat as described in the paragraph "Preheating the espresso coffee unit". • Preheat the cups by rinsing with hot water • The water tank is empty •...
... • Attach the filter holder correctly and rotate as far as it will go. • Have the espresso boiler gasket replaced at a service center • Clean the holes • Wait until the espresso OK indicator light comes on • Preheat as described in the paragraph "Preheating the espresso coffee unit". • Preheat the cups by rinsing with hot water • The water tank is empty •...

Owner Manual
Page 11
... warranty lasts, so the above limitation may not apply to repair at www.delonghi.com. Residents: Please contact our toll free hotline at 1-800-322-3848 or log onto our website at our factory or authorized service center of a products replacement or return, the unit must be returned at www.delonghi.com. De'Longhi does not authorize any defective parts...
... warranty lasts, so the above limitation may not apply to repair at www.delonghi.com. Residents: Please contact our toll free hotline at 1-800-322-3848 or log onto our website at our factory or authorized service center of a products replacement or return, the unit must be returned at www.delonghi.com. De'Longhi does not authorize any defective parts...


