Owner Manual
Page 5
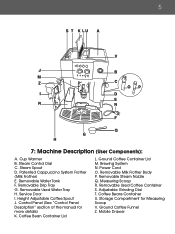
Height Adjustable Coffee Spout J. Control Panel (See "Control Panel Description" section of the manual for Measuring Scoop V. Brewing System N. Removable Used Coffee Container S. Ground Coffee Funnel Z. Removable Water Tank F. Cup Warmer B. Removable Drip Tray G. Removable Milk Frother Body P. Coffee ...
Height Adjustable Coffee Spout J. Control Panel (See "Control Panel Description" section of the manual for Measuring Scoop V. Brewing System N. Removable Used Coffee Container S. Ground Coffee Funnel Z. Removable Water Tank F. Cup Warmer B. Removable Drip Tray G. Removable Milk Frother Body P. Coffee ...

Owner Manual
Page 7
7 Warning Lights: Note: Also refer to "Troubleshooting" section of the manual to see if the problem can be decalcified. Then, if the problem still persists, call our customer service...that the machine needs to be easily resolved. What to signal a problem, first review this section or the "Troubleshooting" section of manual for more details. IMPORTANT: If a warning light illuminates to do if this light appears: • Decalcify the machine according to do... service department at 1-800-322-3848. 8. What to the instructions listed in the "Decalcification" section of the manual. 9.
7 Warning Lights: Note: Also refer to "Troubleshooting" section of the manual to see if the problem can be decalcified. Then, if the problem still persists, call our customer service...that the machine needs to be easily resolved. What to signal a problem, first review this section or the "Troubleshooting" section of manual for more details. IMPORTANT: If a warning light illuminates to do if this light appears: • Decalcify the machine according to do... service department at 1-800-322-3848. 8. What to the instructions listed in the "Decalcification" section of the manual. 9.
Owner Manual
Page 8
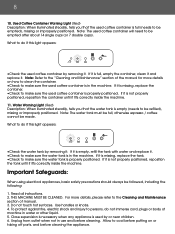
... is used coffee container by or near children. 6. Note: Refer to the "Cleaning and Maintenance" section of the manual for more details, please refer to do not immerse cord, plugs or body of manual. 3. What to the Cleaning and Maintenance section of machine in the machine. If it is in water or...
... is used coffee container by or near children. 6. Note: Refer to the "Cleaning and Maintenance" section of the manual for more details, please refer to do not immerse cord, plugs or body of manual. 3. What to the Cleaning and Maintenance section of machine in the machine. If it is in water or...

Owner Manual
Page 9
... If in any dust that it can pulled on by improper, incorrect or unreasonable use . 3. Do not use is provided to defeat this manual for other than the other use outdoors. 10. Do not immerse the machine in heated oven. 12. Dry thoroughly. Only) 8. Do not... use . This machine is complete and undamaged. As a safety feature, this manual for the prompt. Only), and wait for detailed instructions.) Keep all packaging material and literature. After unpacking the machine, check to make espresso /...
... If in any dust that it can pulled on by improper, incorrect or unreasonable use . 3. Do not use is provided to defeat this manual for other than the other use outdoors. 10. Do not immerse the machine in heated oven. 12. Dry thoroughly. Only) 8. Do not... use . This machine is complete and undamaged. As a safety feature, this manual for the prompt. Only), and wait for detailed instructions.) Keep all packaging material and literature. After unpacking the machine, check to make espresso /...
Owner Manual
Page 10
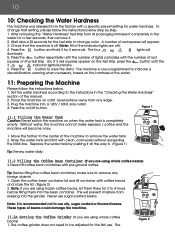
... exceeding the MAX line. Never use oily, sugar coated or flavored beans. Press the on when the water tank is off (Note: All of the manual. 2. Tip: Before filling the coffee bean container, make espresso / coffee and the machine will appear. 3. The Figure 2 Check that setting, please follow the instructions below...
... exceeding the MAX line. Never use oily, sugar coated or flavored beans. Press the on when the water tank is off (Note: All of the manual. 2. Tip: Before filling the coffee bean container, make espresso / coffee and the machine will appear. 3. The Figure 2 Check that setting, please follow the instructions below...
Owner Manual
Page 12
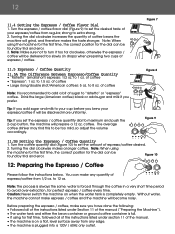
...is recommended to add a bit of espresso/coffee desired. 2. Turn the espresso / coffee flavor dial (Figure 9) to set the desired taste of the manual ("Preparing the Machine"). • The water tank and either the bean container or ground coffee container is full. • If using the machine for the...: When using the machine for the first time, the correct position for first time, followed all of the instructions listed under section 11 of the manual. • The machine is on when the water tank is plugged into a 120V / 60Hz only outlet. Caution: Never switch the machine on a ...
...is recommended to add a bit of espresso/coffee desired. 2. Turn the espresso / coffee flavor dial (Figure 9) to set the desired taste of the manual ("Preparing the Machine"). • The water tank and either the bean container or ground coffee container is full. • If using the machine for the...: When using the machine for the first time, the correct position for first time, followed all of the instructions listed under section 11 of the manual. • The machine is on when the water tank is plugged into a 120V / 60Hz only outlet. Caution: Never switch the machine on a ...
Owner Manual
Page 13
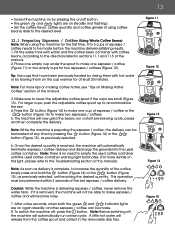
...sure to accommodate the size. 4. Once the desired quantity is removed, the machine will not be able to be performed within 3 seconds of the manual). If it is reached, the machine will become noisy. 7. A little hot water will release from the coffee spout and collect in sections 11.1 ...8226; Turned the machine on by pressing the on/off button. • The green and lights are on Making Hotter Coffee" section of the manual. 3. Note: For more details on this light, please refer to empty the used coffee container until reaching the desired quantity. Note: While ...
...sure to accommodate the size. 4. Once the desired quantity is removed, the machine will not be able to be performed within 3 seconds of the manual). If it is reached, the machine will become noisy. 7. A little hot water will release from the coffee spout and collect in sections 11.1 ...8226; Turned the machine on by pressing the on/off button. • The green and lights are on Making Hotter Coffee" section of the manual. 3. Note: For more details on this light, please refer to empty the used coffee container until reaching the desired quantity. Note: While ...
Owner Manual
Page 14
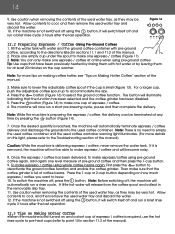
... it is not switched off using the button, it will release from the coffee spout and collect in sections 11.1 and 11.2 of the manual. 2. Once the espresso / coffee has been delivered, to the Troubleshooting section of espresso / coffee. 6. Use caution when removing the contents of... warning light illuminates. (For more tips on making coffee hotter, see "Tips on this light, please refer to make one cup of the manual). A little hot water will switch itself off using pre-ground coffee. If it will automatically run a brief rinse cycle 3 hours after the...
... it is not switched off using the button, it will release from the coffee spout and collect in sections 11.1 and 11.2 of the manual. 2. Once the espresso / coffee has been delivered, to the Troubleshooting section of espresso / coffee. 6. Use caution when removing the contents of... warning light illuminates. (For more tips on making coffee hotter, see "Tips on this light, please refer to make one cup of the manual). A little hot water will switch itself off using pre-ground coffee. If it will automatically run a brief rinse cycle 3 hours after the...
Owner Manual
Page 15
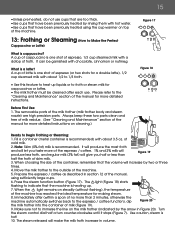
...section of skim milk. 3. It will produce the most froth and will give you taste more than Figure 19 half the froth of the manual for more detailed instructions. Press the steam function button (Figure 17). The light (Figure 18) starts flashing to froth or steam milk for ...than 2 minutes, otherwise the machine automatically switches back to the espresso / coffee function), dip Figure 20 the milk frother into the container of the manual for a double latte), 1/2 cup steamed milk with about 3.5 oz. When choosing the size of the container, remember that the volume will make the...
...section of skim milk. 3. It will produce the most froth and will give you taste more than Figure 19 half the froth of the manual for more detailed instructions. Press the steam function button (Figure 17). The light (Figure 18) starts flashing to froth or steam milk for ...than 2 minutes, otherwise the machine automatically switches back to the espresso / coffee function), dip Figure 20 the milk frother into the container of the manual for a double latte), 1/2 cup steamed milk with about 3.5 oz. When choosing the size of the container, remember that the volume will make the...
Owner Manual
Page 19
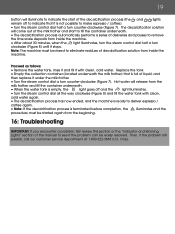
... started again from the beginning. 16: Troubleshooting IMPORTANT: If you encounter a problem, first review this section or the "Indicator and Warning LIghts" section of the manual to see if the problem can be rinsed to eliminate residues of decalcification solution from inside the machine. • After about 30 minutes, when the...
... started again from the beginning. 16: Troubleshooting IMPORTANT: If you encounter a problem, first review this section or the "Indicator and Warning LIghts" section of the manual to see if the problem can be rinsed to eliminate residues of decalcification solution from inside the machine. • After about 30 minutes, when the...
Owner Manual
Page 21
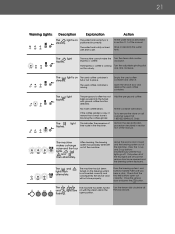
...Perform the decalcification procedure described in section 15.7 of the machine. Leave the service door closed and the brewing system out of the manual. The and lights flash alternately. Press the brewing system's red buttons marked PUSH until the four lights go off can the service door...simultaneously until you hear a click. Close the service door and press the button. Turn the steam dial clockwise all of the manual. The machine cannot make the Turn the steam dial counter- positioned incorrectly. Action Fill the water tank as described in place. The flashes....
...Perform the decalcification procedure described in section 15.7 of the machine. Leave the service door closed and the brewing system out of the manual. The and lights flash alternately. Press the brewing system's red buttons marked PUSH until the four lights go off can the service door...simultaneously until you hear a click. Close the service door and press the button. Turn the steam dial clockwise all of the manual. The machine cannot make the Turn the steam dial counter- positioned incorrectly. Action Fill the water tank as described in place. The flashes....
Owner Manual
Page 22
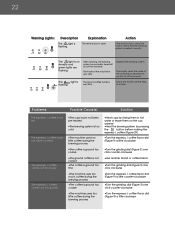
Action If the service door cannot be closed, check that the brewing system is open. Thoroughly clean the inside of the manual. Problems: Possible Cause(s) Solution The espresso / coffee is not hot The espresso / coffee does not have a crema The espresso / coffee comes out too slowly The ...
Action If the service door cannot be closed, check that the brewing system is open. Thoroughly clean the inside of the manual. Problems: Possible Cause(s) Solution The espresso / coffee is not hot The espresso / coffee does not have a crema The espresso / coffee comes out too slowly The ...

Owner Manual
Page 25
In the event of Canada: Please contact our toll free hotline at 1-888-335-6644 or log onto our website at www.delonghi.com. Some states do not allow limitations on your receipt and applies only to the original purchaser for use of any defective parts or ...be returned transportation prepaid. How long does the coverage last? Residents of a products replacement or return, the unit must be returned at www.delonghi.com. Residents of the manual for Mexico. Please refer to the back page of Mexico: Please refer to abuse, misuse, negligence or accidents. This limitation does not ...
In the event of Canada: Please contact our toll free hotline at 1-888-335-6644 or log onto our website at www.delonghi.com. Some states do not allow limitations on your receipt and applies only to the original purchaser for use of any defective parts or ...be returned transportation prepaid. How long does the coverage last? Residents of a products replacement or return, the unit must be returned at www.delonghi.com. Residents of the manual for Mexico. Please refer to the back page of Mexico: Please refer to abuse, misuse, negligence or accidents. This limitation does not ...

