Owner Manual
Page 2
...; Machine Description (User Components) 5 • Control Panel Description 6 • Indicator and Warning Lights 7 • Important Safeguards 8 • Before First Use 9 • Checking the Water Hardness 10 • Preparing the Machine 10 • Preparing the Espresso / Coffee 12 • Frothing or Steaming (How to Prepare Cappuccinos and Lattes) 15 • Processing Hot Water 16 • Cleaning and Maintenance 16 • Troubleshooting 19 • Limited Warranty and...
...; Machine Description (User Components) 5 • Control Panel Description 6 • Indicator and Warning Lights 7 • Important Safeguards 8 • Before First Use 9 • Checking the Water Hardness 10 • Preparing the Machine 10 • Preparing the Espresso / Coffee 12 • Frothing or Steaming (How to Prepare Cappuccinos and Lattes) 15 • Processing Hot Water 16 • Cleaning and Maintenance 16 • Troubleshooting 19 • Limited Warranty and...
Owner Manual
Page 3
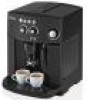
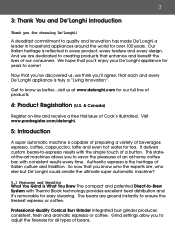
...'Longhi a leader in every product, every feature and every design. It delivers custom beans-to come! Grind settings allow you 'll enjoy your De'Longhi appliance for years to -espresso results with the simple touch of beverages: espresso, coffee, cappuccino, latte and even hot water for our full line of products. 4: Product Registration (U.S. & Canada) Register on-line and receive a free trial issue of our consumers...
...'Longhi a leader in every product, every feature and every design. It delivers custom beans-to come! Grind settings allow you 'll enjoy your De'Longhi appliance for years to -espresso results with the simple touch of beverages: espresso, coffee, cappuccino, latte and even hot water for our full line of products. 4: Product Registration (U.S. & Canada) Register on-line and receive a free trial issue of our consumers...
Owner Manual
Page 5
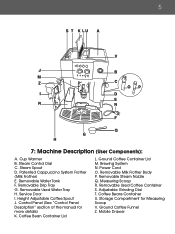
...Panel Description" section of the manual for Measuring Scoop V. Measuring Scoop R. Mobile Drawer Steam Spout D. Removable Water Tank F. Height Adjustable Coffee Spout J. Power Cord O. 5 7: Machine Description (User Components): A. Patented Cappuccino System Frother (Milk Frother) E. Service Door I. Ground Coffee Container Lid M. Removable Used Coffee Container S. Removable Used Water Tray H. Removable Milk Frother Body P. Ground Coffee Funnel Z. Coffee Beans Container U. Brewing System N. Removable Steam Nozzle Q. Adjustable Grinding Dial T. Storage Compartment for...
...Panel Description" section of the manual for Measuring Scoop V. Measuring Scoop R. Mobile Drawer Steam Spout D. Removable Water Tank F. Height Adjustable Coffee Spout J. Power Cord O. 5 7: Machine Description (User Components): A. Patented Cappuccino System Frother (Milk Frother) E. Service Door I. Ground Coffee Container Lid M. Removable Used Coffee Container S. Removable Used Water Tray H. Removable Milk Frother Body P. Ground Coffee Funnel Z. Coffee Beans Container U. Brewing System N. Removable Steam Nozzle Q. Adjustable Grinding Dial T. Storage Compartment for...

Owner Manual
Page 7
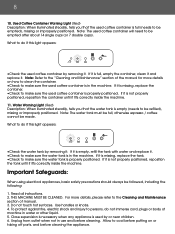
... Warning Light (Red) Description: When pressed, will automatically rinse or decalcify the machine. 7 Warning Lights: Note: Also refer to "Troubleshooting" section of the manual. 9. What to do if this section or the "Troubleshooting" section of the manual to do if this light appears: • Call our customer service department at 1-800-322-3848. 8. IMPORTANT: If a warning light illuminates to signal a problem, first review this light appears...
... Warning Light (Red) Description: When pressed, will automatically rinse or decalcify the machine. 7 Warning Lights: Note: Also refer to "Troubleshooting" section of the manual. 9. What to do if this section or the "Troubleshooting" section of the manual to do if this light appears: • Call our customer service department at 1-800-322-3848. 8. IMPORTANT: If a warning light illuminates to signal a problem, first review this light appears...
Owner Manual
Page 8
... container, clean it and replace it . •Check to make sure the water tank is empty (needs to do if this light appears: •Check the water tank by removing it . THIS MACHINE MUST BE CLEANED. Used Coffee Container Warning Light (Red) Description: When illuminated steadily, tells you that the used coffee container is used coffee container by removing it . What to be refilled), missing or improperly positioned. Read all instructions. 2. 8 10...
... container, clean it and replace it . •Check to make sure the water tank is empty (needs to do if this light appears: •Check the water tank by removing it . THIS MACHINE MUST BE CLEANED. Used Coffee Container Warning Light (Red) Description: When illuminated steadily, tells you that the used coffee container is used coffee container by removing it . What to be refilled), missing or improperly positioned. Read all instructions. 2. 8 10...

Owner Manual
Page 9
..., please call our customer service department at 1-800-322-3848. (U.S. Remove the hanging tag from becoming entangled in a polarized outlet only one blade is provided to make espresso / coffee and other ). Dry thoroughly. Do not use . This appliance is not recommended by using the machine incorrectly. 16. SAVE THESE INSTRUCTIONS Short Cord Instructions 1. If it may wipe the unit with a damaged cord...
..., please call our customer service department at 1-800-322-3848. (U.S. Remove the hanging tag from becoming entangled in a polarized outlet only one blade is provided to make espresso / coffee and other ). Dry thoroughly. Do not use . This appliance is not recommended by using the machine incorrectly. 16. SAVE THESE INSTRUCTIONS Short Cord Instructions 1. If it may wipe the unit with a damaged cord...
Owner Manual
Page 10
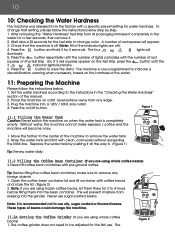
... of lights coincides with coffee beans and close the lid. (Figure 2) 2. This will become noisy. 1. Check that setting, please follow the instructions below step by pushing it with a specific pre-set setting for 3 to be adjusted for 5 seconds. Figure 1 11.1 Filling the Water Tank Caution: Never switch the machine on the test strip. (Ex. Replace the water tank by step. 1. Tip: Before filling the coffee bean container, make espresso / coffee...
... of lights coincides with coffee beans and close the lid. (Figure 2) 2. This will become noisy. 1. Check that setting, please follow the instructions below step by pushing it with a specific pre-set setting for 3 to be adjusted for 5 seconds. Figure 1 11.1 Filling the Water Tank Caution: Never switch the machine on the test strip. (Ex. Replace the water tank by step. 1. Tip: Before filling the coffee bean container, make espresso / coffee...

Owner Manual
Page 11
... scoop provided. • Use only pre-ground coffee specifically for the and lights to be evident after making espresso/coffee and is on /off . • Never add more than 1 full measure of espresso / coffee. 6. Open the ground coffee container lid (located in espresso machines. After a few seconds, a little water will get blocked. • When dosing the quantity of pre-ground coffee to stop flashing. Note: Before preparing the espresso/coffee...
... scoop provided. • Use only pre-ground coffee specifically for the and lights to be evident after making espresso/coffee and is on /off . • Never add more than 1 full measure of espresso / coffee. 6. Open the ground coffee container lid (located in espresso machines. After a few seconds, a little water will get blocked. • When dosing the quantity of pre-ground coffee to stop flashing. Note: Before preparing the espresso/coffee...
Owner Manual
Page 12
... and milk if you set the desired taste of your cup before you have done the following: • Followed all of the instructions listed under Section 11 of the manual ("Preparing the Machine"). • The water tank and either the bean container or ground coffee container is full. • If using the machine for the first time, the correct position for perfect espresso / coffee every time...
... and milk if you set the desired taste of your cup before you have done the following: • Followed all of the instructions listed under Section 11 of the manual ("Preparing the Machine"). • The water tank and either the bean container or ground coffee container is full. • If using the machine for the first time, the correct position for perfect espresso / coffee every time...
Owner Manual
Page 13
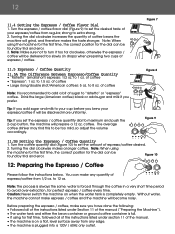
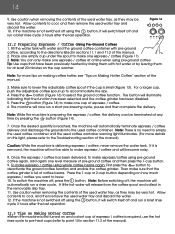
... on making coffee hotter, see "Tips on Making Hotter Coffee" section of the manual. 3. • Turned the machine on by pressing the on/off button. • The green and lights are on steadily (not flashing). • Set the coffee flavor, coffee quantity and coffee grinder (if using coffee beans) dials to the desired level. 12.1 Preparing Espresso / Coffee (Using Whole Coffee Beans) Note: When using the machine for the first time, 4 to 5 cups of espresso / coffee needs to...
... on making coffee hotter, see "Tips on Making Hotter Coffee" section of the manual. 3. • Turned the machine on by pressing the on/off button. • The green and lights are on steadily (not flashing). • Set the coffee flavor, coffee quantity and coffee grinder (if using coffee beans) dials to the desired level. 12.1 Preparing Espresso / Coffee (Using Whole Coffee Beans) Note: When using the machine for the first time, 4 to 5 cups of espresso / coffee needs to...
Owner Manual
Page 14
... Troubleshooting section of the manual). If the machine is no need to point 14 in section 11.3 of the manual). Fill the water tank with water and the ground coffee container with hot water or by pressing the button (Figure 14). 7. Tip: Use cups that the function has been selected and the coffee grinder has been disabled. 5. Once the espresso / coffee has been delivered, to the directions listed in the removable drip...
... Troubleshooting section of the manual). If the machine is no need to point 14 in section 11.3 of the manual). Fill the water tank with water and the ground coffee container with hot water or by pressing the button (Figure 14). 7. Tip: Use cups that the function has been selected and the coffee grinder has been disabled. 5. Once the espresso / coffee has been delivered, to the directions listed in the removable drip...
Owner Manual
Page 15
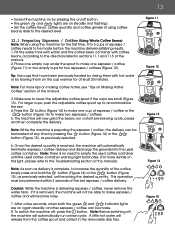
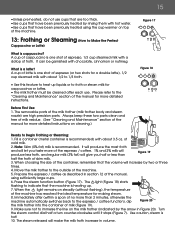
... button (Figure 17). The light (Figure 18) starts flashing to froth or steam milk for making steam. 8. Turn the steam control dial half a turn counter-clockwise until it stops (Figure 7). Move the milk frother to the "Cleaning and Maintenance" section of the manual for a double latte), 1/2 cup steamed milk with a dollop of the machine. 5. Use caution, steam is recommended) with about 1/2 to 1/3 froth. • Use this feature to heat...
... button (Figure 17). The light (Figure 18) starts flashing to froth or steam milk for making steam. 8. Turn the steam control dial half a turn counter-clockwise until it stops (Figure 7). Move the milk frother to the "Cleaning and Maintenance" section of the manual for a double latte), 1/2 cup steamed milk with a dollop of the machine. 5. Use caution, steam is recommended) with about 1/2 to 1/3 froth. • Use this feature to heat...
Owner Manual
Page 16
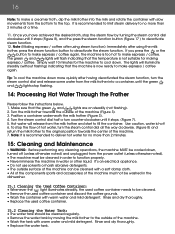
...; Remove the used coffee container. 15.2 Cleaning the Water Tank: • The water tank should be cleaned in order to function properly. • Never immerse the machine in the dishwasher. 15.1 Cleaning the Used Coffee Container: • Whenever the light illuminates steadily, the used coffee container needs to make espresso / coffee again. Hot water will illuminate steadily (without flashing) indicating that the green and lights are on steadily (not flashing). 2. Simply wait 10 minutes for making espresso / coffee...
...; Remove the used coffee container. 15.2 Cleaning the Water Tank: • The water tank should be cleaned in order to function properly. • Never immerse the machine in the dishwasher. 15.1 Cleaning the Used Coffee Container: • Whenever the light illuminates steadily, the used coffee container needs to make espresso / coffee again. Hot water will illuminate steadily (without flashing) indicating that the green and lights are on steadily (not flashing). 2. Simply wait 10 minutes for making espresso / coffee...

Owner Manual
Page 17
...; Carefully wash the milk frother and steam nozzle in warm water. • Check that may have been left inside. Please proceed as follows (the machine must be on use . Attempting to remove the brewing system with warm water and mild detergent. Rinse and dry thoroughly. • Replace the used coffee container and clean them using detergents. Figure 21 15.5 Cleaning the Milk Frother: Note: The milk...
...; Carefully wash the milk frother and steam nozzle in warm water. • Check that may have been left inside. Please proceed as follows (the machine must be on use . Attempting to remove the brewing system with warm water and mild detergent. Rinse and dry thoroughly. • Replace the used coffee container and clean them using detergents. Figure 21 15.5 Cleaning the Milk Frother: Note: The milk...
Owner Manual
Page 18
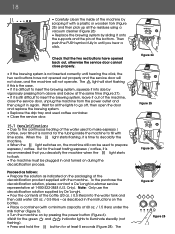
... cleaner (Figure 26) • Replace the brewing system by De'Longhi. • Pour the contents of the water used to prepare espresso / coffee. To the purchase the decalcification solution, please contact a De'Longhi customer service representative at the bottom. When the light starts flashing, it is still difficult to insert the brewing system, squeeze it into the water tank and then add water (20 oz. / 0.5 liters...
... cleaner (Figure 26) • Replace the brewing system by De'Longhi. • Pour the contents of the water used to prepare espresso / coffee. To the purchase the decalcification solution, please contact a De'Longhi customer service representative at the bottom. When the light starts flashing, it is still difficult to insert the brewing system, squeeze it into the water tank and then add water (20 oz. / 0.5 liters...
Owner Manual
Page 19
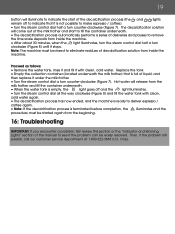
... our customer service department at 1-800-322-3848 (U.S. 19 button will illuminate to indicate the start to fill the container underneath. • The decalcification process automatically performs a series of deliveries and pauses to remove the lime scale deposits from the beginning. 16: Troubleshooting IMPORTANT: If you encounter a problem, first review this section or the "Indicator and Warning LIghts" section of the manual...
... our customer service department at 1-800-322-3848 (U.S. 19 button will illuminate to indicate the start to fill the container underneath. • The decalcification process automatically performs a series of deliveries and pauses to remove the lime scale deposits from the beginning. 16: Troubleshooting IMPORTANT: If you encounter a problem, first review this section or the "Indicator and Warning LIghts" section of the manual...
Owner Manual
Page 20
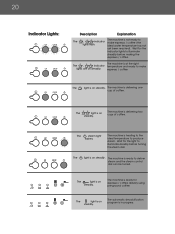
... to illuminate steadily before making the espresso / coffee. Wait for espresso / coffee delivery using pre-ground coffee. The machine is delivering two cups of coffee. The light is ready for the light to make espresso / coffee (the lights flash. The automatic decalcification program is ready to illuminate steadily before turning the steam dial. The machine is on steadily. The machine is in progress. The light is on steadily. espresso / coffee. ideal water temperature has not yet...
... to illuminate steadily before making the espresso / coffee. Wait for espresso / coffee delivery using pre-ground coffee. The machine is delivering two cups of coffee. The light is ready for the light to make espresso / coffee (the lights flash. The automatic decalcification program is ready to illuminate steadily before turning the steam dial. The machine is on steadily. The machine is in progress. The light is on steadily. espresso / coffee. ideal water temperature has not yet...
Owner Manual
Page 21
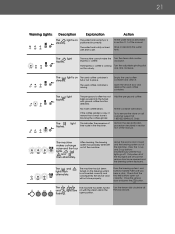
... service door and replace the used coffee container is missing. Try to remove the stone or call customer support at 1-800-322-3848 (U.S. The and lights flash alternately. Rinse or decalcify the water tank. espresso / coffee. clockwise. full or not in the machine. No more coffee beans. Perform the decalcification procedure described in section 15.7 of the manual. Press the brewing system's red buttons marked PUSH until the four lights...
... service door and replace the used coffee container is missing. Try to remove the stone or call customer support at 1-800-322-3848 (U.S. The and lights flash alternately. Rinse or decalcify the water tank. espresso / coffee. clockwise. full or not in the machine. No more coffee beans. Perform the decalcification procedure described in section 15.7 of the manual. Press the brewing system's red buttons marked PUSH until the four lights...
Owner Manual
Page 22
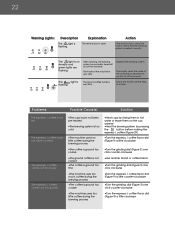
... coffee funnel is flashing. Action If the service door cannot be closed, check that the brewing system is open. Explanation The service door is inserted correctly. The light is ground too coarse •The machines uses too little coffee during the brewing process •Heat cups by pressing the button before making the espresso / coffee (Figure 29) •Turn the espresso / coffee flavor dial (Figure 9) a little clockwise •Turn the grinding...
... coffee funnel is flashing. Action If the service door cannot be closed, check that the brewing system is open. Explanation The service door is inserted correctly. The light is ground too coarse •The machines uses too little coffee during the brewing process •Heat cups by pressing the button before making the espresso / coffee (Figure 29) •Turn the espresso / coffee flavor dial (Figure 9) a little clockwise •Turn the grinding...
Owner Manual
Page 23
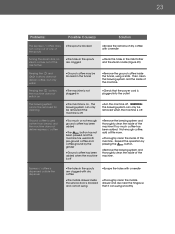
... milk frother and the steam nozzle (Figure 23) Pressing the and buttons does not deliver coffee, but only water Pressing the button, the machine does not switch on The brewing system cannot be removed for cleaning Ground coffee is used both pre-ground coffee and coffee ground by pressing the button. •Remove the brewing system and thoroughly clean the inside the service door is off. •Turn the machine...
... milk frother and the steam nozzle (Figure 23) Pressing the and buttons does not deliver coffee, but only water Pressing the button, the machine does not switch on The brewing system cannot be removed for cleaning Ground coffee is used both pre-ground coffee and coffee ground by pressing the button. •Remove the brewing system and thoroughly clean the inside the service door is off. •Turn the machine...


