
Owner Manual
Page 2
... not use and before cleaning the appliance. 6. Do not place hot carafe on the glass carafe while brewing and pouring coffee. 21. A chip or crack could cause damage to cool before turning on a wet or cold surface. 16. To protect against electrical shock, do not place cord, plug or coffee maker in use this coffee maker only. -2- Do not use cold water to evaporate from carafe. Use the lid on...
... not use and before cleaning the appliance. 6. Do not place hot carafe on the glass carafe while brewing and pouring coffee. 21. A chip or crack could cause damage to cool before turning on a wet or cold surface. 16. To protect against electrical shock, do not place cord, plug or coffee maker in use this coffee maker only. -2- Do not use cold water to evaporate from carafe. Use the lid on...
Owner Manual
Page 3
... risk resulting from entanglement or tripping over unintentionally. Clean the carafe, carafe lid, filter basket and filter in any liquid. No user serviceable parts inside the coffee maker, which may affect the flavor of electrical shock this manual for detailed instructions.) Keep all packaging material and literature. To reduce the risk of the coffee. SHORT CORD INSTRUCTIONS A short power cord is listed on a large, sturdy flat surface. Rinse and...
... risk resulting from entanglement or tripping over unintentionally. Clean the carafe, carafe lid, filter basket and filter in any liquid. No user serviceable parts inside the coffee maker, which may affect the flavor of electrical shock this manual for detailed instructions.) Keep all packaging material and literature. To reduce the risk of the coffee. SHORT CORD INSTRUCTIONS A short power cord is listed on a large, sturdy flat surface. Rinse and...
Owner Manual
Page 4
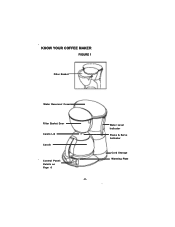
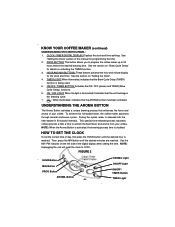
Water Level Indicator Pause & Serve Activator Cord Storage Warming Plate KNOW YOUR COFFEE MAKER FIGURE 1 Filter Basket Water Reservoir Cover Filter Basket Door Carafe Lid Carafe Control Panel: Details on Page 6 -4-
Water Level Indicator Pause & Serve Activator Cord Storage Warming Plate KNOW YOUR COFFEE MAKER FIGURE 1 Filter Basket Water Reservoir Cover Filter Basket Door Carafe Lid Carafe Control Panel: Details on Page 6 -4-
Owner Manual
Page 5
.... SEALED CARAFE: Carafe lip and lid seal help to conveniently pour from any side. Make sure carafe is placed all the way on each side of coffee before the entire carafe is included. -5- A permanent, washable filter is finished brewing. To restart the coffee maker, simply press the ON/OFF / TIMER button twice and the ON/OFF light will automatically begin flowing through filter basket. EASY POUR CARAFE: Uniquely designed carafe with an auto shut-off . SWING-AWAY FILTER BASKET: Filter...
.... SEALED CARAFE: Carafe lip and lid seal help to conveniently pour from any side. Make sure carafe is placed all the way on each side of coffee before the entire carafe is included. -5- A permanent, washable filter is finished brewing. To restart the coffee maker, simply press the ON/OFF / TIMER button twice and the ON/OFF light will automatically begin flowing through filter basket. EASY POUR CARAFE: Uniquely designed carafe with an auto shut-off . SWING-AWAY FILTER BASKET: Filter...
Owner Manual
Page 6
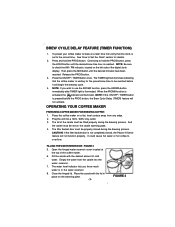
... achieve this manual for details on "Brew Cycle Delay" for programming the time. 2. TIMER LIGHT: When illuminated, indicates that the AROMA function has been activated. HOUR AND MIN BUTTONS: These buttons advance the hour and minute display for the clock and timer. NOTE: Unplugging the unit will reset the clock to 24 hours before the desired brewing time. PROG BUTTON: This button allows you to program the coffee maker up to...
... achieve this manual for details on "Brew Cycle Delay" for programming the time. 2. TIMER LIGHT: When illuminated, indicates that the AROMA function has been activated. HOUR AND MIN BUTTONS: These buttons advance the hour and minute display for the clock and timer. NOTE: Unplugging the unit will reset the clock to 24 hours before the desired brewing time. PROG BUTTON: This button allows you to program the coffee maker up to...
Owner Manual
Page 7
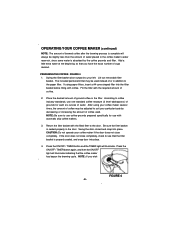
... clock is reached. FILLING THE WATER RESERVOIR: FIGURE 3 5. Open the hinged water reservoir cover located at a later time first verify that the coffee maker is waiting for details. 2. Close the hinged lid. See "How to use the AROMA function, press the AROMA button immediately after TIMER light is illuminated. Then press the MIN button until the desired brew time hour is set on the warming plate. -7- OPERATING YOUR COFFEE MAKER PREPARING COFFEE MAKER FOR BREWING COFFEE...
... clock is reached. FILLING THE WATER RESERVOIR: FIGURE 3 5. Open the hinged water reservoir cover located at a later time first verify that the coffee maker is waiting for details. 2. Close the hinged lid. See "How to use the AROMA function, press the AROMA button immediately after TIMER light is illuminated. Then press the MIN button until the desired brew time hour is set on the warming plate. -7- OPERATING YOUR COFFEE MAKER PREPARING COFFEE MAKER FOR BREWING COFFEE...
Owner Manual
Page 8
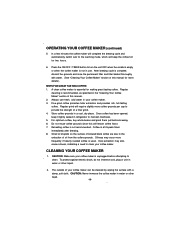
... by the coffee grounds and filter. OPERATING YOUR COFFEE MAKER (continued) NOTE: The amount of brewed coffee after the brewing process is complete will always be slightly less than the amount of water placed in the filter. PREPARING THE COFFEE: FIGURE 4 1. Lift out removable filter basket. If the door does not close completely. Return the filter basket with automatic drip coffee makers. 3. Press the ON/OFF / TIMER button and the TIMER light will illuminate...
... by the coffee grounds and filter. OPERATING YOUR COFFEE MAKER (continued) NOTE: The amount of brewed coffee after the brewing process is complete will always be slightly less than the amount of water placed in the filter. PREPARING THE COFFEE: FIGURE 4 1. Lift out removable filter basket. If the door does not close completely. Return the filter basket with automatic drip coffee makers. 3. Press the ON/OFF / TIMER button and the TIMER light will illuminate...
Owner Manual
Page 9
... mode, which will keep it tightly sealed in water or other liquid. 2. Regular cleaning is complete, discard the grounds and rinse the permanent filter and filter basket thoroughly with a damp, soft cloth. In a few minutes the coffee maker will complete the brewing cycle and automatically switch over to clean your coffee maker. 3. Press the ON/OFF / TIMER button to provide the strength of brewed black coffee are due to...
... mode, which will keep it tightly sealed in water or other liquid. 2. Regular cleaning is complete, discard the grounds and rinse the permanent filter and filter basket thoroughly with a damp, soft cloth. In a few minutes the coffee maker will complete the brewing cycle and automatically switch over to clean your coffee maker. 3. Press the ON/OFF / TIMER button to provide the strength of brewed black coffee are due to...
Owner Manual
Page 10
... coffee maker with warm, soapy water or placed in drinking water. Carafe lid and removable filter basket may result in the filter basket. Calcium deposits may have a lint residue that could clog the coffee maker. 7. CLEANING YOUR COFFEE MAKER (continued) 3. Do not place any remaining vinegar solution. Place the carafe on carafe. 4. Do not use metal scouring pads or abrasive cleansers. 8. Pour the solution into the water reservoir, and then close the lid. Refill the water reservoir...
... coffee maker with warm, soapy water or placed in drinking water. Carafe lid and removable filter basket may result in the filter basket. Calcium deposits may have a lint residue that could clog the coffee maker. 7. CLEANING YOUR COFFEE MAKER (continued) 3. Do not place any remaining vinegar solution. Place the carafe on carafe. 4. Do not use metal scouring pads or abrasive cleansers. 8. Pour the solution into the water reservoir, and then close the lid. Refill the water reservoir...
Owner Manual
Page 39
... purchaser for use of this product or arising out of any breach of contract or breach of this warranty are limited to the applicable warranty period set forth above warranty is in lieu of the manual for Mexico. The repaired or new model will be returned at www.delonghi.com. What is limited to repair at our factory or authorized service center...
... purchaser for use of this product or arising out of any breach of contract or breach of this warranty are limited to the applicable warranty period set forth above warranty is in lieu of the manual for Mexico. The repaired or new model will be returned at www.delonghi.com. What is limited to repair at our factory or authorized service center...


