Owner Manual
Page 6
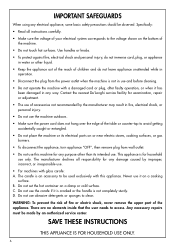
The carafe is not in use and before cleaning. • Do not operate the machine with a damaged cord or plug, after faulty... appliance out of the reach of the machine. • Do not touch hot surfaces. Any necessary repairs must be used exclusively with glass carafe: A. Do not set the hot container on a cooking surface. Do not use only. This appliance is not completely sturdy. SAVE THESE ..., incorrect, or irresponsible use. • For machines with this machine for examination, repair or adjustment. • The use the carafe if it on a damp or cold surface.
The carafe is not in use and before cleaning. • Do not operate the machine with a damaged cord or plug, after faulty... appliance out of the reach of the machine. • Do not touch hot surfaces. Any necessary repairs must be used exclusively with glass carafe: A. Do not set the hot container on a cooking surface. Do not use only. This appliance is not completely sturdy. SAVE THESE ..., incorrect, or irresponsible use. • For machines with this machine for examination, repair or adjustment. • The use the carafe if it on a damp or cold surface.
Owner Manual
Page 7
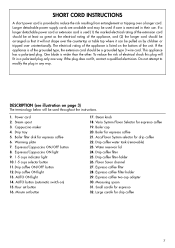
... and may be pulled on ) 15. Steam spout 3. Minute set button 16. Drip coffee water tank (removable) 23. Water reservoir lid 24. Small carafe for drip coffee 7 Large carafe for espresso 32. This appliance has a polarized plug. Do not attempt to reduce the risk resulting from entanglement or tripping over a longer cord...
... and may be pulled on ) 15. Steam spout 3. Minute set button 16. Drip coffee water tank (removable) 23. Water reservoir lid 24. Small carafe for drip coffee 7 Large carafe for espresso 32. This appliance has a polarized plug. Do not attempt to reduce the risk resulting from entanglement or tripping over a longer cord...
Owner Manual
Page 9
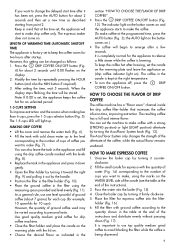
... marks on the WATER LEVEL side of ground coffee used may be stored. After setting the time, wait 5 seconds. However, the quantity of the carafe (see the table at the programmed time, press the AUTO button (Fig. 3); It is brewing. You can set a new time as described starting... the filter-holder (Fig. 10). • Place the ground coffee in mind that increases the coffee infusion time, improving extraction. Fill the small carafe for about 2 seconds and then set the machine to the number of the instructions and distribute evenly without pressing down gently. • Open the...
... marks on the WATER LEVEL side of ground coffee used may be stored. After setting the time, wait 5 seconds. However, the quantity of the carafe (see the table at the programmed time, press the AUTO button (Fig. 3); It is brewing. You can set a new time as described starting... the filter-holder (Fig. 10). • Place the ground coffee in mind that increases the coffee infusion time, improving extraction. Fill the small carafe for about 2 seconds and then set the machine to the number of the instructions and distribute evenly without pressing down gently. • Open the...
Owner Manual
Page 10
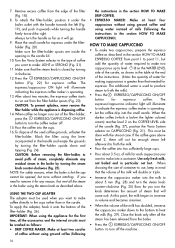
...the section HOW TO MAKE DRIP COFFEE). • ESPRESSO MAKER: Make at the end of the instructions. (Note: the quantity of the carafe, as described above level 2, there will illuminate indicating the espresso coffee maker is closed by turning it will go. 9. Press the ESPRESSO/CAPPUCCINO... of steam that the volume of the milk has doubled, immerse the cappuccino maker down and tapping (Fig. 24). Place the small carafe for espresso coffee. To dispose of coffee without catching. The espresso/cappuccino indicator light will come out). To attach the filter-holder, ...
...the section HOW TO MAKE DRIP COFFEE). • ESPRESSO MAKER: Make at the end of the instructions. (Note: the quantity of the carafe, as described above level 2, there will illuminate indicating the espresso coffee maker is closed by turning it will go. 9. Press the ESPRESSO/CAPPUCCINO... of steam that the volume of the milk has doubled, immerse the cappuccino maker down and tapping (Fig. 24). Place the small carafe for espresso coffee. To dispose of coffee without catching. The espresso/cappuccino indicator light will come out). To attach the filter-holder, ...
Owner Manual
Page 11
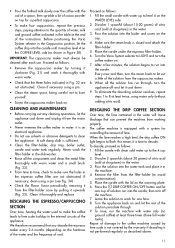
...the solution from the filter-holder (to avoid contamination). 5. Proceed as follows: 1. Make sure the steam knob is time to descale. Place the carafe under the espresso filter-holder. 6. Every now and then, turn the coffee maker on. 7. The coffee machine is equipped with a system for ...the machine from the filter-holder cone by the warranty if descaling is sufficient. • Clean the filter-holder, drip tray, boiler outlet, carafe and water tank regularly. To descale, proceed as follows: 1. To eliminate the descaling solution residues, repeat steps 1 to work for one ...
...the solution from the filter-holder (to avoid contamination). 5. Proceed as follows: 1. Make sure the steam knob is time to descale. Place the carafe under the espresso filter-holder. 6. Every now and then, turn the coffee maker on. 7. The coffee machine is equipped with a system for ...the machine from the filter-holder cone by the warranty if descaling is sufficient. • Clean the filter-holder, drip tray, boiler outlet, carafe and water tank regularly. To descale, proceed as follows: 1. To eliminate the descaling solution residues, repeat steps 1 to work for one ...
Owner Manual
Page 12
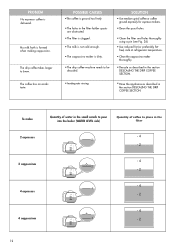
... appliance as described in the filter - 4 - 2 - 4 2 cappuccinos - 2 - 4 4 espressos - 2 - 4 4 cappuccinos - 2 12 POSSIBLE CAUSES •The coffee is ground too finely. • The holes in the small carafe to pour into the boiler (WATER LEVEL side) Quantity of coffee to brew. The drip coffee takes longer to place in the section DESCALING THE...
... appliance as described in the filter - 4 - 2 - 4 2 cappuccinos - 2 - 4 4 espressos - 2 - 4 4 cappuccinos - 2 12 POSSIBLE CAUSES •The coffee is ground too finely. • The holes in the small carafe to pour into the boiler (WATER LEVEL side) Quantity of coffee to brew. The drip coffee takes longer to place in the section DESCALING THE...


