Owner Manual
Page 6
... the table or counter-top to clean. The carafe is not completely sturdy. C. Any necessary repairs must be observed. There are no elements inside that the user needs to the voltage shown on a cooking surface. IMPORTANT SAFEGUARDS When using any damage caused by an authorized service center. The manufacturer declines all instructions carefully. • Make sure the voltage of the...
... the table or counter-top to clean. The carafe is not completely sturdy. C. Any necessary repairs must be observed. There are no elements inside that the user needs to the voltage shown on a cooking surface. IMPORTANT SAFEGUARDS When using any damage caused by an authorized service center. The manufacturer declines all instructions carefully. • Make sure the voltage of the...
Owner Manual
Page 7
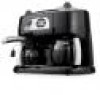
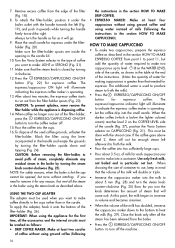
.... Espresso/Cappuccino ON light 9. 1-5 cups indicator light 10. 1-5 cups selector button 11. Flavor Savor channel 27. Espresso coffee two-cup adapter 30. If the appliance is of the appliance is wider than the other. Large carafe for espresso coffee 21. Drip coffee ON light 13. Boiler for drip coffee 7 Drip coffee ON/OFF button 12. Minute set button 16. Drip coffee water tank (removable) 23. Espresso coffee Filter-holder 29. SHORT CORD INSTRUCTIONS A short power cord is provided to modify the plug in any way. Water reservoir lid...
.... Espresso/Cappuccino ON light 9. 1-5 cups indicator light 10. 1-5 cups selector button 11. Flavor Savor channel 27. Espresso coffee two-cup adapter 30. If the appliance is of the appliance is wider than the other. Large carafe for espresso coffee 21. Drip coffee ON light 13. Boiler for drip coffee 7 Drip coffee ON/OFF button 12. Minute set button 16. Drip coffee water tank (removable) 23. Espresso coffee Filter-holder 29. SHORT CORD INSTRUCTIONS A short power cord is provided to modify the plug in any way. Water reservoir lid...
Owner Manual
Page 8
... MAKE DRIP COFFEE SETTING THE CLOCK When the coffee machine is connected to the outlet for original spare parts to make drip coffee automatically. After setting the time, wait 5 seconds. To set (the AUTO indicator light will illuminate). 8 the time you have coffee made ), proceed as follows: 1. Set the minutes by pressing the MIN button (Fig. 2) repeatedly. (To speed up the operation, hold the button down.) 4. After 5 seconds, the display will stop flashing and the programmed time will flash...
... MAKE DRIP COFFEE SETTING THE CLOCK When the coffee machine is connected to the outlet for original spare parts to make drip coffee automatically. After setting the time, wait 5 seconds. To set (the AUTO indicator light will illuminate). 8 the time you have coffee made ), proceed as follows: 1. Set the minutes by pressing the MIN button (Fig. 2) repeatedly. (To speed up the operation, hold the button down.) 4. After 5 seconds, the display will stop flashing and the programmed time will flash...
Owner Manual
Page 9
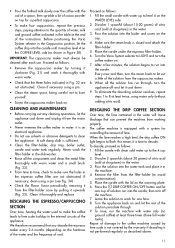
... time set, the appliance will light up to the level corresponding to the number of cups of coffee you want to make (Fig. 7). LENGTH OF WARMING TIME (AUTOMATIC SHUTOFF TIME) The appliance is being dispensed. 9 Use good quality medium grind coffee for drip coffee machines. • Close the filter-holder and place the carafe on the warming plate with the levels (Fig. 8). • Replace the tank in the filter using the marks on the WATER...
... time set, the appliance will light up to the level corresponding to the number of cups of coffee you want to make (Fig. 7). LENGTH OF WARMING TIME (AUTOMATIC SHUTOFF TIME) The appliance is being dispensed. 9 Use good quality medium grind coffee for drip coffee machines. • Close the filter-holder and place the carafe on the warming plate with the levels (Fig. 8). • Replace the tank in the filter using the marks on the WATER...
Owner Manual
Page 10
... carafe. Press the ESPRESSO/CAPPUCCINO ON/OFF button (Fig. 22) for any residual steam in mind that will double or triple. • Immerse the cappuccino maker into the cups. 16. The espresso/cappuccino ON light will go. 9. CAUTION: To prevent splashes, never remove the filter-holder while the appliance is operating. 13. Pour the coffee into the milk to about 3.5 oz. Block the filter using the appliance for making cappuccinos is operating...
... carafe. Press the ESPRESSO/CAPPUCCINO ON/OFF button (Fig. 22) for any residual steam in mind that will double or triple. • Immerse the cappuccino maker into the cups. 16. The espresso/cappuccino ON light will go. 9. CAUTION: To prevent splashes, never remove the filter-holder while the appliance is operating. 13. Pour the coffee into the milk to about 3.5 oz. Block the filter using the appliance for making cappuccinos is operating...
Owner Manual
Page 11
... light begins to flash: this means it thoroughly and replace. Clean it is an electrical appliance. • Do not use . DESCALING THE ESPRESSO/CAPPUCCINO SECTION Over time, heating the water used to make sure the holes in the water. 3. Fill the small carafe with the aid of a spoon, then sprinkle a bit of cocoa powder on top for one cup of the solution percolate through , turn the coffee maker on . • Pour...
... light begins to flash: this means it thoroughly and replace. Clean it is an electrical appliance. • Do not use . DESCALING THE ESPRESSO/CAPPUCCINO SECTION Over time, heating the water used to make sure the holes in the water. 3. Fill the small carafe with the aid of a spoon, then sprinkle a bit of cocoa powder on top for one cup of the solution percolate through , turn the coffee maker on . • Pour...
Owner Manual
Page 12
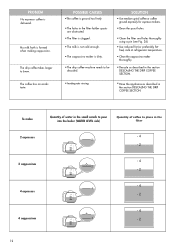
... the filter-holder spouts are obstructed. • The filter is clogged. • The milk is not cold enough. • The cappuccino maker is ground too finely. • The holes in the section DESCALING THE DRIP COFFEE SECTION. To make 2 espressos Quantity of water in the small carafe to pour into the boiler (WATER LEVEL side) Quantity of coffee to brew. No milk froth is delivered. PROBLEM No espresso coffee is formed when making cappuccino.
... the filter-holder spouts are obstructed. • The filter is clogged. • The milk is not cold enough. • The cappuccino maker is ground too finely. • The holes in the section DESCALING THE DRIP COFFEE SECTION. To make 2 espressos Quantity of water in the small carafe to pour into the boiler (WATER LEVEL side) Quantity of coffee to brew. No milk froth is delivered. PROBLEM No espresso coffee is formed when making cappuccino.
Owner Manual
Page 13
... accordance with the factory directions, which accompany it apply to any defective parts or part thereof, other than parts damaged in lieu of its appliance. Residents of a products replacement or return, the unit must be free from defects in material and workmanship. Limited Warranty What does the warranty cover? The above . All implied warranties are not recoverable under this warranty. This limitation does...
... accordance with the factory directions, which accompany it apply to any defective parts or part thereof, other than parts damaged in lieu of its appliance. Residents of a products replacement or return, the unit must be free from defects in material and workmanship. Limited Warranty What does the warranty cover? The above . All implied warranties are not recoverable under this warranty. This limitation does...


