Product Manual
Page 6
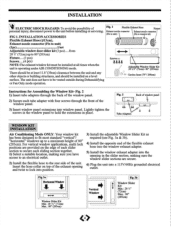
... screws in the slider section, making sure you have to 80"(203cm) pcs) Screws.....(4 pcs) NOTE:The exhaust/window kit must be ventd outside during Dehumidifying or Fan Only mode operation. Fig. 2 1) Loser tubo adaptors through the front of the window panel. 3) Insert window panel extensions into the window exhaust adapter...
... screws in the slider section, making sure you have to 80"(203cm) pcs) Screws.....(4 pcs) NOTE:The exhaust/window kit must be ventd outside during Dehumidifying or Fan Only mode operation. Fig. 2 1) Loser tubo adaptors through the front of the window panel. 3) Insert window panel extensions into the window exhaust adapter...
Product Manual
Page 7
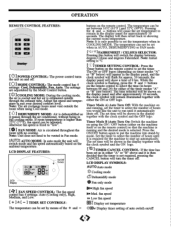
...it automatically shuts off . (O1MODE CONTROL: The mode control has 4 settinms: Cool, Ilehumlay,_Fan, Auto. otherwise an speed is dehumidified as in AUTO, DEHUMIDIFYING or FAN mode. 01 POWER CONTROL: The power control turns the unit on the remote control to select the time (in hours...In auto mode the unit will turn the tuner off 0 The set between t isCelsius and degrees Fahrenheit. LCD DISPLAY SYMBOL& AUTOAuto mode o Cooling mode Dehumidify mode Fan only mode ot'I FAN SPEED CONTROL: The fan ',Inca control haasn4dsettings: Auto (coormg only , High, Medium, Low. + I TEMP. ...
...it automatically shuts off . (O1MODE CONTROL: The mode control has 4 settinms: Cool, Ilehumlay,_Fan, Auto. otherwise an speed is dehumidified as in AUTO, DEHUMIDIFYING or FAN mode. 01 POWER CONTROL: The power control turns the unit on the remote control to select the time (in hours...In auto mode the unit will turn the tuner off 0 The set between t isCelsius and degrees Fahrenheit. LCD DISPLAY SYMBOL& AUTOAuto mode o Cooling mode Dehumidify mode Fan only mode ot'I FAN SPEED CONTROL: The fan ',Inca control haasn4dsettings: Auto (coormg only , High, Medium, Low. + I TEMP. ...
Product Manual
Page 8
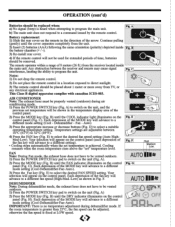
Continue pulling (gently) until the cover separates completely from the receiver located inside the battery chamber (+; 3) Re-install rear cover. 4) If the remote control will not be used for extended periods of time, batteries CWOI should be removed. Mg. OPERATION (cont'd) Batteries should be replaced when: a) No signal (beep) is beard when attempting to program the main unit. The remote operates within a range of the arrow. Battery replacement: 1) Slide the rear cover on the remote in the direction of 8 meters (26 ft.) from the unit. 2) Insert (2) batteries (AAA) following...
Continue pulling (gently) until the cover separates completely from the receiver located inside the battery chamber (+; 3) Re-install rear cover. 4) If the remote control will not be used for extended periods of time, batteries CWOI should be removed. Mg. OPERATION (cont'd) Batteries should be replaced when: a) No signal (beep) is beard when attempting to program the main unit. The remote operates within a range of the arrow. Battery replacement: 1) Slide the rear cover on the remote in the direction of 8 meters (26 ft.) from the unit. 2) Insert (2) batteries (AAA) following...
