Product Manual
Page 2
To contact a Customer Service Representative, call Danby TOLL FREE: 1-800-26(1-800-263-2629) KEEP THESE INSTRUCTIONS FOR FUTURE REFERENCE. Please take a few moments to read the instructions thoroughly and familiarize yourself with all of the "Home Comfort" requirements of your home, cottage, or ...office. For easy reference, may we suggest you many years of trouble free operation. If properly maintained, your Danby appliance will be conveniently...
To contact a Customer Service Representative, call Danby TOLL FREE: 1-800-26(1-800-263-2629) KEEP THESE INSTRUCTIONS FOR FUTURE REFERENCE. Please take a few moments to read the instructions thoroughly and familiarize yourself with all of the "Home Comfort" requirements of your home, cottage, or ...office. For easy reference, may we suggest you many years of trouble free operation. If properly maintained, your Danby appliance will be conveniently...
Product Manual
Page 3
...wiring and fuses checked by the person(s) installing, maintaining, or operating the appliance. If it and correct any problems. SAVE THESE INSTRUCTIONS! 2 For Danby Customer Service call 1-800-26- (1-800-263-2629) ELECTRICAL To reduce the risk of fire, electric shock, or personal injury,...Hertz (alternating current) circuit protected by providing a path of least resistance for electrical current. IMPORTANT SAFETY INFORMATION NOTE The WARNING instructions issued in this manual are not meant to cover all possible conditions and situations that may result in conditions which can result ...
...wiring and fuses checked by the person(s) installing, maintaining, or operating the appliance. If it and correct any problems. SAVE THESE INSTRUCTIONS! 2 For Danby Customer Service call 1-800-26- (1-800-263-2629) ELECTRICAL To reduce the risk of fire, electric shock, or personal injury,...Hertz (alternating current) circuit protected by providing a path of least resistance for electrical current. IMPORTANT SAFETY INFORMATION NOTE The WARNING instructions issued in this manual are not meant to cover all possible conditions and situations that may result in conditions which can result ...
Product Manual
Page 4
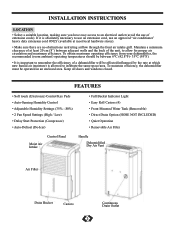
... (room ambient) operating temperatures should be between adjacent walls and the back of the unit, to allow for proper air circulation and maximum efficiency. INSTALLATION INSTRUCTIONS LOCATION • Select a suitable location, making sure you have easy access to an electrical outlet (avoid the use an approved "air conditioner" heavy duty extension...
... (room ambient) operating temperatures should be between adjacent walls and the back of the unit, to allow for proper air circulation and maximum efficiency. INSTALLATION INSTRUCTIONS LOCATION • Select a suitable location, making sure you have easy access to an electrical outlet (avoid the use an approved "air conditioner" heavy duty extension...
Product Manual
Page 5
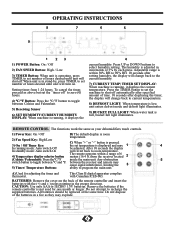
... proper direction. Press UP or DOWN buttons to recharge the supplied batteries. BATTERIES: Remove the cover on . Do not attempt to select humidity setting. OPERATING INSTRUCTIONS 8 7 6 5 9 1 23 1) POWER Button: On / Off 2) FAN SPEED Button: High / Low 3) TIMER Button: When unit is operating, press TIMER to set number of hours desired until...
... proper direction. Press UP or DOWN buttons to recharge the supplied batteries. BATTERIES: Remove the cover on . Do not attempt to select humidity setting. OPERATING INSTRUCTIONS 8 7 6 5 9 1 23 1) POWER Button: On / Off 2) FAN SPEED Button: High / Low 3) TIMER Button: When unit is operating, press TIMER to set number of hours desired until...
Product Manual
Page 6
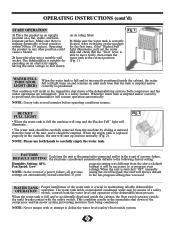
... defeat the water level (safety) float switch system. 5 WATER TANK OPERATION Proper installation of the dehumidification process. NOTE: Never tamper with the safety switch. OPERATING INSTRUCTIONS (cont'd) START OPERATION 1) Place the product in any other position could cause a hazard. 2) Insert the plug into a suitable wall socket. If your program setting was...
... defeat the water level (safety) float switch system. 5 WATER TANK OPERATION Proper installation of the dehumidification process. NOTE: Never tamper with the safety switch. OPERATING INSTRUCTIONS (cont'd) START OPERATION 1) Place the product in any other position could cause a hazard. 2) Insert the plug into a suitable wall socket. If your program setting was...
Product Manual
Page 7
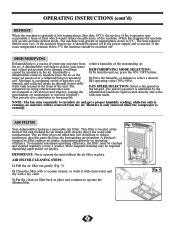
OPERATING INSTRUCTIONS (cont'd) DEFROST When the machine is operated at low temperatures (less than 18°C), the surface of the evaporator may accumulate a layer of frost which ...
OPERATING INSTRUCTIONS (cont'd) DEFROST When the machine is operated at low temperatures (less than 18°C), the surface of the evaporator may accumulate a layer of frost which ...
Product Manual
Page 8
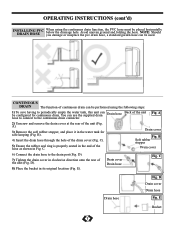
... cover Fig. D). 7) Tighten the drain cover in its original location (Fig. D). 8) Place the bucket in clockwise direction onto the rear of the unit Fig. OPERATING INSTRUCTIONS (cont'd) INSTALLING PVC DRAIN HOSE When using the following steps: 1) To save having to periodically empty the water tank, this unit can be configured for...
... cover Fig. D). 7) Tighten the drain cover in its original location (Fig. D). 8) Place the bucket in clockwise direction onto the rear of the unit Fig. OPERATING INSTRUCTIONS (cont'd) INSTALLING PVC DRAIN HOSE When using the following steps: 1) To save having to periodically empty the water tank, this unit can be configured for...
Product Manual
Page 10
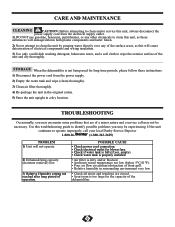
... the power supply cord from the electrical supply outlet. 1) DO NOT use gasoline, benezene, paint thinner, or any of the surface areas, as these instructions: 1) Disconnect the power cord from the power supply. 2) Empty the water tank and wipe (clean) thoroughly. 3) Clean air filter thoroughly. 4) Re...are of the unit and dry thoroughly. If the unit continues to wipe the exterior surface of a minor nature and a service call your local Danby Service Depot or 1-800-26- (1-800-263-2629) PROBLEM 1) Unit will damage/deform both plastic components and luster finish. 2) Never attempt ...
... the power supply cord from the electrical supply outlet. 1) DO NOT use gasoline, benezene, paint thinner, or any of the surface areas, as these instructions: 1) Disconnect the power cord from the power supply. 2) Empty the water tank and wipe (clean) thoroughly. 3) Clean air filter thoroughly. 4) Re...are of the unit and dry thoroughly. If the unit continues to wipe the exterior surface of a minor nature and a service call your local Danby Service Depot or 1-800-26- (1-800-263-2629) PROBLEM 1) Unit will damage/deform both plastic components and luster finish. 2) Never attempt ...
