Product Manual
Page 2
... INSTRUCTIONS FOR FUTURE REFERENCE. CAUTION: Do not leave this unit unattended or operate in an area where people or animals may not be necessary if your unit requires servicing and/or for the proper care and maintenance of your new appliance. Model Number: Serial Number: Date of your home, cottage, or office. This Owner's Use and Care Guide will give you attach...
... INSTRUCTIONS FOR FUTURE REFERENCE. CAUTION: Do not leave this unit unattended or operate in an area where people or animals may not be necessary if your unit requires servicing and/or for the proper care and maintenance of your new appliance. Model Number: Serial Number: Date of your home, cottage, or office. This Owner's Use and Care Guide will give you attach...
Product Manual
Page 3
... wiring and fuses checked by a qualified electrician to make sure adequate electrical power is available. • This appliance is the customer's responsibility to operate on the power cord should be plugged directly into a polarized, three slot, effectively grounded receptacle rated 110/120 V.A.C. The plug must be connected into an outlet that is properly installed and grounded in accordance with all local codes...
... wiring and fuses checked by a qualified electrician to make sure adequate electrical power is available. • This appliance is the customer's responsibility to operate on the power cord should be plugged directly into a polarized, three slot, effectively grounded receptacle rated 110/120 V.A.C. The plug must be connected into an outlet that is properly installed and grounded in accordance with all local codes...
Product Manual
Page 4
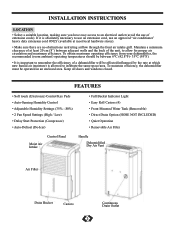
...) • Delay Start Protection (Compressor) • Auto-Defrost (De-Icer) • Full Bucket Indicator Light • Easy Roll Castors (4) • Front Mounted Water Tank (Removable) • Direct Drain Option (HOSE NOT INCLUDED) • Quiet Operation • Removable Air Filter Control Panel Moist Air Intake Handle Dehumidified Dry Air Vent Air Filter Drain Bucket Castors 3 Continuous Drain Outlet INSTALLATION INSTRUCTIONS LOCATION • Select a suitable location, making sure you have easy access to an electrical outlet (avoid the use an approved "air conditioner" heavy...
...) • Delay Start Protection (Compressor) • Auto-Defrost (De-Icer) • Full Bucket Indicator Light • Easy Roll Castors (4) • Front Mounted Water Tank (Removable) • Direct Drain Option (HOSE NOT INCLUDED) • Quiet Operation • Removable Air Filter Control Panel Moist Air Intake Handle Dehumidified Dry Air Vent Air Filter Drain Bucket Castors 3 Continuous Drain Outlet INSTALLATION INSTRUCTIONS LOCATION • Select a suitable location, making sure you have easy access to an electrical outlet (avoid the use an approved "air conditioner" heavy...
Product Manual
Page 5
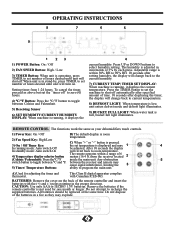
... Sensor 6) SET HUMIDITY/CURRENT HUMIDITY DISPLAY: When machine is not used for adjusting the timer and thermostat. Press UP or DOWN buttons to recharge the supplied batteries. Any obstruction 5 switch button to current temperauture. 8) DEFROST LIGHT: When temperature is low, unit enters defrost mode and defrost light illuminates. 9) BUCKET FULL LIGHT: When water tank is full, bucket full light illuminates. A) Used for one month or longer. Remove the batteries if the remote controller is running, it displays...
... Sensor 6) SET HUMIDITY/CURRENT HUMIDITY DISPLAY: When machine is not used for adjusting the timer and thermostat. Press UP or DOWN buttons to recharge the supplied batteries. Any obstruction 5 switch button to current temperauture. 8) DEFROST LIGHT: When temperature is low, unit enters defrost mode and defrost light illuminates. 9) BUCKET FULL LIGHT: When water tank is full, bucket full light illuminates. A) Used for one month or longer. Remove the batteries if the remote controller is running, it displays...
Product Manual
Page 6
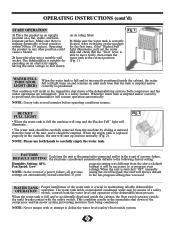
... switch, controls both the water level and operation of the dehumidifying system (both hands to carefully empty the water tank. OPERATING INSTRUCTIONS (cont'd) START OPERATION 1) Place the product in an upright position on /off keypad) the unit will always default to the last program setting that the tank is emptied and/or LIGHT (RED) correctly re-positioned. NOTE: Please use both compressor and fan motor operations are automatically erased/cancelled. WATER TANK OPERATION Proper installation...
... switch, controls both the water level and operation of the dehumidifying system (both hands to carefully empty the water tank. OPERATING INSTRUCTIONS (cont'd) START OPERATION 1) Place the product in an upright position on /off keypad) the unit will always default to the last program setting that the tank is emptied and/or LIGHT (RED) correctly re-positioned. NOTE: Please use both compressor and fan motor operations are automatically erased/cancelled. WATER TANK OPERATION Proper installation...
Product Manual
Page 7
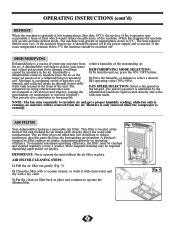
... air passes over a dehumidifying (evaporator) coil. To maintain maximum operating efficiency, the filter must be removed from damage (swelling) caused by the (illuminated) indicator light located directly above the water tank compartment. More frequent cleaning may vary. Fig. 4 6 A dehumidifier will operate in the air. Moisture is only removed when the compressor is condensed on , press the ON / OFF button. 2) Press the humidity or buttons to defrost may be turned off . A blocked / clogged air filter reduces air...
... air passes over a dehumidifying (evaporator) coil. To maintain maximum operating efficiency, the filter must be removed from damage (swelling) caused by the (illuminated) indicator light located directly above the water tank compartment. More frequent cleaning may vary. Fig. 4 6 A dehumidifier will operate in the air. Moisture is only removed when the compressor is condensed on , press the ON / OFF button. 2) Press the humidity or buttons to defrost may be turned off . A blocked / clogged air filter reduces air...
Product Manual
Page 8
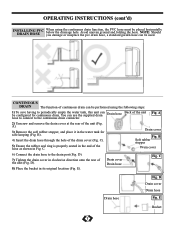
... rubber stopper Drain cover 6) Connect the drain hose to the continuous drain connector. 2) Unscrew and remove the drain cover at the rear of the unit Fig. D Drain cover Drain hose Fig. NOTE: Should you damage or misplace the pvc drain hose, a standard garden hose can use the supplied drain Drain hose Back of the unit (Fig. C Drain hose Fig. D). 7) Tighten the drain cover in Fig. CONTINUOUS DRAIN The function of the unit (Fig. E). OPERATING INSTRUCTIONS (cont'd) INSTALLING PVC DRAIN HOSE When using the following...
... rubber stopper Drain cover 6) Connect the drain hose to the continuous drain connector. 2) Unscrew and remove the drain cover at the rear of the unit Fig. D Drain cover Drain hose Fig. NOTE: Should you damage or misplace the pvc drain hose, a standard garden hose can use the supplied drain Drain hose Back of the unit (Fig. C Drain hose Fig. D). 7) Tighten the drain cover in Fig. CONTINUOUS DRAIN The function of the unit (Fig. E). OPERATING INSTRUCTIONS (cont'd) INSTALLING PVC DRAIN HOSE When using the following...
Product Manual
Page 9
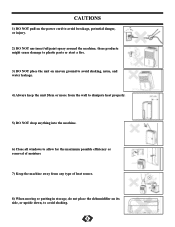
...these products might cause damage to plastic parts or start a fire. 3) DO NOT place the unit on uneven ground to avoid shaking, noise, and water leakage. 4) Always keep the unit 20cm or more from the wall to dissipate heat properly. 5) DO NOT drop anything into the machine. 6) Close all windows ...to allow for the maximum possible efficiency or removal of moisture 7) Keep the machine away from any type of heat source. 8) When moving or putting in storage, do not place the dehumidifier on the power cord to avoid shaking. 8 CAUTIONS 1) DO NOT ...
...these products might cause damage to plastic parts or start a fire. 3) DO NOT place the unit on uneven ground to avoid shaking, noise, and water leakage. 4) Always keep the unit 20cm or more from the wall to dissipate heat properly. 5) DO NOT drop anything into the machine. 6) Close all windows ...to allow for the maximum possible efficiency or removal of moisture 7) Keep the machine away from any type of heat source. 8) When moving or putting in storage, do not place the dehumidifier on the power cord to avoid shaking. 8 CAUTIONS 1) DO NOT ...
Product Manual
Page 10
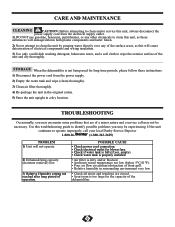
... blown fuse. • Check if water tank is full (if yes, empty). • Check water tank is properly installed. • Air filter is dirty and/or blocked. • Ambient (room) temperature too low (below 5°C/41°F). • Poor air flow circulation/obstruction of front grill. • Relative humidity in a dry location. TROUBLESHOOTING Occasionally, you may not be experiencing. Use this will not operate. 2) Dehumidifying capacity (moisture removal) low. 3) Relative Humidity setting...
... blown fuse. • Check if water tank is full (if yes, empty). • Check water tank is properly installed. • Air filter is dirty and/or blocked. • Ambient (room) temperature too low (below 5°C/41°F). • Poor air flow circulation/obstruction of front grill. • Relative humidity in a dry location. TROUBLESHOOTING Occasionally, you may not be experiencing. Use this will not operate. 2) Dehumidifying capacity (moisture removal) low. 3) Relative Humidity setting...
Product Manual
Page 20
.../or the location of the unit. Model • Modèle DDR5009REE, DDR6009REE, DDR7009REE For service, contact your nearest service depot or call the TOLL FREE NUMBER. Toutes les pièces de rechange ou commandes spéciales sont disponibles à votre centre de service régional autorisé. All repair parts are available for purchase or special order...
.../or the location of the unit. Model • Modèle DDR5009REE, DDR6009REE, DDR7009REE For service, contact your nearest service depot or call the TOLL FREE NUMBER. Toutes les pièces de rechange ou commandes spéciales sont disponibles à votre centre de service régional autorisé. All repair parts are available for purchase or special order...


