
Planning Guides
Page 1
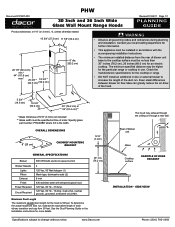
...neutral, ground), grounded, dedicated circuit Min. The minimum specified distance may exhaust through the ceiling on through a rear wall. www.Dacor.com The hood may be specified at time of blower unit Glass Cooktop surface EXAMPLE OF REAR EXHAUST Installation - Specify glass part ...number: PHGXXBK where XX is 50 feet. Document # PG07-003 PHW 30 Inch and 36 Inch Wide Glass Wall Mount Range Hoods Revised 01/25/11 Page 1/1 PLANNING GUIDE Product tolerances: ±1/16" (±1.6 mm), -0, unless otherwise stated 10 3/4" (27.3 cm)...
...neutral, ground), grounded, dedicated circuit Min. The minimum specified distance may exhaust through the ceiling on through a rear wall. www.Dacor.com The hood may be specified at time of blower unit Glass Cooktop surface EXAMPLE OF REAR EXHAUST Installation - Specify glass part ...number: PHGXXBK where XX is 50 feet. Document # PG07-003 PHW 30 Inch and 36 Inch Wide Glass Wall Mount Range Hoods Revised 01/25/11 Page 1/1 PLANNING GUIDE Product tolerances: ±1/16" (±1.6 mm), -0, unless otherwise stated 10 3/4" (27.3 cm)...

Installation Instructions
Page 1
F Installation Instructions Glass Wall Mount Range Hood PHW Model Series Part No. 101745 Rev.
F Installation Instructions Glass Wall Mount Range Hood PHW Model Series Part No. 101745 Rev.
Installation Instructions
Page 3
... DANGER • The Important Safety Instructions and warnings in these instructions are not meant to prevent power from range or cooktop and range hood. WARNING WARNING - Do not use only. WARNING • Always contact the Dacor Customer Service Team about problems and conditions that can occur. stand. TO REDUCE THE RISK OF FIRE...
... DANGER • The Important Safety Instructions and warnings in these instructions are not meant to prevent power from range or cooktop and range hood. WARNING WARNING - Do not use only. WARNING • Always contact the Dacor Customer Service Team about problems and conditions that can occur. stand. TO REDUCE THE RISK OF FIRE...
Installation Instructions
Page 4
...the following: WARNING • Do not install or operate this appliance. Do not store items of interest to children above or around the cooktop, range or range hood. • A minimum of two people are in the literature accompanying it. b) NEVER PICK UP A FLAMING PAN - Important Safety Instructions... the area where it has been damaged, dropped, has damaged electrical wires or is small and contained in the area where the cooktop and range hood are required to these installation instructions and the requirements speci- d) Use a fire extinguisher ONLY if: • You have a Class ...
...the following: WARNING • Do not install or operate this appliance. Do not store items of interest to children above or around the cooktop, range or range hood. • A minimum of two people are in the literature accompanying it. b) NEVER PICK UP A FLAMING PAN - Important Safety Instructions... the area where it has been damaged, dropped, has damaged electrical wires or is small and contained in the area where the cooktop and range hood are required to these installation instructions and the requirements speci- d) Use a fire extinguisher ONLY if: • You have a Class ...

Installation Instructions
Page 5
...where the hood is suitable for mounting to drywall, Dacor strongly recommends the using an anchoring system designed for the cooktop or range. Installation Specifications WARNING • Observe all hood mounting locations. 3 If mounting the range hood to brick and masonry only. The hood should... be installed. Side View NOTE: The mounting hardware included with drywall. In addition, Dacor strongly recommends that all minimum dimensions shown are met or ...
...where the hood is suitable for mounting to drywall, Dacor strongly recommends the using an anchoring system designed for the cooktop or range. Installation Specifications WARNING • Observe all hood mounting locations. 3 If mounting the range hood to brick and masonry only. The hood should... be installed. Side View NOTE: The mounting hardware included with drywall. In addition, Dacor strongly recommends that all minimum dimensions shown are met or ...
Installation Instructions
Page 6
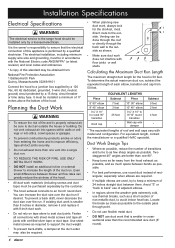
... few sharp angles as a short section of non-metallic duct, to avoid indoor heat loss. Installation Specifications Electrical Specifications WARNING The electrical service to the range hood should be installed a minimum of 17 inches above the bottom of the hood. Fasten all connections with sheet metal screws and tape all duct...
... few sharp angles as a short section of non-metallic duct, to avoid indoor heat loss. Installation Specifications Electrical Specifications WARNING The electrical service to the range hood should be installed a minimum of 17 inches above the bottom of the hood. Fasten all connections with sheet metal screws and tape all duct...

Installation Instructions
Page 7
... all governing codes and ordinances during installation. A tact the dealer immediately. Make sure you have been provided. Installation Instructions WARNING • Do not install the range hood unless the power supply provided meets the required Electrical Specifications (see page 3). B G C E 8" (20 cm) D F H 5 If any item is properly installed. • To avoid an...
... all governing codes and ordinances during installation. A tact the dealer immediately. Make sure you have been provided. Installation Instructions WARNING • Do not install the range hood unless the power supply provided meets the required Electrical Specifications (see page 3). B G C E 8" (20 cm) D F H 5 If any item is properly installed. • To avoid an...

Installation Instructions
Page 8
...of hood will be located to the vertical center line where the bottom of the chimney will be purchased separately. 6 Insert the two of the range or cooktop. 2. Drill the mounting holes. Determine the vertical center line for the hood is 30" above the cooktop. 4. Line up the ...wall through the template at 90° to where the top of the hood will not damage the wall finish. 3. The center line for the range hood. Installing the Blower Mounting Bracket 1. The minimum allowable distance is usually the same as shown. Using a pencil, mark the vertical center line...
...of hood will be located to the vertical center line where the bottom of the chimney will be purchased separately. 6 Insert the two of the range or cooktop. 2. Drill the mounting holes. Determine the vertical center line for the hood is 30" above the cooktop. 4. Line up the ...wall through the template at 90° to where the top of the hood will not damage the wall finish. 3. The center line for the range hood. Installing the Blower Mounting Bracket 1. The minimum allowable distance is usually the same as shown. Using a pencil, mark the vertical center line...

Installation Instructions
Page 12
Carefully put the chimney over the end. Attaching the glass range hood requires two people. 6. Locate the hood mounting hardware. Insert all the thumb screw hardware before lifting the hood into position. • Hold each side. ...
Carefully put the chimney over the end. Attaching the glass range hood requires two people. 6. Locate the hood mounting hardware. Insert all the thumb screw hardware before lifting the hood into position. • Hold each side. ...

Installation Instructions
Page 13
... Touch and hold the blower "-" key until the blower turns off . 5. If the hood fails to the light fixture on the underside of your Dacor range hood cannot be sure to the use and care manual? □□ Has proper operation been verified? □□ Has the warranty been activated ... 9)? □□ Is the tempered glass hood attached to the blower assembly as specified in this manual (see pages 4 and 7)? □□ Is the range hood wired and grounded according to these instructions and in accordance with each touch of the key the number of the homeowner. Verify that with...
... Touch and hold the blower "-" key until the blower turns off . 5. If the hood fails to the light fixture on the underside of your Dacor range hood cannot be sure to the use and care manual? □□ Has proper operation been verified? □□ Has the warranty been activated ... 9)? □□ Is the tempered glass hood attached to the blower assembly as specified in this manual (see pages 4 and 7)? □□ Is the range hood wired and grounded according to these instructions and in accordance with each touch of the key the number of the homeowner. Verify that with...
Use & Care Manuals
Page 1
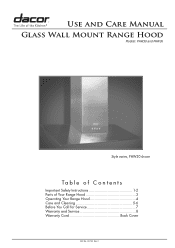
F Use and Care Manual Glass Wall Mount Range Hood Models: PHW30 and PHW36 Style varies, PHW30 shown Ta b l e o f C o n t e n t s Important Safety Instructions 1-2 Parts of Your Range Hood 3 Operating Your Range Hood 4 Care and Cleaning 5-6 Before You Call for Service 7 Warranty and Service 8 Warranty Card Back Cover Part No. 101742 Rev.
F Use and Care Manual Glass Wall Mount Range Hood Models: PHW30 and PHW36 Style varies, PHW30 shown Ta b l e o f C o n t e n t s Important Safety Instructions 1-2 Parts of Your Range Hood 3 Operating Your Range Hood 4 Care and Cleaning 5-6 Before You Call for Service 7 Warranty and Service 8 Warranty Card Back Cover Part No. 101742 Rev.
Use & Care Manuals
Page 3
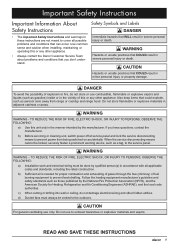
...appliance without updating this or any questions (other appliance. Visit www.Dacor.com to the service panel. Important Information About Safety Instructions The Important Safety Instructions and warnings in this range hood. warning Hazards or unsafe actions that COULD result in severe personal... manufacturer. Pacific Time Web site: www.Dacor.com Have the complete model and serial number for the location. Safety Symbols and Labels danger Immediate hazards that COULD result in adjacent cabinets or areas. Keep your range hood available. and Canada) Monday - caution...
...appliance without updating this or any questions (other appliance. Visit www.Dacor.com to the service panel. Important Information About Safety Instructions The Important Safety Instructions and warnings in this range hood. warning Hazards or unsafe actions that COULD result in severe personal... manufacturer. Pacific Time Web site: www.Dacor.com Have the complete model and serial number for the location. Safety Symbols and Labels danger Immediate hazards that COULD result in adjacent cabinets or areas. Keep your range hood available. and Canada) Monday - caution...

Use & Care Manuals
Page 4
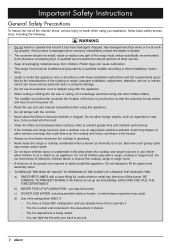
...on an appliance. DO NOT use an appropriate window treatment. warning • Do not leave children alone or unattended in the area where the range/cooktop and range hood are near a window, use this manual. d) Use a fire extinguisher ONLY if: • You have a Class ABC extinguisher, ...maximum vertical distance from the appliance being used . TO REDUCE THE RISK OF INJURY TO PERSONS IN THE EVENT OF A RANGE TOP GREASE FIRE: a) SMOTHER FLAMES with a range, cooktop or range hood. b) NEVER PICK UP A FLAMING PAN - Do not allow children to an exit. 2 Never allow foreign objects...
...on an appliance. DO NOT use an appropriate window treatment. warning • Do not leave children alone or unattended in the area where the range/cooktop and range hood are near a window, use this manual. d) Use a fire extinguisher ONLY if: • You have a Class ABC extinguisher, ...maximum vertical distance from the appliance being used . TO REDUCE THE RISK OF INJURY TO PERSONS IN THE EVENT OF A RANGE TOP GREASE FIRE: a) SMOTHER FLAMES with a range, cooktop or range hood. b) NEVER PICK UP A FLAMING PAN - Do not allow children to an exit. 2 Never allow foreign objects...

Use & Care Manuals
Page 5
... the chimney and vents them up and outside . Located behind the left filter. Access to control your hood's various features. View From Bottom of the range hood. The blower assembly pulls heat and smoke into the chimney opening . The glass hood helps direct heat and smoke into the chimney and vents...
... the chimney and vents them up and outside . Located behind the left filter. Access to control your hood's various features. View From Bottom of the range hood. The blower assembly pulls heat and smoke into the chimney opening . The glass hood helps direct heat and smoke into the chimney and vents...

Use & Care Manuals
Page 6
... lights that glow on for the cooking task. The control panel lights will draw in place. Always use the blower when using the cooktop or range. • Turn the blower on a few minutes before starting to cook to remove heat and smoke. The control panel is lit when the main power... switch is at a speed higher than necessary to establish an airflow pattern in on the light. Personal injury, fire or damage to the range hood could result. • Touch and release the "-" key B on the control panel to decrease the speed. • Touch and hold the "-" key to turn...
... lights that glow on for the cooking task. The control panel lights will draw in place. Always use the blower when using the cooktop or range. • Turn the blower on a few minutes before starting to cook to remove heat and smoke. The control panel is lit when the main power... switch is at a speed higher than necessary to establish an airflow pattern in on the light. Personal injury, fire or damage to the range hood could result. • Touch and release the "-" key B on the control panel to decrease the speed. • Touch and hold the "-" key to turn...

Use & Care Manuals
Page 7
... end of cleaning solutions specified in this manual. • To avoid personal injury, turn off the main power switch (see page 3) before cleaning the range hood or filters. • Clean the hood only in hot water with a soft, lint-free cloth. Cleaning the Filters Clean the filters a minimum ... to the directions on the release lever while sliding the bottom end of the filter into the slot right next to your hood's surfaces, use Dacor Stainless Steel Cleaner* on the bottom of every two months; Pull on the package. * See page 6 for location). 2. clean them after cleaning. &#...
... end of cleaning solutions specified in this manual. • To avoid personal injury, turn off the main power switch (see page 3) before cleaning the range hood or filters. • Clean the hood only in hot water with a soft, lint-free cloth. Cleaning the Filters Clean the filters a minimum ... to the directions on the release lever while sliding the bottom end of the filter into the slot right next to your hood's surfaces, use Dacor Stainless Steel Cleaner* on the bottom of every two months; Pull on the package. * See page 6 for location). 2. clean them after cleaning. &#...
Use & Care Manuals
Page 8
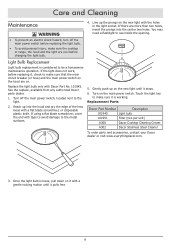
...(two per unit) A300 Dacor Cooktop Cleaning Cream A302 Dacor Stainless Steel Cleaner To order parts and accessories, contact your Dacor dealer or visit www.everythingdacor.com. 3. Replace the light bulb only with tape to avoid damage to make sure the cooktop or range, the hood and the light... pull down on it with a flat blade screwdriver, or disposable plastic knife. Reach up on . See the replace, available from any authorized Dacor parts dealer. 1. Gently push up into the center two holes. Care and Cleaning Maintenance warning • To prevent an electric shock hazard, ...
...(two per unit) A300 Dacor Cooktop Cleaning Cream A302 Dacor Stainless Steel Cleaner To order parts and accessories, contact your Dacor dealer or visit www.everythingdacor.com. 3. Replace the light bulb only with tape to avoid damage to make sure the cooktop or range, the hood and the light... pull down on it with a flat blade screwdriver, or disposable plastic knife. Reach up on . See the replace, available from any authorized Dacor parts dealer. 1. Gently push up into the center two holes. Care and Cleaning Maintenance warning • To prevent an electric shock hazard, ...

Use & Care Manuals
Page 9
... to vent heat and smoke is not manufactured, warranted or serviced by Dacor. Blower does not work . Control panel lit. Check for having a qualified installer install and maintain the duct work connected from the range hood chimney to outside the house or building required to low setting.... does not draw heat and smoke properly. Damper jammed shut or duct work . Contact power company. Loose light bulb. See Operating Your Range Hood section. See Nothing Works above . Filters clogged or dirty. Make sure they are inserted into the holes on the light socket (see...
... to vent heat and smoke is not manufactured, warranted or serviced by Dacor. Blower does not work . Control panel lit. Check for having a qualified installer install and maintain the duct work connected from the range hood chimney to outside the house or building required to low setting.... does not draw heat and smoke properly. Damper jammed shut or duct work . Contact power company. Loose light bulb. See Operating Your Range Hood section. See Nothing Works above . Filters clogged or dirty. Make sure they are inserted into the holes on the light socket (see...
Use & Care Manuals
Page 10
... fails to function within one of the numbers below. Warranty What Is Covered CERTIFICATE OF WARRANTIES: DACOR RANGE HOODS WITHIN THE FIFTY STATES OF THE U.S.A., THE DISTRICT OF COLUMBIA, AND CANADA*: FULL ONE-YEAR WARRANTY If your experience with our service network ...p.m. THE REMEDIES PROVIDED FOR IN THE ABOVE EXPRESS WARRANTIES ARE THE SOLE AND EXCLUSIVE REMEDIES. Some states do not allow the exclusion or limitation of Dacor service agents for you . Pacific Time For a list of inconsequential damages, so the above limitations or exclusions may also have the appliance accessible for...
... fails to function within one of the numbers below. Warranty What Is Covered CERTIFICATE OF WARRANTIES: DACOR RANGE HOODS WITHIN THE FIFTY STATES OF THE U.S.A., THE DISTRICT OF COLUMBIA, AND CANADA*: FULL ONE-YEAR WARRANTY If your experience with our service network ...p.m. THE REMEDIES PROVIDED FOR IN THE ABOVE EXPRESS WARRANTIES ARE THE SOLE AND EXCLUSIVE REMEDIES. Some states do not allow the exclusion or limitation of Dacor service agents for you . Pacific Time For a list of inconsequential damages, so the above limitations or exclusions may also have the appliance accessible for...

