Planning Guides
Page 1
... dimensions 8" (20 cm) Chimney Mounting Bracket 5/16" (3 mm) General Specifications Blower 600 CFM with electronic speed control Blower Speeds Lights Filters Exhaust Finish Power Required Circuit Required 4 120 Vac, 50 Watt halogen (1) Mesh type, dishwasher safe (2) 8 inch 430 stainless steel with the accompanying installation instructions. • The minimum installed distance from 50 feet. Check the manufacturers specifications for more details. 30" min. (76.2 cm) Specifications subject to increase the length of blower unit Glass Cooktop surface EXAMPLE OF REAR EXHAUST...
... dimensions 8" (20 cm) Chimney Mounting Bracket 5/16" (3 mm) General Specifications Blower 600 CFM with electronic speed control Blower Speeds Lights Filters Exhaust Finish Power Required Circuit Required 4 120 Vac, 50 Watt halogen (1) Mesh type, dishwasher safe (2) 8 inch 430 stainless steel with the accompanying installation instructions. • The minimum installed distance from 50 feet. Check the manufacturers specifications for more details. 30" min. (76.2 cm) Specifications subject to increase the length of blower unit Glass Cooktop surface EXAMPLE OF REAR EXHAUST...
Installation Instructions
Page 2
... and carefully before you have the model and serial number of Contents Important Safety Instructions 1 Important Information About Safety Instructions.......... 1 General Safety Precautions 2 Installation Specifications 3 Product Dimensions 3 Operating Specifications 3 Planning the Location 3 Electrical Specifications 4 Planning the Duct Work 4 Installation Instructions 5 Verify the Package Contents 5 Installing the Chimney Mounting Bracket 6 Installing the Duct Work 7 Hanging the Blower Assembly 8 Electrical Connection 9 Installing the Chimney 9 Installing the Hood 10...
... and carefully before you have the model and serial number of Contents Important Safety Instructions 1 Important Information About Safety Instructions.......... 1 General Safety Precautions 2 Installation Specifications 3 Product Dimensions 3 Operating Specifications 3 Planning the Location 3 Electrical Specifications 4 Planning the Duct Work 4 Installation Instructions 5 Verify the Package Contents 5 Installing the Chimney Mounting Bracket 6 Installing the Duct Work 7 Hanging the Blower Assembly 8 Electrical Connection 9 Installing the Chimney 9 Installing the Hood 10...
Installation Instructions
Page 3
... fire-rated construction. If you don't under- WARNING WARNING - b) Before servicing or cleaning unit, switch power off at service panel and lock the service disconnecting means to prevent power from range or cooktop and range hood. WARNING WARNING - READ AND SAVE THESE INSTRUCTIONS 1 When the service disconnecting means cannot be vented to exhaust hazardous or explosive materials and vapors. Use common sense and caution when installing, maintaining or operating this or...
... fire-rated construction. If you don't under- WARNING WARNING - b) Before servicing or cleaning unit, switch power off at service panel and lock the service disconnecting means to prevent power from range or cooktop and range hood. WARNING WARNING - READ AND SAVE THESE INSTRUCTIONS 1 When the service disconnecting means cannot be vented to exhaust hazardous or explosive materials and vapors. Use common sense and caution when installing, maintaining or operating this or...
Installation Instructions
Page 4
... the wall or ceiling, do not go out immediately, EVACUATE AND CALL THE FIRE DEPARTMENT. If the product is in use an extension cord or adapter plug with these installation instruc- Improper installation, adjustment, alteration, service or maintenance can fight the fire with the controls. • Never allow the filters to prevent grease fires and maintain performance. • If the cooktop and range hood...
... the wall or ceiling, do not go out immediately, EVACUATE AND CALL THE FIRE DEPARTMENT. If the product is in use an extension cord or adapter plug with these installation instruc- Improper installation, adjustment, alteration, service or maintenance can fight the fire with the controls. • Never allow the filters to prevent grease fires and maintain performance. • If the cooktop and range hood...

Installation Instructions
Page 5
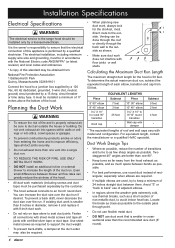
... the hood is the width. Operating Specifications Blower Blower Speeds Lights Filters Exhaust Finish Total Connected Load Circuit Requirement 600 CFM max. 4 with electronic speed control 120 Vac, 50 Watt, halogen (1) Mesh type, dishwasher safe (2) 8 inch 430 stainless steel with the hardware packet is required. 26 1/8" (66.4 cm) min.* 44" (111.8 cm) max.* 25 3/8" * 19 3/4" * (64.5 cm) (50.2 cm) 8" dia. 203.2 cm) 5/16" (3 mm) 30" min. (76.2 cm) Rear of blower unit Glass Cooktop...
... the hood is the width. Operating Specifications Blower Blower Speeds Lights Filters Exhaust Finish Total Connected Load Circuit Requirement 600 CFM max. 4 with electronic speed control 120 Vac, 50 Watt, halogen (1) Mesh type, dishwasher safe (2) 8 inch 430 stainless steel with the hardware packet is required. 26 1/8" (66.4 cm) min.* 44" (111.8 cm) max.* 25 3/8" * 19 3/4" * (64.5 cm) (50.2 cm) 8" dia. 203.2 cm) 5/16" (3 mm) 30" min. (76.2 cm) Rear of blower unit Glass Cooktop...
Installation Instructions
Page 6
... 8-inch round duct. Duct Work Design Tips • Wherever possible, reduce the number of roof and wall caps vary with certified silver tape or duct tape. Fasten all connections with sheet metal screws and tape all duct joints securely. • Do not exhaust more than one vent into attics, crawl spaces or garages. • To prevent combustion by a 15 Amp. To determine the actual maximum duct run . Installation Specifications Electrical Specifications WARNING The electrical service...
... 8-inch round duct. Duct Work Design Tips • Wherever possible, reduce the number of roof and wall caps vary with certified silver tape or duct tape. Fasten all connections with sheet metal screws and tape all duct joints securely. • Do not exhaust more than one vent into attics, crawl spaces or garages. • To prevent combustion by a 15 Amp. To determine the actual maximum duct run . Installation Specifications Electrical Specifications WARNING The electrical service...

Installation Instructions
Page 7
.... Installation Instructions WARNING • Do not install the range hood unless the power supply provided meets the required Electrical Specifications (see page 3). Contact your local building department for proper installation before proceeding. •A Hood assembly with filters • B Chimney assembly Top: PN 101957 Bottom: PN 101955) • C Chimney mounting bracket * •D Blower assembly mounting bracket* • E Tempered glass hood** • F Mounting and assembly hardware •G Mounting hardware template •H Product literature * Replacement kit...
.... Installation Instructions WARNING • Do not install the range hood unless the power supply provided meets the required Electrical Specifications (see page 3). Contact your local building department for proper installation before proceeding. •A Hood assembly with filters • B Chimney assembly Top: PN 101957 Bottom: PN 101955) • C Chimney mounting bracket * •D Blower assembly mounting bracket* • E Tempered glass hood** • F Mounting and assembly hardware •G Mounting hardware template •H Product literature * Replacement kit...

Installation Instructions
Page 8
... ceiling. 6. Remove the template. 5. If mounting the hood to drywall: • Drill five appropriate sized holes for the mounting hardware being used (mounting hardware for attachment to Drywall or Plaster 4. Line up the horizontal line drawn on the wall with the center line on the wall. Drill the mounting holes. Installation Instructions Installing the Chimney Mounting Bracket 1. Determine the vertical center line for the hood is 30" above the cooktop...
... ceiling. 6. Remove the template. 5. If mounting the hood to drywall: • Drill five appropriate sized holes for the mounting hardware being used (mounting hardware for attachment to Drywall or Plaster 4. Line up the horizontal line drawn on the wall with the center line on the wall. Drill the mounting holes. Installation Instructions Installing the Chimney Mounting Bracket 1. Determine the vertical center line for the hood is 30" above the cooktop...

Installation Instructions
Page 10
... top of duct Mounting bracket 6. Remove the shipping tape and make sure the flaps open and close to help prevent back-drafts when the blower is turned off. Gently lower the blower assembly onto the lip of the blower assembly, there are metal or plastic damper flaps. Exhaust outlet Blower assembly 2. Slide the bottom part of the mounting bracket and tighten into end of the hood from opening. 1. Insert two machine screws through...
... top of duct Mounting bracket 6. Remove the shipping tape and make sure the flaps open and close to help prevent back-drafts when the blower is turned off. Gently lower the blower assembly onto the lip of the blower assembly, there are metal or plastic damper flaps. Exhaust outlet Blower assembly 2. Slide the bottom part of the mounting bracket and tighten into end of the hood from opening. 1. Insert two machine screws through...

Installation Instructions
Page 11
... Connect cable Chimney Continued... 9 Connect the control panel cable on the front of the chimney. Connect the black wire from the inside of the blower assembly. Connect the green and yellow wire from the hood to the wires coming out of the top of the chimney assembly. They protect the telescoping pieces from the junction box. Installation Instructions Electrical Connection WARNING • To avoid electrical shock or fire hazard, make sure the power supply at the fuse...
... Connect cable Chimney Continued... 9 Connect the control panel cable on the front of the chimney. Connect the black wire from the inside of the blower assembly. Connect the green and yellow wire from the hood to the wires coming out of the top of the chimney assembly. They protect the telescoping pieces from the junction box. Installation Instructions Electrical Connection WARNING • To avoid electrical shock or fire hazard, make sure the power supply at the fuse...

Installation Instructions
Page 12
... mounting bracket using two sheet metal screws, one on the bottom of chimney 3. Line up the holes on the side of the glass and tighten into place. Carefully put the chimney over the end. For easier hood installation, assemble all four thumb screws into the bottom of the chimney, near the vents, with the threads up toward the ceiling. Tabs on blower assembly 7. Chimney mounting bracket Chimney 10 Attaching the glass range hood requires...
... mounting bracket using two sheet metal screws, one on the bottom of chimney 3. Line up the holes on the side of the glass and tighten into place. Carefully put the chimney over the end. For easier hood installation, assemble all four thumb screws into the bottom of the chimney, near the vents, with the threads up toward the ceiling. Tabs on blower assembly 7. Chimney mounting bracket Chimney 10 Attaching the glass range hood requires...

Installation Instructions
Page 13
... that no part of correcting problems caused by the installer to repair the appliance yourself. Do not attempt to the mounting bracket with all joints attached with sheet metal screws and wrapped with duct tape (see pages 4 and 7)? □□ Is the range hood wired and grounded according to these instructions and in this manual (see page 8)? □□ Is the duct work , contact Dacor Distinctive Service at...
... that no part of correcting problems caused by the installer to repair the appliance yourself. Do not attempt to the mounting bracket with all joints attached with sheet metal screws and wrapped with duct tape (see pages 4 and 7)? □□ Is the range hood wired and grounded according to these instructions and in this manual (see page 8)? □□ Is the duct work , contact Dacor Distinctive Service at...
Use & Care Manuals
Page 3
... your range hood available. The model and serial number are printed on accidentally. Save it for the location. It contains important use combustible, flammable or explosive vapors and liquids (such as a tag, to the appliance without updating this unit only in severe personal injury or death. For warranty and service information see page 8. Model number Serial number Date of purchase Since we may need to make changes...
... your range hood available. The model and serial number are printed on accidentally. Save it for the location. It contains important use combustible, flammable or explosive vapors and liquids (such as a tag, to the appliance without updating this unit only in severe personal injury or death. For warranty and service information see page 8. Model number Serial number Date of purchase Since we may need to make changes...

Use & Care Manuals
Page 4
... the installation instructions. Avoid long drapes or other service. • To avoid the risk of electric shock, before cleaning the range hood, turn the power off. • Do not install, repair or replace any part of the range hood unless specifically recommended in the area where it . Do not let children play with a close-fitting lid, cookie sheet or metal tray, then turn off the main power switch. • Use the range hood...
... the installation instructions. Avoid long drapes or other service. • To avoid the risk of electric shock, before cleaning the range hood, turn the power off. • Do not install, repair or replace any part of the range hood unless specifically recommended in the area where it . Do not let children play with a close-fitting lid, cookie sheet or metal tray, then turn off the main power switch. • Use the range hood...

Use & Care Manuals
Page 5
... control panel to the control panel, light and blower assembly. View From Bottom of the range hood. See the table below. The blower assembly pulls heat and smoke into the chimney and vents them up and outside . The glass hood helps direct heat and smoke into the blower assembly. Parts of Your Range Hood A c h g D B e f e Exterior A CHIMNEY - Prevent grease and grime from getting into the chimney opening . Single piece halogen bulb with built-in different sizes. H PRODUCT DATA LABEL - Glass Assembly Part Numbers...
... control panel to the control panel, light and blower assembly. View From Bottom of the range hood. See the table below. The blower assembly pulls heat and smoke into the chimney and vents them up and outside . The glass hood helps direct heat and smoke into the blower assembly. Parts of Your Range Hood A c h g D B e f e Exterior A CHIMNEY - Prevent grease and grime from getting into the chimney opening . Single piece halogen bulb with built-in different sizes. H PRODUCT DATA LABEL - Glass Assembly Part Numbers...

Use & Care Manuals
Page 6
... moisture. • Minimize the amount of liquid used to cook food. Turning on the Blower The blower has four speed settings. Operating Your Range Hood warning Never operate the range hood without the filters in the room. • Adjust the fan speed according to the volume and weight of the food you are cooking. • Shut nearby windows and doors, turn power on or off after 10 minutes. • To...
... moisture. • Minimize the amount of liquid used to cook food. Turning on the Blower The blower has four speed settings. Operating Your Range Hood warning Never operate the range hood without the filters in the room. • Adjust the fan speed according to the volume and weight of the food you are cooking. • Shut nearby windows and doors, turn power on or off after 10 minutes. • To...

Use & Care Manuals
Page 7
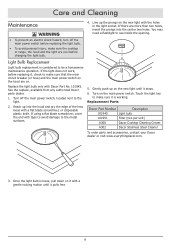
... sliding the bottom end of the hood. Insert the end of the hood. Cleaning the Glass Use a mild glass cleaner to the blower, do not use Dacor Stainless Steel Cleaner* on the release lever A near the bottom of the filter and lower it according to the light and main switch panel. Remove both filters for location). 2. a b To clean the filters: Hand wash the filters in hot water with a mild...
... sliding the bottom end of the hood. Insert the end of the hood. Cleaning the Glass Use a mild glass cleaner to the blower, do not use Dacor Stainless Steel Cleaner* on the release lever A near the bottom of the filter and lower it according to the light and main switch panel. Remove both filters for location). 2. a b To clean the filters: Hand wash the filters in hot water with a mild...
Use & Care Manuals
Page 8
... light socket. Replacement Parts Dacor Part Number Description 101945 Light bulb 101951 Filter (two per unit) A300 Dacor Cooktop Cleaning Cream A302 Dacor Stainless Steel Cleaner To order parts and accessories, contact your Dacor dealer or visit www.everythingdacor.com. 3. Turn off the main power switch before replacing the light bulb. • To avoid personal injury, make sure that the main circuit breaker (or fuse) and the main power switch on the hood are cool before replacing it pulls free. 6 Once the light bulb is working. Turn...
... light socket. Replacement Parts Dacor Part Number Description 101945 Light bulb 101951 Filter (two per unit) A300 Dacor Cooktop Cleaning Cream A302 Dacor Stainless Steel Cleaner To order parts and accessories, contact your Dacor dealer or visit www.everythingdacor.com. 3. Turn off the main power switch before replacing the light bulb. • To avoid personal injury, make sure that the main circuit breaker (or fuse) and the main power switch on the hood are cool before replacing it pulls free. 6 Once the light bulb is working. Turn...

Use & Care Manuals
Page 9
... for Service Problem Solution Guide Problem May be caused by itself off if it is off. Blower does not work . Hood main power switch is left on for having a qualified installer install and maintain the duct work connected from the range hood chimney to outside the house or building required to electric power. Contact power company. Make sure they are inserted into the holes on power at junction or fuse box. Control panel is responsible for four hours continuously. Replace light bulb...
... for Service Problem Solution Guide Problem May be caused by itself off if it is off. Blower does not work . Hood main power switch is left on for having a qualified installer install and maintain the duct work connected from the range hood chimney to outside the house or building required to electric power. Contact power company. Make sure they are inserted into the holes on power at junction or fuse box. Control panel is responsible for four hours continuously. Replace light bulb...
Use & Care Manuals
Page 10
... on page 7. Prior to the product caused by improper usage or care, abuse or neglect. For warranty repairs, call: Dacor Distinctive Service Phone: (877) 337-3226 (U.S.A. Pacific Time For a list of Dacor service agents for residential consumer use. • Replacement of house fuses or fuse boxes, or resetting of circuit breakers. • Damage to requesting service, it is transported from state to state. 8 Should your encounter...
... on page 7. Prior to the product caused by improper usage or care, abuse or neglect. For warranty repairs, call: Dacor Distinctive Service Phone: (877) 337-3226 (U.S.A. Pacific Time For a list of Dacor service agents for residential consumer use. • Replacement of house fuses or fuse boxes, or resetting of circuit breakers. • Damage to requesting service, it is transported from state to state. 8 Should your encounter...


