
Planning Guides
Page 1
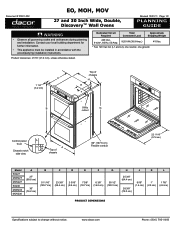
...) 1" (2.5 cm) 1 7/8" (4.6 cm) product DIMENSIONS Specifications subject to change without notice. www.dacor.com Phone: (800) 7931-0.3093 Contact your local building department for further information. • This appliance must be installed in accordance with the accompanying installation instructions. Document # PG01-002 EO, MOH, MOV 27 and 30 Inch Wide, Double, Discovery™ Wall Ovens Revised 10/01/11 Page 1/2 PLANNING GUIDE warning •...
...) 1" (2.5 cm) 1 7/8" (4.6 cm) product DIMENSIONS Specifications subject to change without notice. www.dacor.com Phone: (800) 7931-0.3093 Contact your local building department for further information. • This appliance must be installed in accordance with the accompanying installation instructions. Document # PG01-002 EO, MOH, MOV 27 and 30 Inch Wide, Double, Discovery™ Wall Ovens Revised 10/01/11 Page 1/2 PLANNING GUIDE warning •...

Installation Instructions
Page 3
... oven and may result in severe personal injury or death. Table of safety and to heat or warm the room. Important: • Installer: In the interest of Contents Before You Begin 1 Important Safety Instructions 1 Important Information About Safety Instructions 1 Safety Symbols and Labels 1 General Safety Precautions 2 Customer Service Information 3 If You Need Help 3 Product Data Plate 3 Model Identification 3 Product Specifications 4 Product Dimensions 4 Planning the Installation 6 Selecting the Location 6 Cabinet Cutout 6 Electrical Specifications 9 Installation...
... oven and may result in severe personal injury or death. Table of safety and to heat or warm the room. Important: • Installer: In the interest of Contents Before You Begin 1 Important Safety Instructions 1 Important Information About Safety Instructions 1 Safety Symbols and Labels 1 General Safety Precautions 2 Customer Service Information 3 If You Need Help 3 Product Data Plate 3 Model Identification 3 Product Specifications 4 Product Dimensions 4 Planning the Installation 6 Selecting the Location 6 Cabinet Cutout 6 Electrical Specifications 9 Installation...
Installation Instructions
Page 4
... fan blades at the circuit breaker or fuse box. • Only use . Do not allow heating elements in the literature accompanying it. After use this manual. They will be burned or injured while climbing on the bottom of the oven. In addition, the objects themselves could damage the bake element. Do not install or use , make sure that the electric power to the oven is not responsible for service required...
... fan blades at the circuit breaker or fuse box. • Only use . Do not allow heating elements in the literature accompanying it. After use this manual. They will be burned or injured while climbing on the bottom of the oven. In addition, the objects themselves could damage the bake element. Do not install or use , make sure that the electric power to the oven is not responsible for service required...

Installation Instructions
Page 5
... - Pull the data plate up. Customer Service Information If You Need Help... Pacific Time Web site: www.Dacor.com Product Data Plate • The product data plate contains the model and serial number information and the electrical requirements. • It is located inside the oven door, in the slot above the left hinge (inside the lower door on the data plate: 1. The model and serial number are printed on the product data plate. trim) Millennia oven (vert. to 5:00...
... - Pull the data plate up. Customer Service Information If You Need Help... Pacific Time Web site: www.Dacor.com Product Data Plate • The product data plate contains the model and serial number information and the electrical requirements. • It is located inside the oven door, in the slot above the left hinge (inside the lower door on the data plate: 1. The model and serial number are printed on the product data plate. trim) Millennia oven (vert. to 5:00...
Installation Instructions
Page 11
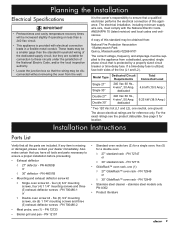
... without removing the oven from the wall. Model Type Single 27" Single 30" Dedicated Circuit Requirements 240 Vac 60 Hz., 4 wire*, 30 Amp. four (4) 3/4" mounting screws, four (4) 1 1/4" mounting screws and three (3) exhaust deflector screws - PN 700486-2 • Meat probe, one ground. Also for a double oven make certain that you have all the parts are for location. PN 72723 • Broiler grill and pan - For the exact ratings see the product data plate. PN...
... without removing the oven from the wall. Model Type Single 27" Single 30" Dedicated Circuit Requirements 240 Vac 60 Hz., 4 wire*, 30 Amp. four (4) 3/4" mounting screws, four (4) 1 1/4" mounting screws and three (3) exhaust deflector screws - PN 700486-2 • Meat probe, one ground. Also for a double oven make certain that you have all the parts are for location. PN 72723 • Broiler grill and pan - For the exact ratings see the product data plate. PN...

Installation Instructions
Page 16
... model and serial numbers available when you call. If you need service, be sure to the fully opened position. 5. caution On double ovens: Install the upper door first to prevent damage to repair the appliance yourself. Secure it is not responsible for proper electrical connection. • Repeat the above bake test. • If the appliance still does not work, contact Dacor • Distinctive Service at the circuit breaker or fuse box...
... model and serial numbers available when you call. If you need service, be sure to the fully opened position. 5. caution On double ovens: Install the upper door first to prevent damage to repair the appliance yourself. Secure it is not responsible for proper electrical connection. • Repeat the above bake test. • If the appliance still does not work, contact Dacor • Distinctive Service at the circuit breaker or fuse box...

Use & Care Manuals
Page 4
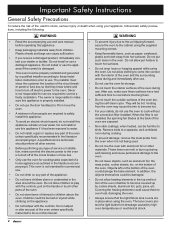
... turn off the power. • Always make sure food is not being used. 2 When the filter is not a toy. Stepping or sitting on the oven may result. • Before self-cleaning the oven, remove the broiler pan grill and pan, oven racks, convection filter, meat probe, and any flames with the controls or other service. • Make sure that are behind them to remain on the oven surfaces inside or outside the oven...
... turn off the power. • Always make sure food is not being used. 2 When the filter is not a toy. Stepping or sitting on the oven may result. • Before self-cleaning the oven, remove the broiler pan grill and pan, oven racks, convection filter, meat probe, and any flames with the controls or other service. • Make sure that are behind them to remain on the oven surfaces inside or outside the oven...

Use & Care Manuals
Page 5
... have a double oven, use the number keypad. 12 for instructions. the screen. In sleep mode, the display lights go into "sleep" mode about your oven, set the controls first, then touch the START key. TIMER key: Use this key to turn the oven on the control panel or open the oven door. They operate separately from • Number keypad: When you need to turn the oven off any of each other. Light key: If you want to time an...
... have a double oven, use the number keypad. 12 for instructions. the screen. In sleep mode, the display lights go into "sleep" mode about your oven, set the controls first, then touch the START key. TIMER key: Use this key to turn the oven on the control panel or open the oven door. They operate separately from • Number keypad: When you need to turn the oven off any of each other. Light key: If you want to time an...

Use & Care Manuals
Page 6
...; Broil elements: Hidden above the glass panel in the roof of keys and a display. You use the meat probe, insert the skewer into the meat and plug the other end into the oven chamber by the convection fan during the self-clean cycle. • Door gasket: The door gasket prevents heat from one food to another when you have a double oven. • Rack supports: There are two oven lights inside each oven chamber. They support the adjustable oven racks. • Meat probe...
...; Broil elements: Hidden above the glass panel in the roof of keys and a display. You use the meat probe, insert the skewer into the meat and plug the other end into the oven chamber by the convection fan during the self-clean cycle. • Door gasket: The door gasket prevents heat from one food to another when you have a double oven. • Rack supports: There are two oven lights inside each oven chamber. They support the adjustable oven racks. • Meat probe...

Use & Care Manuals
Page 8
... SETTINGS DOOR LITE TEMP °F/°C HELP • The clock menu will appear. Enter the current year (all 4 numbers) on the control panel to return to PM or change these settings while the oven is in use . CLOCK 12:25 PM ADDITIONAL SETTINGS SELECT AN OPTION TO ADJUST SETTINGS. Touch SET CLOCK. • Touch MONTH. THE CURRENT TIME SHOULD APPEAR ON THE DISPLAY. Oven Setup NOTE: If you have a single oven, you have a double oven...
... SETTINGS DOOR LITE TEMP °F/°C HELP • The clock menu will appear. Enter the current year (all 4 numbers) on the control panel to return to PM or change these settings while the oven is in use . CLOCK 12:25 PM ADDITIONAL SETTINGS SELECT AN OPTION TO ADJUST SETTINGS. Touch SET CLOCK. • Touch MONTH. THE CURRENT TIME SHOULD APPEAR ON THE DISPLAY. Oven Setup NOTE: If you have a single oven, you have a double oven...

Use & Care Manuals
Page 10
... CUSTOM OK AMBER GREEN GRAY COLOR COLOR Custom Color Display Settings If you want to change the temperature scale: • Touch ADDITIONAL SETTINGS. ▲ UPPER 12:25 PM ▼ LOWER BAKING ADDITIONAL SAVED ROASTING BROILING SETTINGS GUIDE MORE • Touch the CANCEL/SECURE key on the control panel to return to show the cooking temperature. To do so: • Touch CUSTOM COLOR. • Touch...
... CUSTOM OK AMBER GREEN GRAY COLOR COLOR Custom Color Display Settings If you want to change the temperature scale: • Touch ADDITIONAL SETTINGS. ▲ UPPER 12:25 PM ▼ LOWER BAKING ADDITIONAL SAVED ROASTING BROILING SETTINGS GUIDE MORE • Touch the CANCEL/SECURE key on the control panel to return to show the cooking temperature. To do so: • Touch CUSTOM COLOR. • Touch...

Use & Care Manuals
Page 13
... lock. Used for baked goods and multiple rack cooking. To reactivate the control panel, touch and hold the CANCEL/SECURE key for double ovens, touch the EDIT key below the appropriate oven). • Enter the temperature on page 14. Operating Your Oven - Changing The Temperature • Touch EDIT (for 5 seconds. Bake • Bottom heat source, mode commonly used modes are using PURE CONVECTION™ SEAR or MAX BROIL, carefully place the food in the oven...
... lock. Used for baked goods and multiple rack cooking. To reactivate the control panel, touch and hold the CANCEL/SECURE key for double ovens, touch the EDIT key below the appropriate oven). • Enter the temperature on page 14. Operating Your Oven - Changing The Temperature • Touch EDIT (for 5 seconds. Bake • Bottom heat source, mode commonly used modes are using PURE CONVECTION™ SEAR or MAX BROIL, carefully place the food in the oven...

Use & Care Manuals
Page 15
... 12:25 PM PRESS START TIMER 1 01:02:30 DIRECTION DOWN CANCEL TIMER 1 TIMER 2 CANCEL DIRECTION TIMER 2 • If you to 00:00:00, then beep. Touch the DIRECTION key until the desired direction is on the timer. BAKE PURE PURE MAX CONV/SEAR CONVECTION BROIL DACOR GUIDE MAIN MENU • Touch the DACOR GUIDE key. DACOR GUIDE DACOR GUIDE HAS PRESET TEMPERATURES, TIMES, AND MODES FOR VARIOUS FOODS. return to the oven mode screen a few moments...
... 12:25 PM PRESS START TIMER 1 01:02:30 DIRECTION DOWN CANCEL TIMER 1 TIMER 2 CANCEL DIRECTION TIMER 2 • If you to 00:00:00, then beep. Touch the DIRECTION key until the desired direction is on the timer. BAKE PURE PURE MAX CONV/SEAR CONVECTION BROIL DACOR GUIDE MAIN MENU • Touch the DACOR GUIDE key. DACOR GUIDE DACOR GUIDE HAS PRESET TEMPERATURES, TIMES, AND MODES FOR VARIOUS FOODS. return to the oven mode screen a few moments...

Use & Care Manuals
Page 16
... display instructs you place the food in an oven are: • Baking: Cooking dry goods such as cookies, cakes, soufflés, etc. • Roasting: Cooking of meats over a period of time. • Broiling: Cooking with an intense heat for Using Dacor Guide • In some cases the display may instruct you are using the timer, start it is through cooking for doneness yourself. • If you can change the meat probe temperature by food. "NO PROBE...
... display instructs you place the food in an oven are: • Baking: Cooking dry goods such as cookies, cakes, soufflés, etc. • Roasting: Cooking of meats over a period of time. • Broiling: Cooking with an intense heat for Using Dacor Guide • In some cases the display may instruct you are using the timer, start it is through cooking for doneness yourself. • If you can change the meat probe temperature by food. "NO PROBE...

Use & Care Manuals
Page 18
...%. Pan too Change rack position. Incorrect baking mode being used . Dark, heat absorbing cake pans used . Set timer to bake element. close to shortest recommended cooking time and check food when timer beeps. Pure Convection - Oven and/or oven rack not level. You can also prepare complete meals using the standard bake settings. Deluxe Features About Pure Convection Baking • Some recipes, especially those that are homemade, may require adjustment and testing when convert- • The uniform air circulation...
...%. Pan too Change rack position. Incorrect baking mode being used . Dark, heat absorbing cake pans used . Set timer to bake element. close to shortest recommended cooking time and check food when timer beeps. Pure Convection - Oven and/or oven rack not level. You can also prepare complete meals using the standard bake settings. Deluxe Features About Pure Convection Baking • Some recipes, especially those that are homemade, may require adjustment and testing when convert- • The uniform air circulation...

Use & Care Manuals
Page 27
... a start time, the oven will start time that need to be changed, then touch START. • If you are using one of the cook settings, when the stop time is properly cooked. The oven will reduce the temperature to about 150°F to keep the food warm and safe for serving. Pushing or pulling on at the stop time entered. The oven will turn on either end of roasting. You can select meat probe settings...
... a start time, the oven will start time that need to be changed, then touch START. • If you are using one of the cook settings, when the stop time is properly cooked. The oven will reduce the temperature to about 150°F to keep the food warm and safe for serving. Pushing or pulling on at the stop time entered. The oven will turn on either end of roasting. You can select meat probe settings...

Use & Care Manuals
Page 30
... using the self-clean cycle. Care and Cleaning Self-Cleaning warning • Do not leave the racks, the meat probe, pots, pans, utensils or any other materials. The convection filter must also be hot. Sponge the residue up excess grease and other is normal. If you have a double oven, use your oven to broil or roast on how to the door latch may require only a light cleaning. They will automatically activate the electric door latch. IMPORTANT: Always remove...
... using the self-clean cycle. Care and Cleaning Self-Cleaning warning • Do not leave the racks, the meat probe, pots, pans, utensils or any other materials. The convection filter must also be hot. Sponge the residue up excess grease and other is normal. If you have a double oven, use your oven to broil or roast on how to the door latch may require only a light cleaning. They will automatically activate the electric door latch. IMPORTANT: Always remove...
Use & Care Manuals
Page 31
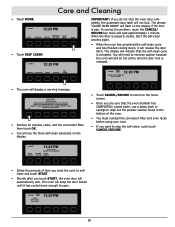
... the convection filter and oven racks before using your oven. • If you want to stop the self-clean, cycle touch CANCEL/SECURE. ▲ UPPER LIGHT 2 HOURS MEDIUM 3 HOURS 12:25 PM SELF CLEAN SELECT SOIL CONDITION HEAVY 4 HOURS • Select the amount of time you want the oven to open. ▲ UPPER ON HEAVY SELF CLEAN Door Locked 12:25 PM 29 The phrase "CLOSE OVEN DOOR" will display a warning message: SELF CLEAN INSTRUCTIONS REMOVE RACKS, BROILER PAN, TRAY...
... the convection filter and oven racks before using your oven. • If you want to stop the self-clean, cycle touch CANCEL/SECURE. ▲ UPPER LIGHT 2 HOURS MEDIUM 3 HOURS 12:25 PM SELF CLEAN SELECT SOIL CONDITION HEAVY 4 HOURS • Select the amount of time you want the oven to open. ▲ UPPER ON HEAVY SELF CLEAN Door Locked 12:25 PM 29 The phrase "CLOSE OVEN DOOR" will display a warning message: SELF CLEAN INSTRUCTIONS REMOVE RACKS, BROILER PAN, TRAY...

Use & Care Manuals
Page 32
... of mild detergent, and warm water. A-300). NOTE: If you want to avoid accidentally turning the oven on while cleaning the control panel, activate the lock-out feature on your oven, use Dacor Stainless Steel Cleaner (Part No. The steps below are not specified to cook. The control panel will disappear from the display. warning • Remove the filter(s) only when the oven is located in the back of...
... of mild detergent, and warm water. A-300). NOTE: If you want to avoid accidentally turning the oven on while cleaning the control panel, activate the lock-out feature on your oven, use Dacor Stainless Steel Cleaner (Part No. The steps below are not specified to cook. The control panel will disappear from the display. warning • Remove the filter(s) only when the oven is located in the back of...

Use & Care Manuals
Page 35
... a properly wired electrical connection. Wait for delay timed cooking. Both oven lights will start to light up . Time of self-clean cycle. Door not shut tight. Touch any control panel key or open . Oven will not work. (NOTE: if only one light is not working, the bulb is probably burned out). See Replacing the Light Bulbs on . NOTE: See Solutions to light up . Door will not heat. Lock-out feature is enabled. Oven's Sabbath feature turned on page 32. Double ovens only: Other oven is on...
... a properly wired electrical connection. Wait for delay timed cooking. Both oven lights will start to light up . Time of self-clean cycle. Door not shut tight. Touch any control panel key or open . Oven will not work. (NOTE: if only one light is not working, the bulb is probably burned out). See Replacing the Light Bulbs on . NOTE: See Solutions to light up . Door will not heat. Lock-out feature is enabled. Oven's Sabbath feature turned on page 32. Double ovens only: Other oven is on...


