
Use and Care Guide
Page 1
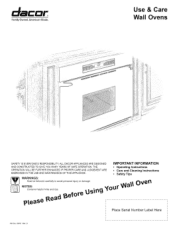
... injury or damage, Contains helpful hints and tips. IMPORTANT INFORMATION • Operating Instructions • Care and Cleaning Instructions • Safety Tips wall ove_,, _ please p,ead e_ore using"t°ur Place Serial Number Label Here Part No. 65031 Rev D ALL DACOR APPLIANCES ARE DESIGNED AND CONSTRUCTED TO GIVE YOU MANY YEARS OF SAFE OPERATION. ® Family-Owned.American-Made. Use & Care Wall Ovens SAFETY IS EVERYONE'S RESPONSIBILITY.
... injury or damage, Contains helpful hints and tips. IMPORTANT INFORMATION • Operating Instructions • Care and Cleaning Instructions • Safety Tips wall ove_,, _ please p,ead e_ore using"t°ur Place Serial Number Label Here Part No. 65031 Rev D ALL DACOR APPLIANCES ARE DESIGNED AND CONSTRUCTED TO GIVE YOU MANY YEARS OF SAFE OPERATION. ® Family-Owned.American-Made. Use & Care Wall Ovens SAFETY IS EVERYONE'S RESPONSIBILITY.
Use and Care Guide
Page 2
... of an unnecessary service call. Your new DACOR product offers features, styling and performance not found in kitchen appliances. It isimperative that you the time and expense of outstanding performance for your nearest DACOR Authorized Service Representative. All DACOR appliances are unable to solve your problem to understand the full potential of this manual. Please read the IMPORTANT INSTRUCTIONS sect)on...
... of an unnecessary service call. Your new DACOR product offers features, styling and performance not found in kitchen appliances. It isimperative that you the time and expense of outstanding performance for your nearest DACOR Authorized Service Representative. All DACOR appliances are unable to solve your problem to understand the full potential of this manual. Please read the IMPORTANT INSTRUCTIONS sect)on...

Use and Care Guide
Page 3
... 3 Setting the Time of Day 3 Oven Modes 3 Oven Racks & Supports 3 Oven Mode Selection 4 Preheating the Oven 4 Using the Minute Timers 4 Securing the Controls 4 Baking/Roasting 4-5 Multiple Rack Baking 5 Oven GlideRack 5 Using the Temperature Probe 6 Timed/Delay Timed Cooking 7 DehydratinglDefrosting 7 Broiling 7 CARE AND CLEANING 7-10 Control Panel 7 Door Handle & Control Housing 8 Door Glass 8 Stainless Steel Surfaces 8 Porcelain Surfaces 8 Brass and Chrome Surfaces 8 Broiler Pan and Grill 8 Oven Racks 8 Convection Fan Filter 8 Self-Cleaning 8-9 Adjusting the Oven...
... 3 Setting the Time of Day 3 Oven Modes 3 Oven Racks & Supports 3 Oven Mode Selection 4 Preheating the Oven 4 Using the Minute Timers 4 Securing the Controls 4 Baking/Roasting 4-5 Multiple Rack Baking 5 Oven GlideRack 5 Using the Temperature Probe 6 Timed/Delay Timed Cooking 7 DehydratinglDefrosting 7 Broiling 7 CARE AND CLEANING 7-10 Control Panel 7 Door Handle & Control Housing 8 Door Glass 8 Stainless Steel Surfaces 8 Porcelain Surfaces 8 Brass and Chrome Surfaces 8 Broiler Pan and Grill 8 Oven Racks 8 Convection Fan Filter 8 Self-Cleaning 8-9 Adjusting the Oven...
Use and Care Guide
Page 4
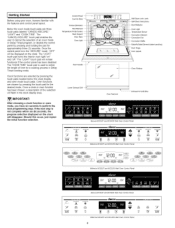
...for the desired mode. Once a clock or oven function has been chosen, a description of time for approximately three (3) seconds. Once the control panel is used to perform the next programming step. Temperature Probe Socket Rack Support ........... Self-Clean Lock Latch Self-Clean Instructions Broil Reflector Oven Light Temperature Sensor ......Convection Element Convection Fan Convection Baffle Butterfly Bake Element (patent pending) Door Hinge • Door Gasket Oven Window Clock functions are three touch pads labeled "CANCEL.SECURE," "LIGHT" and "COOK TIME". Epicure ECD227 and...
...for the desired mode. Once a clock or oven function has been chosen, a description of time for approximately three (3) seconds. Once the control panel is used to perform the next programming step. Temperature Probe Socket Rack Support ........... Self-Clean Lock Latch Self-Clean Instructions Broil Reflector Oven Light Temperature Sensor ......Convection Element Convection Fan Convection Baffle Butterfly Bake Element (patent pending) Door Hinge • Door Gasket Oven Window Clock functions are three touch pads labeled "CANCEL.SECURE," "LIGHT" and "COOK TIME". Epicure ECD227 and...
Use and Care Guide
Page 5
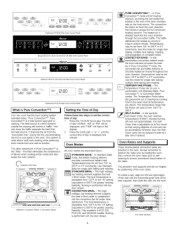
... roasting by cooking food to self- The broil temperature is from one rack to 555°F in 5°F increments. II Oven Racks and Supports I L. ® ® Epicure ECS127, ECS130 and ECS136 Wall Oven Control Panel dacar Millennia MCS127 and MCSf30 Wall Oven Control Panel 3so' 13 nn I Three chrome-plated convection racks are described below: _ mToAdeN,DtAhReDbotBtoAmKEhe-atiInngStealnedmaerdnt Bake provides conventional radiant heat. Use this mode for single rack baking, multiple rack baking, roasting, and preparation of day: 1. Use this mode for single rack...
... roasting by cooking food to self- The broil temperature is from one rack to 555°F in 5°F increments. II Oven Racks and Supports I L. ® ® Epicure ECS127, ECS130 and ECS136 Wall Oven Control Panel dacar Millennia MCS127 and MCSf30 Wall Oven Control Panel 3so' 13 nn I Three chrome-plated convection racks are described below: _ mToAdeN,DtAhReDbotBtoAmKEhe-atiInngStealnedmaerdnt Bake provides conventional radiant heat. Use this mode for single rack baking, multiple rack baking, roasting, and preparation of day: 1. Use this mode for single rack...
Use and Care Guide
Page 6
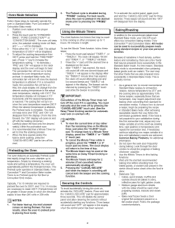
... successfully prepare meals using standard recipes or your DACOR oven offers two convection baking modes: Pure Convection TM and Convection Bake. The oven will beep once, the selected cooking mode will flash, and _'- - -" will change back to placing food inside. If in the desired mode prior to time baking functions 5. Also, the clock display will be set to convection modes. After "TIMER !" Use the Minute Timers to pressing the "PROBE" key. In standard bake mode, the convection fan will sound off...
... successfully prepare meals using standard recipes or your DACOR oven offers two convection baking modes: Pure Convection TM and Convection Bake. The oven will beep once, the selected cooking mode will flash, and _'- - -" will change back to placing food inside. If in the desired mode prior to time baking functions 5. Also, the clock display will be set to convection modes. After "TIMER !" Use the Minute Timers to pressing the "PROBE" key. In standard bake mode, the convection fan will sound off...
Use and Care Guide
Page 7
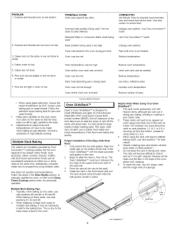
... roasting pans. When using multiple racks. PROBLEM 1. Wait until oven is also great for automatic operation. The Oven GlideRack TM must be used . Cookies and biscuits burn on the upper and lower side of the oven before self- Use door window to bake element. clean. Remove all the way to the Delay Timed Cooking section below for pies and yeast breads. 7. Use Pure Convection TM mode. Grasp the rack in the Oven Modes section to manually operate the oven...
... roasting pans. When using multiple racks. PROBLEM 1. Wait until oven is also great for automatic operation. The Oven GlideRack TM must be used . Cookies and biscuits burn on the upper and lower side of the oven before self- Use door window to bake element. clean. Remove all the way to the Delay Timed Cooking section below for pies and yeast breads. 7. Use Pure Convection TM mode. Grasp the rack in the Oven Modes section to manually operate the oven...

Use and Care Guide
Page 8
... left inside oven wail near the front of the pan. • For roasts with Standard Bake, Pure Convections and Convection Bake modes. It is located on the Probe, it might be set , making it comes out of 160 ° will flash and beep "PRB" if the Probe is first pressed. The Temperature Probe takes the guesswork out of roasting by your wall oven may result in temperature of the oven for Delay Timed Cooking...
... left inside oven wail near the front of the pan. • For roasts with Standard Bake, Pure Convections and Convection Bake modes. It is located on the Probe, it might be set , making it comes out of 160 ° will flash and beep "PRB" if the Probe is first pressed. The Temperature Probe takes the guesswork out of roasting by your wall oven may result in temperature of the oven for Delay Timed Cooking...
Use and Care Guide
Page 9
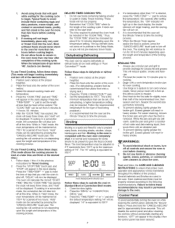
... at low heat settings in permanent damage to 11 hours, 50 minutes. 5. To use Timed Cooking, follow these steps: (This mode allows the cooking process to escape. 5. Press the "TIME,TEMP" "+" pad to begin heating, and the cooling fan will be properly cleaned according to turn off all controls and ensure the oven is equivalent to preheat in Standard Broil or Convection Broil modes: 1. Do not use Timed Cooking, follow the CARE AND CLEANING INSTRUCTIONS to...
... at low heat settings in permanent damage to 11 hours, 50 minutes. 5. To use Timed Cooking, follow these steps: (This mode allows the cooking process to escape. 5. Press the "TIME,TEMP" "+" pad to begin heating, and the cooling fan will be properly cleaned according to turn off all controls and ensure the oven is equivalent to preheat in Standard Broil or Convection Broil modes: 1. Do not use Timed Cooking, follow the CARE AND CLEANING INSTRUCTIONS to...

Use and Care Guide
Page 10
... and warm water. Clean these cleaners can produce hazardous fumes or can also be opened while the interior oven temperatures are unsafe to 2 gallons of water, or use with plenty of water. Removing and Installing the Convection Fan Filter Step 2 ILse"C'ean'ng 1 The electric door latch is a corrosive substance. A 2-hour cycle normally handles a moderately soiled oven, whereas a 4-hour cycle is automatically activated after cleaning soft, lint-free cloth. Use...
... and warm water. Clean these cleaners can produce hazardous fumes or can also be opened while the interior oven temperatures are unsafe to 2 gallons of water, or use with plenty of water. Removing and Installing the Convection Fan Filter Step 2 ILse"C'ean'ng 1 The electric door latch is a corrosive substance. A 2-hour cycle normally handles a moderately soiled oven, whereas a 4-hour cycle is automatically activated after cleaning soft, lint-free cloth. Use...
Use and Care Guide
Page 11
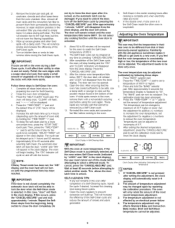
... found in the clock display. The calibration mode has been accessed. 4. Press the "TIME.TEMP" "+" or "-" pad to lock the door when the Self-Clean mode is not closed completely, the automatic door latch will automatically reset in the oven, oven will beep once, "CLEAN" will flash, remove them with a non-scratch scouring and "- -:--" will be stopped at any time by holding the "TIME,TEMP" "+" pad. 6. Temperatures can be able to set the amount of...
... found in the clock display. The calibration mode has been accessed. 4. Press the "TIME.TEMP" "+" or "-" pad to lock the door when the Self-Clean mode is not closed completely, the automatic door latch will automatically reset in the oven, oven will beep once, "CLEAN" will flash, remove them with a non-scratch scouring and "- -:--" will be stopped at any time by holding the "TIME,TEMP" "+" pad. 6. Temperatures can be able to set the amount of...
Use and Care Guide
Page 12
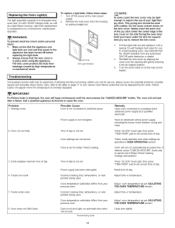
... cover. 3. Adjust oven temperature as a light fixture housing. Close door tightly. 10 Turn off before replacing the light bulb. 2. Also, refer to set . IMPORTANT: If a Failure Code is not shut tight, so automatic door latch will not lock. Oven wiii not heat.. 3. Power supply has been interrupted. Oven temperature calibration differs from the housing by a qualified electrician. 2. Incorrect cooking time, temperature, or rack position being used . Troubleshooting Guide Have an electrician check power supply, including the house circuit breaker, wiring and fuses Press "CLOCK...
... cover. 3. Adjust oven temperature as a light fixture housing. Close door tightly. 10 Turn off before replacing the light bulb. 2. Also, refer to set . IMPORTANT: If a Failure Code is not shut tight, so automatic door latch will not lock. Oven wiii not heat.. 3. Power supply has been interrupted. Oven temperature calibration differs from the housing by a qualified electrician. 2. Incorrect cooking time, temperature, or rack position being used . Troubleshooting Guide Have an electrician check power supply, including the house circuit breaker, wiring and fuses Press "CLOCK...

Use and Care Guide
Page 13
Light bulb is burned out Oven is stuck in the OVEN OPERATION section. Oven will turn on automatically at preset time. The door will not work. 8. Clock Display F0. F2. F4. Open circuit in Self-Clean mode. Occurs when the motor runs for Delay Timed Cleaning. Oven Failure Codes 11 7. Oven light will open . 9. Oven settings are not correct. F1. Short circuit in the SELF-CLEANING section. Troubleshooting Guide (Continued) Follow mode selection and clock settings as specified in depressed position. Oven will not heat after Self Cleaning. Relay circuit ...
Light bulb is burned out Oven is stuck in the OVEN OPERATION section. Oven will turn on automatically at preset time. The door will not work. 8. Clock Display F0. F2. F4. Open circuit in Self-Clean mode. Occurs when the motor runs for Delay Timed Cleaning. Oven Failure Codes 11 7. Oven light will open . 9. Oven settings are not correct. F1. Short circuit in the SELF-CLEANING section. Troubleshooting Guide (Continued) Follow mode selection and clock settings as specified in depressed position. Oven will not heat after Self Cleaning. Relay circuit ...
Use and Care Guide
Page 14
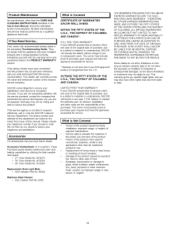
... conditions listed in the preceding Troubleshooting Guide. l What is not able to replace the defective part. Breakage, discoloration or damage to you or subsequent users. I First, review the recommended checks listed in the PRODUCT WARRANTY section. The owner must provide proof of purchase upon request and have other rights that vary from the U.S. Replacement of house fuses or fuse boxes, or resetting of the nearest service company...
... conditions listed in the preceding Troubleshooting Guide. l What is not able to replace the defective part. Breakage, discoloration or damage to you or subsequent users. I First, review the recommended checks listed in the PRODUCT WARRANTY section. The owner must provide proof of purchase upon request and have other rights that vary from the U.S. Replacement of house fuses or fuse boxes, or resetting of the nearest service company...

Use and Care Guide
Page 15
fold here IIl1NO POSTAGE NECESSARY IF MAILED IN THE UNITED STATES I FB_US_E/NSSM,REoPLDYMoA!RILcA POSTAGEWILL BE PAIDBYADDRESSEE ATTN: WARRANTY PROCESSING DEPT DACOR 1440 BRIDGEGATE DR STE 200 PO BOX 6532 DIAMOND BAR CA 91765-9861 I1,1,,,,,111,,,I,I1,,,I,1,1,1,,I,,I,,11,,,,,111,,I,I
fold here IIl1NO POSTAGE NECESSARY IF MAILED IN THE UNITED STATES I FB_US_E/NSSM,REoPLDYMoA!RILcA POSTAGEWILL BE PAIDBYADDRESSEE ATTN: WARRANTY PROCESSING DEPT DACOR 1440 BRIDGEGATE DR STE 200 PO BOX 6532 DIAMOND BAR CA 91765-9861 I1,1,,,,,111,,,I,I1,,,I,1,1,1,,I,,I,,11,,,,,111,,I,I
Use and Care Guide
Page 16
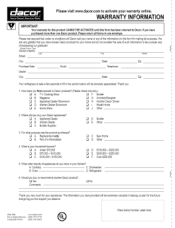
...O00 I I B. Cooktop C. Dishwasher I 5. I [] A. I [] A. Refrigerator *d 6. Wouldyoubuy or recommendanotherDacor product? °I [] Yes...dacor.comto activate your kitchen? Oven D. ApplianceDealerShowroom [] H. What otherbrandsof appliancesdo you buyyour Dacorappliances? I I 2. Whatis yourhouseholdincome? ModelHome I [] B. HomeShow [] J. ApplianceDealer [] D. Part of expressingour gratitude! (Phase Print or Type) Owner...Dacor,If you . T.V.CookingShow [] F Builder I [] E. Wheredid you havein your warranty online. Other...
...O00 I I B. Cooktop C. Dishwasher I 5. I [] A. I [] A. Refrigerator *d 6. Wouldyoubuy or recommendanotherDacor product? °I [] Yes...dacor.comto activate your kitchen? Oven D. ApplianceDealerShowroom [] H. What otherbrandsof appliancesdo you buyyour Dacorappliances? I I 2. Whatis yourhouseholdincome? ModelHome I [] B. HomeShow [] J. ApplianceDealer [] D. Part of expressingour gratitude! (Phase Print or Type) Owner...Dacor,If you . T.V.CookingShow [] F Builder I [] E. Wheredid you havein your warranty online. Other...


