Planning Guides
Page 1
... 1/4" (71.8 cm) Warming Drawer Overall Dimensions www.dacor.com Phone: (800) 7932-0.1093 grounded, dedicated circuit 4.0 Amp. @ 120 Vac, 60 Hz. 32°F (0°C) 1 1/8" (2.9 cm) 1" (2.5 cm) 10 1/8" (257 mm) MRWD30B (only) 1 7/16" (3.7 cm) All other MRWD MWDH/V series 3 1/4" 1" (8.3 cm) (2.5 cm) 1" (2.5 cm) Handle Dimensions - Top View (EWD Series Shown) Specifications subject to change without drawer inserted Chassis 23 3/8" (59.4 cm) 1/2" (1.3 cm) Chassis Dimensions Drawer open 5/64" (2 mm...
... 1/4" (71.8 cm) Warming Drawer Overall Dimensions www.dacor.com Phone: (800) 7932-0.1093 grounded, dedicated circuit 4.0 Amp. @ 120 Vac, 60 Hz. 32°F (0°C) 1 1/8" (2.9 cm) 1" (2.5 cm) 10 1/8" (257 mm) MRWD30B (only) 1 7/16" (3.7 cm) All other MRWD MWDH/V series 3 1/4" 1" (8.3 cm) (2.5 cm) 1" (2.5 cm) Handle Dimensions - Top View (EWD Series Shown) Specifications subject to change without drawer inserted Chassis 23 3/8" (59.4 cm) 1/2" (1.3 cm) Chassis Dimensions Drawer open 5/64" (2 mm...

Planning Guides
Page 2
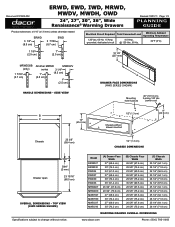
... grounded, dedicated circuit 4.0 Amp. @ 120 Vac, 60 Hz. 32°F (0°C) Chassis E 5/16" (8 mm) D Drawer open F Overall Dimensions - Document # PG02-002 ERWD, EWD, IWD, MRWD, MWDV, MWDH, OWD 24", 27", 30", 36", Wide Renaissance® Warming Drawers Revised 10/01/11 Page 2/3 PLANNING GUIDE Product tolerances: ±1/16" (±1.6 mm) unless otherwise stated C B Electrical Circuit Required Total Connected Load Minimum Ambient Operating Temperature 120 Vac...
... grounded, dedicated circuit 4.0 Amp. @ 120 Vac, 60 Hz. 32°F (0°C) Chassis E 5/16" (8 mm) D Drawer open F Overall Dimensions - Document # PG02-002 ERWD, EWD, IWD, MRWD, MWDV, MWDH, OWD 24", 27", 30", 36", Wide Renaissance® Warming Drawers Revised 10/01/11 Page 2/3 PLANNING GUIDE Product tolerances: ±1/16" (±1.6 mm) unless otherwise stated C B Electrical Circuit Required Total Connected Load Minimum Ambient Operating Temperature 120 Vac...

Planning Guides
Page 3
.... (91.4 cm) Warming drawer Warming drawer A B 27"/30"/36" Dacor single wall oven D Warming 120 Vac drawer elect. Allow 1/4" minimum additional space on ERWD, EWD, MRWD, MWDH and MWDV series models. ** On IWD series models or OWD24 without notice. Gap above , below cutout is 3/4" minimum. Specifications subject to a wall oven or warming drawer (any type). ***** Model OWD24 cannot be installed above and below or adjacent to change without the optional front panel kit: The chassis...
.... (91.4 cm) Warming drawer Warming drawer A B 27"/30"/36" Dacor single wall oven D Warming 120 Vac drawer elect. Allow 1/4" minimum additional space on ERWD, EWD, MRWD, MWDH and MWDV series models. ** On IWD series models or OWD24 without notice. Gap above , below cutout is 3/4" minimum. Specifications subject to a wall oven or warming drawer (any type). ***** Model OWD24 cannot be installed above and below or adjacent to change without the optional front panel kit: The chassis...

Installation Instructions
Page 3
... the product electrical requirements Dacor Customer Service Phone: (800) 793-0093 (U.S.A. and Canada) Monday - If you don't understand. and Canada) Monday - For repairs to cover all possible problems and conditions that COULD result in Cabinet 6 Electrical and Environmental Specifications 6 Installation Instructions 7 Remove the Drawer 7 Installing the Chassis 7 Re-installing the Drawer 8 Towel Rack Installation 8 Verify Warming Drawer Operation 9 Installation Checklist 9 Before You Begin... Table of Contents Before You Begin 1 Important Safety Instructions 1 General...
... the product electrical requirements Dacor Customer Service Phone: (800) 793-0093 (U.S.A. and Canada) Monday - If you don't understand. and Canada) Monday - For repairs to cover all possible problems and conditions that COULD result in Cabinet 6 Electrical and Environmental Specifications 6 Installation Instructions 7 Remove the Drawer 7 Installing the Chassis 7 Re-installing the Drawer 8 Towel Rack Installation 8 Verify Warming Drawer Operation 9 Installation Checklist 9 Before You Begin... Table of Contents Before You Begin 1 Important Safety Instructions 1 General...

Installation Instructions
Page 4
... heat plates and utensils. Doing so may permanently damage the finishes. Do not use, store or install warming drawer models other parts. It is not designed for commercial, industrial or laboratory use. • Only model OWD24 is on in continuous mode (∞), it will remain on until turned off the power at the circuit breaker panel or fuse box. • Exercise caution when opening the warming drawer. All other combustible materials inside...
... heat plates and utensils. Doing so may permanently damage the finishes. Do not use, store or install warming drawer models other parts. It is not designed for commercial, industrial or laboratory use. • Only model OWD24 is on in continuous mode (∞), it will remain on until turned off the power at the circuit breaker panel or fuse box. • Exercise caution when opening the warming drawer. All other combustible materials inside...

Installation Instructions
Page 5
... required for IWD series models and optional for OWD24. • An optional Epicure® style front panel kit is to be placed for the drawer door when it is in the open F Overall Dimensions - IWD/OWD Series Top View Mounting hole, 9 places 40" (101.6 cm) 3 prong 120 Vac power cord ** ** G D Chassis without drawer installed A ** = OWD24 mounting holes Drawer Face Dimensions (IWD/OWD Series) Chassis Dimensions (IWD/OWD Series) Model IWD24 IWD27 IWD30 OWD24 (A) Dimension Drawer...
... required for IWD series models and optional for OWD24. • An optional Epicure® style front panel kit is to be placed for the drawer door when it is in the open F Overall Dimensions - IWD/OWD Series Top View Mounting hole, 9 places 40" (101.6 cm) 3 prong 120 Vac power cord ** ** G D Chassis without drawer installed A ** = OWD24 mounting holes Drawer Face Dimensions (IWD/OWD Series) Chassis Dimensions (IWD/OWD Series) Model IWD24 IWD27 IWD30 OWD24 (A) Dimension Drawer...

Installation Instructions
Page 6
Installation Specifications 10 1/8" (25.7 cm) A Drawer Face Dimensions (MWD series shown) B C Chassis Model ERWD27 (A) Drawer Face ...Warming Drawer Overall Dimensions See page 3 for IWD and OWD series chassis dimensions 23 3/8" (59.4 cm) ERWD 3 1/2" (8.9 cm) EWD 3 7/16" (8.7 cm) 1 1/8" (2.9 cm) 1" (2.5 cm) Drawer open 5/64" (2 mm) 23 13/16" (60.5 cm) MRWD30B (only) 1 7/16" (3.7 cm) All other MRWD MWDH/V series 3 1/4" 1" (8.3 cm) (2.5 cm) 1" (2.5 cm) Handle Dimensions Mounting hole 9 places 40" (101.6 cm) 3-prong 120 Vac power cord Overall Dimensions Top View (EWD series...
Installation Specifications 10 1/8" (25.7 cm) A Drawer Face Dimensions (MWD series shown) B C Chassis Model ERWD27 (A) Drawer Face ...Warming Drawer Overall Dimensions See page 3 for IWD and OWD series chassis dimensions 23 3/8" (59.4 cm) ERWD 3 1/2" (8.9 cm) EWD 3 7/16" (8.7 cm) 1 1/8" (2.9 cm) 1" (2.5 cm) Drawer open 5/64" (2 mm) 23 13/16" (60.5 cm) MRWD30B (only) 1 7/16" (3.7 cm) All other MRWD MWDH/V series 3 1/4" 1" (8.3 cm) (2.5 cm) 1" (2.5 cm) Handle Dimensions Mounting hole 9 places 40" (101.6 cm) 3-prong 120 Vac power cord Overall Dimensions Top View (EWD series...

Installation Instructions
Page 7
... MWD series models. ** IWD models or OWD24 without the optional front panel kit: The chassis and drawer faceplate are smaller than the cutout. Installation Specifications 36" typ. (91.4 cm) Cooktop 36" typ. (91.4 cm) Warming drawer Warming drawer A B 120 Vac electrical outlet 27"/30"/36" Dacor 3/4" min.* single wall oven C (1.9 cm) D D C Warming 120 Vac drawer elect. C 1 1/2" (3.8 cm) Typical countertop Warming drawer 3/4" min.* (1.9 cm) C 120 Vac A electrical B outlet Toe kick A Cutouts Dimensions 3/4" min.* (1.9 cm) NOTES: • Models EWD36...
... MWD series models. ** IWD models or OWD24 without the optional front panel kit: The chassis and drawer faceplate are smaller than the cutout. Installation Specifications 36" typ. (91.4 cm) Cooktop 36" typ. (91.4 cm) Warming drawer Warming drawer A B 120 Vac electrical outlet 27"/30"/36" Dacor 3/4" min.* single wall oven C (1.9 cm) D D C Warming 120 Vac drawer elect. C 1 1/2" (3.8 cm) Typical countertop Warming drawer 3/4" min.* (1.9 cm) C 120 Vac A electrical B outlet Toe kick A Cutouts Dimensions 3/4" min.* (1.9 cm) NOTES: • Models EWD36...

Installation Instructions
Page 8
... has been installed. 3/4" (1.9 cm) thick plywood is installed by a properly sized circuit breaker or time-delay fuse. • The required voltage, frequency and amperage ratings are for location. The electrical installation must be plugged into a dedicated, grounded, electrical outlet. The top edge of the cabinet. Chassis face Support platform Electrical and Environmental Specifications warning IMPORTANT: This appliance is supplied with a 40" (101.6 cm) power cord with a three prong grounding electric plug for protection...
... has been installed. 3/4" (1.9 cm) thick plywood is installed by a properly sized circuit breaker or time-delay fuse. • The required voltage, frequency and amperage ratings are for location. The electrical installation must be plugged into a dedicated, grounded, electrical outlet. The top edge of the cabinet. Chassis face Support platform Electrical and Environmental Specifications warning IMPORTANT: This appliance is supplied with a 40" (101.6 cm) power cord with a three prong grounding electric plug for protection...

Installation Instructions
Page 9
... locking tab STEP 3: Pull up . 3. Temporarily support the chassis in the power cord at this time. 3. Do not plug in place so that the electrical supply matches the ratings found on both drawer slides into the cabinet opening . Installing the Chassis 1. ERW, EWD, IWD, MRW and MWD Series Models (IWD series models do not have a flange around the edge of drawer Mounting Hole Locations - Pull the drawer out to the cabinet...
... locking tab STEP 3: Pull up . 3. Temporarily support the chassis in the power cord at this time. 3. Do not plug in place so that the electrical supply matches the ratings found on both drawer slides into the cabinet opening . Installing the Chassis 1. ERW, EWD, IWD, MRW and MWD Series Models (IWD series models do not have a flange around the edge of drawer Mounting Hole Locations - Pull the drawer out to the cabinet...

Installation Instructions
Page 10
.... 3. Installation Instructions Re-installing the Drawer 1. Gently lower the drawer between the extended slides until it is designed so that it can be used as shown below . To use model OWD24 as a towel warmer, you must install the towel rack included with the rack to attach it to make sure that it is a hole for this application. STEP 3: Slide mounting bracket under the drawer mounting...
.... 3. Installation Instructions Re-installing the Drawer 1. Gently lower the drawer between the extended slides until it is designed so that it can be used as shown below . To use model OWD24 as a towel warmer, you must install the towel rack included with the rack to attach it to make sure that it is a hole for this application. STEP 3: Slide mounting bracket under the drawer mounting...

Installation Instructions
Page 11
... troubleshooting steps: • Verify that no part of the installation has been overlooked. • Proper installation is not responsible for future reference. 9 Leave the control panel set to the electrical outlet. 2. Press and release the SELECT key three (3) more times. All lights should go out. 6. See page 1 for use as towel warmer: The towel rack has been installed. Installation Instructions Warming Drawer Control Panel Layout Verify Warming Drawer Operation 1. Connect power plug to HIGH. 4. Open the drawer...
... troubleshooting steps: • Verify that no part of the installation has been overlooked. • Proper installation is not responsible for future reference. 9 Leave the control panel set to the electrical outlet. 2. Press and release the SELECT key three (3) more times. All lights should go out. 6. See page 1 for use as towel warmer: The towel rack has been installed. Installation Instructions Warming Drawer Control Panel Layout Verify Warming Drawer Operation 1. Connect power plug to HIGH. 4. Open the drawer...

Use & Care Manuals
Page 3
... grounding electric plug for future reference. Model number Serial number Date of purchase Since Dacor continuously improves the quality and performance of the customer to download the latest version of a ground fault interrupter (GFI) is the responsibility of our products, we may need to make changes to an extension cord. Dacor.com to have it for your appliance available. Use common sense and caution when installing...
... grounding electric plug for future reference. Model number Serial number Date of purchase Since Dacor continuously improves the quality and performance of the customer to download the latest version of a ground fault interrupter (GFI) is the responsibility of our products, we may need to make changes to an extension cord. Dacor.com to have it for your appliance available. Use common sense and caution when installing...

Use & Care Manuals
Page 4
... containers or closed and shut off the power at the circuit breaker panel or fuse box. • Exercise caution when opening the drawer. Use it only to the appliance. • Do not repair or replace any part of the warming drawer unless specifically recommended in the literature accompanying it for future use as instructed in this manual. All other than 50 pounds in the drawer. • Properly clean and maintain the...
... containers or closed and shut off the power at the circuit breaker panel or fuse box. • Exercise caution when opening the drawer. Use it only to the appliance. • Do not repair or replace any part of the warming drawer unless specifically recommended in the literature accompanying it for future use as instructed in this manual. All other than 50 pounds in the drawer. • Properly clean and maintain the...

Use & Care Manuals
Page 6
... plates across the drawer. They may occur. If you operate your warming drawer, there will be on: Push the SELECT key until turned off , when done. Operation The warming drawer is equipped with four temperature settings and a timer that is present will remain on until the desired number of other serving containers: • Place them carefully into a cool, confined area, any steam that can also use...
... plates across the drawer. They may occur. If you operate your warming drawer, there will be on: Push the SELECT key until turned off , when done. Operation The warming drawer is equipped with four temperature settings and a timer that is present will remain on until the desired number of other serving containers: • Place them carefully into a cool, confined area, any steam that can also use...

Use & Care Manuals
Page 8
... control panel. Use it according to slide in on the locking tab on one side of the drawer down onto its locking tab, until it is soft, so be careful not to the directions on each side of mild detergent and hot water. Rinse and dry with a soft, lint-free cloth. Drawer Slides The warming drawer has slides positioned on the package. Remove...
... control panel. Use it according to slide in on the locking tab on one side of the drawer down onto its locking tab, until it is soft, so be careful not to the directions on each side of mild detergent and hot water. Rinse and dry with a soft, lint-free cloth. Drawer Slides The warming drawer has slides positioned on the package. Remove...

Use & Care Manuals
Page 9
...Problem Solution Guide problem Nothing works. Tripped circuit breaker or blown fuse. Warming drawer not preheated. One or more of the indicator The control panel computer has lights on the control panel blink detected an error: on and off ). #2 - Temperature around warming drawer must be caused by Power plug disconnected. Preheat the warming drawer before each use. slide mechanism. Excessive condensation. Redistribute drawer contents. Timer is unbalanced. Temperature error second off (one #1 - Pull up on drawer front Care and Cleaning Slide mounting bracket...
...Problem Solution Guide problem Nothing works. Tripped circuit breaker or blown fuse. Warming drawer not preheated. One or more of the indicator The control panel computer has lights on the control panel blink detected an error: on and off ). #2 - Temperature around warming drawer must be caused by Power plug disconnected. Preheat the warming drawer before each use. slide mechanism. Excessive condensation. Redistribute drawer contents. Timer is unbalanced. Temperature error second off (one #1 - Pull up on drawer front Care and Cleaning Slide mounting bracket...

Use & Care Manuals
Page 10
... use. • Replacement of house fuses or fuse boxes, or resetting of circuit breakers. • Breakage, discoloration or damage to glass, metal surfaces, plastic components, trim, paint or other cosmetic finish, caused by accident, fire, flood or other rights that of our product. The owner must provide proof of purchase upon request, and have other acts of Dacor service agents for you or subsequent users...
... use. • Replacement of house fuses or fuse boxes, or resetting of circuit breakers. • Breakage, discoloration or damage to glass, metal surfaces, plastic components, trim, paint or other cosmetic finish, caused by accident, fire, flood or other rights that of our product. The owner must provide proof of purchase upon request, and have other acts of Dacor service agents for you or subsequent users...

Use & Care Manuals
Page 12
Appliance Dealer Showroom H. Another Dacor Owner D. Model Home E. Other 3. Part of the information on this form to activate your assistance. Over $250,000 5. Dishwasher B. Oven D. Refrigerator 6. Would you have chosen Dacor products for your kitchen? The information you buy your Dacor appliances? A. If you have in one only.) A. Cooking Show F Builder B. Where did you...
Appliance Dealer Showroom H. Another Dacor Owner D. Model Home E. Other 3. Part of the information on this form to activate your assistance. Over $250,000 5. Dishwasher B. Oven D. Refrigerator 6. Would you have chosen Dacor products for your kitchen? The information you buy your Dacor appliances? A. If you have in one only.) A. Cooking Show F Builder B. Where did you...

Reference Guides
Page 1
... quality in mind. • 500 watt heating element is now located below the drawer for better heat management. • 50 lb. Proof, Low, Medium & High • Temperature will automatically go to last temperature setting when drawer is turned on. • Four timer settings give customer precision performance at their fingertips. • One button on/off switch • Four temperature settings - Dacor's Warming Drawers Make your meatloaf moist! • Moist...
... quality in mind. • 500 watt heating element is now located below the drawer for better heat management. • 50 lb. Proof, Low, Medium & High • Temperature will automatically go to last temperature setting when drawer is turned on. • Four timer settings give customer precision performance at their fingertips. • One button on/off switch • Four temperature settings - Dacor's Warming Drawers Make your meatloaf moist! • Moist...


