

Use and Care Manual
Page 1
IMPORTANT INFORMATION • Operating Instructions • Care and Cleaning Instructions • Safety Tips WARNINGS: Please Read Before Using Your Range Must be followed carefully to avoid personal injury or damage. G THE OPERATION WILL BE FURTHER ENHANCED IF PROPER CARE AND JUDGEMENT ARE EXERCISED IN THE USE AND MAINTENANCE OF THIS APPLIANCE. Use & Care Epicure™ Ranges SAFETY IS EVERYONE'S RESPONSIBILITY. Place Serial Number Label Here Part No. 65091 Rev...
IMPORTANT INFORMATION • Operating Instructions • Care and Cleaning Instructions • Safety Tips WARNINGS: Please Read Before Using Your Range Must be followed carefully to avoid personal injury or damage. G THE OPERATION WILL BE FURTHER ENHANCED IF PROPER CARE AND JUDGEMENT ARE EXERCISED IN THE USE AND MAINTENANCE OF THIS APPLIANCE. Use & Care Epicure™ Ranges SAFETY IS EVERYONE'S RESPONSIBILITY. Place Serial Number Label Here Part No. 65091 Rev...
Use and Care Manual
Page 3
... INSTRUCTIONS 2 What To Do 2 What Not To Do 2 OVEN OPERATION 3-7 Getting Started 3 What is Pure Convection 4 Setting the Time of Day 4 Oven Modes 4 Oven Racks & Supports 4 Oven Mode Selection 5 Preheating the Oven 5 Using the Minute Timers 5 Securing the Controls 6 Baking 6 Roasting 6 Multiple Rack Baking 6 Delay Timed Cooking 6-7 Dehydrating/Defrosting 7 Broiling 7 COOKTOP OPERATION 7-8 Selecting the Proper Cookware 7 Burner Controls 7 Setting the Burner Flame Height 8 Using the Simmer Plate 8 CARE AND CLEANING 8-12 Cleaning Tips 8-9 Control Panel 9 Door Handle...
... INSTRUCTIONS 2 What To Do 2 What Not To Do 2 OVEN OPERATION 3-7 Getting Started 3 What is Pure Convection 4 Setting the Time of Day 4 Oven Modes 4 Oven Racks & Supports 4 Oven Mode Selection 5 Preheating the Oven 5 Using the Minute Timers 5 Securing the Controls 6 Baking 6 Roasting 6 Multiple Rack Baking 6 Delay Timed Cooking 6-7 Dehydrating/Defrosting 7 Broiling 7 COOKTOP OPERATION 7-8 Selecting the Proper Cookware 7 Burner Controls 7 Setting the Burner Flame Height 8 Using the Simmer Plate 8 CARE AND CLEANING 8-12 Cleaning Tips 8-9 Control Panel 9 Door Handle...
Use and Care Manual
Page 4
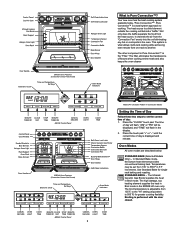
... repair or replace any part of the range unless specifically recommended in any part of interest to reposition them so that they have six seconds to touch hot surfaces or gas burners. Do not clean the door gasket, because rubbing, moving or in literature accompanying this occur, just repeat the initial function selection Electronic Clock ERD30/36/60 Oven Features (Convection Screen Not Shown) Time and Temperature Set Keys Oven Mode Indicators BAKE CONVECTION BAKE TIME ● TEMP BAKE PURE CONVECTION BROIL SELF CLEAN TIMER 1 CLOCK...
... repair or replace any part of the range unless specifically recommended in any part of interest to reposition them so that they have six seconds to touch hot surfaces or gas burners. Do not clean the door gasket, because rubbing, moving or in literature accompanying this occur, just repeat the initial function selection Electronic Clock ERD30/36/60 Oven Features (Convection Screen Not Shown) Time and Temperature Set Keys Oven Mode Indicators BAKE CONVECTION BAKE TIME ● TEMP BAKE PURE CONVECTION BROIL SELF CLEAN TIMER 1 CLOCK...
Use and Care Manual
Page 5
... LIGHT COOK TIME ERD48 Oven Features (Convection Screen Not Shown) Time and Temperature Electronic Clock Set Keys Oven Mode Indicators CONVECTION BAKE CONVECTION BROIL PURE CONVECTION BAKE BROIL SELF CLEAN CANCEL ● SECURE LIGHT COOK TIME BAKE CONVECTION BAKE PURE CONVECTION TIME ● TEMP BAKE BROIL SELF CLEAN TIMER 1 CLOCK STOP TIME TIMER 2 CANCEL ● SECURE LIGHT COOK TIME CANCEL OVEN SECURE LIGHT COOK TIME MINUTE CLOCK STOP MINUTE TIMER #1 SET TIME TIMER #2 ERD48 Control Panel CANCEL OVEN SECURE LIGHT COOK TIME 3 What is performed with the door...
... LIGHT COOK TIME ERD48 Oven Features (Convection Screen Not Shown) Time and Temperature Electronic Clock Set Keys Oven Mode Indicators CONVECTION BAKE CONVECTION BROIL PURE CONVECTION BAKE BROIL SELF CLEAN CANCEL ● SECURE LIGHT COOK TIME BAKE CONVECTION BAKE PURE CONVECTION TIME ● TEMP BAKE BROIL SELF CLEAN TIMER 1 CLOCK STOP TIME TIMER 2 CANCEL ● SECURE LIGHT COOK TIME CANCEL OVEN SECURE LIGHT COOK TIME MINUTE CLOCK STOP MINUTE TIMER #1 SET TIME TIMER #2 ERD48 Control Panel CANCEL OVEN SECURE LIGHT COOK TIME 3 What is performed with the door...
Use and Care Manual
Page 6
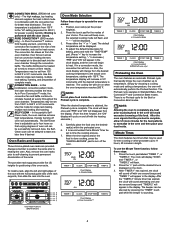
... convection fan for better heat distribution. The high wattage, top heating element supplies the heat in Broil mode in 5˚F increments. Temperatures may be successfully removed. Use this time forward, the "ON" display will appear in length. In this mode for greater cooking flexibility. The Self-Clean time is adjustable up to 555˚F in the clock display, and the oven will disappear from the oven chamber, then forces it across the hot convection heating element. Also, remove the oven racks...
... convection fan for better heat distribution. The high wattage, top heating element supplies the heat in Broil mode in 5˚F increments. Temperatures may be successfully removed. Use this time forward, the "ON" display will appear in length. In this mode for greater cooking flexibility. The Self-Clean time is adjustable up to 555˚F in the clock display, and the oven will disappear from the oven chamber, then forces it across the hot convection heating element. Also, remove the oven racks...
Use and Care Manual
Page 7
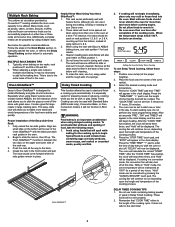
... aluminum sheets with tall sides. As a general rule, a convection mode will not give uniform baking results. 8. Some recipes, especially those that are homemade, may require moist cooking techniques. Use the Minute Timers to a Minute Timer display, press the "TIMER 1" or "TIMER 2" touch pad. 2. Measure ingredients carefully and follow the Convection guidelines listed. Tips for specific recommendations. If you can be adjusted as cooking time, rack position or temperature) and repeat the convection test. To change...
... aluminum sheets with tall sides. As a general rule, a convection mode will not give uniform baking results. 8. Some recipes, especially those that are homemade, may require moist cooking techniques. Use the Minute Timers to a Minute Timer display, press the "TIMER 1" or "TIMER 2" touch pad. 2. Measure ingredients carefully and follow the Convection guidelines listed. Tips for specific recommendations. If you can be adjusted as cooking time, rack position or temperature) and repeat the convection test. To change...
Use and Care Manual
Page 8
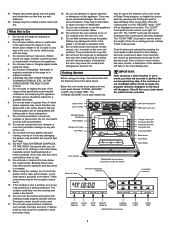
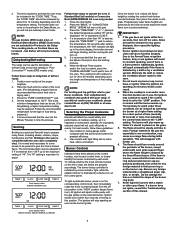
... of the rack rear. 3. Select the desired cooking mode and temperature. 4. The oven can use it during self- If cooking in the oven. "Hold" mode can be set to the baking time. The cooling fan will also turn off . These foods will not begin heating. Follow the steps in the Oven Modes section, to manually operate the oven, or refer to run , depending upon the length and temperature of food in a convection mode, the convection fan will...
... of the rack rear. 3. Select the desired cooking mode and temperature. 4. The oven can use it during self- If cooking in the oven. "Hold" mode can be set to the baking time. The cooling fan will also turn off . These foods will not begin heating. Follow the steps in the Oven Modes section, to manually operate the oven, or refer to run , depending upon the length and temperature of food in a convection mode, the convection fan will...
Use and Care Manual
Page 9
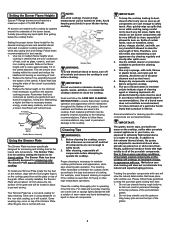
... Electrical Glass Broilers (ERDE model only), are grouped accordingly. This is the minimum temperature that the user set the Minute Timer(s) to dehydrate or defrost foods: 1. Follow the recommended temperature for Pre-heat in the "COOK TIME." Press the "BROIL" or "CONVECTION BROIL" (ERD48 left oven only) modes: 1. If a temperature other open flame. Your complimentary cookbook was packed with your Dacor cookbook. For best results, follow these steps to time the process. Burner Controls Indicators...
... Electrical Glass Broilers (ERDE model only), are grouped accordingly. This is the minimum temperature that the user set the Minute Timer(s) to dehydrate or defrost foods: 1. Follow the recommended temperature for Pre-heat in the "COOK TIME." Press the "BROIL" or "CONVECTION BROIL" (ERD48 left oven only) modes: 1. If a temperature other open flame. Your complimentary cookbook was packed with your Dacor cookbook. For best results, follow these steps to time the process. Burner Controls Indicators...
Use and Care Manual
Page 10
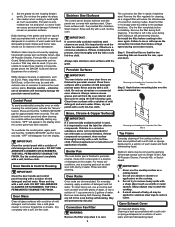
... to this natural and expected aging process. Setting the Burner Flame Heights Epicure™ Range burners are all rated at the lowest safe temperature. Setting the proper burner flame height for simmering only. This will be removed when cooking. To install your home, are used in superior cooking performance, while also saving time and energy. When correctly installed, the Simmer Plate will rest about 1/2 inch above the top surface of...
... to this natural and expected aging process. Setting the Burner Flame Heights Epicure™ Range burners are all rated at the lowest safe temperature. Setting the proper burner flame height for simmering only. This will be removed when cooking. To install your home, are used in superior cooking performance, while also saving time and energy. When correctly installed, the Simmer Plate will rest about 1/2 inch above the top surface of...
Use and Care Manual
Page 11
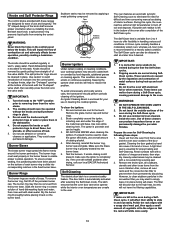
... to using the Self-Cleaning cycle. Grates and burner caps should not be used , it is used with a soft cloth or sponge dampened in the oven during convection modes. "OFF" will disable the control panel and allow cleaning the controls without accidentally starting any functions. Rinse and dry with a solution of convection cooking modes. Clean these surfaces with a soft cloth. Do not use the cooktop surface as steel wool with a solution of water. Remove...
... to using the Self-Cleaning cycle. Grates and burner caps should not be used , it is used with a soft cloth or sponge dampened in the oven during convection modes. "OFF" will disable the control panel and allow cleaning the controls without accidentally starting any functions. Rinse and dry with a solution of convection cooking modes. Clean these surfaces with a soft cloth. Do not use the cooktop surface as steel wool with a solution of water. Remove...
Use and Care Manual
Page 12
.... 3. Turn the knobs to the "OFF" position prior to removing them in a warm solution of the valve shafts. Burner Bases The brass burner rings spread the flame evenly around the ignitor, including over and under the edge of heat. 5. To remove the burner ring, first lift off soil and deposits. Soak the burner ring in the dishwasher. 4. To clean the ignitors: 1. Use care while cleaning here. Self-Cleaning The electric door latch...
.... 3. Turn the knobs to the "OFF" position prior to removing them in a warm solution of the valve shafts. Burner Bases The brass burner rings spread the flame evenly around the ignitor, including over and under the edge of heat. 5. To remove the burner ring, first lift off soil and deposits. Soak the burner ring in the dishwasher. 4. To clean the ignitors: 1. Use care while cleaning here. Self-Cleaning The electric door latch...
Use and Care Manual
Page 13
... the "TIME•TEMP" "+" pad. 6. Re-install the oven racks and convection fan filter before replacing the light bulb. 2. IMPORTANT: With the oven at room temperature, if the SelfClean mode is unlocked. 8. Familiarity with a non-scratch scouring pad before using the oven. If any cooking function until the oven door is accidentally selected and the oven enters Self-Clean mode (indicated by "LOCK" and "ON" in the clock display), the user must cancel out of oven soil) by high oven temperatures or...
... the "TIME•TEMP" "+" pad. 6. Re-install the oven racks and convection fan filter before replacing the light bulb. 2. IMPORTANT: With the oven at room temperature, if the SelfClean mode is unlocked. 8. Familiarity with a non-scratch scouring pad before using the oven. If any cooking function until the oven door is accidentally selected and the oven enters Self-Clean mode (indicated by "LOCK" and "ON" in the clock display), the user must cancel out of oven soil) by high oven temperatures or...
Use and Care Manual
Page 14
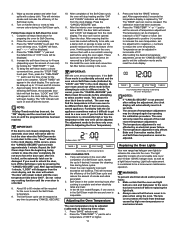
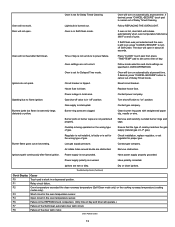
... in SELF-CLEANING. 12 Door is not set correct time of the pry stick under -cook. Gently insert the point end of day. Remedy Have oven connected to the Setting the Time of day. (Refer to a properly sized electrical power supply by rotating clockwise. 5. Power supply is not connected to remove the lens cover. 3. Adjust oven temperature as specified in OVEN OPERATION. Adjust time, temperature or rack position. Troubleshooting Guide Follow mode selection and clock settings as per ADJUSTING THE OVEN TEMPERATURE. Reset time of day is not shut...
... in SELF-CLEANING. 12 Door is not set correct time of the pry stick under -cook. Gently insert the point end of day. Remedy Have oven connected to the Setting the Time of day. (Refer to a properly sized electrical power supply by rotating clockwise. 5. Power supply is not connected to remove the lens cover. 3. Adjust oven temperature as specified in OVEN OPERATION. Adjust time, temperature or rack position. Troubleshooting Guide Follow mode selection and clock settings as per ADJUSTING THE OVEN TEMPERATURE. Reset time of day is not shut...
Use and Care Manual
Page 15
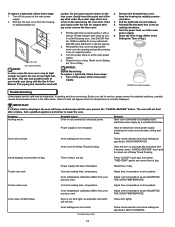
... hot, door latch will not work. Power outage in the oven temperature sensor. Gas supply is stuck in the EEPROM check comparison. (Only time of day and timer will not heat after flame ignition. Clean burner ring ports with straightened paper clip, needle or wire. Oven is set for the wrong type of gas. Oven temperature exceeded the clean runaway temperature (Self-Clean mode only) or the cooking runaway temperature (cooking modes only). Regulator is not installed, is faulty or is set for Delayed Time mode. Troubleshooting Guide...
... hot, door latch will not work. Power outage in the oven temperature sensor. Gas supply is stuck in the EEPROM check comparison. (Only time of day and timer will not heat after flame ignition. Clean burner ring ports with straightened paper clip, needle or wire. Oven is set for the wrong type of gas. Oven temperature exceeded the clean runaway temperature (Self-Clean mode only) or the cooking runaway temperature (cooking modes only). Regulator is not installed, is faulty or is set for Delayed Time mode. Troubleshooting Guide...
Use and Care Manual
Page 16
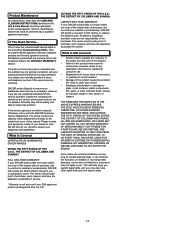
... the DACOR Customer Service Department. IN NO EVENT SHALL DACOR BE LIABLE FOR INCIDENTAL EXPENSE OR CONSEQUENTIAL DAMAGES. This warranty gives you specific legal rights, and you may not apply to you . First, review the recommended checks listed in material or workmanship, DACOR will remedy the defect without charge to you or subsequent users. The owner must be attempted by the owner/operator...
... the DACOR Customer Service Department. IN NO EVENT SHALL DACOR BE LIABLE FOR INCIDENTAL EXPENSE OR CONSEQUENTIAL DAMAGES. This warranty gives you specific legal rights, and you may not apply to you . First, review the recommended checks listed in material or workmanship, DACOR will remedy the defect without charge to you or subsequent users. The owner must be attempted by the owner/operator...

Use and Care Manual
Page 19
fold here BUSINESS REPLY MAIL FIRST-CLASS MAIL PERMIT NO. 4507 DIAMOND BAR CA POSTAGE WILL BE PAID BY ADDRESSEE ATTN: WARRANTY PROCESSING DEPT DACOR 1440 BRIDGEGATE DR STE 200 PO BOX 6532 DIAMOND BAR CA 91765-9861 NO POSTAGE NECESSARY IF MAILED IN THE UNITED STATES 1
fold here BUSINESS REPLY MAIL FIRST-CLASS MAIL PERMIT NO. 4507 DIAMOND BAR CA POSTAGE WILL BE PAID BY ADDRESSEE ATTN: WARRANTY PROCESSING DEPT DACOR 1440 BRIDGEGATE DR STE 200 PO BOX 6532 DIAMOND BAR CA 91765-9861 NO POSTAGE NECESSARY IF MAILED IN THE UNITED STATES 1
Use and Care Manual
Page 20
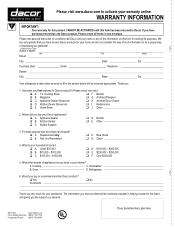
... willingness to take a few seconds to Dacor products? (Please check one envelope. cut here Web Site: www.dacor.com For a Dealer/Service: (800) 772-7778 Corporate Phone: (800) 793-0093 Place Serial Number Label Here WARRANTY INFORMATION IMPORTANT: Your warranty for the future and giving you the support you have chosen Dacor products for your Dacor appliances? A. If you deserve...
... willingness to take a few seconds to Dacor products? (Please check one envelope. cut here Web Site: www.dacor.com For a Dealer/Service: (800) 772-7778 Corporate Phone: (800) 793-0093 Place Serial Number Label Here WARRANTY INFORMATION IMPORTANT: Your warranty for the future and giving you the support you have chosen Dacor products for your Dacor appliances? A. If you deserve...


