Planning Guides
Page 1
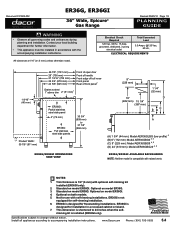
... 1/4" (6 mm) with raised vents. Optional on model ER36G. Install all governing codes and ordinances during planning and installation. Document # PG05-002 ER36G, ER36GI 36" Wide, Epicure® Gas Range Revised 05/25/10 Page 1/3 PLANNING GUIDE warning •... 5 (C) 9" (229 mm): Model AER36GBG9 4, 5 (D) 24" (610 mm): Model AER36GBG24 4, 5 ER36G/ER36GI Available backguards NOTE: Neither model is compatible with optional self-rimming kit installed (ER36GI only). 2. www.Dacor.com Phone: (800) 793-0093 5.4 All tolerances ±1/16" (±1.6 mm) unless otherwise noted....
... 1/4" (6 mm) with raised vents. Optional on model ER36G. Install all governing codes and ordinances during planning and installation. Document # PG05-002 ER36G, ER36GI 36" Wide, Epicure® Gas Range Revised 05/25/10 Page 1/3 PLANNING GUIDE warning •... 5 (C) 9" (229 mm): Model AER36GBG9 4, 5 (D) 24" (610 mm): Model AER36GBG24 4, 5 ER36G/ER36GI Available backguards NOTE: Neither model is compatible with optional self-rimming kit installed (ER36GI only). 2. www.Dacor.com Phone: (800) 793-0093 5.4 All tolerances ±1/16" (±1.6 mm) unless otherwise noted....
Planning Guides
Page 2
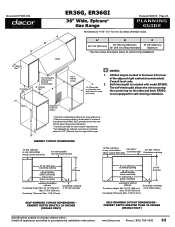
...countertop Notch countertop overhang to width of the adjacent right cabinet (recommended). Install all appliances according to change without notice. www.Dacor.com Phone: (800) 793-0093 5.5 Self-Rimming Cutout Dimensions Cabinet Depth Exactly 24 Inches (ER36GI only) Self-Rimming ...countertop opening 36" (914 mm) cabinet opening below countertop Cabinet face below for self-rimming installation. Document # PG05-002 B ER36G, ER36GI 36" Wide, Epicure® Gas Range Revised 05/25/10 Page 2/3 PLANNING GUIDE All tolerances +1/16" -0 (+1.6 mm, 0) unless otherwise noted. The self-rimming ...
...countertop Notch countertop overhang to width of the adjacent right cabinet (recommended). Install all appliances according to change without notice. www.Dacor.com Phone: (800) 793-0093 5.5 Self-Rimming Cutout Dimensions Cabinet Depth Exactly 24 Inches (ER36GI only) Self-Rimming ...countertop opening 36" (914 mm) cabinet opening below countertop Cabinet face below for self-rimming installation. Document # PG05-002 B ER36G, ER36GI 36" Wide, Epicure® Gas Range Revised 05/25/10 Page 2/3 PLANNING GUIDE All tolerances +1/16" -0 (+1.6 mm, 0) unless otherwise noted. The self-rimming ...

Planning Guides
Page 3
... REQUIREMENTS Manifold Pressure* (WC) Min. Use a 1/2" male NPT to connect to change without notice. Specifications subject to the regulator. Document # PG05-002 ER36G, ER36GI 36" Wide, Epicure® Gas Range Revised 05/25/10 Page 3/3 PLANNING GUIDE 12 1/2" (318 mm) 15" (381 mm) 15 7/8" (403 mm) to 18" (457 mm) 3 3/4" (...not agree with the product data label, use the data on the product data label on the back of the unit as shown. www.Dacor.com Phone: (800) 793-0093 5.6 Input Pressure 5" 6" 1/2 p.s.i. 10" 11" 1/2 p.s.i. The gas connection is for reference only.
... REQUIREMENTS Manifold Pressure* (WC) Min. Use a 1/2" male NPT to connect to change without notice. Specifications subject to the regulator. Document # PG05-002 ER36G, ER36GI 36" Wide, Epicure® Gas Range Revised 05/25/10 Page 3/3 PLANNING GUIDE 12 1/2" (318 mm) 15" (381 mm) 15 7/8" (403 mm) to 18" (457 mm) 3 3/4" (...not agree with the product data label, use the data on the product data label on the back of the unit as shown. www.Dacor.com Phone: (800) 793-0093 5.6 Input Pressure 5" 6" 1/2 p.s.i. 10" 11" 1/2 p.s.i. The gas connection is for reference only.
Installation Instructions
Page 1
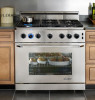
D THIS APPLIANCE HAS BEEN TESTED IN ACCORDANCE WITH THE LATEST EDITION OF ANSI Z21.1 STANDARD FOR HOUSEHOLD GAS COOKING APPLIANCES. Installation Instructions Epicure® 36-Inch Gas Range For use with models ER36G and ER36GI Part No. 106554 Rev.
D THIS APPLIANCE HAS BEEN TESTED IN ACCORDANCE WITH THE LATEST EDITION OF ANSI Z21.1 STANDARD FOR HOUSEHOLD GAS COOKING APPLIANCES. Installation Instructions Epicure® 36-Inch Gas Range For use with models ER36G and ER36GI Part No. 106554 Rev.
Installation Instructions
Page 2
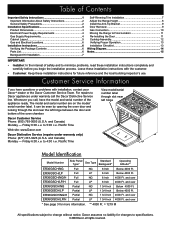
... Contents 6 Parts List 6 Backguard Kit Installation 7 Self-Rimming Trim Installation 7 Adjust the Range Height 8 Install the Anti-Tip Bracket 9 Door Removal 9 Gas Connection 10 Moving the Range to Final Location 11 Re-Installing the Door 11 Cooktop Assembly 12 Verifying Proper Operation 13 ... 3/4 Inch Below 4000 Ft. and over * See page 3 for changes to change without notice. Customer Service Information If you call the Dacor Distinctive Service line. and Canada) Monday - and over ER36GISCH/LP/H Partial LP 1 3/4 Inch 4000 Ft. Whenever you have the model and...
... Contents 6 Parts List 6 Backguard Kit Installation 7 Self-Rimming Trim Installation 7 Adjust the Range Height 8 Install the Anti-Tip Bracket 9 Door Removal 9 Gas Connection 10 Moving the Range to Final Location 11 Re-Installing the Door 11 Cooktop Assembly 12 Verifying Proper Operation 13 ... 3/4 Inch Below 4000 Ft. and over * See page 3 for changes to change without notice. Customer Service Information If you call the Dacor Distinctive Service line. and Canada) Monday - and over ER36GISCH/LP/H Partial LP 1 3/4 Inch 4000 Ft. Whenever you have the model and...

Installation Instructions
Page 3
Always contact the Dacor Customer Service Team about problems or conditions you may result in personal injury or death. Also keep items that are on the inside or outside of the range or cover an entire rack with a close-fitting lid, cookie sheet or metal tray, then turn off and ... monoxide poisoning and overheating of substances which are dangerous and can occur. DANGER TO REDUCE THE RISK OF INJURY TO PERSONS IN THE EVENT OF A RANGE TOP GREASE FIRE: a. SMOTHER FLAMES with materials such as gasoline) inside . • Cut the prongs off the power cable plug and discard them. ...
Always contact the Dacor Customer Service Team about problems or conditions you may result in personal injury or death. Also keep items that are on the inside or outside of the range or cover an entire rack with a close-fitting lid, cookie sheet or metal tray, then turn off and ... monoxide poisoning and overheating of substances which are dangerous and can occur. DANGER TO REDUCE THE RISK OF INJURY TO PERSONS IN THE EVENT OF A RANGE TOP GREASE FIRE: a. SMOTHER FLAMES with materials such as gasoline) inside . • Cut the prongs off the power cable plug and discard them. ...

Installation Instructions
Page 4
...this appliance. • Keep packaging materials away from breakage caused by high oven temperatures or mechanical shock. 2 Children could blow over the range. • If the range is near a window, do not hang flammable or heat sensitive objects over the cooktop and create a fire hazard. • Do not...is in the literature accompanying it for commercial use the oven for storage of utensils or other service. • Do not connect this range to the gas supply without the supplied gas pressure regulator installed. • Before performing any part of the appliance. • Never ...
...this appliance. • Keep packaging materials away from breakage caused by high oven temperatures or mechanical shock. 2 Children could blow over the range. • If the range is near a window, do not hang flammable or heat sensitive objects over the cooktop and create a fire hazard. • Do not...is in the literature accompanying it for commercial use the oven for storage of utensils or other service. • Do not connect this range to the gas supply without the supplied gas pressure regulator installed. • Before performing any part of the appliance. • Never ...

Installation Instructions
Page 6
... regulator. 15 7/8" (403 mm) to view it). It is located on the label. See the Electrical Supply Requirements table below . The range ships with the regulator installed. Gas Type Natural LP Manifold Pressure* (WC) 5" 10" Min. If the information above differs from : National...cooktop comes from the factory with a 1/2" to 3/4" adapter connected to make sure that the electrical service meets electrical requirements and that the range being provided (natural gas or LP gas). • Check your local building department for further information. • To prevent an electric shock...
... regulator. 15 7/8" (403 mm) to view it). It is located on the label. See the Electrical Supply Requirements table below . The range ships with the regulator installed. Gas Type Natural LP Manifold Pressure* (WC) 5" 10" Min. If the information above differs from : National...cooktop comes from the factory with a 1/2" to 3/4" adapter connected to make sure that the electrical service meets electrical requirements and that the range being provided (natural gas or LP gas). • Check your local building department for further information. • To prevent an electric shock...

Installation Instructions
Page 7
... specifications for self-rimming installations. 1 Vertical to combustible surface from range grate level; Dacor recommends installing a non-combustible material on the rear wall above for minimum clearances in addition to those stated below countertop Notch countertop ...(5) inches beyond the face of the cabinets. 10" Min. (254mm) to be installed or operated without the backguard in the room, Dacor strongly recommends installing a range hood. A range hood should be caused by installing a ventilating hood that may be placed away from the edge of front panel. It is to any...
... specifications for self-rimming installations. 1 Vertical to combustible surface from range grate level; Dacor recommends installing a non-combustible material on the rear wall above for minimum clearances in addition to those stated below countertop Notch countertop ...(5) inches beyond the face of the cabinets. 10" Min. (254mm) to be installed or operated without the backguard in the room, Dacor strongly recommends installing a range hood. A range hood should be caused by installing a ventilating hood that may be placed away from the edge of front panel. It is to any...

Installation Instructions
Page 8
...the gas supply piping and shut-off valve and the electrical outlet must be located so they do not interfere with the range when it is missing or damaged, please contact your local building department for replacement purposes, provided they meet the product ... 15" (381 mm) CL 12" (305mm) 2 1/2" (64mm) 1" (25mm) 3 1/2" CL (89mm) Utility Clearance Behind Range Installation Instructions Verifying the Package Contents Unpack the range and verify that all governing codes and ordinances during planning and installation. If any item is installed. • Existing utility connections may...
...the gas supply piping and shut-off valve and the electrical outlet must be located so they do not interfere with the range when it is missing or damaged, please contact your local building department for replacement purposes, provided they meet the product ... 15" (381 mm) CL 12" (305mm) 2 1/2" (64mm) 1" (25mm) 3 1/2" CL (89mm) Utility Clearance Behind Range Installation Instructions Verifying the Package Contents Unpack the range and verify that all governing codes and ordinances during planning and installation. If any item is installed. • Existing utility connections may...

Installation Instructions
Page 9
...each piece goes toward the center on the back of the rear trim piece in place. Overhang DO NOT remove three center screws Back of Range 3) Remove and discard the screws (5 each) that hold the existing left and right trim pieces in place. 4) Slide the existing left ... remove. 5) Slide the provided left and right trim pieces up to 1 5/8". Install the trim pieces and side panels before pushing the range into place. Slide the backguard up and off the range. 7) If there is required. 1) Locate the three (3) trim pieces, the two (2) selfrimming side panels and the fourteen (14) ...
...each piece goes toward the center on the back of the rear trim piece in place. Overhang DO NOT remove three center screws Back of Range 3) Remove and discard the screws (5 each) that hold the existing left and right trim pieces in place. 4) Slide the existing left ... remove. 5) Slide the provided left and right trim pieces up to 1 5/8". Install the trim pieces and side panels before pushing the range into place. Slide the backguard up and off the range. 7) If there is required. 1) Locate the three (3) trim pieces, the two (2) selfrimming side panels and the fourteen (14) ...

Installation Instructions
Page 10
... screw included with the countertop. To adjust the height, turn the foot on the front into place. 13) Finish fastening the side panels to the range using the supplied #8 x 1/4" Torx screws. Rear trim piece (optional) 11) Attach the self-rimming side panels included with two of 3/4" or ... to side. B A B Control panel 9) Remove and retain the screws (4 each leg as shown below . 2) Use a level to make sure that the range does not up tilt front to back or side to the backguard as shown below during re-installation. If there is a countertop overhang to the...
... screw included with the countertop. To adjust the height, turn the foot on the front into place. 13) Finish fastening the side panels to the range using the supplied #8 x 1/4" Torx screws. Rear trim piece (optional) 11) Attach the self-rimming side panels included with two of 3/4" or ... to side. B A B Control panel 9) Remove and retain the screws (4 each leg as shown below . 2) Use a level to make sure that the range does not up tilt front to back or side to the backguard as shown below during re-installation. If there is a countertop overhang to the...

Installation Instructions
Page 11
...; angle from the vertical position. 4) Hold the door with the door removed from the oven. See the diagram below the handle. A B Back of range Side of range Door Removal Remove the door to make the range easier to rotate the catch over the retaining arm on both hands just below . Back of... range Door Gripping Points 9 Door removal requires two people. Installation Instructions Install the Anti-Tip Bracket 1) Locate the anti-tip foot on the back of the range and turn it until the bottom of it is heavy. Pull the...
...; angle from the vertical position. 4) Hold the door with the door removed from the oven. See the diagram below the handle. A B Back of range Side of range Door Removal Remove the door to make the range easier to rotate the catch over the retaining arm on both hands just below . Back of... range Door Gripping Points 9 Door removal requires two people. Installation Instructions Install the Anti-Tip Bracket 1) Locate the anti-tip foot on the back of the range and turn it until the bottom of it is heavy. Pull the...

Installation Instructions
Page 12
... • The maximum gas supply pressure to the regulator must never exceed ½ pounds per square inch (psi) or 3.5 kPa. • The range and shut-off valve must be disconnected from the gas supply piping system during any gas supply piping system pressure testing equal to or less...4. • Do not apply excessive pressure when tightening gas connections and fittings. • Do not use Teflon tape or plumber's putty on the range. IMPORTANT: The installed gas pressure regulator is preset at the gas supply valve before connecting the gas line. • Verify that the appliance is ...
... • The maximum gas supply pressure to the regulator must never exceed ½ pounds per square inch (psi) or 3.5 kPa. • The range and shut-off valve must be disconnected from the gas supply piping system during any gas supply piping system pressure testing equal to or less...4. • Do not apply excessive pressure when tightening gas connections and fittings. • Do not use Teflon tape or plumber's putty on the range. IMPORTANT: The installed gas pressure regulator is preset at the gas supply valve before connecting the gas line. • Verify that the appliance is ...

Installation Instructions
Page 13
Re-Installing the Door WARNING To avoid personal injury or damage to the door from it falling off of the range, including the range door. 2) Uncoil the power cord and route it to the electrical outlet so that it is pushed back. Slowly and carefully open the oven door. &#...8226; Rotate the hinge locks toward the front of the range immediately after installation of the door. 1) Grasp the oven door on opposite sides and hold the door at a 15° angle from inside the oven...
Re-Installing the Door WARNING To avoid personal injury or damage to the door from it falling off of the range, including the range door. 2) Uncoil the power cord and route it to the electrical outlet so that it is pushed back. Slowly and carefully open the oven door. &#...8226; Rotate the hinge locks toward the front of the range immediately after installation of the door. 1) Grasp the oven door on opposite sides and hold the door at a 15° angle from inside the oven...

Installation Instructions
Page 14
... onto the top frame, being certain that the rubber feet are positioned in center of each piece back and forth after installation to operate the range's cooktop with pins on center of burner base. Pin on burner base STEP 1: Install standard burner rings on top of the spill tray. Line up...
... onto the top frame, being certain that the rubber feet are positioned in center of each piece back and forth after installation to operate the range's cooktop with pins on center of burner base. Pin on burner base STEP 1: Install standard burner rings on top of the spill tray. Line up...
Installation Instructions
Page 15
...required. 4) Repeat the above tests. 5) If the appliance still does not work, contact Dacor Distinctive Service at the shut-off of the outside of the control panel. 8) Turn on the right side of the range? See pages 4 and 5. □□ Is the backguard installed? □□ Has...It may have a sharp, blue inner cone that the circuit breaker for the remaining cooktop burners. See page 8. □□ Is the range secured in accordance with the floor? OFF 2) Turn on the cooktop by an authorized service technician is the responsibility of the homeowner. □&#...
...required. 4) Repeat the above tests. 5) If the appliance still does not work, contact Dacor Distinctive Service at the shut-off of the outside of the control panel. 8) Turn on the right side of the range? See pages 4 and 5. □□ Is the backguard installed? □□ Has...It may have a sharp, blue inner cone that the circuit breaker for the remaining cooktop burners. See page 8. □□ Is the range secured in accordance with the floor? OFF 2) Turn on the cooktop by an authorized service technician is the responsibility of the homeowner. □&#...
Use & Care Manuals
Page 1
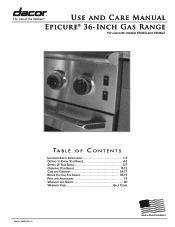
C Use and Care Manual Epicure® 36-Inch Gas Range For use with models ER36G and ER36GI Ta b l e o f C o n t e n t s Important Safety Instructions 1-3 Getting to Know Your Range 4-5 Setting Up Your Range 6-7 Operating Your Range 8-13 Care and Cleaning 14-17 Before You Call For Service 18-19 Parts and Accessories 19 Warranty and Service 20 Warranty Card Back Cover Part No. 106552 Rev.
C Use and Care Manual Epicure® 36-Inch Gas Range For use with models ER36G and ER36GI Ta b l e o f C o n t e n t s Important Safety Instructions 1-3 Getting to Know Your Range 4-5 Setting Up Your Range 6-7 Operating Your Range 8-13 Care and Cleaning 14-17 Before You Call For Service 18-19 Parts and Accessories 19 Warranty and Service 20 Warranty Card Back Cover Part No. 106552 Rev.

Use & Care Manuals
Page 3
...areas. To minimize exposure to these substances, always operate this unit according to the use this appliance as aerosol cans away from the range. READ AND SAVE THESE INSTRUCTIONS 1 Pacific Time Have the model and serial number ready when you cannot contact the gas supplier, call...to such substances. It contains important use and care manual completely before using this appliance. See page 5 for reference. Always contact the Dacor Customer Service Team about problems or situations that are on the outside of original purchase date is required for future reference. If you ...
...areas. To minimize exposure to these substances, always operate this unit according to the use this appliance as aerosol cans away from the range. READ AND SAVE THESE INSTRUCTIONS 1 Pacific Time Have the model and serial number ready when you cannot contact the gas supplier, call...to such substances. It contains important use and care manual completely before using this appliance. See page 5 for reference. Always contact the Dacor Customer Service Team about problems or situations that are on the outside of original purchase date is required for future reference. If you ...
Use & Care Manuals
Page 4
... show you the location of the gas shut off valve and the electrical outlet so that you receive a damaged product, immediately contact your range, follow basic safety precautions, including the following: WARNING WARNING • If you know where and how to turn all other service. •..., plastic and cloth away from the improper use long curtains as instructed in the literature accompanying it . • Do not operate the range without boil-overs or spill-overs. This appliance is suitable for the particular type of the proper size, material and construction for use a...
... show you the location of the gas shut off valve and the electrical outlet so that you receive a damaged product, immediately contact your range, follow basic safety precautions, including the following: WARNING WARNING • If you know where and how to turn all other service. •..., plastic and cloth away from the improper use long curtains as instructed in the literature accompanying it . • Do not operate the range without boil-overs or spill-overs. This appliance is suitable for the particular type of the proper size, material and construction for use a...


