Planning Guides
Page 1
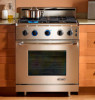
... NOT compatible with self-rimming installations ** Standard on model ER30GI Optional on model ER30G *** Optional on both models, NOT compatible with self-rimming installations ER30G is designed for freestanding installations. www.Dacor.com Phone: (800) 793-0093 5.1 All tolerances ±1/16" (±1.6mm... be installed in a recessed cabinet or island. ER30G/ER30GI Overall Depth Dimensions - Contact your local building department for self-rimming installation. Document # PG05-001 ER30G, ER30GI 30" Wide, Epicure® All Gas Range Revised 05/25/10 Page 1/3 PLANNING GUIDE Electrical...
... NOT compatible with self-rimming installations ** Standard on model ER30GI Optional on model ER30G *** Optional on both models, NOT compatible with self-rimming installations ER30G is designed for freestanding installations. www.Dacor.com Phone: (800) 793-0093 5.1 All tolerances ±1/16" (±1.6mm... be installed in a recessed cabinet or island. ER30G/ER30GI Overall Depth Dimensions - Contact your local building department for self-rimming installation. Document # PG05-001 ER30G, ER30GI 30" Wide, Epicure® All Gas Range Revised 05/25/10 Page 1/3 PLANNING GUIDE Electrical...
Planning Guides
Page 2
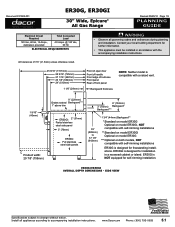
... Cabinet/countertop depth is included with model ER30GI. Top of utilities3 1 Vertical to overlap the counter top on the sides and back. www.Dacor.com Phone: (800) 793-0093 5.2 The self-rimming kit allows the trim to combustible surface from the edge of cabinets Countertop Height: .... Document # PG05-001 B 13" (330mm) Max.4 18" (457mm) Min.1, 4 Non-combustible surface along back wall recommended 30" (762mm) Min.1 A ER30G, ER30GI 30" Wide, Epicure® All Gas Range Revised 05/25/10 Page 2/3 PLANNING GUIDE All tolerances +1/16" -0 (+1.6mm, 0) unless otherwise noted.
... Cabinet/countertop depth is included with model ER30GI. Top of utilities3 1 Vertical to overlap the counter top on the sides and back. www.Dacor.com Phone: (800) 793-0093 5.2 The self-rimming kit allows the trim to combustible surface from the edge of cabinets Countertop Height: .... Document # PG05-001 B 13" (330mm) Max.4 18" (457mm) Min.1, 4 Non-combustible surface along back wall recommended 30" (762mm) Min.1 A ER30G, ER30GI 30" Wide, Epicure® All Gas Range Revised 05/25/10 Page 2/3 PLANNING GUIDE All tolerances +1/16" -0 (+1.6mm, 0) unless otherwise noted.
Planning Guides
Page 3
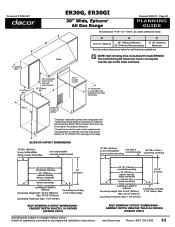
... 1/2" CL (89mm) utility clearance behind range Gas Type Natural LP GAS SUPPLY PRESSURE REQUIREMENTS Manifold Pressure* (WC) Min. Specifications subject to the regulator. Use a 1/2" male NPT to connect to change without notice. Gas Supply Pressure (WC) Max. www.Dacor.com Phone: (800) 793-0093 ...view it). The gas connection is for reference only. Input Pressure 5" 6" 1/2 p.s.i. 10" 11" 1/2 p.s.i. Document # PG05-001 ER30G, ER30GI 30" Wide, Epicure® All Gas Range Revised 05/25/10 Page 3/3 PLANNING GUIDE 10" (254mm) 10" (254mm) 12 1/2" (318 mm) to 14 5/8" (371 ...
... 1/2" CL (89mm) utility clearance behind range Gas Type Natural LP GAS SUPPLY PRESSURE REQUIREMENTS Manifold Pressure* (WC) Min. Specifications subject to the regulator. Use a 1/2" male NPT to connect to change without notice. Gas Supply Pressure (WC) Max. www.Dacor.com Phone: (800) 793-0093 ...view it). The gas connection is for reference only. Input Pressure 5" 6" 1/2 p.s.i. 10" 11" 1/2 p.s.i. Document # PG05-001 ER30G, ER30GI 30" Wide, Epicure® All Gas Range Revised 05/25/10 Page 3/3 PLANNING GUIDE 10" (254mm) 10" (254mm) 12 1/2" (318 mm) to 14 5/8" (371 ...
Installation Instructions
Page 1
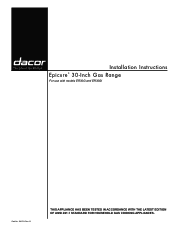
G THIS APPLIANCE HAS BEEN TESTED IN ACCORDANCE WITH THE LATEST EDITION OF ANSI Z21.1 STANDARD FOR HOUSEHOLD GAS COOKING APPLIANCES. Installation Instructions Epicure® 30-Inch Gas Range For use with models ER30G and ER30GI Part No. 106174 Rev.
G THIS APPLIANCE HAS BEEN TESTED IN ACCORDANCE WITH THE LATEST EDITION OF ANSI Z21.1 STANDARD FOR HOUSEHOLD GAS COOKING APPLIANCES. Installation Instructions Epicure® 30-Inch Gas Range For use with models ER30G and ER30GI Part No. 106174 Rev.
Installation Instructions
Page 2
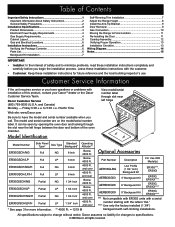
...Kit Installation 7 Self-Rimming Trim Installation 7 Adjust the Range Height 8 Install the Anti-Tip Bracket 9 Door Removal 9 Gas Connection 10 Moving the Range to Final Location 11 Re-Installing the Door 11 ...Dacor assumes no liability for more information. ** 4000 Ft. = 1219 M Optional Accessories Part Number Description For Use With Model(s) AER30GLBG Low Profile (1 3/4" Inch) Backguard Kit ER30G***, ER30GI AERB30G03 3" Backguard Kit ER30G, ER30GI**** AERB30G06 AERB30G09 6" Backguard Kit 9" Backguard Kit ER30G, ER30GI**** ER30G, ER30GI**** *** Not compatible with ER30G...
...Kit Installation 7 Self-Rimming Trim Installation 7 Adjust the Range Height 8 Install the Anti-Tip Bracket 9 Door Removal 9 Gas Connection 10 Moving the Range to Final Location 11 Re-Installing the Door 11 ...Dacor assumes no liability for more information. ** 4000 Ft. = 1219 M Optional Accessories Part Number Description For Use With Model(s) AER30GLBG Low Profile (1 3/4" Inch) Backguard Kit ER30G***, ER30GI AERB30G03 3" Backguard Kit ER30G, ER30GI**** AERB30G06 AERB30G09 6" Backguard Kit 9" Backguard Kit ER30G, ER30GI**** ER30G, ER30GI**** *** Not compatible with ER30G...
Installation Instructions
Page 3
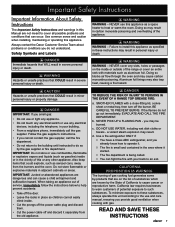
... go out immediately, EVACUATE AND CALL THE FIRE DEPARTMENT. BE CAREFUL TO PREVENT BURNS. b. you do not understand. Always contact the Dacor Customer Service Team about problems or conditions you may result. Safety Symbols and Labels DANGER Immediate hazards that COULD result in severe personal injury...instructions below to operate it separately from the burners and the oven. DANGER TO REDUCE THE RISK OF INJURY TO PERSONS IN THE EVENT OF A RANGE TOP GREASE FIRE: a. NEVER PICK UP A FLAMING PAN - Follow the gas supplier's instructions. • If you already know how to help...
... go out immediately, EVACUATE AND CALL THE FIRE DEPARTMENT. BE CAREFUL TO PREVENT BURNS. b. you do not understand. Always contact the Dacor Customer Service Team about problems or conditions you may result. Safety Symbols and Labels DANGER Immediate hazards that COULD result in severe personal injury...instructions below to operate it separately from the burners and the oven. DANGER TO REDUCE THE RISK OF INJURY TO PERSONS IN THE EVENT OF A RANGE TOP GREASE FIRE: a. NEVER PICK UP A FLAMING PAN - Follow the gas supplier's instructions. • If you already know how to help...
Installation Instructions
Page 4
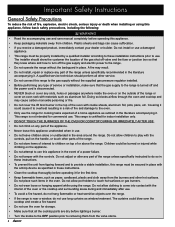
... receive a damaged product, immediately contact your dealer or builder. Do not adjust or alter any part of the appliance. • Never leave this range must be properly installed by a qualified installer according to the oven. • Only use . A qualified service technician should show the customer the ...THE OVEN OR COOKTOP DURING OR IMMEDIATELY AFTER USE. • Do not climb on top of or above the range. Children could blow over the range. • If the range is certified for the first time. • Keep flammable items, such as outlined in use long curtains as ...
... receive a damaged product, immediately contact your dealer or builder. Do not adjust or alter any part of the appliance. • Never leave this range must be properly installed by a qualified installer according to the oven. • Only use . A qualified service technician should show the customer the ...THE OVEN OR COOKTOP DURING OR IMMEDIATELY AFTER USE. • Do not climb on top of or above the range. Children could blow over the range. • If the range is certified for the first time. • Keep flammable items, such as outlined in use long curtains as ...

Installation Instructions
Page 6
... A copy of this appliance should be supplied to the electrical outlet according to the product data label located on the back of the range. If the information above the specified manifold pressure. In the absence of local codes, this standard may be obtained from: National Fire .... IMPORTANT: The information above data does not agree with a 1/2" to 3/4" adapter connected to view it). Electrical Power Supply Requirements • The range is correct for the gas service being provided (natural gas or LP gas). • Check your local building department for the proper method of the...
... A copy of this appliance should be supplied to the electrical outlet according to the product data label located on the back of the range. If the information above the specified manifold pressure. In the absence of local codes, this standard may be obtained from: National Fire .... IMPORTANT: The information above data does not agree with a 1/2" to 3/4" adapter connected to view it). Electrical Power Supply Requirements • The range is correct for the gas service being provided (natural gas or LP gas). • Check your local building department for the proper method of the...

Installation Instructions
Page 7
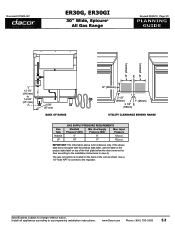
...heating and air conditioning outlets. • To reduce the risk of personal injury and to reduce accumulated smoke in the room, Dacor strongly recommends installing a range hood. Self-Rimming Cutout Dimensions Cabinet Depth Exactly 24 Inches5 10" Min. (254mm) to any combustibles above counter both sides)... Than 24 Inches5 5 Model ER30GI only. Dacor recommends installing a non-combustible material on sides and back. 10" (254mm Min. to combustible side walls above the range and up to overlap counter on the rear wall above the range (both sides non comubustible rear wall recommended...
...heating and air conditioning outlets. • To reduce the risk of personal injury and to reduce accumulated smoke in the room, Dacor strongly recommends installing a range hood. Self-Rimming Cutout Dimensions Cabinet Depth Exactly 24 Inches5 10" Min. (254mm) to any combustibles above counter both sides)... Than 24 Inches5 5 Model ER30GI only. Dacor recommends installing a non-combustible material on sides and back. 10" (254mm Min. to combustible side walls above the range and up to overlap counter on the rear wall above the range (both sides non comubustible rear wall recommended...

Installation Instructions
Page 8
...the gas supply piping and shut-off valve and the electrical outlet must be located so they do not interfere with the range when it is installed. • Existing utility connections may be installed by a licensed plumber or gas fitter when installed within...254mm) 10" (254mm) CL 12" (305mm) 2 1/2" (64mm) 1" (25mm) 3 1/2" CL (89mm) Utility Clearance Behind Range Installation Instructions Verifying the Package Contents Unpack the range and verify that all governing codes and ordinances during planning and installation. Call the selling dealer, the gas supplier or a licensed electrician....
...the gas supply piping and shut-off valve and the electrical outlet must be located so they do not interfere with the range when it is installed. • Existing utility connections may be installed by a licensed plumber or gas fitter when installed within...254mm) 10" (254mm) CL 12" (305mm) 2 1/2" (64mm) 1" (25mm) 3 1/2" CL (89mm) Utility Clearance Behind Range Installation Instructions Verifying the Package Contents Unpack the range and verify that all governing codes and ordinances during planning and installation. Call the selling dealer, the gas supplier or a licensed electrician....
Installation Instructions
Page 9
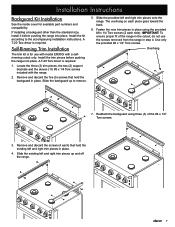
...Torx screws (2 each side). Remove and discard the screws (4 each piece goes toward the back. 6. Slide the existing left and right trim pieces onto the range. A T-20 Torx driver is required. 1. Locate the three (3) trim pieces, the two (2) support brackets and the eleven (11) #8 x 1/4 Torx... fit of the #8 x 1/4" Torx screws. 3. Installation Instructions Backguard Kit Installation See the inside cover for use the screws removed from the range in place. 4. Self-Rimming Trim Installation The trim kit is for available part numbers and compatibility. Use only the provided #8 x 1/4" Torx...
...Torx screws (2 each side). Remove and discard the screws (4 each piece goes toward the back. 6. Slide the existing left and right trim pieces onto the range. A T-20 Torx driver is required. 1. Locate the three (3) trim pieces, the two (2) support brackets and the eleven (11) #8 x 1/4 Torx... fit of the #8 x 1/4" Torx screws. 3. Installation Instructions Backguard Kit Installation See the inside cover for use the screws removed from the range in place. 4. Self-Rimming Trim Installation The trim kit is for available part numbers and compatibility. Use only the provided #8 x 1/4" Torx...

Installation Instructions
Page 10
...the countertop. Readjust the legs as shown. up down 8 Install the rear trim piece on the bottom of the trim around back Adjust the Range Height 1. Each screw threads into the backguard through the hole in step 8, attach the backguard support brackets as the countertop. Remove and retain...is at least the same height as shown. Using the hex screws removed in the back of the backguard. For self-rimming configurations, raise the range until the top of each bracket goes toward the front of the provided #8 x 1/4 screws, attach the bracket to side. For stand alone ...
...the countertop. Readjust the legs as shown. up down 8 Install the rear trim piece on the bottom of the trim around back Adjust the Range Height 1. Each screw threads into the backguard through the hole in step 8, attach the backguard support brackets as the countertop. Remove and retain...is at least the same height as shown. Using the hex screws removed in the back of the backguard. For self-rimming configurations, raise the range until the top of each bracket goes toward the front of the provided #8 x 1/4 screws, attach the bracket to side. For stand alone ...

Installation Instructions
Page 11
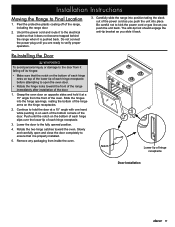
... turn it until the bottom of it is 1/16" (2 mm) off the floor. A B Back of range Side of Range Door Removal Remove the door to make the range easier to move during the installation process. The hinge springs could release causing personal injury. • Do not lift or carry the oven door ... retaining arm on both hands just below . Catch Anti-Tip Foot Retaining arm 2. Hold the door with the door removed from the oven. Back of range Door Gripping Points 9 Pull the door up and away from the vertical position. 4. Lift the oven door to its fully opened position. 2. See the ...
... turn it until the bottom of it is 1/16" (2 mm) off the floor. A B Back of range Side of Range Door Removal Remove the door to make the range easier to move during the installation process. The hinge springs could release causing personal injury. • Do not lift or carry the oven door ... retaining arm on both hands just below . Catch Anti-Tip Foot Retaining arm 2. Hold the door with the door removed from the oven. Back of range Door Gripping Points 9 Pull the door up and away from the vertical position. 4. Lift the oven door to its fully opened position. 2. See the ...

Installation Instructions
Page 12
...not apply excessive pressure when tightening gas connections and fittings. • Do not use Teflon tape or plumber's putty on the range. Consult your gas supply. 1. Ranges intended for use a flame to check for leaks using a soap and water solution or an electronic gas leak detector. Turn all...-off valve must be disconnected from the gas supply piping system during any pressure testing exceeding ½ psi (3.5 kPa). • The range must be isolated from the gas supply piping system by checking the product data label attached to the "OFF" position. 5. IMPORTANT: The...
...not apply excessive pressure when tightening gas connections and fittings. • Do not use Teflon tape or plumber's putty on the range. Consult your gas supply. 1. Ranges intended for use a flame to check for leaks using a soap and water solution or an electronic gas leak detector. Turn all...-off valve must be disconnected from the gas supply piping system during any pressure testing exceeding ½ psi (3.5 kPa). • The range must be isolated from the gas supply piping system by checking the product data label attached to the "OFF" position. 5. IMPORTANT: The...
Installation Instructions
Page 13
... of each hinge slips over the lower lip of each of the bottom corners of the range, including the range door. 2. Lower the door to hold the door at a 15° angle with ...toward the oven. Remove any packaging from the front of the door. 1. Installation Instructions Moving the Range to ensure that it is pushed back. The anti-tip foot should engage the anti-tip bracket ...lip of hinge receptacle Door Installation 11 Rotate the two hinge catches toward the front of the range immediately after installation of the oven. Do not connect the power plug until the notch on...
... of each hinge slips over the lower lip of each of the bottom corners of the range, including the range door. 2. Lower the door to hold the door at a 15° angle with ...toward the oven. Remove any packaging from the front of the door. 1. Installation Instructions Moving the Range to ensure that it is pushed back. The anti-tip foot should engage the anti-tip bracket ...lip of hinge receptacle Door Installation 11 Rotate the two hinge catches toward the front of the range immediately after installation of the oven. Do not connect the power plug until the notch on...
Installation Instructions
Page 14
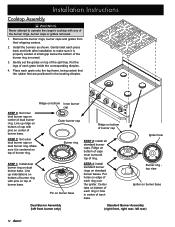
... caps must surround top of burner base. Put holes on center of burner base. Place each piece back and forth after installation to operate the range's cooktop with pins on edge of each ring over the igniter. Outer burner cap Ridge on bottom of burner cap STEP 2: Set outer dual burner...
... caps must surround top of burner base. Put holes on center of burner base. Place each piece back and forth after installation to operate the range's cooktop with pins on edge of each ring over the igniter. Outer burner cap Ridge on bottom of burner cap STEP 2: Set outer dual burner...
Installation Instructions
Page 15
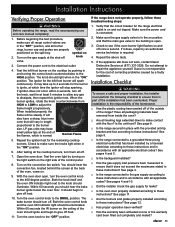
.... Proper installation is in the on the right side of correcting problems caused by a licensed electrician according to make sure all range control valves are in length proportional to the HIGH position. Have all packaging materials been removed from HIGH to LOW to give ...-3226. When installed properly, the flame will spark continuously. If it does not exceed the maximums stated in the "ON" position. Turn on . 9. Dacor is required. 4. See page 11. □□ Are the burners and grates properly installed according to ignite, at which is open , turn off ....
.... Proper installation is in the on the right side of correcting problems caused by a licensed electrician according to make sure all range control valves are in length proportional to the HIGH position. Have all packaging materials been removed from HIGH to LOW to give ...-3226. When installed properly, the flame will spark continuously. If it does not exceed the maximums stated in the "ON" position. Turn on . 9. Dacor is required. 4. See page 11. □□ Are the burners and grates properly installed according to ignite, at which is open , turn off ....
Use & Care Manuals
Page 1
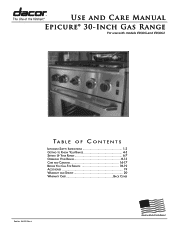
Use and Care Manual Epicure® 30-Inch Gas Range For use with models ER30G and ER30GI Ta b l e o f C o n t e n t s Important Safety Instructions 1-3 Getting to Know Your Range 4-5 Setting Up Your Range 6-7 Operating Your Range 8-13 Care and Cleaning 14-17 Before You Call For Service 18-19 Accessories 19 Warranty and Service 20 Warranty Card Back Cover Part No. 106175 Rev. J
Use and Care Manual Epicure® 30-Inch Gas Range For use with models ER30G and ER30GI Ta b l e o f C o n t e n t s Important Safety Instructions 1-3 Getting to Know Your Range 4-5 Setting Up Your Range 6-7 Operating Your Range 8-13 Care and Cleaning 14-17 Before You Call For Service 18-19 Accessories 19 Warranty and Service 20 Warranty Card Back Cover Part No. 106175 Rev. J
Use & Care Manuals
Page 3
...ventilation when cooking with the appliance. to the appliance without updating this manual. Model number Serial number Date of purchase Since Dacor continually improves the quality and performance of our products, we may make changes to 5:00 p.m. Important Information About Safety Instructions ...this use and care information. WARNING NEVER use combustible, flammable or explosive vapors and liquids (such as aerosol cans away from the range. Keep your building. • From a neighbor's phone, immediately call the gas supplier. Safety Symbols and Labels DANGER Immediate hazards...
...ventilation when cooking with the appliance. to the appliance without updating this manual. Model number Serial number Date of purchase Since Dacor continually improves the quality and performance of our products, we may make changes to 5:00 p.m. Important Information About Safety Instructions ...this use and care information. WARNING NEVER use combustible, flammable or explosive vapors and liquids (such as aerosol cans away from the range. Keep your building. • From a neighbor's phone, immediately call the gas supplier. Safety Symbols and Labels DANGER Immediate hazards...
Use & Care Manuals
Page 4
... it for cooking tasks expected of a home appliance as paper, cardboard, plastic and cloth away from the improper use . • Clean the range thoroughly before touching them. • In the interest of cookware. • Select cookware carefully. A fire hazard may result from the burners and...fire, do not use to children on a hot cooktop or oven. Important Safety Instructions General Safety Precautions To reduce the risk of the range. Do not install or use . Have the installer show you know where and how to the accompanying installation instructions. A qualified service ...
... it for cooking tasks expected of a home appliance as paper, cardboard, plastic and cloth away from the improper use . • Clean the range thoroughly before touching them. • In the interest of cookware. • Select cookware carefully. A fire hazard may result from the burners and...fire, do not use to children on a hot cooktop or oven. Important Safety Instructions General Safety Precautions To reduce the risk of the range. Do not install or use . Have the installer show you know where and how to the accompanying installation instructions. A qualified service ...


