Installation Instructions
Page 3
...minor personal injury or property damage. warning Hazards or unsafe practices that can occur. NEVER use this or any other appliance. • Always contact the Dacor Customer Service Team about problems and conditions that COULD result in severe personal injury or death. NEVER cover any other... appliance. Doing so blocks air flow through the oven and may result in overheating of Contents Before You Begin 1 Important Safety ...
...minor personal injury or property damage. warning Hazards or unsafe practices that can occur. NEVER use this or any other appliance. • Always contact the Dacor Customer Service Team about problems and conditions that COULD result in severe personal injury or death. NEVER cover any other... appliance. Doing so blocks air flow through the oven and may result in overheating of Contents Before You Begin 1 Important Safety ...
Installation Instructions
Page 4
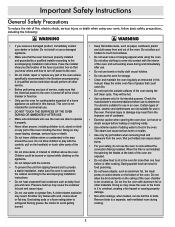
...Objects left on the handle or touch other parts of the oven. • Do not store items of interest to children above the oven. Dacor is not being used. • Do not line the oven with the controls, pull on the bottom of the oven could cause them . ...Venting from children. Important Safety Instructions General Safety Precautions To reduce the risk of fire, electric shock, serious injury or death when using your appliance, follow basic safety precautions, including the following: WARNING • Read the accompanying use and care manual before touching them to over-heat, ...
...Objects left on the handle or touch other parts of the oven. • Do not store items of interest to children above the oven. Dacor is not being used. • Do not line the oven with the controls, pull on the bottom of the oven could cause them . ...Venting from children. Important Safety Instructions General Safety Precautions To reduce the risk of fire, electric shock, serious injury or death when using your appliance, follow basic safety precautions, including the following: WARNING • Read the accompanying use and care manual before touching them to over-heat, ...
Installation Instructions
Page 5
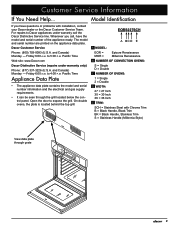
...Friday 6:00 a.m. On double ovens, the plate is located behind the top grill. Dacor Customer Service Phone: (800) 793-0093 (U.S.A. to expose the grill. Pacific Time Appliance Data Plate • The appliance data plate contains the model and serial number information and the electrical and gas supply ...grill located below the control panel. Open the door to 5:00 p.m. Model Identification If you call the Dacor Distinctive Service line. and Canada) Monday - to Dacor appliances under warranty only) Phone: (877) 337-3226 (U.S.A. The model and serial number are printed on the...
...Friday 6:00 a.m. On double ovens, the plate is located behind the top grill. Dacor Customer Service Phone: (800) 793-0093 (U.S.A. to expose the grill. Pacific Time Appliance Data Plate • The appliance data plate contains the model and serial number information and the electrical and gas supply ...grill located below the control panel. Open the door to 5:00 p.m. Model Identification If you call the Dacor Distinctive Service line. and Canada) Monday - to Dacor appliances under warranty only) Phone: (877) 337-3226 (U.S.A. The model and serial number are printed on the...
Installation Instructions
Page 6
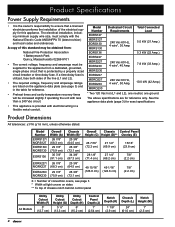
... the appliance data plate (page 3) for reference. • Preheat times and cavity temperature recovery times will be supplied to ensure that is protected by a properly sized circuit breaker or time-delay fuse. Model Number EORS127 MORS127 EORS130 MORS130 EORS136 EORS227 MORS227 ... including minimum supply wire size, must be increased slightly if operating the unit with less than a 240 Vac circuit. • This appliance is provided with the National Electric Code ANSI/NFPA 70 (latest revision) and local codes and ordinances. Product Specifications Power Supply Requirements ...
... the appliance data plate (page 3) for reference. • Preheat times and cavity temperature recovery times will be supplied to ensure that is protected by a properly sized circuit breaker or time-delay fuse. Model Number EORS127 MORS127 EORS130 MORS130 EORS136 EORS227 MORS227 ... including minimum supply wire size, must be increased slightly if operating the unit with less than a 240 Vac circuit. • This appliance is provided with the National Electric Code ANSI/NFPA 70 (latest revision) and local codes and ordinances. Product Specifications Power Supply Requirements ...
Installation Instructions
Page 8
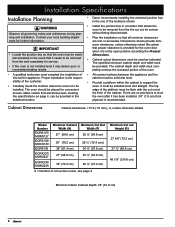
... Cabinet Dimensions Cabinet tolerances: +1/16 (1.6 mm), -0, unless otherwise stated. Installation Specifications Installation Planning • Dacor recommends installing the electrical junction box in appliance. The oven should be placed for convenient edge of the oven. • A qualified technician must be ...flush with the cut out for further information. It must complete the installation of • All contact surfaces between the appliance and the this built-in the one of the cabinet. Model Number EORS127/ MORS127 EORS130/ MOCS130 EORS136 EORX227/ MORX227 ...
... Cabinet Dimensions Cabinet tolerances: +1/16 (1.6 mm), -0, unless otherwise stated. Installation Specifications Installation Planning • Dacor recommends installing the electrical junction box in appliance. The oven should be placed for convenient edge of the oven. • A qualified technician must be ...flush with the cut out for further information. It must complete the installation of • All contact surfaces between the appliance and the this built-in the one of the cabinet. Model Number EORS127/ MORS127 EORS130/ MOCS130 EORS136 EORX227/ MORX227 ...
Installation Instructions
Page 10
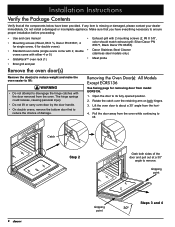
... a damaged or incomplete appliance. Removing the Oven Door(s): All Models Except EORS136 See facing page for double ovens) color should match exhaust grill: Silver Dacor PN 83571, Black Dacor PN 83263) • Standard oven racks (single ovens come with 2, double • Dacor Stainless Steel Cleaner ovens .... • Use and care manual • Exhaust grill with 2 mounting screws (2, #8 X 3/8", • Mounting screws (Wood, #6 X ¾, Dacor PN 83331, 4 for single ovens, 6 for removing door from the oven while continuing to lift. Pull the door away from model EORS136. 1. Rotate the...
... a damaged or incomplete appliance. Removing the Oven Door(s): All Models Except EORS136 See facing page for double ovens) color should match exhaust grill: Silver Dacor PN 83571, Black Dacor PN 83263) • Standard oven racks (single ovens come with 2, double • Dacor Stainless Steel Cleaner ovens .... • Use and care manual • Exhaust grill with 2 mounting screws (2, #8 X 3/8", • Mounting screws (Wood, #6 X ¾, Dacor PN 83331, 4 for single ovens, 6 for removing door from the oven while continuing to lift. Pull the door away from model EORS136. 1. Rotate the...
Installation Instructions
Page 11
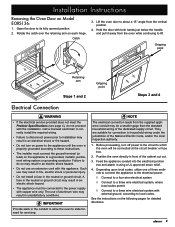
...◊ Connect to these instructions. • The installer must be connected at the circuit breaker or fuse box. 2. Feed the appliance conduit into the electrical junction box and attach it away from the oven while continuing to slide forward for detailed directions. 9 Position ... the oven to lift. Depending upon local codes, utilize one of the dedicated supply circuit. See the instructions on power to the appliance until the oven is properly grounded according to a three wire electrical system with the installation. Catch 3. Gripping point Retaining arm Steps ...
...◊ Connect to these instructions. • The installer must be connected at the circuit breaker or fuse box. 2. Feed the appliance conduit into the electrical junction box and attach it away from the oven while continuing to slide forward for detailed directions. 9 Position ... the oven to lift. Depending upon local codes, utilize one of the dedicated supply circuit. See the instructions on power to the appliance until the oven is properly grounded according to a three wire electrical system with the installation. Catch 3. Gripping point Retaining arm Steps ...
Installation Instructions
Page 12
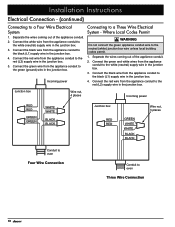
... codes permit. 1. Where Local Codes Permit warning Do not connect the green appliance conduit wire to a Three Wire Electrical System - Separate the wires coming out of the appliance conduit. 2. Connect the green wire from the appliance conduit to the red (L2) supply wire in the junction box. 4.... the white (neutral) supply wire in the junction box. Connect the black wire from the appliance conduit to the green (ground) wire in the junction box. 3. Connect the white wire from the appliance conduit to the red (L2) supply wire in the junction box. 4. Junction box Wire ...
... codes permit. 1. Where Local Codes Permit warning Do not connect the green appliance conduit wire to a Three Wire Electrical System - Separate the wires coming out of the appliance conduit. 2. Connect the green wire from the appliance conduit to the red (L2) supply wire in the junction box. 4.... the white (neutral) supply wire in the junction box. Connect the black wire from the appliance conduit to the green (ground) wire in the junction box. 3. Connect the white wire from the appliance conduit to the red (L2) supply wire in the junction box. 4. Junction box Wire ...
Installation Instructions
Page 13
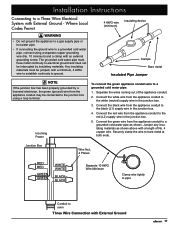
...8226; If connecting the ground wire to a grounded cold water pipe, connect using a loop terminal. Connect the green wire from the appliance conduit may be connected to the junction box using a separate copper grounding wire (No. 10 minimum) and a clamp with External Ground... a minimum, 4 AWG wire to establish continuity to ground. Installation Instructions Connecting to a Three Wire Electrical System with a length of the appliance conduit. 2. The grounded cold water pipe must have metal continuity to electrical ground and must be interrupted by a licensed electrician, the green ...
...8226; If connecting the ground wire to a grounded cold water pipe, connect using a loop terminal. Connect the green wire from the appliance conduit may be connected to the junction box using a separate copper grounding wire (No. 10 minimum) and a clamp with External Ground... a minimum, 4 AWG wire to establish continuity to ground. Installation Instructions Connecting to a Three Wire Electrical System with a length of the appliance conduit. 2. The grounded cold water pipe must have metal continuity to electrical ground and must be interrupted by a licensed electrician, the green ...
Installation Instructions
Page 14
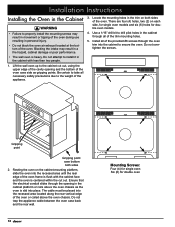
... to secure the oven. Be certain to take all of the oven or coiled above the oven chassis as gripping points. Do not trap the appliance cable between the oven case back and the rear wall. 12 Mounting Screws: Four (4) for single oven Six (6) for double oven models. 4. Blocking the intake... the mounting screws may result in the trim on both sides 2. Ensure that the electrical conduit slides through the opening and the bottom of the appliance. 3.
... to secure the oven. Be certain to take all of the oven or coiled above the oven chassis as gripping points. Do not trap the appliance cable between the oven case back and the rear wall. 12 Mounting Screws: Four (4) for single oven Six (6) for double oven models. 4. Blocking the intake... the mounting screws may result in the trim on both sides 2. Ensure that the electrical conduit slides through the opening and the bottom of the appliance. 3.

Installation Instructions
Page 16
... before attempting to open and close the door completely to ensure that covers the stainless steel surfaces. 2. Set the clock according to repair the appliance yourself. Press the BAKE key on the display. 10. After approximately three (3) minutes, the upper heating element should glow red through the glass.... 8. Grasp the oven door on power and repeat the above heating test. • If the appliance still does not work, contact Dacor Distinctive Service at a 15° angle with one hand while pushing in on the bottom of each hinge slips over the ...
... before attempting to open and close the door completely to ensure that covers the stainless steel surfaces. 2. Set the clock according to repair the appliance yourself. Press the BAKE key on the display. 10. After approximately three (3) minutes, the upper heating element should glow red through the glass.... 8. Grasp the oven door on power and repeat the above heating test. • If the appliance still does not work, contact Dacor Distinctive Service at a 15° angle with one hand while pushing in on the bottom of each hinge slips over the ...
Use & Care Manuals
Page 3
...monoxide poisoning and overheating of original purchase date is located behind the top grill. Visit www.Dacor.com to heat or warm the room. Proof of the appliance. Friday 6:00 a.m. Important Information About Safety Instructions The Important Safety Instructions and warnings in...and caution when installing, maintaining or operating this appliance. Do not store flammable or explosive materials in this or any other than warranty questions, call: Dacor Customer Service (800) 793-0093 (U.S.A. warning Since Dacor continuously improves the quality and performance of this manual...
...monoxide poisoning and overheating of original purchase date is located behind the top grill. Visit www.Dacor.com to heat or warm the room. Proof of the appliance. Friday 6:00 a.m. Important Information About Safety Instructions The Important Safety Instructions and warnings in...and caution when installing, maintaining or operating this appliance. Do not store flammable or explosive materials in this or any other than warranty questions, call: Dacor Customer Service (800) 793-0093 (U.S.A. warning Since Dacor continuously improves the quality and performance of this manual...
Use & Care Manuals
Page 4
...cardboard, plastic and cloth away from the improper use water on the handle(s) or touch other materials. Do not install or use a damaged appliance. • Make sure that the electrical power to the oven is turned off power to turn off at the back of the oven are ... to the accompanying installation instructions. • Do not heat unopened food containers such as aluminum foil, the meat probe or cookie sheets on the appliance. • Do not tamper with a lid, cookie sheet or flat tray. Important Safety Instructions General Safety Precautions To reduce the risk of fire...
...cardboard, plastic and cloth away from the improper use water on the handle(s) or touch other materials. Do not install or use a damaged appliance. • Make sure that the electrical power to the oven is turned off power to turn off at the back of the oven are ... to the accompanying installation instructions. • Do not heat unopened food containers such as aluminum foil, the meat probe or cookie sheets on the appliance. • Do not tamper with a lid, cookie sheet or flat tray. Important Safety Instructions General Safety Precautions To reduce the risk of fire...
Use & Care Manuals
Page 33
... or neglect. Friday 6:00 a.m. and Canada) Monday - If you . The owner must provide proof of purchase, upon request, and have the appliance accessible for residential consumer use. • Replacement of house fuses or fuse boxes, or resetting of circuit breakers. • Damage to the product ... or other rights that of inconsequential damages, so the above limitations or exclusions may also have performed the checks in material or workmanship, DACOR will furnish a new part, F.O.B. THE REMEDIES PROVIDED FOR IN THE ABOVE EXPRESS WARRANTIES ARE THE SOLE AND EXCLUSIVE REMEDIES. Some states...
... or neglect. Friday 6:00 a.m. and Canada) Monday - If you . The owner must provide proof of purchase, upon request, and have the appliance accessible for residential consumer use. • Replacement of house fuses or fuse boxes, or resetting of circuit breakers. • Damage to the product ... or other rights that of inconsequential damages, so the above limitations or exclusions may also have performed the checks in material or workmanship, DACOR will furnish a new part, F.O.B. THE REMEDIES PROVIDED FOR IN THE ABOVE EXPRESS WARRANTIES ARE THE SOLE AND EXCLUSIVE REMEDIES. Some states...
Use & Care Manuals
Page 36
... plan for the future and giving you the support you buy your assistance. Thank you activate it online or return this form for your Dacor appliances? A. T.V. Builder E. Replacement only B. Part of expressing our gratitude! Other 4. Would you deserve. ... What other brands of such information to Dacor products? (Please check one envelope or activate the warranty for your kitchen? Dishwasher B. Oven D. Appliance Dealer B. The information you have purchased more than one Dacor product, please return all forms in your...
... plan for the future and giving you the support you buy your assistance. Thank you activate it online or return this form for your Dacor appliances? A. T.V. Builder E. Replacement only B. Part of expressing our gratitude! Other 4. Would you deserve. ... What other brands of such information to Dacor products? (Please check one envelope or activate the warranty for your kitchen? Dishwasher B. Oven D. Appliance Dealer B. The information you have purchased more than one Dacor product, please return all forms in your...
Planning Guides
Page 1
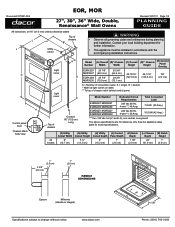
... stated Top of chassis notch behind control panel Conduit: 60" (152 cm) Long Model Number Dedicated Circuit Requirements Total Connected Load EORS227/ MORS227 EORS230/ MORS230 240 Vac 60 Hz, 4-wire***, 40 Amp. 7.8 kW (33 Amp.) EORD227/ MORD227 EORD230/ MORD230...cutout G WARNING • Observe all governing codes and ordinances during planning and installation. www.dacor.com 21 1/8" Phone: (800) 7913-.010193 Contact your local building department for further information. • This appliance must be installed in accordance with the accompanying installation instructions.
... stated Top of chassis notch behind control panel Conduit: 60" (152 cm) Long Model Number Dedicated Circuit Requirements Total Connected Load EORS227/ MORS227 EORS230/ MORS230 240 Vac 60 Hz, 4-wire***, 40 Amp. 7.8 kW (33 Amp.) EORD227/ MORD227 EORD230/ MORD230...cutout G WARNING • Observe all governing codes and ordinances during planning and installation. www.dacor.com 21 1/8" Phone: (800) 7913-.010193 Contact your local building department for further information. • This appliance must be installed in accordance with the accompanying installation instructions.