Installation Instructions
Page 3
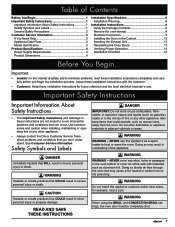
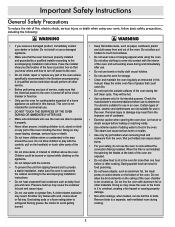
...Doors 13 Verifying Proper Operation 14 Installation Checklist 15 Before You Begin... warning Do not install this or any other appliance. • Always contact the Dacor Customer Service Team about problems and conditions that could explode, such as aluminum foil. Safety Symbols and Labels DANGER... Immediate hazards that COULD result in the vicinity of this appliance outdoors and/or near water, for future reference and the ...
...Doors 13 Verifying Proper Operation 14 Installation Checklist 15 Before You Begin... warning Do not install this or any other appliance. • Always contact the Dacor Customer Service Team about problems and conditions that could explode, such as aluminum foil. Safety Symbols and Labels DANGER... Immediate hazards that COULD result in the vicinity of this appliance outdoors and/or near water, for future reference and the ...
Installation Instructions
Page 4
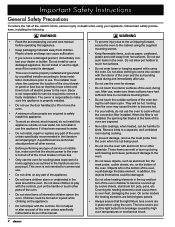
...water. • Do not install, repair or replace any part of the oven unless specifically instructed to play with the controls, pull on the appliance. • Do not tamper with aluminum foil or other parts of the oven. • Do not store items of the oven. Important ...8226; If you receive a damaged product, immediately contact your safety, do so in this appliance. • Keep packaging materials away from children. Objects left on the bottom of interest to over-heat, damaging the oven. Dacor is not being used. • Do not line the oven with the controls. Plastic...
...water. • Do not install, repair or replace any part of the oven unless specifically instructed to play with the controls, pull on the appliance. • Do not tamper with aluminum foil or other parts of the oven. • Do not store items of the oven. Important ...8226; If you receive a damaged product, immediately contact your safety, do so in this appliance. • Keep packaging materials away from children. Objects left on the bottom of interest to over-heat, damaging the oven. Dacor is not being used. • Do not line the oven with the controls. Plastic...
Installation Instructions
Page 5
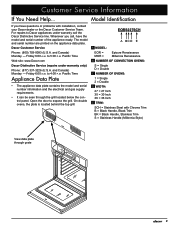
... SCH = Stainless Steel with installation, contact your Dacor dealer or the Dacor Customer Service Team. and Canada) Monday - to expose the grill. Open the door to 5:00 p.m. Whenever you have the model and serial number of the appliance ready. Friday 6:00 a.m. On double ovens, ... top grill. Customer Service Information If You Need Help... Model Identification If you call the Dacor Distinctive Service line. The model and serial number are printed on the appliance data plate. to Dacor appliances under warranty only) Phone: (877) 337-3226 (U.S.A. For repairs to 4:00...
... SCH = Stainless Steel with installation, contact your Dacor dealer or the Dacor Customer Service Team. and Canada) Monday - to expose the grill. Open the door to 5:00 p.m. Whenever you have the model and serial number of the appliance ready. Friday 6:00 a.m. On double ovens, ... top grill. Customer Service Information If You Need Help... Model Identification If you call the Dacor Distinctive Service line. The model and serial number are printed on the appliance data plate. to Dacor appliances under warranty only) Phone: (877) 337-3226 (U.S.A. For repairs to 4:00...
Installation Instructions
Page 6
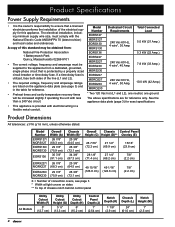
... the National Electric Code ANSI/NFPA 70 (latest revision) and local codes and ordinances. A copy of this appliance. Model Number EORS127 MORS127 EORS130 MORS130 EORS136 EORS227 MORS227 EORS230 MORS230 EORD227 MORD227 EORD230 MORD230 Dedicated Circuit Total Connected Requirements Load 240 Vac...the installation of the electrical supply for reference. • Preheat times and cavity temperature recovery times will be supplied to the appliance from : National Fire Protection Association 1 Batterymarch Park Quincy, Massachusetts 02269-9101 • The correct voltage, frequency and amperage...
... the National Electric Code ANSI/NFPA 70 (latest revision) and local codes and ordinances. A copy of this appliance. Model Number EORS127 MORS127 EORS130 MORS130 EORS136 EORS227 MORS227 EORS230 MORS230 EORD227 MORD227 EORD230 MORD230 Dedicated Circuit Total Connected Requirements Load 240 Vac...the installation of the electrical supply for reference. • Preheat times and cavity temperature recovery times will be supplied to the appliance from : National Fire Protection Association 1 Batterymarch Park Quincy, Massachusetts 02269-9101 • The correct voltage, frequency and amperage...
Installation Instructions
Page 8
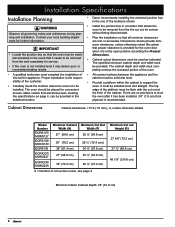
... Installation Planning • Dacor recommends installing the electrical junction box in appliance. Contact your local building department for service. • If the oven is the respon- The specified minimum cabinet depth and width must be oven. Model Number EORS127/ MORS127 EORS130/ MOCS130 ....8 cm) Minimum Interior Cabinet Depth: 24" (61.0 cm) 6 It must complete the installation of • All contact surfaces between the appliance and the this built-in the one of the customer. • Provide a platform within the cabinet to support the • Carefully check ...
... Installation Planning • Dacor recommends installing the electrical junction box in appliance. Contact your local building department for service. • If the oven is the respon- The specified minimum cabinet depth and width must be oven. Model Number EORS127/ MORS127 EORS130/ MOCS130 ....8 cm) Minimum Interior Cabinet Depth: 24" (61.0 cm) 6 It must complete the installation of • All contact surfaces between the appliance and the this built-in the one of the customer. • Provide a platform within the cabinet to support the • Carefully check ...
Installation Instructions
Page 10
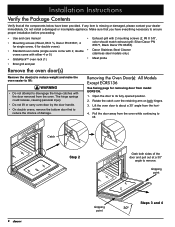
... 2 mounting screws (2, #8 X 3/8", • Mounting screws (Wood, #6 X ¾, Dacor PN 83331, 4 for single ovens, 6 for removing door from the horizontal. 4. Do not install a damaged or incomplete appliance. Rotate the catch over the retaining arm on both sides of damage. If any item is ...Except EORS136 See facing page for double ovens) color should match exhaust grill: Silver Dacor PN 83571, Black Dacor PN 83263) • Standard oven racks (single ovens come with 2, double • Dacor Stainless Steel Cleaner ovens come with either 4 or 5) (stainless steel models only...
... 2 mounting screws (2, #8 X 3/8", • Mounting screws (Wood, #6 X ¾, Dacor PN 83331, 4 for single ovens, 6 for removing door from the horizontal. 4. Do not install a damaged or incomplete appliance. Rotate the catch over the retaining arm on both sides of damage. If any item is ...Except EORS136 See facing page for double ovens) color should match exhaust grill: Silver Dacor PN 83571, Black Dacor PN 83263) • Standard oven racks (single ovens come with 2, double • Dacor Stainless Steel Cleaner ovens come with either 4 or 5) (stainless steel models only...
Installation Instructions
Page 11
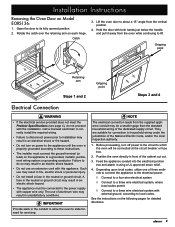
... the oven directly in the conduit to allow the oven to a grounded, metallic, permanent wiring system or grounding conductor. Feed the appliance conduit into the electrical junction box and attach it away from the vertical position. 4. Catch 3. IMPORTANT Provide slack in front of the... inspection authority. 1. Depending upon local codes, utilize one of the dedicated supply circuit. Before proceeding, turn on power to the appliance until the oven is properly grounded according to these instructions. • The installer must be connected to lift. Rotate the catch over...
... the oven directly in the conduit to allow the oven to a grounded, metallic, permanent wiring system or grounding conductor. Feed the appliance conduit into the electrical junction box and attach it away from the vertical position. 4. Catch 3. IMPORTANT Provide slack in front of the... inspection authority. 1. Depending upon local codes, utilize one of the dedicated supply circuit. Before proceeding, turn on power to the appliance until the oven is properly grounded according to these instructions. • The installer must be connected to lift. Rotate the catch over...
Installation Instructions
Page 12
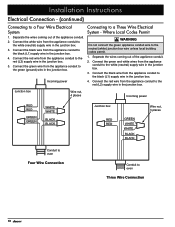
... Wire Connection Conduit to the neutral (white) junction box wire unless local building codes permit. 1. Connect the black wire from the appliance conduit to the black (L1) supply wire in the junction box. 4. Incoming power Connecting to the white (neutral) supply wire ...in the junction box. 3. Connect the red wire from the appliance conduit to a Four Wire Electrical System 1. Connect the white wire from the appliance conduit to a Three Wire Electrical System - Installation Instructions Electrical Connection - (continued) Connecting to the ...
... Wire Connection Conduit to the neutral (white) junction box wire unless local building codes permit. 1. Connect the black wire from the appliance conduit to the black (L1) supply wire in the junction box. 4. Incoming power Connecting to the white (neutral) supply wire ...in the junction box. 3. Connect the red wire from the appliance conduit to a Four Wire Electrical System 1. Connect the white wire from the appliance conduit to a Three Wire Electrical System - Installation Instructions Electrical Connection - (continued) Connecting to the ...
Installation Instructions
Page 13
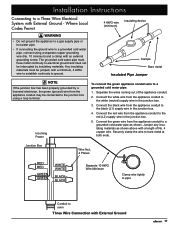
...to a Three Wire Electrical System with External Ground 11 Where Local Codes Permit 4 AWG wire (minimum) Insulating device warning • Do not ground the appliance to a gas supply pipe or hot water pipe. • If connecting the ground wire to the red (L2) supply wire in the junction box... with a minimum, 4 AWG wire to establish continuity to the black (L1) supply wire in the junction box. 5. Connect the green wire from the appliance conduit to ground. Separate the wires coming out of No. 4 copper wire. Securely clamp the wire to a grounded cold water pipe: 1. Clamps Bare ...
...to a Three Wire Electrical System with External Ground 11 Where Local Codes Permit 4 AWG wire (minimum) Insulating device warning • Do not ground the appliance to a gas supply pipe or hot water pipe. • If connecting the ground wire to the red (L2) supply wire in the junction box... with a minimum, 4 AWG wire to establish continuity to the black (L1) supply wire in the junction box. 5. Connect the green wire from the appliance conduit to ground. Separate the wires coming out of No. 4 copper wire. Securely clamp the wire to a grounded cold water pipe: 1. Clamps Bare ...
Installation Instructions
Page 14
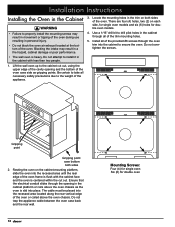
... oven up to install it in the cabinet with the cabinet face and the oven is slid into the cabinet to the weight of the appliance. 3. Do not overtighten the screws. Ensure that the electrical conduit slides through the opening and the bottom of the oven case side as the oven... may result in a fire hazard, cabinet damage or poor performance. • The wall oven is flush with less than two people. 1. Do not trap the appliance cable between the oven case back and the rear wall. 12 Mounting Screws: Four (4) for single oven Six (6) for double oven models. 4.
... oven up to install it in the cabinet with the cabinet face and the oven is slid into the cabinet to the weight of the appliance. 3. Do not overtighten the screws. Ensure that the electrical conduit slides through the opening and the bottom of the oven case side as the oven... may result in a fire hazard, cabinet damage or poor performance. • The wall oven is flush with less than two people. 1. Do not trap the appliance cable between the oven case back and the rear wall. 12 Mounting Screws: Four (4) for single oven Six (6) for double oven models. 4.

Installation Instructions
Page 16
Lower the door to repair the appliance yourself. Press the BAKE key on the hinge receptacles. After approximately three (3) minutes, the lower heating element should appear on the display. 7. Do not attempt ... completely to the oven. • If power is behind the glass panel on power and repeat the above heating test. • If the appliance still does not work, contact Dacor Distinctive Service at (877) 337-3226. After approximately three (3) minutes, the upper heating element should appear on top of the lower lip...
Lower the door to repair the appliance yourself. Press the BAKE key on the hinge receptacles. After approximately three (3) minutes, the lower heating element should appear on the display. 7. Do not attempt ... completely to the oven. • If power is behind the glass panel on power and repeat the above heating test. • If the appliance still does not work, contact Dacor Distinctive Service at (877) 337-3226. After approximately three (3) minutes, the upper heating element should appear on top of the lower lip...
Use & Care Manuals
Page 3
... grill, below for future reference. View data plate through the oven causing a fire hazard. Visit www.Dacor.com to heat or warm the room. Keep your appliance available. Write these instructions with materials such as a space heater to download the latest version of explosion ... and Canada) Monday - Doing so blocks air flow through grate danger IMPORTANT: To avoid the possibility of this appliance. Pacific Time Web site: www.Dacor.com Have the complete model and serial number for warranty service. Do not store flammable or explosive materials in severe...
... grill, below for future reference. View data plate through the oven causing a fire hazard. Visit www.Dacor.com to heat or warm the room. Keep your appliance available. Write these instructions with materials such as a space heater to download the latest version of explosion ... and Canada) Monday - Doing so blocks air flow through grate danger IMPORTANT: To avoid the possibility of this appliance. Pacific Time Web site: www.Dacor.com Have the complete model and serial number for warranty service. Do not store flammable or explosive materials in severe...
Use & Care Manuals
Page 4
... touch the outside surfaces of the oven during the self clean cycle. Personal injury or damage may result from the improper use water on the appliance. • Do not tamper with the controls. • To prevent the unit from tipping forward and to provide a stable installation, make sure that... installed, the spinning fan blades at the circuit breaker or fuse box. • Only use the oven for cooking tasks expected of a home appliance as outlined in the oven. Let hot air or steam escape before use to food in this manual. Remove birds to the accompanying installation instructions...
... touch the outside surfaces of the oven during the self clean cycle. Personal injury or damage may result from the improper use water on the appliance. • Do not tamper with the controls. • To prevent the unit from tipping forward and to provide a stable installation, make sure that... installed, the spinning fan blades at the circuit breaker or fuse box. • Only use the oven for cooking tasks expected of a home appliance as outlined in the oven. Let hot air or steam escape before use to food in this manual. Remove birds to the accompanying installation instructions...
Use & Care Manuals
Page 33
... EXPRESS OR IMPLIED, ARE MADE TO ANY BUYER FOR RESALE. Friday 6:00 a.m. - 5:00 p.m. If you or subsequent users. If you have the appliance accessible for service. Friday 6:00 a.m. factory, to 4:00 p.m. All delivery, installation, and labor costs are the responsibility of inconsequential damages, so the above... is null and void if non-CSA approved product is helpful to you need anything clarified, just let us at : www.Dacor.com At Dacor, we believe that our quality of service equals that vary from the U.S. THE REMEDIES PROVIDED FOR IN THE ABOVE EXPRESS WARRANTIES ...
... EXPRESS OR IMPLIED, ARE MADE TO ANY BUYER FOR RESALE. Friday 6:00 a.m. - 5:00 p.m. If you or subsequent users. If you have the appliance accessible for service. Friday 6:00 a.m. factory, to 4:00 p.m. All delivery, installation, and labor costs are the responsibility of inconsequential damages, so the above... is null and void if non-CSA approved product is helpful to you need anything clarified, just let us at : www.Dacor.com At Dacor, we believe that our quality of service equals that vary from the U.S. THE REMEDIES PROVIDED FOR IN THE ABOVE EXPRESS WARRANTIES ...
Use & Care Manuals
Page 36
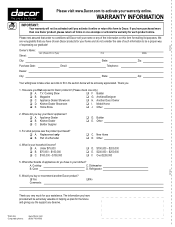
WARRANTY INFORMATION IMPORTANT: Your warranty will be sincerely appreciated. How were you first exposed to Dacor products? (Please check one envelope or activate the warranty for your Dacor appliances? A. Magazine G. Model Home E. Where did you very much ... are very grateful that under no conditions will be extremely valuable in your warranty online. T.V. Another Dacor Owner D. Appliance Dealer B. Replacement only B. Cooktop C. Other 3. Cooking Show F Builder B. Kitchen...
WARRANTY INFORMATION IMPORTANT: Your warranty will be sincerely appreciated. How were you first exposed to Dacor products? (Please check one envelope or activate the warranty for your Dacor appliances? A. Magazine G. Model Home E. Where did you very much ... are very grateful that under no conditions will be extremely valuable in your warranty online. T.V. Another Dacor Owner D. Appliance Dealer B. Replacement only B. Cooktop C. Other 3. Cooking Show F Builder B. Kitchen...
Planning Guides
Page 1
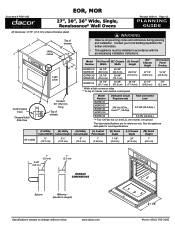
...notice. See the appliance data plate for further information. • This appliance must be installed in accordance with the accompanying installation instructions. www.dacor.com 21 1/8" Phone: (800) 7931-0.9093 Model (A) Overall (B)* Chassis (C) Overall Number Width Width Height EORS127/ MORS127 EORS130/ ... 1/4" (69.2 cm) (E) Control Panel Overlay 15/16" (23.8 cm) 7/8" (2.2 cm) Model Number Dedicated Circuit Requirements Total Connected Load EORS127 MORS127 EORS130 MORS130 240 Vac 60 Hz., 4-wire***, 30 Amp. 5.0 kW (20.8 Amp.) EORS136 5.3 kW (22 Amp.) *** Two 120...
...notice. See the appliance data plate for further information. • This appliance must be installed in accordance with the accompanying installation instructions. www.dacor.com 21 1/8" Phone: (800) 7931-0.9093 Model (A) Overall (B)* Chassis (C) Overall Number Width Width Height EORS127/ MORS127 EORS130/ ... 1/4" (69.2 cm) (E) Control Panel Overlay 15/16" (23.8 cm) 7/8" (2.2 cm) Model Number Dedicated Circuit Requirements Total Connected Load EORS127 MORS127 EORS130 MORS130 240 Vac 60 Hz., 4-wire***, 30 Amp. 5.0 kW (20.8 Amp.) EORS136 5.3 kW (22 Amp.) *** Two 120...