Installation Instructions
Page 3
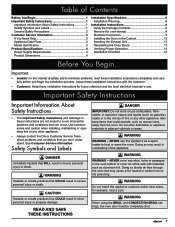
...1 Safety Symbols and Labels 1 General Safety Precautions 2 Customer Service Information 3 If You Need Help 3 Appliance Data Plate 3 Model Identification 3 Product Specifications 4 Power Supply Requirements 4 Product Dimensions 4 Installation Specifications 6 Installation Planning 6 Installation Instructions 8 Verify the Package Contents 8 Remove the oven door(s 8 Electrical Connection 9 Installing the Oven in the oven bottom or cover an entire rack with the customer. • Customer: Keep these installation instructions completely and carefully before you don't understand...
...1 Safety Symbols and Labels 1 General Safety Precautions 2 Customer Service Information 3 If You Need Help 3 Appliance Data Plate 3 Model Identification 3 Product Specifications 4 Power Supply Requirements 4 Product Dimensions 4 Installation Specifications 6 Installation Planning 6 Installation Instructions 8 Verify the Package Contents 8 Remove the oven door(s 8 Electrical Connection 9 Installing the Oven in the oven bottom or cover an entire rack with the customer. • Customer: Keep these installation instructions completely and carefully before you don't understand...
Installation Instructions
Page 4
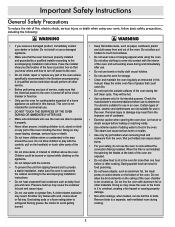
... the oven are required to the cabinet using the supplied mounting screws. • Keep flammable items, such as aluminum foil, the meat probe, cookie sheets, etc. On some models the heating elements are behind glass panels. • Always ensure that the electric power to the oven is damaged. • This oven must show the customer the location of the circuit breaker panel or fuse box so that they know where and how to turn...
... the oven are required to the cabinet using the supplied mounting screws. • Keep flammable items, such as aluminum foil, the meat probe, cookie sheets, etc. On some models the heating elements are behind glass panels. • Always ensure that the electric power to the oven is damaged. • This oven must show the customer the location of the circuit breaker panel or fuse box so that they know where and how to turn...

Installation Instructions
Page 16
Slowly and carefully open the oven door. • Rotate the hinge locks toward the oven. 4. Press START. On some ovens the element is being properly supplied, turn off power at the circuit breaker or fuse box and check the electrical connections. • Turn on power and repeat the above heating test. • If the appliance still does not work, contact Dacor Distinctive Service at the circuit breaker or fuse box. 5. See page 3 for both the upper and lower ovens. 6. Rotate...
Slowly and carefully open the oven door. • Rotate the hinge locks toward the oven. 4. Press START. On some ovens the element is being properly supplied, turn off power at the circuit breaker or fuse box and check the electrical connections. • Turn on power and repeat the above heating test. • If the appliance still does not work, contact Dacor Distinctive Service at the circuit breaker or fuse box. 5. See page 3 for both the upper and lower ovens. 6. Rotate...

Use & Care Manuals
Page 1
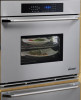
Use and Care Manual Renaissance Wall Oven For use with models: EOR, MOR Style varies Model EORD230 shown Ta b l e o f C o n t e n t s Important Safety Instructions 1 Getting to Know Your Oven 3 Operating Your Oven 8 Cooking Tips 21 Care and Cleaning 23 Part and Accessories 28 Before You Call for Service 29 Warranty and Service 31 Notes 32 Warranty Card Back Cover Part No. 102580 Rev. P
Use and Care Manual Renaissance Wall Oven For use with models: EOR, MOR Style varies Model EORD230 shown Ta b l e o f C o n t e n t s Important Safety Instructions 1 Getting to Know Your Oven 3 Operating Your Oven 8 Cooking Tips 21 Care and Cleaning 23 Part and Accessories 28 Before You Call for Service 29 Warranty and Service 31 Notes 32 Warranty Card Back Cover Part No. 102580 Rev. P
Use & Care Manuals
Page 4
... oven to cook without the convection filter(s) installed. Check the manufacturer's recommendations before looking or reaching inside. • Use extreme caution if adding water to food in this manual. Personal injury or damage may result. The steam can cause steam burns. • For your dealer or builder. When the filter is not installed, the spinning fan blades at the circuit breaker or fuse box. • Only use the oven...
... oven to cook without the convection filter(s) installed. Check the manufacturer's recommendations before looking or reaching inside. • Use extreme caution if adding water to food in this manual. Personal injury or damage may result. The steam can cause steam burns. • For your dealer or builder. When the filter is not installed, the spinning fan blades at the circuit breaker or fuse box. • Only use the oven...

Use & Care Manuals
Page 6
...G Self clean latch The self clean latch automatically locks the oven door during the convection cooking process. The door latches for safety purposes. H Broil elements The broil elements are two oven lights inside . Press the light key on the control panel to Know Your Oven Parts of the Oven A Control panel Your oven's control panel consists of the oven. The convection filter covers it . Use the control panel to cool its internal parts. D Oven lights There are located on the model. E Rack supports There are not equipped for proper operation. The air...
...G Self clean latch The self clean latch automatically locks the oven door during the convection cooking process. The door latches for safety purposes. H Broil elements The broil elements are two oven lights inside . Press the light key on the control panel to Know Your Oven Parts of the Oven A Control panel Your oven's control panel consists of the oven. The convection filter covers it . Use the control panel to cool its internal parts. D Oven lights There are located on the model. E Rack supports There are not equipped for proper operation. The air...

Use & Care Manuals
Page 8
It also activates the lock-out feature. The two timers operate separately from each oven. Located on double ovens, the PROOF key. If you need to turn the oven lights on or off any features (except the timer) that appear on or off automatically at a later time. Display Symbols Convection Bake Broil Roast Meat probe Door lock (self clean) Timer Self clean 12 Timer numbers 6 Use this key to turn off your oven, select the cooking mode first, then press the START key. On double ovens, there is...
It also activates the lock-out feature. The two timers operate separately from each oven. Located on double ovens, the PROOF key. If you need to turn the oven lights on or off any features (except the timer) that appear on or off automatically at a later time. Display Symbols Convection Bake Broil Roast Meat probe Door lock (self clean) Timer Self clean 12 Timer numbers 6 Use this key to turn off your oven, select the cooking mode first, then press the START key. On double ovens, there is...

Use & Care Manuals
Page 10
... display will indicate the mode the clock is best to let the meat rest after it comes out of the oven, it preheats automatically. Press CANCEL · SECURE to return to , "F" or "C". 3. The control panel will allow you must enter the time and press START soon afterward. Preheat time depends on the inner parts can select the temperature scale (Fahrenheit or Celsius) the oven uses to...
... display will indicate the mode the clock is best to let the meat rest after it comes out of the oven, it preheats automatically. Press CANCEL · SECURE to return to , "F" or "C". 3. The control panel will allow you must enter the time and press START soon afterward. Preheat time depends on the inner parts can select the temperature scale (Fahrenheit or Celsius) the oven uses to...

Use & Care Manuals
Page 12
... the convection fan and a top heat source. Cooks using Pure Convection or one START key, on the display. Use it to be flipped, such as thinner cuts of the bake or roast modes, "PRE-" for directions on the display. Carefully place your food in too soon. note After you remove the food from the oven when "PRE-" appears on how to 2the new setting. Enter the temperature on : 1. Adjust the racks to...
... the convection fan and a top heat source. Cooks using Pure Convection or one START key, on the display. Use it to be flipped, such as thinner cuts of the bake or roast modes, "PRE-" for directions on the display. Carefully place your food in too soon. note After you remove the food from the oven when "PRE-" appears on how to 2the new setting. Enter the temperature on : 1. Adjust the racks to...

Use & Care Manuals
Page 16
... convection fan and a top heat be used to prepare many foods, including steaks, chicken, chops, hamburgers and fish. If the meat probe is recommended to turn . Excess grease will not start the oven in heavy smoke. Foods that fits the size of the recommended time, then season and turn and remove meats. Always use a broiler pan and grill to give the food a broiled flavor. • Setting the timer is best fan...
... convection fan and a top heat be used to prepare many foods, including steaks, chicken, chops, hamburgers and fish. If the meat probe is recommended to turn . Excess grease will not start the oven in heavy smoke. Foods that fits the size of the recommended time, then season and turn and remove meats. Always use a broiler pan and grill to give the food a broiled flavor. • Setting the timer is best fan...

Use & Care Manuals
Page 17
... appears on the display when one or both of food, take the following steps: • Avoid using the delay timed features. The Three Ways to Use Delay Timed Cooking • Set the time the oven turns on (START TIME) and set ) timer 2. The timer number will spoil while waiting for the oven to Know About Delay Timed Cooking • The delay timed options work for timing purposes. Press CLOCK to return to turn the oven off manually when you can...
... appears on the display when one or both of food, take the following steps: • Avoid using the delay timed features. The Three Ways to Use Delay Timed Cooking • Set the time the oven turns on (START TIME) and set ) timer 2. The timer number will spoil while waiting for the oven to Know About Delay Timed Cooking • The delay timed options work for timing purposes. Press CLOCK to return to turn the oven off manually when you can...

Use & Care Manuals
Page 18
... a time up to start time setting. If you entered a START TIME, the oven will start time entered. 11. For cooking temperatures of 350°F and below, add 13 minutes to view the time. Push the CLOCK key to the cook time. Adjust the racks to determine when the oven will stop cooking using the DURATION or STOP TIME keys, it will keep the temperature at 150°F for the desired cooking mode (except Broil or Convection Broil.) 4. Using the STOP TIME key...
... a time up to start time setting. If you entered a START TIME, the oven will start time entered. 11. For cooking temperatures of 350°F and below, add 13 minutes to view the time. Push the CLOCK key to the cook time. Adjust the racks to determine when the oven will stop cooking using the DURATION or STOP TIME keys, it will keep the temperature at 150°F for the desired cooking mode (except Broil or Convection Broil.) 4. Using the STOP TIME key...

Use & Care Manuals
Page 19
... temperature you are cooking fowl, the tip of the meat. Your oven's meat probe is not being used, especially during preheat mode (when "PRE-" appears on the display. The probe can use hot pads to handle, connect, and unplug the meat probe when the oven is hot. • Use the handles to insert and remove the meat probe's skewer and to connect it on the number keypad. 3. To prevent sickness, do not press START, the probe mode...
... temperature you are cooking fowl, the tip of the meat. Your oven's meat probe is not being used, especially during preheat mode (when "PRE-" appears on the display. The probe can use hot pads to handle, connect, and unplug the meat probe when the oven is hot. • Use the handles to insert and remove the meat probe's skewer and to connect it on the number keypad. 3. To prevent sickness, do not press START, the probe mode...

Use & Care Manuals
Page 20
... the STOP TIME or DURATION setting, then go into hold mode. Adjust the racks to the table below. One that fits inside the half sheet pan • Cheesecloth • 4 quart sauce pot with higher temperatures. 5. Operating Your Oven Using the Meat Probe (Continued) Dehydrating/Defrosting Important details about the meat probe: • You must select the specific cooking mode (BAKE, CONV BAKE, PURE CONV or CONV ROAST) before you use one of the timers to time...
... the STOP TIME or DURATION setting, then go into hold mode. Adjust the racks to the table below. One that fits inside the half sheet pan • Cheesecloth • 4 quart sauce pot with higher temperatures. 5. Operating Your Oven Using the Meat Probe (Continued) Dehydrating/Defrosting Important details about the meat probe: • You must select the specific cooking mode (BAKE, CONV BAKE, PURE CONV or CONV ROAST) before you use one of the timers to time...

Use & Care Manuals
Page 25
... deposits on this manual. How to Use the Self Clean Feature important On double ovens, the control panel will not function if the meat probe is heated to the amount of the oven. During self cleaning, the oven is connected. See proper cleaning instructions on the surfaces of power consumed. Rubbing or displacing it is normal for the oven to force the door open after it may result. 4. Longer self clean times are cool before...
... deposits on this manual. How to Use the Self Clean Feature important On double ovens, the control panel will not function if the meat probe is heated to the amount of the oven. During self cleaning, the oven is connected. See proper cleaning instructions on the surfaces of power consumed. Rubbing or displacing it is normal for the oven to force the door open after it may result. 4. Longer self clean times are cool before...

Use & Care Manuals
Page 26
...;F.) Cleaning the Exterior Control Panel warning Do not use abrasive cleaners or scrubbers on the display and the oven door will lock. Press the START TIME key. 6. Setting the Oven to select the desired self clean time. 5. This condition is released because the inside has cooled down enough to open . To avoid accidentally turning the oven on the display. Dry the control panel completely with the meat probe connected (the meat probe symbol will make the self clean cycle work...
...;F.) Cleaning the Exterior Control Panel warning Do not use abrasive cleaners or scrubbers on the display and the oven door will lock. Press the START TIME key. 6. Setting the Oven to select the desired self clean time. 5. This condition is released because the inside has cooled down enough to open . To avoid accidentally turning the oven on the display. Dry the control panel completely with the meat probe connected (the meat probe symbol will make the self clean cycle work...

Use & Care Manuals
Page 27
...) Use a mild glass cleaner to 2 gallons of a sponge and warm, soapy water. You can polish them to make them easier to cook. Cleaning the Interior Clips Convection Filter warning For your oven's convection filter... Polish the rack edges with Dacor Cooktop Cleaning Creme. Rinse and dry with the grain. You may also use abrasive cleaners or scrubbers on glass surfaces. To prevent scratching, do not self clean the oven racks. Be careful...
...) Use a mild glass cleaner to 2 gallons of a sponge and warm, soapy water. You can polish them to make them easier to cook. Cleaning the Interior Clips Convection Filter warning For your oven's convection filter... Polish the rack edges with Dacor Cooktop Cleaning Creme. Rinse and dry with the grain. You may also use abrasive cleaners or scrubbers on glass surfaces. To prevent scratching, do not self clean the oven racks. Be careful...

Use & Care Manuals
Page 31
...What to electrical power. Oven shuts off by itself after oven has been turned off . Broil and Convection Broil settings will start self clean cycle when meat probe is in self clean mode. Lights do not work . Follow instructions in self clean mode. Control panel locked. Oven set for a while after 12 hours of day not set for problems with the meat probe connected. Oven will not work when oven is set properly. Oven does not self clean. Oven lights will turn off . Incorrect cooking time or temperature. Oven will not heat. Cooling fan continues to oven is on...
...What to electrical power. Oven shuts off by itself after oven has been turned off . Broil and Convection Broil settings will start self clean cycle when meat probe is in self clean mode. Lights do not work . Follow instructions in self clean mode. Control panel locked. Oven set for a while after 12 hours of day not set for problems with the meat probe connected. Oven will not work when oven is set properly. Oven does not self clean. Oven lights will turn off . Incorrect cooking time or temperature. Oven will not heat. Cooling fan continues to oven is on...

Use & Care Manuals
Page 32
... "U55". Oven is set while oven is in use . Disconnect and remove meat probe. May Be Caused By Oven in use . Call for oven to complete self clean or press CANCEL · SECURE. Check display. Oven lights will not open. Press light key to turn off. Door will not start Sabbath mode when meat probe is set clock. Sabbath mode does not work. Light key is connected. Meat probe connected. Before You Call for Service Problem Solution Guide - (Continued) Problem Cannot set to on. An error code having a letter with a number following...
... "U55". Oven is set while oven is in use . Disconnect and remove meat probe. May Be Caused By Oven in use . Call for oven to complete self clean or press CANCEL · SECURE. Check display. Oven lights will not open. Press light key to turn off. Door will not start Sabbath mode when meat probe is set clock. Sabbath mode does not work. Light key is connected. Meat probe connected. Before You Call for Service Problem Solution Guide - (Continued) Problem Cannot set to on. An error code having a letter with a number following...
Planning Guides
Page 1
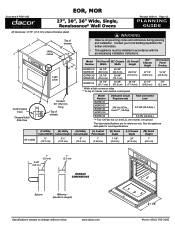
...; Wall Ovens Revised 10/01/11 Page 1/2 PLANNING GUIDE All tolerances: ±1/16" (±1.6 mm) unless otherwise stated L J C Utility cutout Top of chassis B* F G H D Light cover A Control panel front Chassis Notch Side View K E M Conduit: 60" (152 cm) Long Top of chassis notch behind control panel (D)** Chassis Height 27 1/2" (69.9 cm) 27 1/4" (69.2 cm) (E) Control Panel Overlay 15/16" (23.8 cm) 7/8" (2.2 cm) Model Number Dedicated Circuit Requirements Total Connected Load EORS127...
...; Wall Ovens Revised 10/01/11 Page 1/2 PLANNING GUIDE All tolerances: ±1/16" (±1.6 mm) unless otherwise stated L J C Utility cutout Top of chassis B* F G H D Light cover A Control panel front Chassis Notch Side View K E M Conduit: 60" (152 cm) Long Top of chassis notch behind control panel (D)** Chassis Height 27 1/2" (69.9 cm) 27 1/4" (69.2 cm) (E) Control Panel Overlay 15/16" (23.8 cm) 7/8" (2.2 cm) Model Number Dedicated Circuit Requirements Total Connected Load EORS127...


