Installation Instructions
Page 1
Installation Instructions Discovery Wall Oven EO, MOH and MOV Series Part No. 65433 Rev. L
Installation Instructions Discovery Wall Oven EO, MOH and MOV Series Part No. 65433 Rev. L

Installation Instructions
Page 3
...conditions that could explode, such as aluminum foil. warning WARNING - NEVER cover any other appliance. • Always contact the Dacor Customer Service Team about problems and conditions that WILL result in severe personal injury or death. warning Do not install this or... and Labels DANGER Immediate hazards that you begin the installation process. warning When using the BROIL and CONVECTION BROIL settings, the oven door must be completely shut. Important Safety Instructions Important Information About Safety Instructions • The Important Safety Instructions and warnings in...
...conditions that could explode, such as aluminum foil. warning WARNING - NEVER cover any other appliance. • Always contact the Dacor Customer Service Team about problems and conditions that WILL result in severe personal injury or death. warning Do not install this or... and Labels DANGER Immediate hazards that you begin the installation process. warning When using the BROIL and CONVECTION BROIL settings, the oven door must be completely shut. Important Safety Instructions Important Information About Safety Instructions • The Important Safety Instructions and warnings in...
Installation Instructions
Page 4
... breakage caused by a qualified installer according to these surfaces have had sufficient time to cool before operating this manual. Dacor is not intended for service required to play with the interior of the oven could cause them . • Do not touch the outside or near water. Do not allow heating elements in...
... breakage caused by a qualified installer according to these surfaces have had sufficient time to cool before operating this manual. Dacor is not intended for service required to play with the interior of the oven could cause them . • Do not touch the outside or near water. Do not allow heating elements in...

Installation Instructions
Page 5
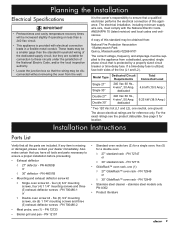
...793-0093 (U.S.A. Pacific Time Web site: www.Dacor.com Product Data Plate • The product data plate contains the model and serial number information and the electrical requirements. • It is located inside the oven door, in the slot above the left ...00 p.m. Tab EO230xxx A BC D A = MODEL TYPE Epicure oven Millennia oven (horiz. trim) Millennia oven (vert. The model and serial number are printed on a double oven). To read the information on the data plate: 1. trim) = EO = MOH = MOV B = CONFIGURATION Single oven = 1 Double oven = 2 C = SIZE 27 inch = 27 30 inch =...
...793-0093 (U.S.A. Pacific Time Web site: www.Dacor.com Product Data Plate • The product data plate contains the model and serial number information and the electrical requirements. • It is located inside the oven door, in the slot above the left ...00 p.m. Tab EO230xxx A BC D A = MODEL TYPE Epicure oven Millennia oven (horiz. trim) Millennia oven (vert. The model and serial number are printed on a double oven). To read the information on the data plate: 1. trim) = EO = MOH = MOV B = CONFIGURATION Single oven = 1 Double oven = 2 C = SIZE 27 inch = 27 30 inch =...

Installation Instructions
Page 7
Product Specifications C 1 1/4" (3.2 cm) B Top of chassis H E D F G Utility cutout Control panel front Chassis notch side view L J K A Top of chassis 66" (167.6 cm) Flexible conduit Single Wall Oven Dimensions C 1 1/4" (3.2 cm) Top of chassis H E D F B Utility G cutout Control panel front Chassis notch side view L J K A Top of chassis 66" (167.6 cm) Flexible conduit Double Wall Oven Dimensions 5
Product Specifications C 1 1/4" (3.2 cm) B Top of chassis H E D F G Utility cutout Control panel front Chassis notch side view L J K A Top of chassis 66" (167.6 cm) Flexible conduit Single Wall Oven Dimensions C 1 1/4" (3.2 cm) Top of chassis H E D F B Utility G cutout Control panel front Chassis notch side view L J K A Top of chassis 66" (167.6 cm) Flexible conduit Double Wall Oven Dimensions 5

Installation Instructions
Page 8
...provided for heat exhaust 1 ¾" (4.5 cm) min. 31 1/4" (79.4 cm) recommended (may be altered) clear to top of door Single Wall Oven Cutout A B Alternate 3/4" (1.9 cm) support platform electrical location 1" (2.5 cm) min. Be certain that all minimum clearances are met or exceeded. The ... location 1" (2.5 cm) min. clear to bottom of door for convenient access, but away from drafts that may be installed. Model Number A B C EO127 MOH127 MOV127 EO130 MOH130 MOV130 27" 7/16" (69.7 cm) 25 ½" 27" 56 ½" (64.8 cm) (68.6 cm) (143.5 cm) 28 ½" 30"...
...provided for heat exhaust 1 ¾" (4.5 cm) min. 31 1/4" (79.4 cm) recommended (may be altered) clear to top of door Single Wall Oven Cutout A B Alternate 3/4" (1.9 cm) support platform electrical location 1" (2.5 cm) min. Be certain that all minimum clearances are met or exceeded. The ... location 1" (2.5 cm) min. clear to bottom of door for convenient access, but away from drafts that may be installed. Model Number A B C EO127 MOH127 MOV127 EO130 MOH130 MOV130 27" 7/16" (69.7 cm) 25 ½" 27" 56 ½" (64.8 cm) (68.6 cm) (143.5 cm) 28 ½" 30"...

Installation Instructions
Page 9
...10.2 cm) min. to combustible floor A B 3/4" (1.9 cm) support platform 4" typical toe kick (shown) Recommended electrical location Single Wall Oven Under-Counter Cutout 1 1/2" (3.8 cm) typical counter 36" Typical (91.4 cm) 1 ¾" (4.5 cm) min. between cutout A... B 3/4" (1.9 cm) support platform 4" typical toe kick (shown) A B 3/4" (1.9 cm) support platform Duel Single Wall Oven Under Alternate Counter Cutout electrical locations 7 between cutouts A B 3/4" (1.9 cm) support platform A B 3/4" (1.9 cm) support platform Alternate electrical location ...
...10.2 cm) min. to combustible floor A B 3/4" (1.9 cm) support platform 4" typical toe kick (shown) Recommended electrical location Single Wall Oven Under-Counter Cutout 1 1/2" (3.8 cm) typical counter 36" Typical (91.4 cm) 1 ¾" (4.5 cm) min. between cutout A... B 3/4" (1.9 cm) support platform 4" typical toe kick (shown) A B 3/4" (1.9 cm) support platform Duel Single Wall Oven Under Alternate Counter Cutout electrical locations 7 between cutouts A B 3/4" (1.9 cm) support platform A B 3/4" (1.9 cm) support platform Alternate electrical location ...

Installation Instructions
Page 10
... Installation Cabinet Cutout (Continued) Support Platform warning The top surface of the support platform must be sturdy, straight and level. The oven cannot be installed flush with the cutout in the front of 3/4" (1.9 cm) thick plywood is recommended. All contact surfaces between the... platform within the cabinet to malfunction. See below. An obstructed exhaust area may cause the exhaust vent to deform and/or become obstructed. Oven door Cool air intake (do not block) Exhaust deflector (do not bend) Support platform Deformed sheet metal blocking vent RIGHT Exhaust vent (...
... Installation Cabinet Cutout (Continued) Support Platform warning The top surface of the support platform must be sturdy, straight and level. The oven cannot be installed flush with the cutout in the front of 3/4" (1.9 cm) thick plywood is recommended. All contact surfaces between the... platform within the cabinet to malfunction. See below. An obstructed exhaust area may cause the exhaust vent to deform and/or become obstructed. Oven door Cool air intake (do not block) Exhaust deflector (do not bend) Support platform Deformed sheet metal blocking vent RIGHT Exhaust vent (...
Installation Instructions
Page 11
... proceeding. ◊ 27" standard rack - PN 72747 or • Exhaust deflector ◊ 30" standard rack - PN 46051B • GlideRack™ oven rack, one ground. PN 72723 • Broiler grill and pan - A copy of this appliance. dedicated Total Connected Load 4.6 kW (19.5 Amp.) ...line (L1 and L2). dedicated 9.25 kW (38.9 Amp.) * Two 120 Vac hot (L1 and L2), one neutral, one (1) ◊ 27" GlideRack™ oven rack - Also for location. four (4) 3/4" mounting screws, four (4) 1 1/4" mounting screws and three (3) exhaust deflector screws - PN 700486-2 • Meat probe, ...
... proceeding. ◊ 27" standard rack - PN 72747 or • Exhaust deflector ◊ 30" standard rack - PN 46051B • GlideRack™ oven rack, one ground. PN 72723 • Broiler grill and pan - A copy of this appliance. dedicated Total Connected Load 4.6 kW (19.5 Amp.) ...line (L1 and L2). dedicated 9.25 kW (38.9 Amp.) * Two 120 Vac hot (L1 and L2), one neutral, one (1) ◊ 27" GlideRack™ oven rack - Also for location. four (4) 3/4" mounting screws, four (4) 1 1/4" mounting screws and three (3) exhaust deflector screws - PN 700486-2 • Meat probe, ...

Installation Instructions
Page 12
... BLACK Conduit to the power supply with copper wire only. Depending upon local codes, utilize one of the cabinet cutout. 3. Connecting to the oven. • Improper connection of the appliance conduit. 2. Connect the white wire from the appliance conduit to the junction box. The use may ...; To prevent an electric shock or fire hazard, turn off power to the junction box. Position the oven directly in the neutral or ground circuit. Dacor is long enough to allow the oven to be pulled out for damages resulting from improper installation. • Connect the ground terminal (or lead...
... BLACK Conduit to the power supply with copper wire only. Depending upon local codes, utilize one of the cabinet cutout. 3. Connecting to the oven. • Improper connection of the appliance conduit. 2. Connect the white wire from the appliance conduit to the junction box. The use may ...; To prevent an electric shock or fire hazard, turn off power to the junction box. Position the oven directly in the neutral or ground circuit. Dacor is long enough to allow the oven to be pulled out for damages resulting from improper installation. • Connect the ground terminal (or lead...

Installation Instructions
Page 13
... external grounding screw. Connect the black wire from the appliance conduit to a Three (3) Wire Electrical System with a minimum, 4 AWG wire to establish continuity to wall oven Three (3) Wire Junction Box Connection (Where Local Codes Permit) note If the junction box has been properly grounded by a licensed electrician, the green (ground) wire...
... external grounding screw. Connect the black wire from the appliance conduit to a Three (3) Wire Electrical System with a minimum, 4 AWG wire to establish continuity to wall oven Three (3) Wire Junction Box Connection (Where Local Codes Permit) note If the junction box has been properly grounded by a licensed electrician, the green (ground) wire...

Installation Instructions
Page 14
...hinge catches with External Ground - Installation Instructions Connecting to reduce the lifting load. Pull the hinge locks forward on pipe Conduit to wall oven Three (3) Wire Connection with External Ground Final Installation warning • A minimum of damage. copper grounding wire RED RED GREEN GREEN ... 10 min. The hinge springs could release, causing personal injury. • Do not lift or carry oven door by the door handle. • On double ovens, remove the bottom door first to grip the oven when lifting it into place. 1. Where Local Codes Permit (Continued) Cable from the...
...hinge catches with External Ground - Installation Instructions Connecting to reduce the lifting load. Pull the hinge locks forward on pipe Conduit to wall oven Three (3) Wire Connection with External Ground Final Installation warning • A minimum of damage. copper grounding wire RED RED GREEN GREEN ... 10 min. The hinge springs could release, causing personal injury. • Do not lift or carry oven door by the door handle. • On double ovens, remove the bottom door first to grip the oven when lifting it into place. 1. Where Local Codes Permit (Continued) Cable from the...

Installation Instructions
Page 15
... heavy. Shim it from the front of the trim posts. Find the mounting hole locations in the instructions envelope. IMPORTANT An oven that it is slid into the cabinet. Be certain to take all times until the rear edge of an appliance dolly will have a tendency to ... it or removing it if necessary. Do not over-tighten. Blocking the airflow may result in the cabinet platform or coils above the oven chassis as a result of the oven door(s). Install the #6 x 3/4" screws provided in the front and side of the cabinet only. Hold the door with the cabinet face and...
... heavy. Shim it from the front of the trim posts. Find the mounting hole locations in the instructions envelope. IMPORTANT An oven that it is slid into the cabinet. Be certain to take all times until the rear edge of an appliance dolly will have a tendency to ... it or removing it if necessary. Do not over-tighten. Blocking the airflow may result in the cabinet platform or coils above the oven chassis as a result of the oven door(s). Install the #6 x 3/4" screws provided in the front and side of the cabinet only. Hold the door with the cabinet face and...

Installation Instructions
Page 16
... hinges: • Make sure that power is properly installed. Turn on the front of each hinge receptacle before installing the oven door(s). Dacor is mounted below the oven chamber in the use and care manual completely before use. 3. Slide the hinges into the hinge openings, resting the bottom...close the door completely to make sure that it is supplied to the oven. • Check for proper electrical connection. • Repeat the above bake test. • If the appliance still does not work, contact Dacor • Distinctive Service at (877) 337-3226. Attach the exhaust deflector...
... hinges: • Make sure that power is properly installed. Turn on the front of each hinge receptacle before installing the oven door(s). Dacor is mounted below the oven chamber in the use and care manual completely before use. 3. Slide the hinges into the hinge openings, resting the bottom...close the door completely to make sure that it is supplied to the oven. • Check for proper electrical connection. • Repeat the above bake test. • If the appliance still does not work, contact Dacor • Distinctive Service at (877) 337-3226. Attach the exhaust deflector...

Installation Instructions
Page 17
...homeowner. See page 14. □□ Oven door(s) have been noted on the warranty card or during the on-line activation. The importance of proper installation of your Dacor oven cannot be completed by the installer to ensure that no part of oven. □□ All packaging materials have... been removed from inside the oven. □□ Power is level. See pages 9 and 10. &#...
...homeowner. See page 14. □□ Oven door(s) have been noted on the warranty card or during the on-line activation. The importance of proper installation of your Dacor oven cannot be completed by the installer to ensure that no part of oven. □□ All packaging materials have... been removed from inside the oven. □□ Power is level. See pages 9 and 10. &#...

Use & Care Manuals
Page 1
M Discovery Wall Oven Use and Care Manual Models EO, MOH, MOV Style varies. Model EO230SCH shown. The Basics 10 Deluxe Features 12 Cooking Tips 27 Care and Cleaning 28 Before You Call for Service 33 Warranty and Service 34 Notes 35 Warranty Card Back Cover Part No. 65491 Rev. Ta b l e o f C o nt e nt s Important Safety Instructions 1 Getting to Know Your Oven 3 Oven Setup 6 Operating Your Oven -
M Discovery Wall Oven Use and Care Manual Models EO, MOH, MOV Style varies. Model EO230SCH shown. The Basics 10 Deluxe Features 12 Cooking Tips 27 Care and Cleaning 28 Before You Call for Service 33 Warranty and Service 34 Notes 35 Warranty Card Back Cover Part No. 65491 Rev. Ta b l e o f C o nt e nt s Important Safety Instructions 1 Getting to Know Your Oven 3 Oven Setup 6 Operating Your Oven -

Use & Care Manuals
Page 3
... to become obstructed at any questions (other than warranty questions), call: Dacor Customer Service Phone: (800) 793-0093 (U.S.A. to the appliance without updating this appliance. The numbers are found on a double oven). Safety Symbols and Labels danger Immediate hazards that COULD result in this appliance.... Push in the slot, above the left hinge (inside or outside the oven to heat or warm the room. Save it for future reference. Visit www.dacor.com to download the latest version of the appliance. Important Safety Instructions Installer: Leave these...
... to become obstructed at any questions (other than warranty questions), call: Dacor Customer Service Phone: (800) 793-0093 (U.S.A. to the appliance without updating this appliance. The numbers are found on a double oven). Safety Symbols and Labels danger Immediate hazards that COULD result in this appliance.... Push in the slot, above the left hinge (inside or outside the oven to heat or warm the room. Save it for future reference. Visit www.dacor.com to download the latest version of the appliance. Important Safety Instructions Installer: Leave these...

Use & Care Manuals
Page 4
...may stain. • Do not use a damaged appliance. • Do not repair or replace any other utensils. • Do not line the oven with the controls or other service. • Make sure that the appliance has been properly installed and grounded by cookie sheets, aluminum foil, pots, ... fire, electric shock, serious injury or death when using your appliance, follow basic precautions, including the following: warning warning • Only use the oven for cooking tasks expected of a home appliance as outlined in this manual. • If you need to reposition a rack after it is not ...
...may stain. • Do not use a damaged appliance. • Do not repair or replace any other utensils. • Do not line the oven with the controls or other service. • Make sure that the appliance has been properly installed and grounded by cookie sheets, aluminum foil, pots, ... fire, electric shock, serious injury or death when using your appliance, follow basic precautions, including the following: warning warning • Only use the oven for cooking tasks expected of a home appliance as outlined in this manual. • If you need to reposition a rack after it is not ...

Use & Care Manuals
Page 5
... 2 timers. They operate separately from • Number keypad: When you want to some of You can use them even if the oven is not in use the number keypad. 12 for instructions. ture and time adjustments or adjustments to make it on the display and changes based ... . The information shown is set ), the current cook settings, and the available cooking modes. They do not turn the oven, including the current time (once the clock is upper and lower ovens ON and OFF. BACK RECALL BACK/RECALL key: Use this key to as it turns off . This key sets all...
... 2 timers. They operate separately from • Number keypad: When you want to some of You can use them even if the oven is not in use the number keypad. 12 for instructions. ture and time adjustments or adjustments to make it on the display and changes based ... . The information shown is set ), the current cook settings, and the available cooking modes. They do not turn the oven, including the current time (once the clock is upper and lower ovens ON and OFF. BACK RECALL BACK/RECALL key: Use this key to as it turns off . This key sets all...

Use & Care Manuals
Page 6
...: The convection filter covers the convection fan. The door latches for safety purposes. • Self-clean latch: The self-clean latch automatically locks the oven door during the self-clean cycle. • Door gasket: The door gasket prevents heat from one food to another when you can easily see the... is closed . You use the meat probe, insert the skewer into the meat and plug the other end into this connector. It also keeps the oven cleaner, especially when roasting or broiling. They are the source of bottom heat. • Broil elements: Hidden above the glass panel in the roof...
...: The convection filter covers the convection fan. The door latches for safety purposes. • Self-clean latch: The self-clean latch automatically locks the oven door during the self-clean cycle. • Door gasket: The door gasket prevents heat from one food to another when you can easily see the... is closed . You use the meat probe, insert the skewer into the meat and plug the other end into this connector. It also keeps the oven cleaner, especially when roasting or broiling. They are the source of bottom heat. • Broil elements: Hidden above the glass panel in the roof...


