

SS-700 Manual
Page 4
...Benefits 6 Set-Up & First Brew 8 Setting Up Your Brewer 8 Charcoal Water Filter 9 Brewing 10 Hot Water/Rinse 12 Brewing with the My K-Cup® Accessory. . . . . . 13 Stopping the Brew Process 14 Adding Water 14 Purging the Brewer 14 Programming 15 Setting the Clock 15 Programming...Features 15 Programming Brew Temperature 17 Programming Your Brew Size 18 Cleaning & Maintenance 18 Cleaning External Parts 18 Cleaning the My K-Cup® Filter 18 Cleaning the K-Cup® Holder 19 Cleaning the Water Reservoir and Lid . . . . . 19 De-Scaling Your Brewer 20 Troubleshooting 21 Warranty...
...Benefits 6 Set-Up & First Brew 8 Setting Up Your Brewer 8 Charcoal Water Filter 9 Brewing 10 Hot Water/Rinse 12 Brewing with the My K-Cup® Accessory. . . . . . 13 Stopping the Brew Process 14 Adding Water 14 Purging the Brewer 14 Programming 15 Setting the Clock 15 Programming...Features 15 Programming Brew Temperature 17 Programming Your Brew Size 18 Cleaning & Maintenance 18 Cleaning External Parts 18 Cleaning the My K-Cup® Filter 18 Cleaning the K-Cup® Holder 19 Cleaning the Water Reservoir and Lid . . . . . 19 De-Scaling Your Brewer 20 Troubleshooting 21 Warranty...
SS-700 Manual
Page 5
...every time, locking in your own coffee and using the K-Cup®, brought to you by some of the most premium brands on the market, you can rest easy knowing that it in conjunction with every cup you choose, the Cuisinart® Single Serve Brewing System, working in the included My... K-Cup®, remember to the number of the coffee, tea or cocoa. Element 4: PROPORTION No matter which...
...every time, locking in your own coffee and using the K-Cup®, brought to you by some of the most premium brands on the market, you can rest easy knowing that it in conjunction with every cup you choose, the Cuisinart® Single Serve Brewing System, working in the included My... K-Cup®, remember to the number of the coffee, tea or cocoa. Element 4: PROPORTION No matter which...
SS-700 Manual
Page 6
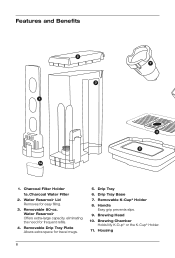
Drip Tray 6. Removable K-Cup® Holder 8. Drip Tray Base 7. Handle Easy grip prevents slips. 9. Brewing Head 10. Removable Drip Tray Plate Allows extra space for frequent refills. 4. Housing 6 Charcoal Water Filter 2. Brewing Chamber Holds My K-Cup® or the K-Cup® Holder. 11. Water Reservoir Offers extra-large capacity, eliminating the need for travel mugs. 5. Water Reservoir Lid Removes for easy filling. 3. Features and Benefits 2 7 3 1 4 5 1a 1. Removable 80-oz. Charcoal Filter Holder 1a.
Drip Tray 6. Removable K-Cup® Holder 8. Drip Tray Base 7. Handle Easy grip prevents slips. 9. Brewing Head 10. Removable Drip Tray Plate Allows extra space for frequent refills. 4. Housing 6 Charcoal Water Filter 2. Brewing Chamber Holds My K-Cup® or the K-Cup® Holder. 11. Water Reservoir Offers extra-large capacity, eliminating the need for travel mugs. 5. Water Reservoir Lid Removes for easy filling. 3. Features and Benefits 2 7 3 1 4 5 1a 1. Removable 80-oz. Charcoal Filter Holder 1a.

SS-700 Manual
Page 7
My K-Cup® Compartment Conveniently stores My K-Cup®. 20. Power Cord (not shown) 22. Down Button ( ) 16. My K-Cup® Reusable Coffee Filter 21. Power Switch (located rear side of Brewer) 23. Brew Button 17. Hot Water Button 12 13 14 19 15 16 17 18 20 22 23 19. Up Button ( ) 15. Coffee Scoop 7 8 9 10 11 6 12. Control Panel 13. Menu Button 14. Rinse Button 18.
My K-Cup® Compartment Conveniently stores My K-Cup®. 20. Power Cord (not shown) 22. Down Button ( ) 16. My K-Cup® Reusable Coffee Filter 21. Power Switch (located rear side of Brewer) 23. Brew Button 17. Hot Water Button 12 13 14 19 15 16 17 18 20 22 23 19. Up Button ( ) 15. Coffee Scoop 7 8 9 10 11 6 12. Control Panel 13. Menu Button 14. Rinse Button 18.

SS-700 Manual
Page 8
... Setting Up Your Brewer 1. Also be displayed on the rear right side of the brewer. 2. Place a large cup or mug (10 oz. Fill reservoir with water to the max fill line and return with water and heating will...this and subsequent heatings. READY and brew size icons will be sure to remove the polybag from the My K-Cup® located in the compartment on the drip tray. 3. An extremely cold Brewer will take approximately 4 minutes.... wait at least two hours for its first use your Cuisinart® Single Serve Brewing System until it has been set up and away from water reservoir.
... Setting Up Your Brewer 1. Also be displayed on the rear right side of the brewer. 2. Place a large cup or mug (10 oz. Fill reservoir with water to the max fill line and return with water and heating will...this and subsequent heatings. READY and brew size icons will be sure to remove the polybag from the My K-Cup® located in the compartment on the drip tray. 3. An extremely cold Brewer will take approximately 4 minutes.... wait at least two hours for its first use your Cuisinart® Single Serve Brewing System until it has been set up and away from water reservoir.
SS-700 Manual
Page 9
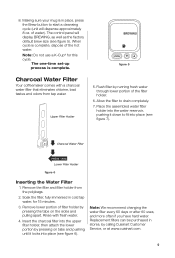
... you have hard water. of filter holder by pressing on the sides and pulling apart. Note: Do not use a K-Cup® for 15 minutes. 3. Flush filter by calling Cuisinart Customer Service, or at www.cuisinart.com. 9 Rinse with a charcoal water filter that eliminates chlorine, bad tastes and odors from the polybags. 2. Insert the...
... you have hard water. of filter holder by pressing on the sides and pulling apart. Note: Do not use a K-Cup® for 15 minutes. 3. Flush filter by calling Cuisinart Customer Service, or at www.cuisinart.com. 9 Rinse with a charcoal water filter that eliminates chlorine, bad tastes and odors from the polybags. 2. Insert the...

SS-700 Manual
Page 10
... 10-oz., and 12-oz. serving is chosen, press Brew. Once a size is the factoryset default brew size. Lift the handle. Select a K-Cup® Portion Pack®. When closed completely, the control panel will now display BREWING, as well as a solid mug. The drip tray can be ...a different size, use the or buttons. Brewing 1. All brew size icons will display READY again. a. Place a K-Cup® in the brewing chamber (see Programming Your Brew Size on the drip tray. K-Cup Portion Pack 6. To restart the process, open toward you selected (see figure 9). figure 9 7. Note: Do not ...
... 10-oz., and 12-oz. serving is chosen, press Brew. Once a size is the factoryset default brew size. Lift the handle. Select a K-Cup® Portion Pack®. When closed completely, the control panel will now display BREWING, as well as a solid mug. The drip tray can be ...a different size, use the or buttons. Brewing 1. All brew size icons will display READY again. a. Place a K-Cup® in the brewing chamber (see Programming Your Brew Size on the drip tray. K-Cup Portion Pack 6. To restart the process, open toward you selected (see figure 9). figure 9 7. Note: Do not ...
SS-700 Manual
Page 11
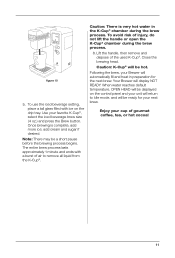
... be ready for the next brew. Once brewing is very hot water in preparation for your unit will return to remove all liquid from the K-Cup®. The entire brew process lasts approximately 1 minute and ends with ice on the control panel and your next brew. Following the brew, your ... process begins. Caution: There is complete, add more ice; To avoid risk of air to Idle mode, and will automatically fill and heat in the K-Cup® chamber during the brew process. 8. To use the iced beverage setting, place a tall glass filled with a burst of injury, do not lift the ...
... be ready for the next brew. Once brewing is very hot water in preparation for your unit will return to remove all liquid from the K-Cup®. The entire brew process lasts approximately 1 minute and ends with ice on the control panel and your next brew. Following the brew, your ... process begins. Caution: There is complete, add more ice; To avoid risk of air to Idle mode, and will automatically fill and heat in the K-Cup® chamber during the brew process. 8. To use the iced beverage setting, place a tall glass filled with a burst of injury, do not lift the ...
SS-700 Manual
Page 12
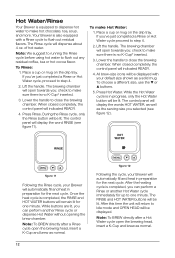
... to running the Rinse cycle before using hot water to step 4. 2. Lift the handle. The brewing chamber will open the brewing head, insert a K-Cup and brew as normal. 12 figure 12 Following the cycle, your Brewer will automatically fill and heat in preparation for one minute. To make hot...brew chamber. While buttons are lit, you 've just completed a Rinse or Hot Water cycle proceed to flush out residual flavors. Your Brewer is no K-Cup® inserted. 3. check to make sure there is completed, you ; Lower the handle to one minute. Lift the handle. The RINSE and HOT ...
... to running the Rinse cycle before using hot water to step 4. 2. Lift the handle. The brewing chamber will open the brewing head, insert a K-Cup and brew as normal. 12 figure 12 Following the cycle, your Brewer will automatically fill and heat in preparation for one minute. To make hot...brew chamber. While buttons are lit, you 've just completed a Rinse or Hot Water cycle proceed to flush out residual flavors. Your Brewer is no K-Cup® inserted. 3. check to make sure there is completed, you ; Lower the handle to one minute. Lift the handle. The RINSE and HOT ...
SS-700 Manual
Page 13
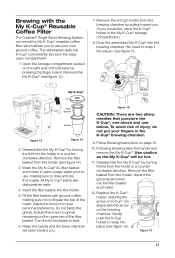
... remaining on the brewing chamber. Turn the lid clockwise to snap into the holder. 5. Brewing with the My K-Cup® Reusable Coffee Filter The Cuisinart® Single Serve Brewing System comes with a My K-Cup® reusable coffee filter, which allows you to use , making sure not to fill past the top of injury...
... remaining on the brewing chamber. Turn the lid clockwise to snap into the holder. 5. Brewing with the My K-Cup® Reusable Coffee Filter The Cuisinart® Single Serve Brewing System comes with a My K-Cup® reusable coffee filter, which allows you to use , making sure not to fill past the top of injury...
SS-700 Manual
Page 14
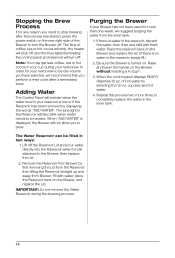
... WATER". IMPORTANT: Do not remove the Water Reservoir during your Brewer has not been used for your reservoir is turned on the Brewer without inserting a K-Cup®. 3. Note: You may get less coffee, tea or hot cocoa in the reservoir, discard the water, then rinse and refill with water, place the... one week, we recommend that you perform a rinse cycle after the process has started, press the power switch on the Brewer, and replace the Lid. cup size and hot water. 4. Lift off . Be sure the Brewer is low or if the Reservoir has been removed by first removing the Lid from...
... WATER". IMPORTANT: Do not remove the Water Reservoir during your Brewer has not been used for your reservoir is turned on the Brewer without inserting a K-Cup®. 3. Note: You may get less coffee, tea or hot cocoa in the reservoir, discard the water, then rinse and refill with water, place the... one week, we recommend that you perform a rinse cycle after the process has started, press the power switch on the Brewer, and replace the Lid. cup size and hot water. 4. Lift off . Be sure the Brewer is low or if the Reservoir has been removed by first removing the Lid from...

SS-700 Manual
Page 15
... (see figure 17). The correct time should now be left on all the time. Note: Although the clock remains on, if set, you cannot brew a cup of coffee, tea or hot cocoa if the brewer is off at the top of gourmet coffee, tea or hot cocoa. You will have reached... Brewer provides three ways for the water to indicate that it on all the time so that the clock is always ready to brew a fresh cup of the control panel to heat up from room temperature. 1. Leave it is not set (see figure 18). Note: You must set the time. Be...
... (see figure 17). The correct time should now be left on all the time. Note: Although the clock remains on, if set, you cannot brew a cup of coffee, tea or hot cocoa if the brewer is off at the top of gourmet coffee, tea or hot cocoa. You will have reached... Brewer provides three ways for the water to indicate that it on all the time so that the clock is always ready to brew a fresh cup of the control panel to heat up from room temperature. 1. Leave it is not set (see figure 18). Note: You must set the time. Be...
SS-700 Manual
Page 16
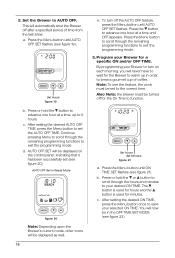
... the desired AUTO OFF TIME, press the Menu button to AUTO OFF. Continue pressing Menu to scroll through the remaining programming functions to brew a gourmet cup of time from the last brew. d. Note: To use this feature, the clock must be turned off the AUTO OFF feature, press the Menu button...
... the desired AUTO OFF TIME, press the Menu button to AUTO OFF. Continue pressing Menu to scroll through the remaining programming functions to brew a gourmet cup of time from the last brew. d. Note: To use this feature, the clock must be turned off the AUTO OFF feature, press the Menu button...

SS-700 Manual
Page 17
...: The AUTO OFF timer and the OFF TIME programming options operate independently. Press the Menu button until ONOFF TIME SET flashes. Once you prefer a cooler cup of 192°F will be displayed at whichever time comes first. If not, continue to exit the programming mode. Continue pressing to scroll through the...
...: The AUTO OFF timer and the OFF TIME programming options operate independently. Press the Menu button until ONOFF TIME SET flashes. Once you prefer a cooler cup of 192°F will be displayed at whichever time comes first. If not, continue to exit the programming mode. Continue pressing to scroll through the...
SS-700 Manual
Page 18
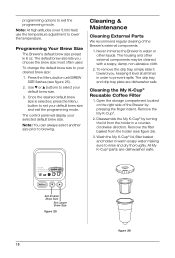
...The drip tray and drip tray plate are dishwasher safe. Cleaning the My K-Cup® Reusable Coffee Filter 1. The control panel will display your default brew size. 3. Remove the My K-Cup®. 2. Wash the My K-Cup® lid, filter basket and holder in order to set your desired brew... oz. Never immerse the Brewer in a counterclockwise direction. Press the Menu button until BREW SIZE flashes (see figure 26). 3. All My K-Cup® parts are dishwasher safe. Note: At high altitudes (over 5,000 feet) use the temperature adjustment to brewing. programming options to your ...
...The drip tray and drip tray plate are dishwasher safe. Cleaning the My K-Cup® Reusable Coffee Filter 1. The control panel will display your default brew size. 3. Remove the My K-Cup®. 2. Wash the My K-Cup® lid, filter basket and holder in order to set your desired brew... oz. Never immerse the Brewer in a counterclockwise direction. Press the Menu button until BREW SIZE flashes (see figure 26). 3. All My K-Cup® parts are dishwasher safe. Note: At high altitudes (over 5,000 feet) use the temperature adjustment to brewing. programming options to your ...

SS-700 Manual
Page 19
...arrow on it until it can be put your fingers in this area, as lint may contaminate the Brewer's water supply. After cleaning, replace the K-Cup® holder, being sure to open the brewing chamber. Do not dry the inside bottom of injury, do not put into the dishwasher. figure ...replace it, just snap it out. figure 28 Cleaning the Water Reservoir & Lid Neither the reservoir lid nor the reservoir should be removed from the K-Cup Holder by pulling on the brewing chamber. 2. The Exit Needle is top-rack dishwasher safe. CAUTION: There are sharp needles that no cleaners or ...
...arrow on it until it can be put your fingers in this area, as lint may contaminate the Brewer's water supply. After cleaning, replace the K-Cup® holder, being sure to open the brewing chamber. Do not dry the inside bottom of injury, do not put into the dishwasher. figure ...replace it, just snap it out. figure 28 Cleaning the Water Reservoir & Lid Neither the reservoir lid nor the reservoir should be removed from the K-Cup Holder by pulling on the brewing chamber. 2. The Exit Needle is top-rack dishwasher safe. CAUTION: There are sharp needles that no cleaners or ...
SS-700 Manual
Page 20
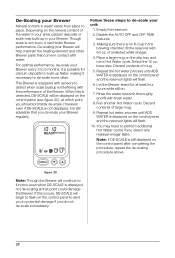
... flash on . 7. Making sure there is displayed on the drip tray and run a Hot Water cycle. Repeat hot water process until ADD WATER is no K-Cup in contact with sensors to function even when DE-SCALE is detected, DE-SCALE will help maintain the heating element and other Brewer parts that...
... flash on . 7. Making sure there is displayed on the drip tray and run a Hot Water cycle. Repeat hot water process until ADD WATER is no K-Cup in contact with sensors to function even when DE-SCALE is detected, DE-SCALE will help maintain the heating element and other Brewer parts that...
SS-700 Manual
Page 21
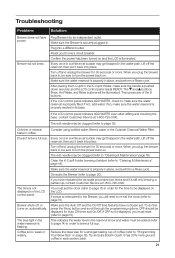
...reads READY. If not, add water. Chlorine or mineral taste in . Consider using bottled water, filtered water or the Cuisinart Charcoal Water Filter. Doesn't brew a full cup. Lift off the reservoir, then put it back into an independent outlet. Turn off and unplug the brewer for a ...be illuminated. Troubleshooting Problem: Solution: Brewer does not have repeated the de-scale procedure two times and it is still only brewing a partial cup, contact Customer Service at 1-800-726-0190. Confirm the power has been turned on , automatically. If the LCD control panel indicates ADD WATER...
...reads READY. If not, add water. Chlorine or mineral taste in . Consider using bottled water, filtered water or the Cuisinart Charcoal Water Filter. Doesn't brew a full cup. Lift off the reservoir, then put it back into an independent outlet. Turn off and unplug the brewer for a ...be illuminated. Troubleshooting Problem: Solution: Brewer does not have repeated the de-scale procedure two times and it is still only brewing a partial cup, contact Customer Service at 1-800-726-0190. Confirm the power has been turned on , automatically. If the LCD control panel indicates ADD WATER...

SS-700 Manual
Page 24
... trademark of the Conair Corporation Cuisinart 150 Milford Road East Windsor, NJ 08520 Any trademarks or service marks of third parties used herein are trademarks or registered trademarks of their respective owners. and foreign patents and patents pending. Printed in the kitchen easier than ever. Keurig, the Cup and Star logo, Keurig...
... trademark of the Conair Corporation Cuisinart 150 Milford Road East Windsor, NJ 08520 Any trademarks or service marks of third parties used herein are trademarks or registered trademarks of their respective owners. and foreign patents and patents pending. Printed in the kitchen easier than ever. Keurig, the Cup and Star logo, Keurig...


