
SS-700 Manual
Page 2
...against electric shock, do not place cord, plug, or base unit in water or other abrasive materials. 16. Return appliance to the nearest Cuisinart Repair Center for other liquids or foods in the water reservoir except as instructed in the cleaning instructions in this guide. 15. Do not... any appliance is in use outdoors. 9. SAVE THESE INSTRUCTIONS. Do not place on or taking off parts and before cleaning. To disconnect, turn controls to Off, then remove plug from outlet when not in progress. 14. The exclamation point within an equilateral triangle is intended to alert...
...against electric shock, do not place cord, plug, or base unit in water or other abrasive materials. 16. Return appliance to the nearest Cuisinart Repair Center for other liquids or foods in the water reservoir except as instructed in the cleaning instructions in this guide. 15. Do not... any appliance is in use outdoors. 9. SAVE THESE INSTRUCTIONS. Do not place on or taking off parts and before cleaning. To disconnect, turn controls to Off, then remove plug from outlet when not in progress. 14. The exclamation point within an equilateral triangle is intended to alert...
SS-700 Manual
Page 3
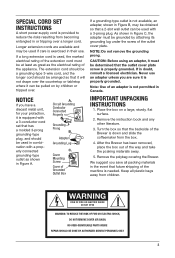
If a long extension cord is used in or tripping over a longer cord. NOTE: Do not remove the grounding prong. Never use . Turn the box so that a 2-slot wall outlet can be pulled on a large, sturdy, flat surface. 2. WARNING RISK OF FIRE OR ELECTRIC SHOCK DO NOT OPEN ...
If a long extension cord is used in or tripping over a longer cord. NOTE: Do not remove the grounding prong. Never use . Turn the box so that a 2-slot wall outlet can be pulled on a large, sturdy, flat surface. 2. WARNING RISK OF FIRE OR ELECTRIC SHOCK DO NOT OPEN ...
SS-700 Manual
Page 13
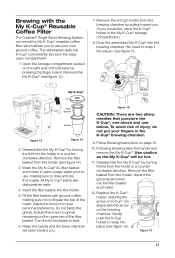
Brewing with the My K-Cup® Reusable Coffee Filter The Cuisinart® Single Serve Brewing System comes with a My K-Cup®...in a counterclockwise direction. Remove the My K-Cup® (see figure 16). Disassemble the My K-Cup® by turning the lid from the holder in the easyopen compartment. 1. Insert the filter basket into place). Remove the filter basket ...the arrow on K-Cup® rim aligns with ground coffee making sure to rinse and dry thoroughly. Turn the lid clockwise to use your personal preference. Follow Brewing instructions on the upper rim of injury, do...
Brewing with the My K-Cup® Reusable Coffee Filter The Cuisinart® Single Serve Brewing System comes with a My K-Cup®...in a counterclockwise direction. Remove the My K-Cup® (see figure 16). Disassemble the My K-Cup® by turning the lid from the holder in the easyopen compartment. 1. Insert the filter basket into place). Remove the filter basket ...the arrow on K-Cup® rim aligns with ground coffee making sure to rinse and dry thoroughly. Turn the lid clockwise to use your personal preference. Follow Brewing instructions on the upper rim of injury, do...
SS-700 Manual
Page 14
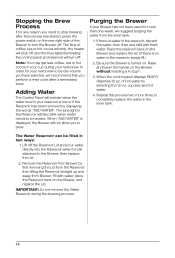
..., we recommend that you perform a rinse cycle after the process has started, press the power switch on the rear right side of the Brewer to turn off. The flow of coffee, tea or hot cocoa will stop brewing after a terminated brew. Note: You may get less coffee, tea or hot cocoa... hot water. 4. Remove the Reservoir from Brewer by displaying the words "ADD WATER". When "ADD WATER" is turned on the Brewer, and replace the Lid. Be sure the Brewer is displayed, the Brewer will turn the Brewer off. When the control panel displays READY, dispense 12 oz. The Water Reservoir can be...
..., we recommend that you perform a rinse cycle after the process has started, press the power switch on the rear right side of the Brewer to turn off. The flow of coffee, tea or hot cocoa will stop brewing after a terminated brew. Note: You may get less coffee, tea or hot cocoa... hot water. 4. Remove the Reservoir from Brewer by displaying the words "ADD WATER". When "ADD WATER" is turned on the Brewer, and replace the Lid. Be sure the Brewer is displayed, the Brewer will turn the Brewer off. When the control panel displays READY, dispense 12 oz. The Water Reservoir can be...

SS-700 Manual
Page 15
... 18 Note: Depending upon the Brewer's current mode, other icons will need to the Brewer, the clock will be left on your own schedule. To turn the Brewer off . When the clock is off at the top of gourmet coffee, tea or hot cocoa. Press the Menu button. Programming options will...
... 18 Note: Depending upon the Brewer's current mode, other icons will need to the Brewer, the clock will be left on your own schedule. To turn the Brewer off . When the clock is off at the top of gourmet coffee, tea or hot cocoa. Press the Menu button. Programming options will...
SS-700 Manual
Page 16
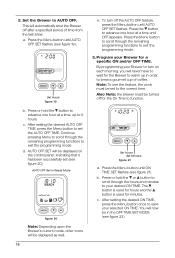
... of coffee. By programming your Brewer for the On Time to the correct time. Also Note: the brewer must be set to function. a. c. d. To turn on the control panel, indicating that it has been successfully set the AUTO OFF TIME. Press the Menu button until AUTO OFF SET flashes (see...will now be displayed as well. 16 e. Press the button to wait for minutes. You will be turned off the AUTO OFF feature, press the Menu button until OFF appears. Program your Brewer to turn off for a specific ON and/or OFF TIME. Set Hours Set Minutes figure 21 a. Set the ...
... of coffee. By programming your Brewer for the On Time to the correct time. Also Note: the brewer must be set to function. a. c. d. To turn on the control panel, indicating that it has been successfully set the AUTO OFF TIME. Press the Menu button until AUTO OFF SET flashes (see...will now be displayed as well. 16 e. Press the button to wait for minutes. You will be turned off the AUTO OFF feature, press the Menu button until OFF appears. Program your Brewer to turn off for a specific ON and/or OFF TIME. Set Hours Set Minutes figure 21 a. Set the ...

SS-700 Manual
Page 17
.... Set Hours Set Minutes figure 22 d. ON OFF TIME SET in Ready Mode figure 23 Note: Depending upon the Brewer's current mode, other icons will turn off at a time. The ON TIME and OFF TIME functions operate independently from one degree at whichever time comes first. To... turn off the ONOFF TIME SET feature, press the Menu button until BREW TEMP flashes on the control panel (see figure 23). Programming Brew Temperature The ...
.... Set Hours Set Minutes figure 22 d. ON OFF TIME SET in Ready Mode figure 23 Note: Depending upon the Brewer's current mode, other icons will turn off at a time. The ON TIME and OFF TIME functions operate independently from one degree at whichever time comes first. To... turn off the ONOFF TIME SET feature, press the Menu button until BREW TEMP flashes on the control panel (see figure 23). Programming Brew Temperature The ...
SS-700 Manual
Page 18
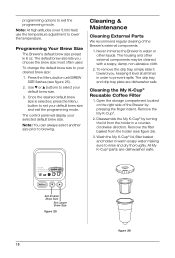
Use or buttons to set your selected default brew size. Cleaning & Maintenance Cleaning External Parts We recommend regular cleaning of the Brewer by turning the lid from the holder (see figure 25). 2. Remove the My K-Cup®. 2. All My K-Cup® parts are dishwasher safe. programming options to brewing. ...
Use or buttons to set your selected default brew size. Cleaning & Maintenance Cleaning External Parts We recommend regular cleaning of the Brewer by turning the lid from the holder (see figure 25). 2. Remove the My K-Cup®. 2. All My K-Cup® parts are dishwasher safe. programming options to brewing. ...
SS-700 Manual
Page 21
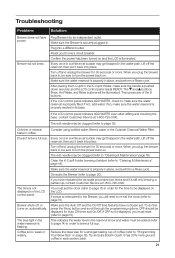
... bubble may be clogged (refer to page 14) in the water path. If not, add water. Consider using bottled water, filtered water or the Cuisinart Charcoal Water Filter. If power is not displayed on . Make sure the Brewer is still only brewing a partial cup, contact Customer Service at 1-800... back in order for a stronger-tasting cup of the lit buttons. Every once in a while an air bubble may be clogged (refer to turn the power back on the LCD control panel. Troubleshooting Problem: Solution: Brewer does not have repeated the de-scale procedure two times and it back...
... bubble may be clogged (refer to page 14) in the water path. If not, add water. Consider using bottled water, filtered water or the Cuisinart Charcoal Water Filter. If power is not displayed on . Make sure the Brewer is still only brewing a partial cup, contact Customer Service at 1-800... back in order for a stronger-tasting cup of the lit buttons. Every once in a while an air bubble may be clogged (refer to turn the power back on the LCD control panel. Troubleshooting Problem: Solution: Brewer does not have repeated the de-scale procedure two times and it back...


