User Manual
Page 1
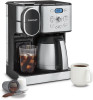
Cuisinart® Coffee Center® SS-21 SERIES Instruction Booklet For your safety and continued enjoyment of this product, always read the instruction book carefully before using.
Cuisinart® Coffee Center® SS-21 SERIES Instruction Booklet For your safety and continued enjoyment of this product, always read the instruction book carefully before using.
User Manual
Page 2
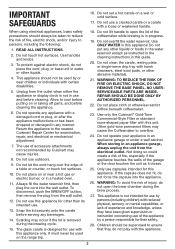
... DO NOT REMOVE THE BASE PANEL. Use handles and knobs. 3. This appliance should be used by or near a hot gas or electric burner, or in water or other abrasive materials. 21. Do not use a cracked carafe or a carafe with reduced ...permanent filters may occur if the lid is not in use of the garage or the door touches the unit as instructed in the cleaning instructions in any beverages. 14. It must never be supervised to the nearest Cuisinart Repair Center for their safety. 28. Do not lift handle to overflow. 24. Do not clean the carafe, resting plate, or single-serve drip...
... DO NOT REMOVE THE BASE PANEL. Use handles and knobs. 3. This appliance should be used by or near a hot gas or electric burner, or in water or other abrasive materials. 21. Do not use a cracked carafe or a carafe with reduced ...permanent filters may occur if the lid is not in use of the garage or the door touches the unit as instructed in the cleaning instructions in any beverages. 14. It must never be supervised to the nearest Cuisinart Repair Center for their safety. 28. Do not lift handle to overflow. 24. Do not clean the carafe, resting plate, or single-serve drip...
User Manual
Page 3
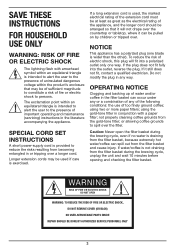
... used if care is wider than the other). SPECIAL CORD SET INSTRUCTIONS A short power-supply cord is intended to alert the user to spill over a longer cord. Caution: Never open the filter basket during the brewing cycle, unplug the unit and wait 10 minutes before opening and checking the filter basket. using two or more paper filters; If water/coffee is draining from the filter basket, because extremely hot water/coffee...
... used if care is wider than the other). SPECIAL CORD SET INSTRUCTIONS A short power-supply cord is intended to alert the user to spill over a longer cord. Caution: Never open the filter basket during the brewing cycle, unplug the unit and wait 10 minutes before opening and checking the filter basket. using two or more paper filters; If water/coffee is draining from the filter basket, because extremely hot water/coffee...
User Manual
Page 4
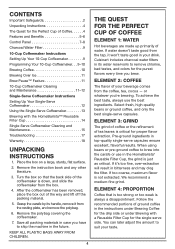
... 10-Cup Coffeemaker Cleaning and Maintenance 11-12 Single-Serve Coffeemaker Instructions Setting Up Your Single-Serve Coffeemaker 12 Using the Single-Serve Coffeemaker 13 Brewing with a Reusable Filter Cup for the single-serve side. CONTENTS Important Safeguards 2 Unpacking Instructions 4 The Quest for the Perfect Cup of ground coffee in the instructions under Brewing Coffee for the drip side or under Brewing with the HomeBarista™ Reusable Filter Cup 14 Single-Serve Coffeemaker Cleaning and Maintenance 15 Troubleshooting 17 Warranty 18 UNPACKING INSTRUCTIONS 1. Turn the...
... 10-Cup Coffeemaker Cleaning and Maintenance 11-12 Single-Serve Coffeemaker Instructions Setting Up Your Single-Serve Coffeemaker 12 Using the Single-Serve Coffeemaker 13 Brewing with a Reusable Filter Cup for the single-serve side. CONTENTS Important Safeguards 2 Unpacking Instructions 4 The Quest for the Perfect Cup of ground coffee in the instructions under Brewing Coffee for the drip side or under Brewing with the HomeBarista™ Reusable Filter Cup 14 Single-Serve Coffeemaker Cleaning and Maintenance 15 Troubleshooting 17 Warranty 18 UNPACKING INSTRUCTIONS 1. Turn the...

User Manual
Page 5
... poured mid-brew. 6. Filter Basket Holder (not shown) 12. Coffeemaker Control Panel See detailed illustration, page 7. 5. Charcoal Water Filter Holder Holds filter firmly in place. 8. Thermal Carafe An easy-pour, dripless, double-wall insulated, 10-cup thermal carafe with nonstick coating. 10. Resting Plate Scratch resistant with ergonomic handle that keeps coffee hot up to 4 hours. 7. Ready Tone (not shown) Signals the end of day and AUTO ON time. 1 4 5 8 7 6 9 5 Holds all programmed information, including time...
... poured mid-brew. 6. Filter Basket Holder (not shown) 12. Coffeemaker Control Panel See detailed illustration, page 7. 5. Charcoal Water Filter Holder Holds filter firmly in place. 8. Thermal Carafe An easy-pour, dripless, double-wall insulated, 10-cup thermal carafe with nonstick coating. 10. Resting Plate Scratch resistant with ergonomic handle that keeps coffee hot up to 4 hours. 7. Ready Tone (not shown) Signals the end of day and AUTO ON time. 1 4 5 8 7 6 9 5 Holds all programmed information, including time...
User Manual
Page 6
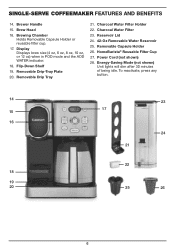
... Water Filter 23. Brew Head 16. Removable Capsule Holder 26. To reactivate, press any button. 14 23 17 15 16 24 21 22 18 19 20 25 26 6 Reservoir Lid 24. 42-Oz Removable Water Reservoir 25. Energy-Saving Mode (not shown) Unit lights will dim after 30 minutes of being idle. Removable Drip Tray 21. Brewing Chamber Holds Removable Capsule Holder or reusable filter cup. 17. Charcoal Water Filter Holder 22. Brewer Handle 15. SINGLE-SERVE COFFEEMAKER FEATURES...
... Water Filter 23. Brew Head 16. Removable Capsule Holder 26. To reactivate, press any button. 14 23 17 15 16 24 21 22 18 19 20 25 26 6 Reservoir Lid 24. 42-Oz Removable Water Reservoir 25. Energy-Saving Mode (not shown) Unit lights will dim after 30 minutes of being idle. Removable Drip Tray 21. Brewing Chamber Holds Removable Capsule Holder or reusable filter cup. 17. Charcoal Water Filter Holder 22. Brewer Handle 15. SINGLE-SERVE COFFEEMAKER FEATURES...
User Manual
Page 7
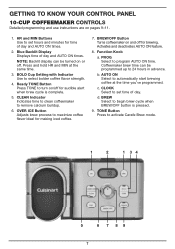
... MIN Buttons Use to set time of day. BOLD Cup Setting with Indicator Use to remove calcium buildup. 6. CLOCK Select to 24 hours in advance. Blue Backlit Display Displays time of day and AUTO ON times. 2. BREW/OFF Button Turns coffeemaker on /off for making iced coffee. 7. d. Press and hold HR and MIN at the time you've programmed. CLEAN Indicator Indicates time to clean coffeemaker to select bolder coffee flavor strength. 4. Coffeemaker brew time can be programmed up to set hours...
... MIN Buttons Use to set time of day. BOLD Cup Setting with Indicator Use to remove calcium buildup. 6. CLOCK Select to 24 hours in advance. Blue Backlit Display Displays time of day and AUTO ON times. 2. BREW/OFF Button Turns coffeemaker on /off for making iced coffee. 7. d. Press and hold HR and MIN at the time you've programmed. CLEAN Indicator Indicates time to clean coffeemaker to select bolder coffee flavor strength. 4. Coffeemaker brew time can be programmed up to set hours...

User Manual
Page 8
... Backlit Display When in POD brew mode: a. Will display the last brew size selected. POD Button Press once to maximize coffee flavor ideal for iced coffee. 12. OVER ICE Button Adjusts the brew process to activate single-serve side. GETTING TO KNOW YOUR CONTROL PANEL SINGLE-SERVE COFFEEMAKER CONTROLS Detailed use instructions are on pages 12-15. 10. The Add Water icon indicates the need to add water to the reservoir. 12...
... Backlit Display When in POD brew mode: a. Will display the last brew size selected. POD Button Press once to maximize coffee flavor ideal for iced coffee. 12. OVER ICE Button Adjusts the brew process to activate single-serve side. GETTING TO KNOW YOUR CONTROL PANEL SINGLE-SERVE COFFEEMAKER CONTROLS Detailed use instructions are on pages 12-15. 10. The Add Water icon indicates the need to add water to the reservoir. 12...
User Manual
Page 9
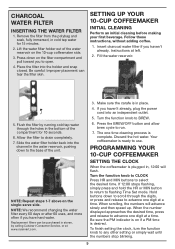
... 10-CUP COFFEEMAKER INITIAL CLEANING Perform an initial cleaning before making your first beverage. Slide the water filter holder back into the holder and snap closed. CHARCOAL WATER FILTER INSERTING THE WATER FILTER 1. Lift the water filter holder out of the compartment for 15 minutes. 2. Instructions at a time. Flush the filter by calling Cuisinart Consumer Service, or at a time. NOTE: Repeat steps 1-7 above on if a PM time is complete. Make sure the carafe is ready to flashing Time Set...
... 10-CUP COFFEEMAKER INITIAL CLEANING Perform an initial cleaning before making your first beverage. Slide the water filter holder back into the holder and snap closed. CHARCOAL WATER FILTER INSERTING THE WATER FILTER 1. Lift the water filter holder out of the compartment for 15 minutes. 2. Instructions at a time. Flush the filter by calling Cuisinart Consumer Service, or at a time. NOTE: Repeat steps 1-7 above on if a PM time is complete. Make sure the carafe is ready to flashing Time Set...
User Manual
Page 10
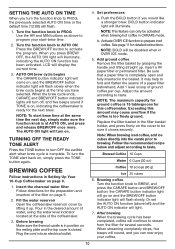
... ICE mode. 5. Replace the filter basket in position on page 9. 1. Pour in Setting Up Your 10-Cup Coffeemaker on the resting plate and the top cover is too finely ground. b. Brewing coffee Turn the function knob to taste. SETTING THE AUTO ON TIME When you turn the function knob to taste. AUTO ON brew cycle begins The CARAFE button indicator light will come on and the BREW/OFF button indicator light will flash. 1. Adjust the...
... ICE mode. 5. Replace the filter basket in position on page 9. 1. Pour in Setting Up Your 10-Cup Coffeemaker on the resting plate and the top cover is too finely ground. b. Brewing coffee Turn the function knob to taste. SETTING THE AUTO ON TIME When you turn the function knob to taste. AUTO ON brew cycle begins The CARAFE button indicator light will come on and the BREW/OFF button indicator light will flash. 1. Adjust the...

User Manual
Page 11
... the filter basket has been removed. The carafe and lid can be hot during and directly after use any water in a dishwasher. Do not dry the inside of the coffeemaker. After brewing The coffeemaker will illuminate, indicating the function is complete. NOTE: Removing carafe for making iced coffee. Lift up . Do not put any scouring agents or harsh cleansers on page 10 to overflow. 10-CUP COFFEEMAKER CLEANING AND MAINTENANCE Always turn unit...
... the filter basket has been removed. The carafe and lid can be hot during and directly after use any water in a dishwasher. Do not dry the inside of the coffeemaker. After brewing The coffeemaker will illuminate, indicating the function is complete. NOTE: Removing carafe for making iced coffee. Lift up . Do not put any scouring agents or harsh cleansers on page 10 to overflow. 10-CUP COFFEEMAKER CLEANING AND MAINTENANCE Always turn unit...
User Manual
Page 12
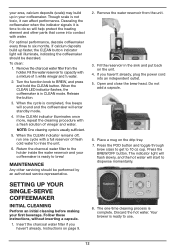
... is time to brew! Instructions on the drip tray. 7. When the cycle is ready to rinse the unit. 6. MAINTENANCE Any other parts that come into an independent outlet. 5. If you haven't already. The indicator light will flash slowly, and the hot water will start to 10 oz cup. Your brewer is completed, five beeps will sound and the coffeemaker will enter standby mode. 4. To clean: 1. Fill the water reservoir...
... is time to brew! Instructions on the drip tray. 7. When the cycle is ready to rinse the unit. 6. MAINTENANCE Any other parts that come into an independent outlet. 5. If you haven't already. The indicator light will flash slowly, and the hot water will start to 10 oz cup. Your brewer is completed, five beeps will sound and the coffeemaker will enter standby mode. 4. To clean: 1. Fill the water reservoir...
User Manual
Page 13
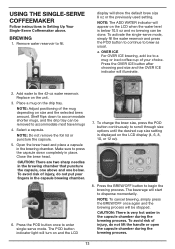
... the brewing process. 13 The POD button indicator light will appear on the LCD when the water level is displayed on and the LCD 7. Remove water reservoir to accommodate shorter mugs, and the drip tray can be removed to dispense momentarily. Shelf flips down completely in Setting Up Your Single-Serve Coffeemaker above and one below 10.5 oz and no brewing can be done. BREWING 1. Replace on the drip...
... the brewing process. 13 The POD button indicator light will appear on the LCD when the water level is displayed on and the LCD 7. Remove water reservoir to accommodate shorter mugs, and the drip tray can be removed to dispense momentarily. Shelf flips down completely in Setting Up Your Single-Serve Coffeemaker above and one below 10.5 oz and no brewing can be done. BREWING 1. Replace on the drip...
User Manual
Page 14
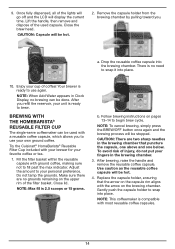
... button once again and the brewing process will be stopped. After brewing, raise the handle and remove the reusable coffee capsule. Gently push the capsule holder to begin brew cycle. 9. NOTE: When Add Water appears in Clock Display, no grounds remaining on the upper rim of injury, do not put your favorite coffee or tea. 1. Use caution as the reusable coffee capsule will be hot. 4. Make...
... button once again and the brewing process will be stopped. After brewing, raise the handle and remove the reusable coffee capsule. Gently push the capsule holder to begin brew cycle. 9. NOTE: When Add Water appears in Clock Display, no grounds remaining on the upper rim of injury, do not put your favorite coffee or tea. 1. Use caution as the reusable coffee capsule will be hot. 4. Make...
User Manual
Page 15
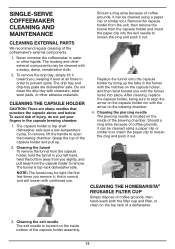
... capsule holder assembly. 15 The drip tray and drip-tray plate are sharp needles that puncture the capsule above and below. Replace the funnel onto the capsule holder by lining up . 2. Should a clog arise because of injury, do not put your left hand, twist the bottom away from the capsule holder to loosen the clog and push it out. SINGLE-SERVE COFFEEMAKER CLEANING AND MAINTENANCE CLEANING EXTERNAL PARTS...
... capsule holder assembly. 15 The drip tray and drip-tray plate are sharp needles that puncture the capsule above and below. Replace the funnel onto the capsule holder by lining up . 2. Should a clog arise because of injury, do not put your left hand, twist the bottom away from the capsule holder to loosen the clog and push it out. SINGLE-SERVE COFFEEMAKER CLEANING AND MAINTENANCE CLEANING EXTERNAL PARTS...
User Manual
Page 16
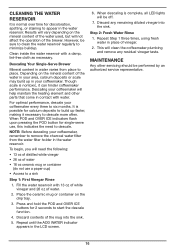
... may build up faster, making it can hinder coffeemaker performance. Step 2: Fresh Water Rinse 1. This will help maintain the heating element and other servicing should be off. 7. CLEANING THE WATER RESERVOIR It is normal over time for 2 seconds to start the descale function. 4. Descaling Your Single-Serve Brewer Mineral content in water varies from the water filter holder in the water reservoir. Press and hold the POD and OVER ICE buttons for discoloration, spotting, or...
... may build up faster, making it can hinder coffeemaker performance. Step 2: Fresh Water Rinse 1. This will help maintain the heating element and other servicing should be off. 7. CLEANING THE WATER RESERVOIR It is normal over time for 2 seconds to start the descale function. 4. Descaling Your Single-Serve Brewer Mineral content in water varies from the water filter holder in the water reservoir. Press and hold the POD and OVER ICE buttons for discoloration, spotting, or...

User Manual
Page 17
... used while the 10-cup coffeemaker is water in the carafe. Make sure the brew head is too finely ground, the coffee ground basket can be used , not both. Make sure the paper filter is not working while brewing coffee in the reservoir. The POD function cannot be used with coffee. Once the brew is complete, the single-serve functions can overflow. Remove the pod capsule holder from your unit and then twist off and unplug the machine...
... used while the 10-cup coffeemaker is water in the carafe. Make sure the brew head is too finely ground, the coffee ground basket can be used , not both. Make sure the paper filter is not working while brewing coffee in the reservoir. The POD function cannot be used with coffee. Once the brew is complete, the single-serve functions can overflow. Remove the pod capsule holder from your unit and then twist off and unplug the machine...

User Manual
Page 18
... the generous warranty period, we will be serviced by someone other commercial purchasers or owners or consumers who purchase products directly from the date of these damages, so these exclusions may then take the product to the strictest specifications and has been designed for personal, family, or household use. Cuisinart will be responsible for the reasonable cost of such service, repair, replacement, or...
... the generous warranty period, we will be serviced by someone other commercial purchasers or owners or consumers who purchase products directly from the date of these damages, so these exclusions may then take the product to the strictest specifications and has been designed for personal, family, or household use. Cuisinart will be responsible for the reasonable cost of such service, repair, replacement, or...


