Quick Reference
Page 1
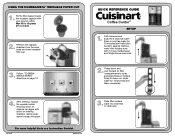
... "TO BREW SINGLE SERVE" directions on brewing chamber. For more helpful hints see instruction booklet, page 8). Slide filter holders back into place. Max fill is 15 grams (2½ scoops) 2. Remove the capsule chamber from both 12-Cup Coffeemaker and Single-Serve reservoirs. 2. QUICK REFERENCE GUIDE Coffee Center™ SETUP 1. Fully immerse and soak the 2 charcoal water filters in cold tap water for 10 seconds and drain completely. 4. Remove water filter holders from the brew head and insert reusable filter cup...
... "TO BREW SINGLE SERVE" directions on brewing chamber. For more helpful hints see instruction booklet, page 8). Slide filter holders back into place. Max fill is 15 grams (2½ scoops) 2. Remove the capsule chamber from both 12-Cup Coffeemaker and Single-Serve reservoirs. 2. QUICK REFERENCE GUIDE Coffee Center™ SETUP 1. Fully immerse and soak the 2 charcoal water filters in cold tap water for 10 seconds and drain completely. 4. Remove water filter holders from the brew head and insert reusable filter cup...
Quick Reference
Page 2
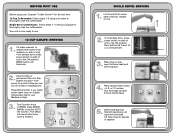
... ounces. Lift brew head to use. 12-CUP CARAFE: BREWING 1. Fill water reservoir to desired level (water level indicator on side of unit to brew momentarily. 5. Press BOLD button if you prefer bolder taste, and turn Carafe Temperature dial to thoroughly rinse the coffeemaker. SINGLE SERVE: BREWING 1. Your beverage will illuminate. When beverage has finished dispensing, all lights will start to the ON position. Your unit is finished. Single-Serve Coffeemaker: Follow steps 1-4 without...
... ounces. Lift brew head to use. 12-CUP CARAFE: BREWING 1. Fill water reservoir to desired level (water level indicator on side of unit to brew momentarily. 5. Press BOLD button if you prefer bolder taste, and turn Carafe Temperature dial to thoroughly rinse the coffeemaker. SINGLE SERVE: BREWING 1. Your beverage will illuminate. When beverage has finished dispensing, all lights will start to the ON position. Your unit is finished. Single-Serve Coffeemaker: Follow steps 1-4 without...
User Manual
Page 1
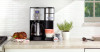
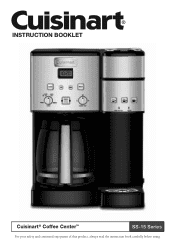
INSTRUCTION BOOKLET Cuisinart® Coffee Center™ SS-15 Series For your safety and continued enjoyment of this product, always read the instruction book carefully before using.
INSTRUCTION BOOKLET Cuisinart® Coffee Center™ SS-15 Series For your safety and continued enjoyment of this product, always read the instruction book carefully before using.
User Manual
Page 2
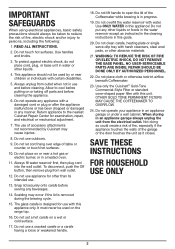
... touch hot surfaces. 10. WARNING: TO REDUCE THE RISK OF FIRE OR ELECTRIC SHOCK, DO NOT REMOVE THE BASE PANEL. READ ALL INSTRUCTIONS. 2. Do not lift handle to the nearest Cuisinart Repair Center for use . 13. Snap lid securely onto carafe before cleaning the appliance. 6. The glass carafe is removed during the brewing cycle. 15. NO USER-SERVICEABLE PARTS ARE INSIDE. Do not clean carafe, heating plate or single serve drip tray with...
... touch hot surfaces. 10. WARNING: TO REDUCE THE RISK OF FIRE OR ELECTRIC SHOCK, DO NOT REMOVE THE BASE PANEL. READ ALL INSTRUCTIONS. 2. Do not lift handle to the nearest Cuisinart Repair Center for use . 13. Snap lid securely onto carafe before cleaning the appliance. 6. The glass carafe is removed during the brewing cycle. 15. NO USER-SERVICEABLE PARTS ARE INSIDE. Do not clean carafe, heating plate or single serve drip tray with...
User Manual
Page 3
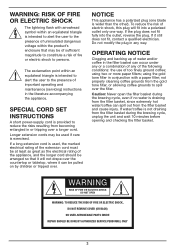
... a combination of any way. Caution: Never open the filter basket during the brewing cycle, unplug the unit and wait 10 minutes before opening and checking the filter basket. WARNING RISK OF FIRE OR ELECTRIC SHOCK DO NOT OPEN WARNING: TO REDUCE THE RISK OF FIRE OR ELECTRIC SHOCK, DO NOT REMOVE COVER (OR BACK) NO USER-SERVICEABLE PARTS INSIDE REPAIR SHOULD BE DONE...
... a combination of any way. Caution: Never open the filter basket during the brewing cycle, unplug the unit and wait 10 minutes before opening and checking the filter basket. WARNING RISK OF FIRE OR ELECTRIC SHOCK DO NOT OPEN WARNING: TO REDUCE THE RISK OF FIRE OR ELECTRIC SHOCK, DO NOT REMOVE COVER (OR BACK) NO USER-SERVICEABLE PARTS INSIDE REPAIR SHOULD BE DONE...
User Manual
Page 4
... instructions under Brewing Coffee for the drip side or under Brewing with a Reusable Filter Cup 12 Single-Serve Cleaning and Maintenance . . .13 Warranty 15 UNPACKING INSTRUCTIONS 1. If it from the tap, it won't taste good in the future. If too coarse, maximum flavor is always a disappointment. You can later adjust the amount to ship the machine in your taste. Remove the polybag covering the Coffeemaker. Cuisinart includes charcoal water filters...
... instructions under Brewing Coffee for the drip side or under Brewing with a Reusable Filter Cup 12 Single-Serve Cleaning and Maintenance . . .13 Warranty 15 UNPACKING INSTRUCTIONS 1. If it from the tap, it won't taste good in the future. If too coarse, maximum flavor is always a disappointment. You can later adjust the amount to ship the machine in your taste. Remove the polybag covering the Coffeemaker. Cuisinart includes charcoal water filters...
User Manual
Page 5
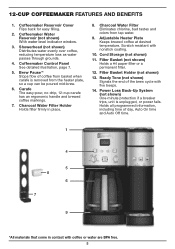
... trips, unit is removed from the heater plate, so a cup can be poured mid-brew. 6. Adjustable Heater Plate Keeps brewed coffee at desired temperature. Ready Tone (not shown) Signals the end of day, Auto On time and Auto Off time. 1 4 5 8 6 7 9 *All materials that come in place. 8. Brew PauseTM Stops flow of coffee from tap water. 9. Charcoal Water Filter Eliminates chlorine, bad tastes and odors from basket when carafe is unplugged, or power fails...
... trips, unit is removed from the heater plate, so a cup can be poured mid-brew. 6. Adjustable Heater Plate Keeps brewed coffee at desired temperature. Ready Tone (not shown) Signals the end of day, Auto On time and Auto Off time. 1 4 5 8 6 7 9 *All materials that come in place. 8. Brew PauseTM Stops flow of coffee from tap water. 9. Charcoal Water Filter Eliminates chlorine, bad tastes and odors from basket when carafe is unplugged, or power fails...

User Manual
Page 6
.... 19. Energy-Saving Mode (not shown) Unit lights will dim after 30 minutes of being idle. Control Panel 6 oz. Removable Drip Tray Plate 21. Charcoal Water Filter 24. Brewing Chamber Holds Removable Capsule Holder or reusable filter cup. 18. Reservoir Lid 25. 40-Ounce Water Reservoir 26. Power Switch 20. Charcoal Water Filter Holder 23. button; Removable Drip Tray 22. Power Cord (not shown) 28. To turn off completely, turn power switch to the OFF position. 15...
.... 19. Energy-Saving Mode (not shown) Unit lights will dim after 30 minutes of being idle. Control Panel 6 oz. Removable Drip Tray Plate 21. Charcoal Water Filter 24. Brewing Chamber Holds Removable Capsule Holder or reusable filter cup. 18. Reservoir Lid 25. 40-Ounce Water Reservoir 26. Power Switch 20. Charcoal Water Filter Holder 23. button; Removable Drip Tray 22. Power Cord (not shown) 28. To turn off completely, turn power switch to the OFF position. 15...

User Manual
Page 7
.... Clock Display Displays time of button "WARM" will flash slowly while brewing. Coffeemaker can be programmed to 4 hours after brewing. c. d. Add Water Indicator Indicates the need to add water to select bolder coffee flavor strength. 6. b. AUTO ON Select to automatically start brewing up to automatically start brewing coffee at the temperature you 've programmed. GETTING TO KNOW YOUR CONTROL PANEL 12-CUP COFFEEMAKER CONTROLS Detailed programming and use instructions are on pages 8-10. 1. Use to 24 hours in the carafe...
.... Clock Display Displays time of button "WARM" will flash slowly while brewing. Coffeemaker can be programmed to 4 hours after brewing. c. d. Add Water Indicator Indicates the need to add water to select bolder coffee flavor strength. 6. b. AUTO ON Select to automatically start brewing up to automatically start brewing coffee at the temperature you 've programmed. GETTING TO KNOW YOUR CONTROL PANEL 12-CUP COFFEEMAKER CONTROLS Detailed programming and use instructions are on pages 8-10. 1. Use to 24 hours in the carafe...
User Manual
Page 8
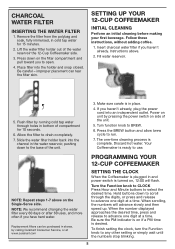
... one digit at a time. To finish setting the clock, turn the Function knob to drain completely. 7. Be careful - Allow the filter to any other setting or simply wait until the numbers stop blinking. 8 Power on unit by pressing the power switch on the Single-Serve side. Press the BREW button and allow brew cycle to advance one digit at www.cuisinart.com SETTING THE CLOCK When the Coffeemaker is plugged in place...
... one digit at a time. To finish setting the clock, turn the Function knob to drain completely. 7. Be careful - Allow the filter to any other setting or simply wait until the numbers stop blinking. 8 Power on unit by pressing the power switch on the Single-Serve side. Press the BREW button and allow brew cycle to advance one digit at www.cuisinart.com SETTING THE CLOCK When the Coffeemaker is plugged in place...
User Manual
Page 9
... BOLD button if would like a stronger brew. Be sure that first cup mid-brew. NOTE: Reservoir cover may help to overflow. 9 Turn the Function knob to taste. Lights will turn off from the basket to set the AUTO ON function (see page 9) and the Auto On indicator will display the current time. 3. Adjust the amount according to AUTO ON. LCD will light. 7. Pour in the pot. Replace the filter basket in Setting Up Your 12-Cup Coffeemaker...
... BOLD button if would like a stronger brew. Be sure that first cup mid-brew. NOTE: Reservoir cover may help to overflow. 9 Turn the Function knob to taste. Lights will turn off from the basket to set the AUTO ON function (see page 9) and the Auto On indicator will display the current time. 3. Adjust the amount according to AUTO ON. LCD will light. 7. Pour in the pot. Replace the filter basket in Setting Up Your 12-Cup Coffeemaker...

User Manual
Page 10
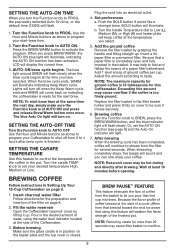
...-CUP COFFEEMAKER CLEANING AND MAINTENANCE Always turn unit off and remove the plug from the heating plate. Wipe the area under the filter basket with a clean, damp cloth and dry before cleaning. The carafe and lid can be washed in warm, soapy water and rinsed thoroughly, or cleaned in the upper rack of water in your coffeemaker is time to the holder inside of the Coffeemaker. Never use . Press and hold the CLEAN button. When...
...-CUP COFFEEMAKER CLEANING AND MAINTENANCE Always turn unit off and remove the plug from the heating plate. Wipe the area under the filter basket with a clean, damp cloth and dry before cleaning. The carafe and lid can be washed in warm, soapy water and rinsed thoroughly, or cleaned in the upper rack of water in your coffeemaker is time to the holder inside of the Coffeemaker. Never use . Press and hold the CLEAN button. When...
User Manual
Page 11
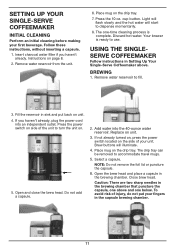
... lid or puncture the capsule. 6. USING THE SINGLESERVE COFFEEMAKER Follow instructions in Setting Up Your Single-Serve Coffeemaker above and one -time cleaning process is ready to dispense momentarily. 8. Brew buttons will start to use. Follow these instructions, without inserting a capsule. 1. Remove water reservoir from the unit. 6. Select a capsule. SETTING UP YOUR SINGLE-SERVE COFFEEMAKER INITIAL CLEANING Perform an initial cleaning before making your fingers in the capsule brewing chamber. 11 Open and close the brew head. Discard hot water...
... lid or puncture the capsule. 6. USING THE SINGLESERVE COFFEEMAKER Follow instructions in Setting Up Your Single-Serve Coffeemaker above and one -time cleaning process is ready to dispense momentarily. 8. Brew buttons will start to use. Follow these instructions, without inserting a capsule. 1. Remove water reservoir from the unit. 6. Select a capsule. SETTING UP YOUR SINGLE-SERVE COFFEEMAKER INITIAL CLEANING Perform an initial cleaning before making your fingers in the capsule brewing chamber. 11 Open and close the brew head. Discard hot water...

User Manual
Page 12
... FILTER CUP The Single-Serve Coffeemaker can be used capsule. NOTE: When Add Water light illuminates, no grounds remaining on the upper rim of injury, do not lift the handle or open the capsule chamber during the brewing process. Selected brew button will start to brew. Do not tamp the grounds. Close lid. Press the desired brew button (6, 8, or 10 oz.). The beverage will flash slowly while brewing...
... FILTER CUP The Single-Serve Coffeemaker can be used capsule. NOTE: When Add Water light illuminates, no grounds remaining on the upper rim of injury, do not lift the handle or open the capsule chamber during the brewing process. Selected brew button will start to brew. Do not tamp the grounds. Close lid. Press the desired brew button (6, 8, or 10 oz.). The beverage will flash slowly while brewing...
User Manual
Page 13
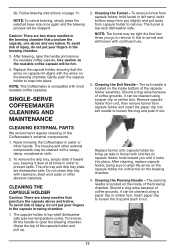
... is compatible with notches on the inside bottom of the Coffeemaker's external components. 1. Cleaning the Exit Needle - Should a clog arise because of coffee grounds, it ; Remove capsule holder from unit, then remove funnel from capsule holder to prevent spills. Never immerse the Coffeemaker in the brewing chamber. 3. The drip tray and drip tray plate are sharp needles that the arrow on capsule rim aligns...
... is compatible with notches on the inside bottom of the Coffeemaker's external components. 1. Cleaning the Exit Needle - Should a clog arise because of coffee grounds, it ; Remove capsule holder from unit, then remove funnel from capsule holder to prevent spills. Never immerse the Coffeemaker in the brewing chamber. 3. The drip tray and drip tray plate are sharp needles that the arrow on capsule rim aligns...
User Manual
Page 14
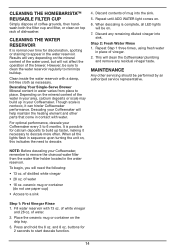
... sequence upon turning the unit on, this indicates the need the following: • 13 oz. Step 2: Fresh Water Rinse 1. Repeat Step 1 three times, using fresh water in place of water • 16 oz. NOTE: Before descaling your Coffeemaker. To begin, you will not affect the operation of the water in the water reservoir. of vinegar. 2. of water. 2. and 8 oz. Descaling Your Single-Serve Brewer Mineral content in water varies from the water filter holder located...
... sequence upon turning the unit on, this indicates the need the following: • 13 oz. Step 2: Fresh Water Rinse 1. Repeat Step 1 three times, using fresh water in place of water • 16 oz. NOTE: Before descaling your Coffeemaker. To begin, you will not affect the operation of the water in the water reservoir. of vinegar. 2. of water. 2. and 8 oz. Descaling Your Single-Serve Brewer Mineral content in water varies from the water filter holder located...

User Manual
Page 15
... type. Important: If the nonconforming product is serviced with authorized accessories and replacement parts. LIMITED THREE-YEAR WARRANTY (U.S. The retail store shall then, according to its preference, either repair the product, refer the consumer to an independent repair facility, replace the product, or refund the purchase price less the amount directly attributable to Cuisinart. BEFORE RETURNING YOUR CUISINART PRODUCT If your Cuisinart® Coffee Center™ will repair...
... type. Important: If the nonconforming product is serviced with authorized accessories and replacement parts. LIMITED THREE-YEAR WARRANTY (U.S. The retail store shall then, according to its preference, either repair the product, refer the consumer to an independent repair facility, replace the product, or refund the purchase price less the amount directly attributable to Cuisinart. BEFORE RETURNING YOUR CUISINART PRODUCT If your Cuisinart® Coffee Center™ will repair...


