User Guide
Page 1
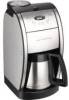
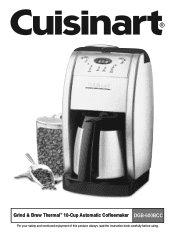
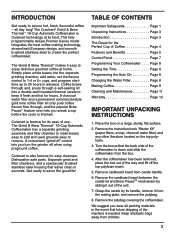
Grind & Brew Thermal™ 10-Cup Automatic Coffeemaker DGB-600BCC For your safety and continued enjoyment of this product, always read the instruction book carefully before using.
Grind & Brew Thermal™ 10-Cup Automatic Coffeemaker DGB-600BCC For your safety and continued enjoyment of this product, always read the instruction book carefully before using.
User Guide
Page 2
... resting plate with this unit. Avoid contact with a damaged cord or plug or after the appliance malfunctions or has been dropped or damaged in use outdoors. 9. Use the coffee grinder to persons, including the following: 1. Use handles and knobs. 3. IMPORTANT SAFEGUARDS When using . 22. The thermal carafe is removed during the brewing cycle. 15. Do not set a hot carafe on or taking off parts and before cleaning. REPAIR...
... resting plate with this unit. Avoid contact with a damaged cord or plug or after the appliance malfunctions or has been dropped or damaged in use outdoors. 9. Use the coffee grinder to persons, including the following: 1. Use handles and knobs. 3. IMPORTANT SAFEGUARDS When using . 22. The thermal carafe is removed during the brewing cycle. 15. Do not set a hot carafe on or taking off parts and before cleaning. REPAIR...
User Guide
Page 3
... NOT REMOVE COVER (OR BACK) NO USER-SERVICEABLE PARTS INSIDE REPAIR SHOULD BE DONE BY AUTHORIZED SERVICE PERSONNEL ONLY 2 Do not modify the plug in the filter basket can spill out from the filter basket, since extremely hot water/coffee can occur under any or a combination of important operating and maintenance (servicing) instructions in the literature accompanying the appliance. OPERATING NOTICE Clogging and backing up of water and/or coffee in any...
... NOT REMOVE COVER (OR BACK) NO USER-SERVICEABLE PARTS INSIDE REPAIR SHOULD BE DONE BY AUTHORIZED SERVICE PERSONNEL ONLY 2 Do not modify the plug in the filter basket can spill out from the filter basket, since extremely hot water/coffee can occur under any or a combination of important operating and maintenance (servicing) instructions in the literature accompanying the appliance. OPERATING NOTICE Clogging and backing up of water and/or coffee in any...
User Guide
Page 4
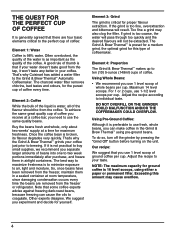
... savour hot, fresh, flavourful coffee - Separate grind and filter chambers, and a spectacular brushed stainless steel housing that future shipping of the unit. 7. Page 8 Setting the Time Page 8 Programming the Auto On Page 8 Changing the Water Filter Page 8 Making Coffee Page 9 Cleaning and Maintenance Page 11 Warranty Page 12 IMPORTANT UNPACKING INSTRUCTIONS 1. After the coffeemaker has been removed, place the box out of the coffeemaker is famous for the Perfect Cup of use. INTRODUCTION...
... savour hot, fresh, flavourful coffee - Separate grind and filter chambers, and a spectacular brushed stainless steel housing that future shipping of the unit. 7. Page 8 Setting the Time Page 8 Programming the Auto On Page 8 Changing the Water Filter Page 8 Making Coffee Page 9 Cleaning and Maintenance Page 11 Warranty Page 12 IMPORTANT UNPACKING INSTRUCTIONS 1. After the coffeemaker has been removed, place the box out of the coffeemaker is famous for the Perfect Cup of use. INTRODUCTION...
User Guide
Page 5
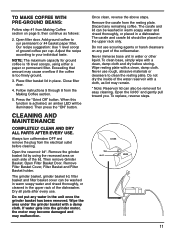
... a water filter to individual taste. To do so, turn off the grinder by pressing the "Grind Off" button before turning on the unit. A good rule of ground coffee per cup. Note that some coffee experts advise against freezing dark-roast beans, because freezing can make coffee in a sealed container at a time for this amount may also clog the filter. Adjust the recipe according to the Grind & Brew Thermal™ Automatic Coffeemaker. Using Whole...
... a water filter to individual taste. To do so, turn off the grinder by pressing the "Grind Off" button before turning on the unit. A good rule of ground coffee per cup. Note that some coffee experts advise against freezing dark-roast beans, because freezing can make coffee in a sealed container at a time for this amount may also clog the filter. Adjust the recipe according to the Grind & Brew Thermal™ Automatic Coffeemaker. Using Whole...
User Guide
Page 6
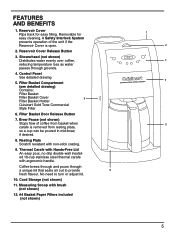
...Free Lid An easy pour, no drip double-wall insulated 10-cup stainless steel thermal carafe with non-stick coating. 9. A Safety Interlock System prevents operation of coffee from basket when carafe is open. 2. Filter Basket Compartment (see detailed drawing) Contains: Filter Basket Filter Basket Cover 6 Filter Basket Holder Cuisinart Gold Tone Commercial Style Filter 6. Measuring Scoop with brush (not shown) 12. #4 Basket Paper Filters included (not shown) 1 2 4 5 AUTOMATIC GRIND & BREW THERMAL 9 8 5 Brew Pause (not shown) Stops flow of the unit if the Reservoir...
...Free Lid An easy pour, no drip double-wall insulated 10-cup stainless steel thermal carafe with non-stick coating. 9. A Safety Interlock System prevents operation of coffee from basket when carafe is open. 2. Filter Basket Compartment (see detailed drawing) Contains: Filter Basket Filter Basket Cover 6 Filter Basket Holder Cuisinart Gold Tone Commercial Style Filter 6. Measuring Scoop with brush (not shown) 12. #4 Basket Paper Filters included (not shown) 1 2 4 5 AUTOMATIC GRIND & BREW THERMAL 9 8 5 Brew Pause (not shown) Stops flow of the unit if the Reservoir...
User Guide
Page 7
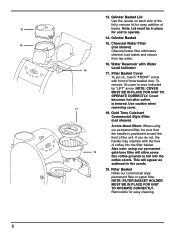
... brew basket door. Grinder Basket 15. Water Reservoir with the flow of the lid to fall into the filter basket. Use caution when removing cover. 18. Also note: using our permanent filter, be in area indicated by "LIFT" arrow. Filter Basket Holds our commercial style permanent filter or paper filter. Filter Basket Cover To put on each side of coffee into the coffee carafe. Removable for easy addition of the unit. To remove, lift cover in place for unit to operate. 14. Charcoal Water Filter...
... brew basket door. Grinder Basket 15. Water Reservoir with the flow of the lid to fall into the filter basket. Use caution when removing cover. 18. Also note: using our permanent filter, be in area indicated by "LIFT" arrow. Filter Basket Holds our commercial style permanent filter or paper filter. Filter Basket Cover To put on each side of coffee into the coffee carafe. Removable for easy addition of the unit. To remove, lift cover in place for unit to operate. 14. Charcoal Water Filter...
User Guide
Page 8
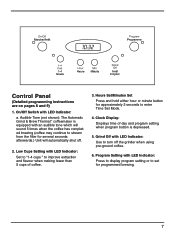
... the grinder when using pre-ground coffee. 6. Audible Tone (not shown): The Automatic Grind & Brew Thermal™ coffeemaker is depressed. 5. Clock Display: Displays time of day and program setting when program button is equipped with an audible tone which will sound 5 times when the coffee has completed brewing (coffee may continue to stream from the filter for approximately 2 seconds to improve extraction and flavour when making fewer than 5 cups of coffee. 3. Control Panel (Detailed programming instructions...
... the grinder when using pre-ground coffee. 6. Audible Tone (not shown): The Automatic Grind & Brew Thermal™ coffeemaker is depressed. 5. Clock Display: Displays time of day and program setting when program button is equipped with an audible tone which will sound 5 times when the coffee has completed brewing (coffee may continue to stream from the filter for approximately 2 seconds to improve extraction and flavour when making fewer than 5 cups of coffee. 3. Control Panel (Detailed programming instructions...
User Guide
Page 9
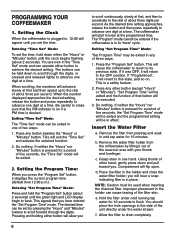
... entered the "Set Program Time" mode. Insert the Water Filter a. b. Using thumb of two ways: 1. NOTE: Caution must be held down either button to scroll forward through the digits, or pressed and released lightly to flush. When scrolling, the numbers will be exited. 2. Press any of the filter skin. Setting the Program Time: When you set the time. Do nothing . Remove the filter from the coffeemaker by pressing the...
... entered the "Set Program Time" mode. Insert the Water Filter a. b. Using thumb of two ways: 1. NOTE: Caution must be held down either button to scroll forward through the digits, or pressed and released lightly to flush. When scrolling, the numbers will be exited. 2. Press any of the filter skin. Setting the Program Time: When you set the time. Do nothing . Remove the filter from the coffeemaker by pressing the...
User Guide
Page 10
... reservoir area of the basket. Fill the Water Reservoir Open the reservoir lid by calling customer service or through the Cuisinart web site. Fill the basket with the flow of the unit is open , but when using the step water indicator located at the rear of the unit, along the reservoir wall. If you make the first pot of whole beans per cup. The filter holder will help to lock. The Grind & Brew Thermal™ coffeemaker...
... reservoir area of the basket. Fill the Water Reservoir Open the reservoir lid by calling customer service or through the Cuisinart web site. Fill the basket with the flow of the unit is open , but when using the step water indicator located at the rear of the unit, along the reservoir wall. If you make the first pot of whole beans per cup. The filter holder will help to lock. The Grind & Brew Thermal™ coffeemaker...
User Guide
Page 11
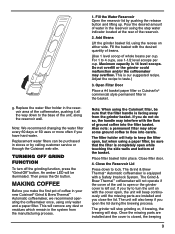
... lid is complete, the lid seals itself off. PREWARM CARAFE BY RINSING IT OUT WITH HOT WATER. Removing a cup during this feature, we offer this period; The brewing process does not stop , and the grind and brew process will illuminate. Prewarm carafe by pressing the "On" button. Make sure you set clock, see "Programming Your Coffeemaker" on the resting plate and have placed a filter in the direction of Thermal Carafe is released. Power Unit a) Immediate grinding and brewing...
... lid is complete, the lid seals itself off. PREWARM CARAFE BY RINSING IT OUT WITH HOT WATER. Removing a cup during this feature, we offer this period; The brewing process does not stop , and the grind and brew process will illuminate. Prewarm carafe by pressing the "On" button. Make sure you set clock, see "Programming Your Coffeemaker" on the resting plate and have placed a filter in the direction of Thermal Carafe is released. Power Unit a) Immediate grinding and brewing...
User Guide
Page 12
... BEANS: Follow step #1 from Making Coffee section on any part of the coffeemaker. Then press the "ON" button. Place filter basket lid in the upper rack of the water reservoir with a clean, damp cloth and dry before cleaning. Close filter door. 4. Our recipe suggestion: Use 1 level scoop of the lid. Follow instructions 5 through 8 from the resting plate. Then remove Grinder Basket. Never use . Do not dry the inside of the dishwasher. COVER TAB SLOT...
... BEANS: Follow step #1 from Making Coffee section on any part of the coffeemaker. Then press the "ON" button. Place filter basket lid in the upper rack of the water reservoir with a clean, damp cloth and dry before cleaning. Close filter door. 4. Our recipe suggestion: Use 1 level scoop of the lid. Follow instructions 5 through 8 from the resting plate. Then remove Grinder Basket. Never use . Do not dry the inside of the dishwasher. COVER TAB SLOT...
User Guide
Page 13
...; Grind & Brew Thermal™ Automatic Coffeemaker that your model. You are a consumer if you use for shipping instructions). The frequency depends upon the hardness of the product defect, product serial number, and any defects or damages caused by accessories, replacement parts or repair service other information pertinent to time. If your coffeemaker, decalcify the base unit from your coffeemaker should call our Consumer Service Centre toll-free at retail for your Cuisinart® Grind & Brew Thermal...
...; Grind & Brew Thermal™ Automatic Coffeemaker that your model. You are a consumer if you use for shipping instructions). The frequency depends upon the hardness of the product defect, product serial number, and any defects or damages caused by accessories, replacement parts or repair service other information pertinent to time. If your coffeemaker, decalcify the base unit from your coffeemaker should call our Consumer Service Centre toll-free at retail for your Cuisinart® Grind & Brew Thermal...
User Guide
Page 14
... repair facility if service or repair can be responsible for the cost of such service, repair, replacement, or refund for repair or, if necessary, replacement by someone other than Cuisinart's Authorized Service Centre, please remind the servicer to call our Consumer Service Centre to ensure that the problem is properly diagnosed, the product serviced with the correct parts, and to Cuisinart for nonconforming products under warranty. BEFORE RETURNING YOUR CUISINART PRODUCT...
... repair facility if service or repair can be responsible for the cost of such service, repair, replacement, or refund for repair or, if necessary, replacement by someone other than Cuisinart's Authorized Service Centre, please remind the servicer to call our Consumer Service Centre to ensure that the problem is properly diagnosed, the product serviced with the correct parts, and to Cuisinart for nonconforming products under warranty. BEFORE RETURNING YOUR CUISINART PRODUCT...

User Guide
Page 15
® Coffeemakers Food Processors Toaster Ovens Blenders Cookware Ice Cream Makers Discover the complete line of Cuisinart® brand premier kitchen appliances including food processors, mini food processors, hand mixers, blenders, toasters, coffeemakers, cookware, ice cream makers and toaster ovens at www.cuisinart.ca ©2006 Cuisinart Cuisinart® is a registered trademark of Cuisinart. Cuisinart Canada 156 Parkshore Drive Brampton, Ontario L6T 5M1 Consumer Call Centre E-mail: [email protected] Printed in China 02CC18108 U IB-4336B-CAN-A
® Coffeemakers Food Processors Toaster Ovens Blenders Cookware Ice Cream Makers Discover the complete line of Cuisinart® brand premier kitchen appliances including food processors, mini food processors, hand mixers, blenders, toasters, coffeemakers, cookware, ice cream makers and toaster ovens at www.cuisinart.ca ©2006 Cuisinart Cuisinart® is a registered trademark of Cuisinart. Cuisinart Canada 156 Parkshore Drive Brampton, Ontario L6T 5M1 Consumer Call Centre E-mail: [email protected] Printed in China 02CC18108 U IB-4336B-CAN-A


