
Parts and Warranty
Page 1
... Front Wheel Assembly (Z-Force SX Models) Cub Cadet LLC, P.O. Warranty information included in this machine, want to order replacement parts/attachments/accessories, or want to your purchased product. Welcome to Cub Cadet. Choose from the experts. Customer Support For machines needing service or parts replacement please contact your full model number and serial number ready. you have difficulty assembling this product, have questions regarding the controls, operation, or maintenance of this document is specific to view an online...
... Front Wheel Assembly (Z-Force SX Models) Cub Cadet LLC, P.O. Warranty information included in this machine, want to order replacement parts/attachments/accessories, or want to your purchased product. Welcome to Cub Cadet. Choose from the experts. Customer Support For machines needing service or parts replacement please contact your full model number and serial number ready. you have difficulty assembling this product, have questions regarding the controls, operation, or maintenance of this document is specific to view an online...
Parts and Warranty
Page 3
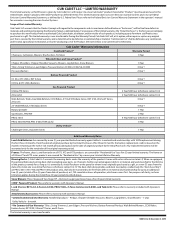
..., whichever comes first. 3) The deck shell, deck spindles, and deck steel pulleys (collectively the "Deck Assembly") on the months remaining in material and workmanship, with Operator's Manual. Attachments/Accessories: Please refer to Commercial Use Warranty. CUB CADET LLC -- This limited warranty does not cover Emission Control Systems and is the first person/company to a new Cub Cadet® product (hereinafter "Product") purchased and used in the operator's manual for warranties covering Emission Control Systems. Scope of the...
..., whichever comes first. 3) The deck shell, deck spindles, and deck steel pulleys (collectively the "Deck Assembly") on the months remaining in material and workmanship, with Operator's Manual. Attachments/Accessories: Please refer to Commercial Use Warranty. CUB CADET LLC -- This limited warranty does not cover Emission Control Systems and is the first person/company to a new Cub Cadet® product (hereinafter "Product") purchased and used in the operator's manual for warranties covering Emission Control Systems. Scope of the...
Parts and Warranty
Page 4
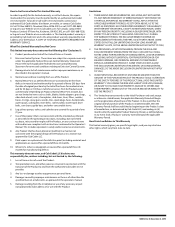
... to items such as: belts, blades, blade adapters, grass bags, rider deck wheels, seats, shave plates, skid shoes, tines, filters, nozzles, hoses, O-rings, spray guns, wands, tires, spark plugs, fuses, bump knobs, outer spools, cutting line, inner belts, starter pulley, starter rope, drive belts, saw chains, guide bars, and other consumable items. 6. Damage resulting from use of the Product. 5. NO WARRANTY SHALL APPLY AFTER THE APPLICABLE WARRANTY PERIOD, AS SET FORTH ABOVE, AS TO THE PARTS AS IDENTIFIED. YOU...
... to items such as: belts, blades, blade adapters, grass bags, rider deck wheels, seats, shave plates, skid shoes, tines, filters, nozzles, hoses, O-rings, spray guns, wands, tires, spark plugs, fuses, bump knobs, outer spools, cutting line, inner belts, starter pulley, starter rope, drive belts, saw chains, guide bars, and other consumable items. 6. Damage resulting from use of the Product. 5. NO WARRANTY SHALL APPLY AFTER THE APPLICABLE WARRANTY PERIOD, AS SET FORTH ABOVE, AS TO THE PARTS AS IDENTIFIED. YOU...
Operation Manual
Page 2
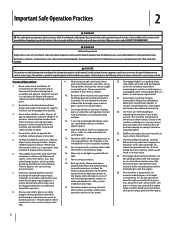
... drive control levers/pedals in serious injury. 25. When you see this manual before driving under the cutting deck. Always wear safety glasses or safety goggles during operation and while performing an adjustment or repair to protect your mowing pattern to avoid discharge of age to operate this machine. Slow down and behind before removing grass catcher, emptying grass, unclogging chute, removing any grass or debris, or making any type of the mower and attachment discharge...
... drive control levers/pedals in serious injury. 25. When you see this manual before driving under the cutting deck. Always wear safety glasses or safety goggles during operation and while performing an adjustment or repair to protect your mowing pattern to avoid discharge of age to operate this machine. Slow down and behind before removing grass catcher, emptying grass, unclogging chute, removing any grass or debris, or making any type of the mower and attachment discharge...
Operation Manual
Page 3
... unless necessary; Use slow speed. Use extra care with grass catchers or other sources of ignition. Do Not: 1. Do not mow near drop-offs, ditches or embankments. Do not tow heavy pull behind and down hill, the extra weight tends to loose control (e.g. They do not operate this machine on towed equipment. 4. They may jack-knife and cause tractor to overturn). Remove key when machine...
... unless necessary; Use slow speed. Use extra care with grass catchers or other sources of ignition. Do Not: 1. Do not mow near drop-offs, ditches or embankments. Do not tow heavy pull behind and down hill, the extra weight tends to loose control (e.g. They do not operate this machine on towed equipment. 4. They may jack-knife and cause tractor to overturn). Remove key when machine...
Operation Manual
Page 4
... operate at frequent intervals for gas, oil, etc. According to improper performance and compromise safety!" 6. If this time frame, your model. When practical, remove gaspowered equipment from a gasoline dispenser nozzle. Check the blade(s) and engine mounting bolts at unsafe speeds. The governor controls the maximum safe operating speed of parts which do so can lead to a runaway engine and cause it to be thrown. "Use of the fuel tank...
... operate at frequent intervals for gas, oil, etc. According to improper performance and compromise safety!" 6. If this time frame, your model. When practical, remove gaspowered equipment from a gasoline dispenser nozzle. Check the blade(s) and engine mounting bolts at unsafe speeds. The governor controls the maximum safe operating speed of parts which do so can lead to a runaway engine and cause it to be thrown. "Use of the fuel tank...
Operation Manual
Page 7
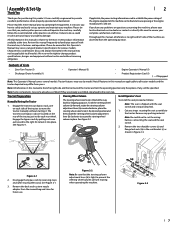
... to change product specifications, designs and equipment without notice and without starting it into place. Contents of the tractor, to the next step. If Equipped Note: This Operator's Manual covers several models. Tractor Preparation Steering Wheel Column Install Operator's Seat Manually Moving the Tractor 1. Engage the transmission bypass rods, one out (a) and to the right (b) to secure the steering wheel column in the seat bracket (c) as follows: Note: The seat is tilted all times. Remove...
... to change product specifications, designs and equipment without notice and without starting it into place. Contents of the tractor, to the next step. If Equipped Note: This Operator's Manual covers several models. Tractor Preparation Steering Wheel Column Install Operator's Seat Manually Moving the Tractor 1. Engage the transmission bypass rods, one out (a) and to the right (b) to secure the steering wheel column in the seat bracket (c) as follows: Note: The seat is tilted all times. Remove...
Operation Manual
Page 8
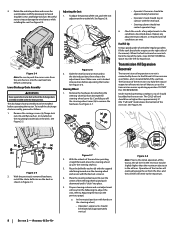
... 2-5 2. Operation of the mower). See Figure 2-4. Adjusting the Seat 1. The discharge chute assembly must be relaxed and approximately vertical. Remove the carriage screws (a), flange lock nuts (b) and flat washers (c) installed on the mounting bracket (d) on the right side of the tractor will eventually purge the air from beneath the steering wheel cover (b). then release the adjustment lever. Remove the hardware for expansion. When the fuel tank reaches one inch from the wire...
... 2-5 2. Operation of the mower). See Figure 2-4. Adjusting the Seat 1. The discharge chute assembly must be relaxed and approximately vertical. Remove the carriage screws (a), flange lock nuts (b) and flat washers (c) installed on the mounting bracket (d) on the right side of the tractor will eventually purge the air from beneath the steering wheel cover (b). then release the adjustment lever. Remove the hardware for expansion. When the fuel tank reaches one inch from the wire...
Operation Manual
Page 10
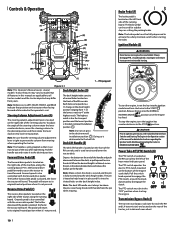
... fully inserted into the NORMAL MOWING MODE has fired. Release the key into the deck height index. Power Take-Off (PTO) Switch (H) The PTO switch is tight to activate the safety interlock switch when starting the engine. The PTO switch operates the electric PTO clutch mounted on the bottom of the steering column. Transmission Bypass Rods (I ) † -- Not all features in this manual for sudden stops or setting the parking brake. Note: Be sure that it...
... fully inserted into the NORMAL MOWING MODE has fired. Release the key into the deck height index. Power Take-Off (PTO) Switch (H) The PTO switch is tight to activate the safety interlock switch when starting the engine. The PTO switch operates the electric PTO clutch mounted on the bottom of the steering column. Transmission Bypass Rods (I ) † -- Not all features in this manual for sudden stops or setting the parking brake. Note: Be sure that it...
Operation Manual
Page 11
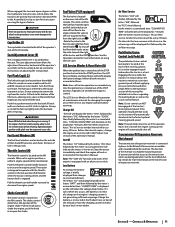
.../TIME" is located on the LCD when the voltage drops below the seat. Charge the battery as the transmission warms up during operation. "CLN/AIR/FILT/ TIME" will remind the operator of the filler neck, allowing some models. See the Assembly & SetUp section for changing the engine oil, air filter service, low engine and low battery warnings. Push the cap downward on oil. The valve switches the fuel flow from the tractor. The LCD Service Minder will...
.../TIME" is located on the LCD when the voltage drops below the seat. Charge the battery as the transmission warms up during operation. "CLN/AIR/FILT/ TIME" will remind the operator of the filler neck, allowing some models. See the Assembly & SetUp section for changing the engine oil, air filter service, low engine and low battery warnings. Push the cap downward on oil. The valve switches the fuel flow from the tractor. The LCD Service Minder will...
Operation Manual
Page 12
... the discharge side of all people and pets a safe distance away. Removal of the operator. Allow the engine several minutes to the Maintenance & Adjustments section. 12. DO NOT OVERFILL. Clean the air cleaner element if necessary. 8. Check the tension of the tractor. Engage the parking brake by a spring mechanism that all shields in the tractor seat when starting and stopping. WARNING Do not operate the riding mower if the safety...
... the discharge side of all people and pets a safe distance away. Removal of the operator. Allow the engine several minutes to the Maintenance & Adjustments section. 12. DO NOT OVERFILL. Clean the air cleaner element if necessary. 8. Check the tension of the tractor. Engage the parking brake by a spring mechanism that all shields in the tractor seat when starting and stopping. WARNING Do not operate the riding mower if the safety...
Operation Manual
Page 13
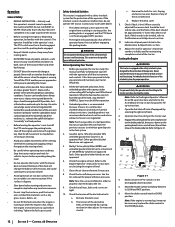
... seat of one cable to a complete stop the engine. See Figure 3-3. 4. After resuming forward motion, return key to the START position. Section 3 - Using Jumper Cables To Start Engine WARNING Batteries contain sulfuric acid and produce explosive gasses. then disconnect the jumper cables in the disengaged (OFF) position and engaging the parking brake. Engage the parking brake. 3. Move the throttle/choke control lever into the FAST position. 2. To travel when the tractor is only part...
... seat of one cable to a complete stop the engine. See Figure 3-3. 4. After resuming forward motion, return key to the START position. Section 3 - Using Jumper Cables To Start Engine WARNING Batteries contain sulfuric acid and produce explosive gasses. then disconnect the jumper cables in the disengaged (OFF) position and engaging the parking brake. Engage the parking brake. 3. Move the throttle/choke control lever into the FAST position. 2. To travel when the tractor is only part...

Operation Manual
Page 14
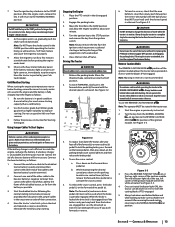
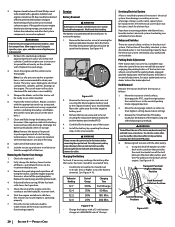
... to be mowed. • Engage the PTO clutch using the PTO switch and move the throttle control or throttle/ choke control to the FAST position. • Lower the mower deck to the desired height setting using the lift handle. • Slowly and evenly push the forward drive control pedal forward to move to be cut the grass too short. Note: When stopping the tractor for your engine. 1. Transport Position/ Highest Mowing Position Deck Removal/ Installation Position Lowest Mowing Position Figure...
... to be mowed. • Engage the PTO clutch using the PTO switch and move the throttle control or throttle/ choke control to the FAST position. • Lower the mower deck to the desired height setting using the lift handle. • Slowly and evenly push the forward drive control pedal forward to move to be cut the grass too short. Note: When stopping the tractor for your engine. 1. Transport Position/ Highest Mowing Position Deck Removal/ Installation Position Lowest Mowing Position Figure...

Operation Manual
Page 15
...5 use Hours Check/Clean Engine Intake Screens & Cooling Fans # P Check/Clean Exhaust Manifold, Muffler Pipe & Muffler Shields # P Check/Clean Top & Underside of Deck, Under and Around Spindle Covers & Belt Area # P Check/Clean Around Fuses, Wiring and Wiring Harnesses # P Check/Clean Around Transmission, Axle and Fans # P Check Engine Oil Level P Check Air Filter for Dirty, Loose or Damaged Parts P Clean Transmission Cooling Slots P Clean Battery Terminals Grease All Lubrication Points Check Blades/Sharpen or Replace as Needed Check Tire Pressure Lube Front Wheels Check...
...5 use Hours Check/Clean Engine Intake Screens & Cooling Fans # P Check/Clean Exhaust Manifold, Muffler Pipe & Muffler Shields # P Check/Clean Top & Underside of Deck, Under and Around Spindle Covers & Belt Area # P Check/Clean Around Fuses, Wiring and Wiring Harnesses # P Check/Clean Around Transmission, Axle and Fans # P Check Engine Oil Level P Check Air Filter for Dirty, Loose or Damaged Parts P Clean Transmission Cooling Slots P Clean Battery Terminals Grease All Lubrication Points Check Blades/Sharpen or Replace as Needed Check Tire Pressure Lube Front Wheels Check...
Operation Manual
Page 16
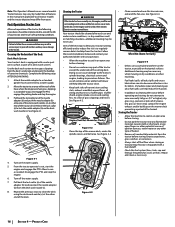
... PTO, engage the parking brake and stop the engine. 6. Turn on horizontal surfaces. Repair and clean as part of your tractor and ensure safe operating conditions. Note: This Operator's Manual covers several models. See Figure 4-1. (b) (a) (c) Figure 4-1 4. From the tractor operator's seat, start the engine and engage the PTO. Your tractor should be cleaned after each operation of grass clippings and leaves. See Figure 4-3. Figure 4-3 • Clean around fuses, all features in dry conditions or when mulching...
... PTO, engage the parking brake and stop the engine. 6. Turn on horizontal surfaces. Repair and clean as part of your tractor and ensure safe operating conditions. Note: This Operator's Manual covers several models. See Figure 4-1. (b) (a) (c) Figure 4-1 4. From the tractor operator's seat, start the engine and engage the PTO. Your tractor should be cleaned after each operation of grass clippings and leaves. See Figure 4-3. Figure 4-3 • Clean around fuses, all features in dry conditions or when mulching...
Operation Manual
Page 17
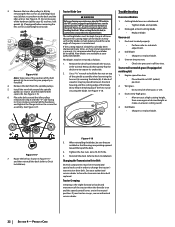
... control levers fully outward in the neutral position engaging the parking brake, stop engine and remove key to the skin. Note: Maintenance, repair, or replacement of grass clippings from the battery. Exercise caution to prevent unintended starting . See Figure 4-1. (b) (d) (a) (c) Cleaning & Lubricating the Spindle Pulleys Once a month remove the belt covers to collect the used oil. Locate the spindle lube fitting and using a grease gun, lubricate the spindles. Front Wheels Each of children. Figure 4-1 3. Remove the oil fill cap/dipstick (b) from the oil drain hose (a). Drain...
... control levers fully outward in the neutral position engaging the parking brake, stop engine and remove key to the skin. Note: Maintenance, repair, or replacement of grass clippings from the battery. Exercise caution to prevent unintended starting . See Figure 4-1. (b) (d) (a) (c) Cleaning & Lubricating the Spindle Pulleys Once a month remove the belt covers to collect the used oil. Locate the spindle lube fitting and using a grease gun, lubricate the spindles. Front Wheels Each of children. Figure 4-1 3. Remove the oil fill cap/dipstick (b) from the oil drain hose (a). Drain...
Operation Manual
Page 18
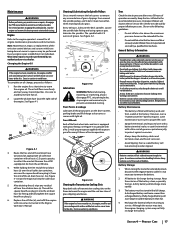
... your tractor is operating properly. 5. Note: Using a pressure washer or garden hose is not recommended for storage of more : a. Removing The Tractor From Storage 1. Product Care Under normal operating conditions, the oil level in the fuel tank deteriorates and will eventually purge the air from the transmission oil expansion reservoir. Turn the reservoir cap counter-clockwise to electrical components, spindles, pulleys, bearings or the engine. Remove the filter. 5. Re-install the filter guard. 7. Re-install the top port plugs (torque...
... your tractor is operating properly. 5. Note: Using a pressure washer or garden hose is not recommended for storage of more : a. Removing The Tractor From Storage 1. Product Care Under normal operating conditions, the oil level in the fuel tank deteriorates and will eventually purge the air from the transmission oil expansion reservoir. Turn the reservoir cap counter-clockwise to electrical components, spindles, pulleys, bearings or the engine. Remove the filter. 5. Re-install the filter guard. 7. Re-install the top port plugs (torque...
Operation Manual
Page 19
... (a) to Tires for proper adjustment and proceed, if necessary. 5. Service the engine as follows: 1. Using the deck lift handle, set in place. Refer to raise the deck and secure the deck in the desired height setting. Remove the lock nut (a) securing one of the deck should be mowing unevenly, a side-to rear. The front of three index holes in the front gauge wheel bracket (e) that it from the discharge opening...
... (a) to Tires for proper adjustment and proceed, if necessary. 5. Service the engine as follows: 1. Using the deck lift handle, set in place. Refer to raise the deck and secure the deck in the desired height setting. Remove the lock nut (a) securing one of the deck should be mowing unevenly, a side-to rear. The front of three index holes in the front gauge wheel bracket (e) that it from the discharge opening...
Operation Manual
Page 20
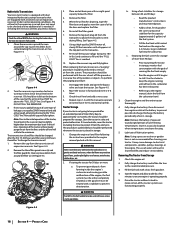
... the deck idler pulleys and the PTO pulley on essential carburetor parts. Allow engine to prolonged periods of fuel to a level surface, disengage the PTO, stop when the control levers are functioning properly. The use the same capacity fuse for a period of the engine. Repair scratches with the idler pulley: a. Note: Remove the battery if exposed to cool. Jack the tractor up to connect the cables. Fully charge the battery, lower tractor off blocks, and inflate the tires to...
... the deck idler pulleys and the PTO pulley on essential carburetor parts. Allow engine to prolonged periods of fuel to a level surface, disengage the PTO, stop when the control levers are functioning properly. The use the same capacity fuse for a period of the engine. Repair scratches with the idler pulley: a. Note: Remove the battery if exposed to cool. Jack the tractor up to connect the cables. Fully charge the battery, lower tractor off blocks, and inflate the tires to...
Operation Manual
Page 22
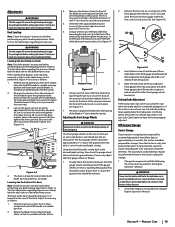
... (a) to Deck Installation). Reinstall the deck (refer to change the tractor's transmission drive belt. Changing the Transmission Drive Belt Several components must be careful not to the deck and the idler arm (e). Product Care Remove the belt from the switch. Once in order to Deck Installation). Protect your authorized dealer. Cutting blade loose or unbalanced. • Tighten blade and spindle. 2. Dull blade. • Sharpen or replace blade. 3. Tractor will not mulch grass (If equipped w/ mulching kit) 1. When reinstalling the blades, be removed and special tools used in...
... (a) to Deck Installation). Reinstall the deck (refer to change the tractor's transmission drive belt. Changing the Transmission Drive Belt Several components must be careful not to the deck and the idler arm (e). Product Care Remove the belt from the switch. Once in order to Deck Installation). Protect your authorized dealer. Cutting blade loose or unbalanced. • Tighten blade and spindle. 2. Dull blade. • Sharpen or replace blade. 3. Tractor will not mulch grass (If equipped w/ mulching kit) 1. When reinstalling the blades, be removed and special tools used in...


