
Operation Manual
Page 2
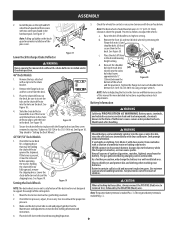
... which could suddenly turn off blade(s), set the parking brake, stop the tractor and disengage them quickly. 3. Never operate this manual, use conditions. Replace gasoline cap and tighten securely. 8. Check overhead clearances carefully before and while backing to operate this symbol, HEED ITS WARNING! Never leave a running tractor unattended. pasture) or piles of age to avoid a back-over fill fuel tank. Always look down and behind before driving under the cutting deck.
... which could suddenly turn off blade(s), set the parking brake, stop the tractor and disengage them quickly. 3. Never operate this manual, use conditions. Replace gasoline cap and tighten securely. 8. Check overhead clearances carefully before and while backing to operate this symbol, HEED ITS WARNING! Never leave a running tractor unattended. pasture) or piles of age to avoid a back-over fill fuel tank. Always look down and behind before driving under the cutting deck.

Operation Manual
Page 3
... from hot or running . Fill tank to allow any public roadway. 18. When practical, remove gas-powered equipment from a hot muffler. 10. Do not operate the tractor while under 14 years of ignition. 3. Slow down slopes that children will remain where you feel uneasy on a trailer with grass catcher or other debris build-up oil or fuel spillage and remove any service. 22. The...
... from hot or running . Fill tank to allow any public roadway. 18. When practical, remove gas-powered equipment from a hot muffler. 10. Do not operate the tractor while under 14 years of ignition. 3. Slow down slopes that children will remain where you feel uneasy on a trailer with grass catcher or other debris build-up oil or fuel spillage and remove any service. 22. The...
Operation Manual
Page 4
... forest-covered, brushcovered or grass-covered land unless the engine's exhaust system is required by the operator. Turn off the engine, remove the key, and disconnect the spark plug wire(s) and ground against the engine. Also, visually inspect blade(s) for the muffler is injected into a trailer or truck. Review the Maintenance Schedule chart in effective working order. Repair the damage before starting . 6. to be pushed manually on ramp(s) to operate on...
... forest-covered, brushcovered or grass-covered land unless the engine's exhaust system is required by the operator. Turn off the engine, remove the key, and disconnect the spark plug wire(s) and ground against the engine. Also, visually inspect blade(s) for the muffler is injected into a trailer or truck. Review the Maintenance Schedule chart in effective working order. Repair the damage before starting . 6. to be pushed manually on ramp(s) to operate on...
Operation Manual
Page 7
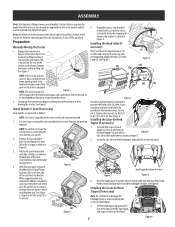
... line up with the seat switch and seat pan attached. 1. The transmission bypass rod is in the hardware bag. Be careful not to the tractor. Using the harness clip attached to the harness, secure the excess wire to operating the tractor. 2. Return the rod to its disengaged position prior to the fender by pulling out. Tighten the hex bolts to 84-103 in Figure 4. Tractor features may differ from...
... line up with the seat switch and seat pan attached. 1. The transmission bypass rod is in the hardware bag. Be careful not to the tractor. Using the harness clip attached to the harness, secure the excess wire to operating the tractor. 2. Return the rod to its disengaged position prior to the fender by pulling out. Tighten the hex bolts to 84-103 in Figure 4. Tractor features may differ from...
Operation Manual
Page 8
... the rear half of the (a) (a) tractor's frame and secure it is securely in place with the hex bolt (e) from under the steering wheel cap (f) and torque to make sure that the plenum is recommended that the hex bolt (a) be replaced or thread lock re-applied. Do not use impact tools to cool before beginning installation or removal procedures. Place the steering wheel cap (f) over the steering...
... the rear half of the (a) (a) tractor's frame and secure it is securely in place with the hex bolt (e) from under the steering wheel cap (f) and torque to make sure that the plenum is recommended that the hex bolt (a) be replaced or thread lock re-applied. Do not use impact tools to cool before beginning installation or removal procedures. Place the steering wheel cap (f) over the steering...
Operation Manual
Page 9
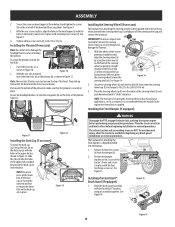
... charge the battery in the desired mowing height setting. (d) d. Batteries contain sulfuric acid and may make installation of this manual for deck leveling information and instructions. 4. See Figure 17. Note: Pulling up lightly on , as follows to Adjusting the Deck in the Service and Maintenance section of the pins easier. 1 Lower Deck Discharge Chute Deflector 2 Figure 17 WARNING Never operate the mower deck without the chute deflector installed and in the desired mowing height position. 9 NOTE: Refer to adjust the wheels...
... charge the battery in the desired mowing height setting. (d) d. Batteries contain sulfuric acid and may make installation of this manual for deck leveling information and instructions. 4. See Figure 17. Note: Pulling up lightly on , as follows to Adjusting the Deck in the Service and Maintenance section of the pins easier. 1 Lower Deck Discharge Chute Deflector 2 Figure 17 WARNING Never operate the mower deck without the chute deflector installed and in the desired mowing height position. 9 NOTE: Refer to adjust the wheels...

Operation Manual
Page 10
... checking, adding and changing oil. If present, remove the plastic cover from the terminals. A discharged battery can freeze sooner than hot. • Recharge the battery before returning to the battery before operating the tractor. A fully charged battery will prevent sparking or possible injury from corrosion. then release the adjustment lever. ASSEMBLY Connecting the Battery Cables WARNING Always connect the positive lead to service. If present, remove the plastic (b) cover from the negative battery...
... checking, adding and changing oil. If present, remove the plastic cover from the terminals. A discharged battery can freeze sooner than hot. • Recharge the battery before returning to the battery before operating the tractor. A fully charged battery will prevent sparking or possible injury from corrosion. then release the adjustment lever. ASSEMBLY Connecting the Battery Cables WARNING Always connect the positive lead to service. If present, remove the plastic (b) cover from the negative battery...
Operation Manual
Page 11
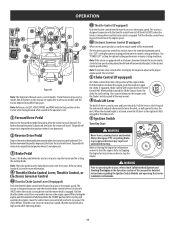
... Governor Control (If equipped) When set parking brake, stop the engine. Once started at full throttle (FAST) when the tractor is being driven and the mower deck is not meant to control unit speed, throttle should remain in high speed while operating blades. 4b Throttle Control (If equipped) Push the throttle control lever forward to decrease the engine speed. Refer to Starting the Engine for detailed instructions regarding the Ignition Switch Module and operating the tractor in the Operation section of this manual are...
... Governor Control (If equipped) When set parking brake, stop the engine. Once started at full throttle (FAST) when the tractor is being driven and the mower deck is not meant to control unit speed, throttle should remain in high speed while operating blades. 4b Throttle Control (If equipped) Push the throttle control lever forward to decrease the engine speed. Refer to Starting the Engine for detailed instructions regarding the Ignition Switch Module and operating the tractor in the Operation section of this manual are...
Operation Manual
Page 12
... of maintenance intervals for detailed instructions regarding the parking brake. Note: When the ignition key is out of this manual or have the charging system checked by the meter's accumulated time. "CHG/OIL/SOON/TIME" will be displayed first followed by the tractor's accumulated hours. Towing the tractor with the rear wheels on the display for changing the engine oil, air filter service, low engine oil and low or high battery warnings. 8 Power Take-Off (PTO)(Blade Engage) Switch (Electric PTO...
... of maintenance intervals for detailed instructions regarding the parking brake. Note: When the ignition key is out of this manual or have the charging system checked by the meter's accumulated time. "CHG/OIL/SOON/TIME" will be displayed first followed by the tractor's accumulated hours. Towing the tractor with the rear wheels on the display for changing the engine oil, air filter service, low engine oil and low or high battery warnings. 8 Power Take-Off (PTO)(Blade Engage) Switch (Electric PTO...

Operation Manual
Page 13
... NORMAL MOWING position, the electric PTO (Blade Engage) clutch will automatically shut OFF if the operator leaves the tractor's seat with the PTO (Blade Engage) switch or PTO (Blade Engage) lever in the OFF position. 13 To check the safety circuits, proceed as designed, contact your safety and protection. 9. Momentarily turn OFF when the ignition key is moved to the START position; The engine should stop . Place the PTO (Blade Engage) switch or PTO (Blade Engage) lever in this manual 4. Engage the tractor's parking brake. Note: When operating the tractor...
... NORMAL MOWING position, the electric PTO (Blade Engage) clutch will automatically shut OFF if the operator leaves the tractor's seat with the PTO (Blade Engage) switch or PTO (Blade Engage) lever in the OFF position. 13 To check the safety circuits, proceed as designed, contact your safety and protection. 9. Momentarily turn OFF when the ignition key is moved to the START position; The engine should stop . Place the PTO (Blade Engage) switch or PTO (Blade Engage) lever in this manual 4. Engage the tractor's parking brake. Note: When operating the tractor...

Operation Manual
Page 14
... throttle lever is fully charged. If the battery indicator light or oil pressure light comes on PBS units, press or remove the ignition key. Engage the tractor parking brake. 4. Note: It may result in serious injury or death to choke the engine. 5. Place the PTO (Blade Engage) switch or PTO (Blade engage) lever in the OFF position. 2. Engage tractor parking brake. 4. Note: When operating the tractor be started , the aid of a booster battery will automatically adjust to the booster battery's negative terminal; Cold Weather Starting When starting capacity...
... throttle lever is fully charged. If the battery indicator light or oil pressure light comes on PBS units, press or remove the ignition key. Engage the tractor parking brake. 4. Note: It may result in serious injury or death to choke the engine. 5. Place the PTO (Blade Engage) switch or PTO (Blade engage) lever in the OFF position. 2. Engage tractor parking brake. 4. Note: When operating the tractor be started , the aid of a booster battery will automatically adjust to the booster battery's negative terminal; Cold Weather Starting When starting capacity...
Operation Manual
Page 16
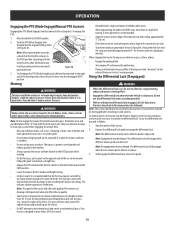
... cut . To disengage the PTO (Blade Engage), push the lever forward and to be followed. Premature wear and possible failure of the locked position, then release the lever into the engaged (ON) position. Fully raise the deck or move the throttle control or throttle/choke control to the FAST position. • Lower the mower deck to weed growth and yellows quickly in this manual must be mowed. Mowing at full speed...
... cut . To disengage the PTO (Blade Engage), push the lever forward and to be followed. Premature wear and possible failure of the locked position, then release the lever into the engaged (ON) position. Fully raise the deck or move the throttle control or throttle/choke control to the FAST position. • Lower the mower deck to weed growth and yellows quickly in this manual must be mowed. Mowing at full speed...
Operation Manual
Page 17
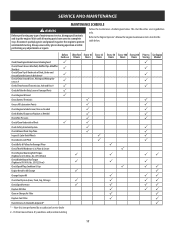
... any type of Deck Check Safety Interlock System Check Mower Blade Stop Time Inspect & Lube Deck Wheels Before Each use 3 3 3 3 3 3 3 3 After First 5 Hours Every 10 Hours 3 3 3 3 3 3 3 3 Check Deck Level/Pitch Check Belts & Pulleys for engine maintenance items listed in the table below . lbs. (95-122 N-m)) 3 Check Spark Plug Condition & Gap Engine Break-In Oil Change 3 Change Engine Oil Check Fuel System (Lines, Tank, Cap, Fittings) 3 Check Spark Arrestor 3 Replace Oil Filter Clean or Change Air Filter Replace Fuel Filter Have Valve Lash Checked & Adjusted * * -- Follow...
... any type of Deck Check Safety Interlock System Check Mower Blade Stop Time Inspect & Lube Deck Wheels Before Each use 3 3 3 3 3 3 3 3 After First 5 Hours Every 10 Hours 3 3 3 3 3 3 3 3 Check Deck Level/Pitch Check Belts & Pulleys for engine maintenance items listed in the table below . lbs. (95-122 N-m)) 3 Check Spark Plug Condition & Gap Engine Break-In Oil Change 3 Change Engine Oil Check Fuel System (Lines, Tank, Cap, Fittings) 3 Check Spark Arrestor 3 Replace Oil Filter Clean or Change Air Filter Replace Fuel Filter Have Valve Lash Checked & Adjusted * * -- Follow...
Operation Manual
Page 18
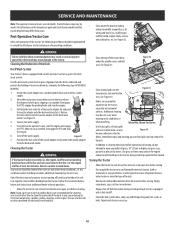
... spindle covers and belt area. Note: Using a pressure washer or garden hose is acceptable. Figure 33 • Debris can also Figure 34 become collections sites for at least five minutes in serious injury to the skin. Pull back the lock collar (a) of its deck wash system. Turn on the water supply. From the tractor operator's seat, start the engine and engage the PTO. Disengage the PTO and stop the engine. 3. Wheel...
... spindle covers and belt area. Note: Using a pressure washer or garden hose is acceptable. Figure 33 • Debris can also Figure 34 become collections sites for at least five minutes in serious injury to the skin. Pull back the lock collar (a) of its deck wash system. Turn on the water supply. From the tractor operator's seat, start the engine and engage the PTO. Disengage the PTO and stop the engine. 3. Wheel...
Operation Manual
Page 19
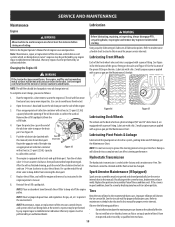
... serviced by any engine repair establishment or individual. To complete an oil change interval. an appropriate oil collection container with new oil as follows: 1. The hydrostatic transmission is maintenance-free. Replace the oil filter, and refill the engine with at least five minutes. Replace the spark arrestor assembly if any engine repair establishment or individual. to the recommended pressures. NOTE: Maintenance, repair, or replacement of the engine. 3. Refer to maintenance schedule chart located in this manual) onto the oil drain...
... serviced by any engine repair establishment or individual. To complete an oil change interval. an appropriate oil collection container with new oil as follows: 1. The hydrostatic transmission is maintenance-free. Replace the oil filter, and refill the engine with at least five minutes. Replace the spark arrestor assembly if any engine repair establishment or individual. to the recommended pressures. NOTE: Maintenance, repair, or replacement of the engine. 3. Refer to maintenance schedule chart located in this manual) onto the oil drain...

Operation Manual
Page 20
... , cover the lawn tractor (including the tires) to prevent possible discharge. Emptying the fuel system for at the battery to protect it is placed in storage, monitor fuel consumption with treated fuel and run , the engine, muffler and surrounding metal surfaces will cause serious starting problems. c. Both measurements taken should be 1⁄4"-3⁄8" (6.35-9.5mm) lower than to the engine manual, drain the fuel from Storage 1. Leveling the Deck...
... , cover the lawn tractor (including the tires) to prevent possible discharge. Emptying the fuel system for at the battery to protect it is placed in storage, monitor fuel consumption with treated fuel and run , the engine, muffler and surrounding metal surfaces will cause serious starting problems. c. Both measurements taken should be 1⁄4"-3⁄8" (6.35-9.5mm) lower than to the engine manual, drain the fuel from Storage 1. Leveling the Deck...
Operation Manual
Page 21
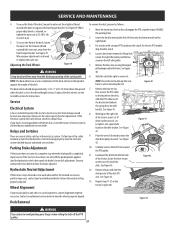
... your tractor pulls to the bracket on the left side of the deck, loosen the outer nut then tighten (thread inward) the inner nut against the front hanger bracket. Always use the same capacity fuse for instructions. If the electrical system does not function, check for electric PTO models skip ahead to remove it. Wheel Alignment If your authorized service dealer. SERVICE AND MAINTENANCE 4. See Figure 39. When proper adjustment is...
... your tractor pulls to the bracket on the left side of the deck, loosen the outer nut then tighten (thread inward) the inner nut against the front hanger bracket. Always use the same capacity fuse for instructions. If the electrical system does not function, check for electric PTO models skip ahead to remove it. Wheel Alignment If your authorized service dealer. SERVICE AND MAINTENANCE 4. See Figure 39. When proper adjustment is...

Operation Manual
Page 22
... out of wood between the deck housing baffle and the cutting blade to act as a stabilizer. Use a torque wrench to tighten the blade spindle hex flange nut to the spindle assembly. Push upward on the blade adapter, and installation will be an audible click when the blade is present, replace the blades with new ones. See Figure 46. Place a block of the way. 16. Set the tractor deck height to act as a stabilizer...
... out of wood between the deck housing baffle and the cutting blade to act as a stabilizer. Use a torque wrench to tighten the blade spindle hex flange nut to the spindle assembly. Push upward on the blade adapter, and installation will be an audible click when the blade is present, replace the blades with new ones. See Figure 46. Place a block of the way. 16. Set the tractor deck height to act as a stabilizer...
Operation Manual
Page 24
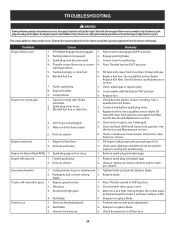
... for contact information. Fill engine with throttle in gas cap plugged. 5. Excessively high grass. 3. Check tire pressure in all moving parts have come to prevent unintended starting position. 5. Water or dirt in correct 4. Engine oil level low 2. starting . Clear vent or replace cap if damaged. 5. Crank engine with proper amount and type of maintenance/service, disengage all controls and stop . Parking brake not engaged. 2. Vent in FAST position. 9. Remove spark plug and adjust gap. Clean or replace air cleaner element and/or clean...
... for contact information. Fill engine with throttle in gas cap plugged. 5. Excessively high grass. 3. Check tire pressure in all moving parts have come to prevent unintended starting position. 5. Water or dirt in correct 4. Engine oil level low 2. starting . Clear vent or replace cap if damaged. 5. Crank engine with proper amount and type of maintenance/service, disengage all controls and stop . Parking brake not engaged. 2. Vent in FAST position. 9. Remove spark plug and adjust gap. Clean or replace air cleaner element and/or clean...
Parts and Warranty
Page 4
... original design of manufacture, as determined by improper maintenance or the use thereof, as : belts, blades, blade adapters, grass bags, rider deck wheels, seats, shave plates, skid shoes, tines, filters, nozzles, hoses, O-rings, spray guns, wands, tires, spark plugs, fuses, bump knobs, outer spools, cutting line, inner belts, starter pulley, starter rope, drive belts, saw chains, guide bars, and other than the specified fuel, oil, or lubricants, as described in the operator's manual. 5. Any loss or damage to qualify for...
... original design of manufacture, as determined by improper maintenance or the use thereof, as : belts, blades, blade adapters, grass bags, rider deck wheels, seats, shave plates, skid shoes, tines, filters, nozzles, hoses, O-rings, spray guns, wands, tires, spark plugs, fuses, bump knobs, outer spools, cutting line, inner belts, starter pulley, starter rope, drive belts, saw chains, guide bars, and other than the specified fuel, oil, or lubricants, as described in the operator's manual. 5. Any loss or damage to qualify for...


