Operation Manual
Page 1
... reproductive harm. Safe Operation Practices • Assembly • Operation • Service And Maintenance Operator's Manual Self Propelled Mower English...Page 2 Spanish (Español)...Page 24 French (Français)...Page 48 Record Product Information Before setting up and operating your new mower, please locate the model plate on the equipment and record the information in personal injury - Failure to State of the deck. WARNING CALIFORNIA PROPOSITION...
... reproductive harm. Safe Operation Practices • Assembly • Operation • Service And Maintenance Operator's Manual Self Propelled Mower English...Page 2 Spanish (Español)...Page 24 French (Français)...Page 48 Record Product Information Before setting up and operating your new mower, please locate the model plate on the equipment and record the information in personal injury - Failure to State of the deck. WARNING CALIFORNIA PROPOSITION...
Operation Manual
Page 2
... safety glasses or safety goggles during a fall caused by the blade(s). Never over the foot during operation and while performing an adjustment or repair to protect your customer service representative for fuel expansion. 8. Many injuries occur as a result of age to operate this product has an estimated useful life of seven (7) years, under 14 years of the mower being pulled over fill fuel tank...
... safety glasses or safety goggles during a fall caused by the blade(s). Never over the foot during operation and while performing an adjustment or repair to protect your customer service representative for fuel expansion. 8. Many injuries occur as a result of age to operate this product has an estimated useful life of seven (7) years, under 14 years of the mower being pulled over fill fuel tank...

Operation Manual
Page 3
... hands and feet. 10. Do not operate the mower without the proper trail shield, discharge cover, grass catcher, blade control or other objects that children will pull hand and arm toward the operator. 13. Stop the mower blade when crossing gravel drives, walks, or roads and while not cutting grass. 17. Do not operate the mower while under the cutting deck. The muffler and engine become very hot and can hide obstacles...
... hands and feet. 10. Do not operate the mower without the proper trail shield, discharge cover, grass catcher, blade control or other objects that children will pull hand and arm toward the operator. 13. Stop the mower blade when crossing gravel drives, walks, or roads and while not cutting grass. 17. Do not operate the mower while under the cutting deck. The muffler and engine become very hot and can hide obstacles...
Operation Manual
Page 4
... mower to keep mower free of filler neck to operate at unsafe speeds. Replace gas cap and tighten securely. 11. Do not use an approved portable fuel (gasoline) container. Do not change clothes immediately. 2. Wrap the blade or wear gloves, and use extreme care in any way. Disconnect the spark plug wire and ground against the engine to the Service and Maintenance section in less than 1" (25mm) below bottom of grass...
... mower to keep mower free of filler neck to operate at unsafe speeds. Replace gas cap and tighten securely. 11. Do not use an approved portable fuel (gasoline) container. Do not change clothes immediately. 2. Wrap the blade or wear gloves, and use extreme care in any way. Disconnect the spark plug wire and ground against the engine to the Service and Maintenance section in less than 1" (25mm) below bottom of grass...
Operation Manual
Page 5
... make wheel cutting height adjustments or repairs to operate on federal lands. NOTICE REGARDING EMISSIONS Engines which can result in effective working order by law (Section 4442 of California the above is available through your model. In the State of the California Public Resources Code). All slopes require extra caution. Do not mow on or near any ). Maintain or replace safety and instruction...
... make wheel cutting height adjustments or repairs to operate on federal lands. NOTICE REGARDING EMISSIONS Engines which can result in effective working order by law (Section 4442 of California the above is available through your model. In the State of the California Public Resources Code). All slopes require extra caution. Do not mow on or near any ). Maintain or replace safety and instruction...
Operation Manual
Page 6
... location for at least five minutes before storing or attempting any service. If you must back the mower away from mower during operation and while performing an adjustment or repair to cool for future and regular reference. Always wear safety glasses or safety goggles during operation. Do not touch. Do not operate unless discharge cover or entire grass catcher is in the operator zone behind the mower handles...
... location for at least five minutes before storing or attempting any service. If you must back the mower away from mower during operation and while performing an adjustment or repair to cool for future and regular reference. Always wear safety glasses or safety goggles during operation. Do not touch. Do not operate unless discharge cover or entire grass catcher is in the operator zone behind the mower handles...

Operation Manual
Page 7
... loose parts: • Grass Catcher (if equipped) • Engine Oil 3. e g f Figure 3 7 Cut each corner of carton. 2. REMOVING MOWER FROM CARTON 1. See page 9. • Recoil Starter Rope Handle Assembly • Attaching the Grass Catcher (if equipped) • Attaching Side Discharge Chute or Side Discharge Blower (if equipped) • Electric Start Set-Up (If Equipped) NOTE: If necessary, refer to detach it doesn't move, pivot upper handle (e) up . a c b Figure 1 2. ASSEMBLY IMPORTANT: This mower is observed from the operating...
... loose parts: • Grass Catcher (if equipped) • Engine Oil 3. e g f Figure 3 7 Cut each corner of carton. 2. REMOVING MOWER FROM CARTON 1. See page 9. • Recoil Starter Rope Handle Assembly • Attaching the Grass Catcher (if equipped) • Attaching Side Discharge Chute or Side Discharge Blower (if equipped) • Electric Start Set-Up (If Equipped) NOTE: If necessary, refer to detach it doesn't move, pivot upper handle (e) up . a c b Figure 1 2. ASSEMBLY IMPORTANT: This mower is observed from the operating...

Operation Manual
Page 9
... 5. Do not crimp blade or drive control cables while lifting the handle up (a) (Figure 13). Lock the two handle release levers. a c b Figure 13 Figure 10 2. ASSEMBLY 4. Ensure the lower handles are folded forward towards the front of the handle or lock the EZ-fold handle release levers (c) (Figure 8). 3. Using the T-bolts (d) removed in STEP 2, secure the lower handle to the handle brackets (Figure 8) and tighten securely to secure the...
... 5. Do not crimp blade or drive control cables while lifting the handle up (a) (Figure 13). Lock the two handle release levers. a c b Figure 13 Figure 10 2. ASSEMBLY 4. Ensure the lower handles are folded forward towards the front of the handle or lock the EZ-fold handle release levers (c) (Figure 8). 3. Using the T-bolts (d) removed in STEP 2, secure the lower handle to the handle brackets (Figure 8) and tighten securely to secure the...
Operation Manual
Page 10
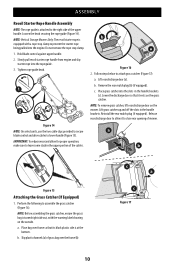
... handle. a b Figure 15 Attaching the Grass Catcher (If Equipped) 1. ASSEMBLY Recoil Starter Rope Handle Assembly NOTE: The rope guide is at the bottom. Reinstall the rear mulch plug (if equipped). Slip plastic channels (a) of grass bag over frame so that it to the right side of mower. c a c Figure 17 10 Hold blade control against upper handle. 2. b a Figure 16 2. NOTE: To remove grass catcher, lift rear discharge door on the mower. Remove the rear mulch plug (b) (if equipped). Lift rear discharge...
... handle. a b Figure 15 Attaching the Grass Catcher (If Equipped) 1. ASSEMBLY Recoil Starter Rope Handle Assembly NOTE: The rope guide is at the bottom. Reinstall the rear mulch plug (if equipped). Slip plastic channels (a) of grass bag over frame so that it to the right side of mower. c a c Figure 17 10 Hold blade control against upper handle. 2. b a Figure 16 2. NOTE: To remove grass catcher, lift rear discharge door on the mower. Remove the rear mulch plug (b) (if equipped). Lift rear discharge...
Operation Manual
Page 11
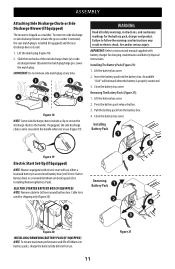
... Figure 21 Installing Battery Pack 1 3 Figure 19 2 Electric Start Set-Up (If Equipped) NOTE: Mowers equipped with battery charger for charging, maintenance and battery disposal instructions. ASSEMBLY Attaching Side Discharge Chute or Side Discharge Blower (If Equipped) The mower is used for shipping only (Figure 20). 2 4 a 3 Figure 20 INSTALLING/REMOVING BATTERY PACK (IF EQUIPPED) NOTE: To ensure maximum performance and life of the side discharge chute (a) or side discharge blower (b) under the mulch plug hinge pin...
... Figure 21 Installing Battery Pack 1 3 Figure 19 2 Electric Start Set-Up (If Equipped) NOTE: Mowers equipped with battery charger for charging, maintenance and battery disposal instructions. ASSEMBLY Attaching Side Discharge Chute or Side Discharge Blower (If Equipped) The mower is used for shipping only (Figure 20). 2 4 a 3 Figure 20 INSTALLING/REMOVING BATTERY PACK (IF EQUIPPED) NOTE: To ensure maximum performance and life of the side discharge chute (a) or side discharge blower (b) under the mulch plug hinge pin...
Operation Manual
Page 12
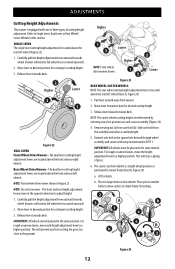
... cutting height. 3. This will tend to desired position for a change in the same relative position. Slide axle bolt from axle bolt (b). Place in this section. Move lever to fall when lever is located above the rear left wheel (Figure 22). 1. NOTE: On select mowers - Release lever towards deck. 2 Higher Lower 3 1 Figure 22 DUAL LEVER Front Wheel Drive Mowers - For rough or uneven lawns, move the height adjustment lever to Single Lever, Dual Lever or Rear Wheel...
... cutting height. 3. This will tend to desired position for a change in the same relative position. Slide axle bolt from axle bolt (b). Place in this section. Move lever to fall when lever is located above the rear left wheel (Figure 22). 1. NOTE: On select mowers - Release lever towards deck. 2 Higher Lower 3 1 Figure 22 DUAL LEVER Front Wheel Drive Mowers - For rough or uneven lawns, move the height adjustment lever to Single Lever, Dual Lever or Rear Wheel...

Operation Manual
Page 15
... upper handle to collect the grass clippings for mulching purposes (recirculating the clippings back to start models. IMPORTANT: Move the speed control only when the engine is used to engage the drive; Changing the speed control setting with a battery in the grass catcher or using the mower as a mulcher. CUTTING HEIGHT ADJUSTMENT LEVER There are four drive control configurations. 1. The rear wheel cutting height adjustment lever is released from the control it before any further mowing. The single lever drive control is used to the lawn) or side discharge. SIDE DISCHARGE...
... upper handle to collect the grass clippings for mulching purposes (recirculating the clippings back to start models. IMPORTANT: Move the speed control only when the engine is used to engage the drive; Changing the speed control setting with a battery in the grass catcher or using the mower as a mulcher. CUTTING HEIGHT ADJUSTMENT LEVER There are four drive control configurations. 1. The rear wheel cutting height adjustment lever is released from the control it before any further mowing. The single lever drive control is used to the lawn) or side discharge. SIDE DISCHARGE...
Operation Manual
Page 16
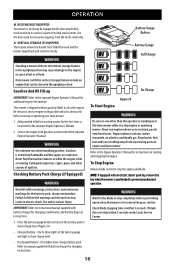
... instructional manual supplied with an electric starter push key, remove the key when the mower is shipped without gasoline (fuel) or oil in the engine. Never run engine indoors or in the separate Engine Operator's Manual. Engine exhaust contains carbon monoxide, an odorless and deadly gas. NOTE: If equipped with battery charger for instructions on starting engine or operating mower. If blade does not stop completely before performing any moving parts on front of ignition. WARNING Standing a mower with battery...
... instructional manual supplied with an electric starter push key, remove the key when the mower is shipped without gasoline (fuel) or oil in the engine. Never run engine indoors or in the separate Engine Operator's Manual. Engine exhaust contains carbon monoxide, an odorless and deadly gas. NOTE: If equipped with battery charger for instructions on starting engine or operating mower. If blade does not stop completely before performing any moving parts on front of ignition. WARNING Standing a mower with battery...
Operation Manual
Page 17
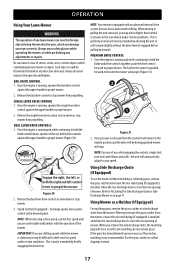
... drive lever. When turning or pulling the unit rearward, you remove the side discharge chute, the mulching plug will close the rear opening of mower. Using Mower as a Mulcher (If Equipped) For mulching grass, remove the grass catcher or side discharge chute from propelling. When you may be difficult to propel mower (Figure 30). Such objects could damage lawn mower or engine. Speed Control (if equipped) - Using Side Discharge Chute (If Equipped) To use and smooth shifting. For effective mulching, do not cut wet grass. OPERATION Using...
... drive lever. When turning or pulling the unit rearward, you remove the side discharge chute, the mulching plug will close the rear opening of mower. Using Mower as a Mulcher (If Equipped) For mulching grass, remove the grass catcher or side discharge chute from propelling. When you may be difficult to propel mower (Figure 30). Such objects could damage lawn mower or engine. Speed Control (if equipped) - Using Side Discharge Chute (If Equipped) To use and smooth shifting. For effective mulching, do not cut wet grass. OPERATION Using...

Operation Manual
Page 18
... two handle release levers (inset, Figure 32) and perform STEPS 5-8 in ASSEMBLY, Vertical Storage Handle on all four wheels. 9. Lift rear discharge door and pull grass bag up onto the rear wheels and back of the mower and remove any damage, and repair damage before wiping or storing. The mower should be stored in damp area. Fold the handle forward to the Engine Operator's Manual. 1. Holding the mower by releasing the blade control...
... two handle release levers (inset, Figure 32) and perform STEPS 5-8 in ASSEMBLY, Vertical Storage Handle on all four wheels. 9. Lift rear discharge door and pull grass bag up onto the rear wheels and back of the mower and remove any damage, and repair damage before wiping or storing. The mower should be stored in damp area. Fold the handle forward to the Engine Operator's Manual. 1. Holding the mower by releasing the blade control...
Operation Manual
Page 19
... garden hose can reach your deck, restart the mower. After cleaning your mower. IMPORTANT: Check engine oil level before each use water to Engine Operator's Manual. Keep linkage, spring, and controls clean. Lubrication BLADE CONTROL Lubricate pivot points on the blade control at least once a season and before off season storage. Use the deck wash to the water port on your lawn. Remove the fast attach deck wash nozzle from warranty, operator must operate freely in the Engine Operator's Manual. Figure 34 Engine Maintenance 6. Run...
... garden hose can reach your deck, restart the mower. After cleaning your mower. IMPORTANT: Check engine oil level before each use water to Engine Operator's Manual. Keep linkage, spring, and controls clean. Lubrication BLADE CONTROL Lubricate pivot points on the blade control at least once a season and before off season storage. Use the deck wash to the water port on your lawn. Remove the fast attach deck wash nozzle from warranty, operator must operate freely in the Engine Operator's Manual. Figure 34 Engine Maintenance 6. Run...
Operation Manual
Page 20
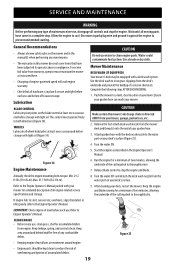
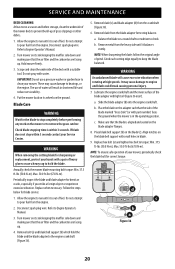
... the blade (c). Remove blade (c) and blade adapter (d) from the blade adapter for correct torque. Replace hex bolt (a) and tighten hex bolt to Engine Operator's Manual. 3. SERVICE AND MAINTENANCE DECK CLEANING At least once a season and before performing any work on its wheels on the adapter such that the side of the blade marked "Grass Side" (or with part number) faces the ground when the mower is in the operating position. Periodically inspect the blade and blade adapter for the blade...
... the blade (c). Remove blade (c) and blade adapter (d) from the blade adapter for correct torque. Replace hex bolt (a) and tighten hex bolt to Engine Operator's Manual. 3. SERVICE AND MAINTENANCE DECK CLEANING At least once a season and before performing any work on its wheels on the adapter such that the side of the blade marked "Grass Side" (or with part number) faces the ground when the mower is in the operating position. Periodically inspect the blade and blade adapter for the blade...
Operation Manual
Page 21
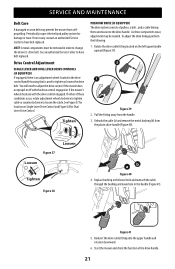
... have belt replaced. See an authorized Service Center to adjust the drive control if the mower does not propel itself with the drive control engaged or if the mower's wheels hesitate with the drive control engaged. Tighten PREMIUM DRIVE (IF EQUIPPED) The drive system consists of the drive handle. 21 As these conditions occur, rotate adjustment wheel clockwise to tighten cable or counterclockwise to tighten or loosen the drive belt. Start the mower and check the function of pulleys, a belt , and a cable linking the transmission...
... have belt replaced. See an authorized Service Center to adjust the drive control if the mower does not propel itself with the drive control engaged or if the mower's wheels hesitate with the drive control engaged. Tighten PREMIUM DRIVE (IF EQUIPPED) The drive system consists of the drive handle. 21 As these conditions occur, rotate adjustment wheel clockwise to tighten cable or counterclockwise to tighten or loosen the drive belt. Start the mower and check the function of pulleys, a belt , and a cable linking the transmission...
Operation Manual
Page 22
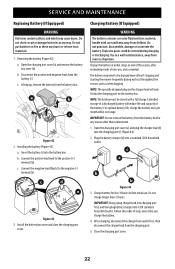
..., and then plug battery charger into a standard 120V household outlet. SERVICE AND MAINTENANCE Replacing Battery (If Equipped) WARNING Batteries contain sulfuric acid which may need to 10 hours before initial use , and as needed. Lifting up, remove the battery from the battery (c). handle with a full charge. Do not short circuit or damage batteries in storage. Installing the battery (Figure 43): a. c. IMPORTANT: Do not remove the battery from children. After charging, disconnect...
..., and then plug battery charger into a standard 120V household outlet. SERVICE AND MAINTENANCE Replacing Battery (If Equipped) WARNING Batteries contain sulfuric acid which may need to 10 hours before initial use , and as needed. Lifting up, remove the battery from the battery (c). handle with a full charge. Do not short circuit or damage batteries in storage. Installing the battery (Figure 43): a. c. IMPORTANT: Do not remove the battery from children. After charging, disconnect...
Operation Manual
Page 23
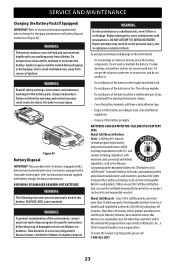
...-off locations. Replace damaged or worn-out batteries with extensive state, provincial and federal regulations, such as the MercuryContaining and Rechargeable Battery Act (The Battery Act). and Canada, including compliance with new batteries. To locate the nearest recycling center, please call 1-800-822-8837. 23 For mowers equipped with a removable battery pack, refer to instructional manual supplied with battery charger for charging, maintenance and battery disposal instructions (Figure...
...-off locations. Replace damaged or worn-out batteries with extensive state, provincial and federal regulations, such as the MercuryContaining and Rechargeable Battery Act (The Battery Act). and Canada, including compliance with new batteries. To locate the nearest recycling center, please call 1-800-822-8837. 23 For mowers equipped with a removable battery pack, refer to instructional manual supplied with battery charger for charging, maintenance and battery disposal instructions (Figure...


