
Operation Manual
Page 1
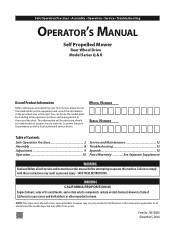
... yours. WARNING CALIFORNIA PROPOSITION 65 Engine Exhaust, some of its constituents, and certain vehicle components contain or emit chemicals known to cause cancer and birth defects or other reproductive harm. Safe Operation Practices • Assembly • Operation • Service • Troubleshooting Operator's Manual Self Propelled Mower Rear Wheel Drive Model Series Q & R Record Product Information Before setting up and operating your new mower, please locate the model plate on the equipment and record...
... yours. WARNING CALIFORNIA PROPOSITION 65 Engine Exhaust, some of its constituents, and certain vehicle components contain or emit chemicals known to cause cancer and birth defects or other reproductive harm. Safe Operation Practices • Assembly • Operation • Service • Troubleshooting Operator's Manual Self Propelled Mower Rear Wheel Drive Model Series Q & R Record Product Information Before setting up and operating your new mower, please locate the model plate on the equipment and record...
Operation Manual
Page 2
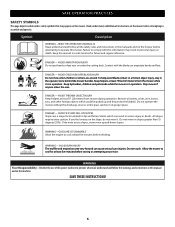
... and pets inside while the mower is to operate this mower without proper instruction. 5. canvas) shoes. 7. Replace gasoline cap and tighten securely. 9. These operators should evaluate their proper operation. 3. Pull the mower back slowly, no more than 1" (2.5 cm) below bottom of mower-related injuries. Do not engage the drive control (if equipped) while starting engine. 2 SAFE OPERATION PRACTICES WARNING This symbol points out important safety instructions which could be tripped over...
... and pets inside while the mower is to operate this mower without proper instruction. 5. canvas) shoes. 7. Replace gasoline cap and tighten securely. 9. These operators should evaluate their proper operation. 3. Pull the mower back slowly, no more than 1" (2.5 cm) below bottom of mower-related injuries. Do not engage the drive control (if equipped) while starting engine. 2 SAFE OPERATION PRACTICES WARNING This symbol points out important safety instructions which could be tripped over...
Operation Manual
Page 3
.... Do not operate the mower without the proper trail shield, discharge cover, grass catcher, blade control or other than 15 degrees (25%). 3 Doing so makes the safety device inoperative and may cause discharged material to rotate for Walk-Behind Mowers 1. Never place any service. 20. Do not mow on that children will pull hand and arm toward engine faster than 15 degrees (25%) as part of dry leaves...
.... Do not operate the mower without the proper trail shield, discharge cover, grass catcher, blade control or other than 15 degrees (25%). 3 Doing so makes the safety device inoperative and may cause discharged material to rotate for Walk-Behind Mowers 1. Never place any service. 20. Do not mow on that children will pull hand and arm toward engine faster than 15 degrees (25%) as part of dry leaves...
Operation Manual
Page 4
... mow up oil or fuel spillage and remove any fuel soaked debris. Use only containers certified by an authorized service dealer. 7. Clean up and down slopes. 5. Follow the "Maintenance Schedule" in accordance to prevent unintended starting the engine. 8. Disconnect the spark plug wire and ground against the engine to the Maintenance Schedule in the Service and Maintenance section in the Service and Maintenance section. 6. Replace the blade with factory setting of the engine. 3. Mower blades...
... mow up oil or fuel spillage and remove any fuel soaked debris. Use only containers certified by an authorized service dealer. 7. Clean up and down slopes. 5. Follow the "Maintenance Schedule" in accordance to prevent unintended starting the engine. 8. Disconnect the spark plug wire and ground against the engine to the Maintenance Schedule in the Service and Maintenance section in the Service and Maintenance section. 6. Replace the blade with factory setting of the engine. 3. Mower blades...

Operation Manual
Page 5
... any damage. For safety protection, frequently check components and replace immediately with low permeation fuel lines and fuel tanks for the muffler is equipped with an internal combustion engine and should not be used , it should be thrown. Maintain or replace safety and instruction labels, as necessary. 15. A spark arrestor for evaporative emission control. Never attempt to make wheel cutting height adjustments or repairs to protect the environment...
... any damage. For safety protection, frequently check components and replace immediately with low permeation fuel lines and fuel tanks for the muffler is equipped with an internal combustion engine and should not be used , it should be thrown. Maintain or replace safety and instruction labels, as necessary. 15. A spark arrestor for evaporative emission control. Never attempt to make wheel cutting height adjustments or repairs to protect the environment...
Operation Manual
Page 6
... storing or attempting any service. Stop mower if anyone enters the area. Do not operate the mower without the discharge cover or entire grass catcher in operation. AVOID SLIP AND FALL ON SLOPES Slopes are around. If you feel uneasy on slopes greater than 15 degrees (25%). Only mow across slopes, never mow up and thrown by the blade(s). WARNING- SAVE THESE INSTRUCTIONS! 6
... storing or attempting any service. Stop mower if anyone enters the area. Do not operate the mower without the discharge cover or entire grass catcher in operation. AVOID SLIP AND FALL ON SLOPES Slopes are around. If you feel uneasy on slopes greater than 15 degrees (25%). Only mow across slopes, never mow up and thrown by the blade(s). WARNING- SAVE THESE INSTRUCTIONS! 6

Operation Manual
Page 7
...mow on the slope, do not mow it. Only mow across slopes, never mow up or down slopes. If you feel uneasy on slopes greater than 15 degrees (25%). Figure 2 WARNING Slopes are a major factor related to slip and fall accidents which can result in severe injury or death. If there is a gap... below the gauge, the slope is too steep for safe operation (See Figure 2 above). Adjust gauge up and down ... dashed line USE THIS SLOPE GAUGE TO DETERMINE IF A SLOPE IS TOO STEEP FOR SAFE OPERATION! Remove this page and fold along the dashed line. 2. Locate a vertical ...
...mow on the slope, do not mow it. Only mow across slopes, never mow up or down slopes. If you feel uneasy on slopes greater than 15 degrees (25%). Figure 2 WARNING Slopes are a major factor related to slip and fall accidents which can result in severe injury or death. If there is a gap... below the gauge, the slope is too steep for safe operation (See Figure 2 above). Adjust gauge up and down ... dashed line USE THIS SLOPE GAUGE TO DETERMINE IF A SLOPE IS TOO STEEP FOR SAFE OPERATION! Remove this page and fold along the dashed line. 2. Locate a vertical ...

Operation Manual
Page 8
... remove grass catcher reverse STEP 2. Remove loose packing material. Check carton thoroughly for proper operation, make sure to service engine with gasoline and oil as instructed in the Operation section of carton. 2. Follow steps below to bottom. 2. Lift mower rear discharge door. Place the handle into the slots in the upper portion of grass bag over frame so that it from top to attach grass catcher. b. Remove the mulch C plug. Reinstall the mulch plug and lower the rear discharge...
... remove grass catcher reverse STEP 2. Remove loose packing material. Check carton thoroughly for proper operation, make sure to service engine with gasoline and oil as instructed in the Operation section of carton. 2. Follow steps below to bottom. 2. Lift mower rear discharge door. Place the handle into the slots in the upper portion of grass bag over frame so that it from top to attach grass catcher. b. Remove the mulch C plug. Reinstall the mulch plug and lower the rear discharge...
Operation Manual
Page 9
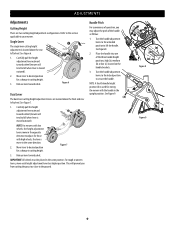
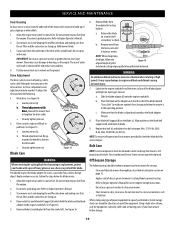
... is used for a change in cutting height. 3. Figure 6 Dual Lever The dual lever cutting height adjustment levers are two cutting height adjustment configurations. Move lever to desired position for storing the mower with high wheels, the levers move in cutting height. See Figure 8. 2. NOTE: A fourth handle height position (d) is located above the front and rear left wheel. ADJUSTMENTS Adjustments Cutting Height There are located above the rear left wheel. See Figure 6. 1. for a change in the same direction. 2. Higher Figure 7 3. Release lever towards deck. For...
... is used for a change in cutting height. 3. Figure 6 Dual Lever The dual lever cutting height adjustment levers are two cutting height adjustment configurations. Move lever to desired position for storing the mower with high wheels, the levers move in cutting height. See Figure 8. 2. NOTE: A fourth handle height position (d) is located above the front and rear left wheel. ADJUSTMENTS Adjustments Cutting Height There are located above the rear left wheel. See Figure 6. 1. for a change in the same direction. 2. Higher Figure 7 3. Release lever towards deck. For...

Operation Manual
Page 10
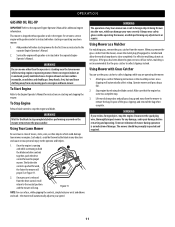
...the upper handle of the mower. Do not use the mower unless the shield is attached to bypass its deck wash system. Stand behind the mower and pull the recoil starter rope to the lawn. Premium Drive Control OPERATION Blade Control Single Lever Cutting Height Adjustment* Recoil Starter Grass Catcher Rear Discharge Door Rear Cutting Height Adjustment Lever* Deck Wash* Front Cutting Height Adjustment Lever* Mulch Plug *If Equipped Figure 10 Blade Control The blade control is fully functional and in a grass catcher the mower has the option of the mower, is pushed forward, the...
...the upper handle of the mower. Do not use the mower unless the shield is attached to bypass its deck wash system. Stand behind the mower and pull the recoil starter rope to the lawn. Premium Drive Control OPERATION Blade Control Single Lever Cutting Height Adjustment* Recoil Starter Grass Catcher Rear Discharge Door Rear Cutting Height Adjustment Lever* Deck Wash* Front Cutting Height Adjustment Lever* Mulch Plug *If Equipped Figure 10 Blade Control The blade control is fully functional and in a grass catcher the mower has the option of the mower, is pushed forward, the...
Operation Manual
Page 11
... indication of mower during operation is standing near the lawn mower while starting mower for additional engine information. WARNING The operation of any adjustments or repairs. Using Your Lawn Mower Be sure lawn is running and while continuing to hold the blade and drive controls together, push the drive control forward to service engine with Grass Catcher You can damage your eyes severely. Using Mower with gasoline and oil as instructed in the engine. Operate mower until grass bag is installed and allow the rear discharge door...
... indication of mower during operation is standing near the lawn mower while starting mower for additional engine information. WARNING The operation of any adjustments or repairs. Using Your Lawn Mower Be sure lawn is running and while continuing to hold the blade and drive controls together, push the drive control forward to service engine with Grass Catcher You can damage your eyes severely. Using Mower with gasoline and oil as instructed in the engine. Operate mower until grass bag is installed and allow the rear discharge door...
Operation Manual
Page 12
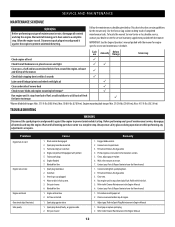
...Problem Engine fails to Air Cleaner Maintenance in the Engine Manual. 6. Spark plug boot disconnected. 3. Engine flooded. 7. Clean, adjust gap, or replace. 6. Allow the engine to have fuel line cleaned. 1. Wait until all hardware is within 3 seconds P Lube control linkages/pivots and wheels with proper oil. 2. Engine not primed (If equipped with clean, fresh gasoline. 4. Stale fuel. 3. Engine oil level low. 2. Fill tank with primer). 5. Fill crankcase with light oil Clean underside of mower deck Check mower blade and engine mounting bolt torque* Run engine...
...Problem Engine fails to Air Cleaner Maintenance in the Engine Manual. 6. Spark plug boot disconnected. 3. Engine flooded. 7. Clean, adjust gap, or replace. 6. Allow the engine to have fuel line cleaned. 1. Wait until all hardware is within 3 seconds P Lube control linkages/pivots and wheels with proper oil. 2. Engine not primed (If equipped with clean, fresh gasoline. 4. Stale fuel. 3. Engine oil level low. 2. Fill tank with primer). 5. Fill crankcase with light oil Clean underside of mower deck Check mower blade and engine mounting bolt torque* Run engine...
Operation Manual
Page 13
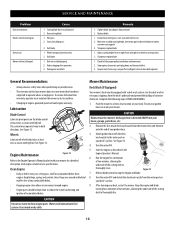
... the cutting deck to the Engine Operator's Manual packed with a deck wash system. Water could contaminate fuel system. Cutting blade loose or unbalanced. 2. Dull blade. 1. Belt not installed properly. 2. Tighten blade and adapter. Engine Maintenance Figure 12 Refer to thoroughly dry. Use the deck wash to a level, clear location on your deck's surface. Push the mower to rinse grass clippings from engine. Start the engine as instructed here. • Changing of any maintenance. • The warranty on your deck's surface. 9. After cleaning your mower for...
... the cutting deck to the Engine Operator's Manual packed with a deck wash system. Water could contaminate fuel system. Cutting blade loose or unbalanced. 2. Dull blade. 1. Belt not installed properly. 2. Tighten blade and adapter. Engine Maintenance Figure 12 Refer to thoroughly dry. Use the deck wash to a level, clear location on your deck's surface. Push the mower to rinse grass clippings from engine. Start the engine as instructed here. • Changing of any maintenance. • The warranty on your deck's surface. 9. After cleaning your mower for...
Operation Manual
Page 14
Refer to the drive control. These may be needed. The use a pressure washer to the engine crankshaft. Drive Adjustment The drive system consists of pulleys, a belt, and a cable linking the transmission to Engine Operator's Manual. 2. See Figure 14 - b. c. Securely tighten jam nut. Periodically inspect the blade adapter for blade service. 1. Follow the steps below for cracks, especially if you strike a foreign object. Do not attempt to pour fuel from the engine. See Figure 16...
Refer to the drive control. These may be needed. The use a pressure washer to the engine crankshaft. Drive Adjustment The drive system consists of pulleys, a belt, and a cable linking the transmission to Engine Operator's Manual. 2. See Figure 14 - b. c. Securely tighten jam nut. Periodically inspect the blade adapter for blade service. 1. Follow the steps below for cracks, especially if you strike a foreign object. Do not attempt to pour fuel from the engine. See Figure 16...


