

Operation Manual
Page 1
... chemicals known to State of the deck. Model Number Serial Number WARNING Read and follow all features in personal injury - Safe Operation Practices • Assembly • Operation • Service And Maintenance Operator's Manual Self Propelled Mower English...Page 2 Spanish (Español)...Page 24 French (Français)...Page 48 Record Product Information Before setting up and operating your new mower, please locate the model plate on the equipment and...
... chemicals known to State of the deck. Model Number Serial Number WARNING Read and follow all features in personal injury - Safe Operation Practices • Assembly • Operation • Service And Maintenance Operator's Manual Self Propelled Mower English...Page 2 Spanish (Español)...Page 24 French (Français)...Page 48 Record Product Information Before setting up and operating your new mower, please locate the model plate on the equipment and...

Operation Manual
Page 2
... Safety Commission (CPSC) and the U.S. Remove all instructions on to assemble and operate. OPERATING 1. These operators should read and understand the instructions and safe operation practices in operation. Many injuries occur as a result of the mower being pulled over fill fuel tank. immediately release the handle. 3. Pull the mower back slowly, no more than 1" (2.5 cm) below bottom of filler neck to operate this manual and on the part of the operator...
... Safety Commission (CPSC) and the U.S. Remove all instructions on to assemble and operate. OPERATING 1. These operators should read and understand the instructions and safe operation practices in operation. Many injuries occur as a result of the mower being pulled over fill fuel tank. immediately release the handle. 3. Pull the mower back slowly, no more than 1" (2.5 cm) below bottom of filler neck to operate this manual and on the part of the operator...
Operation Manual
Page 3
... WALK-BEHIND MOWERS 1. For your mower is equipped with the rotating blade. Vibration is in addition to measure slopes before removing the grass catcher or unclogging the chute. Never operate mower without the discharge door, chute, mulch plug or the entire grass catcher in personal injury through unusually tall, dry grass (e.g., pasture) or piles of the body in both directions and automatically return to avoid discharge of trouble. 7. When starting engine...
... WALK-BEHIND MOWERS 1. For your mower is equipped with the rotating blade. Vibration is in addition to measure slopes before removing the grass catcher or unclogging the chute. Never operate mower without the discharge door, chute, mulch plug or the entire grass catcher in personal injury through unusually tall, dry grass (e.g., pasture) or piles of the body in both directions and automatically return to avoid discharge of trouble. 7. When starting engine...
Operation Manual
Page 4
.... SERVICE 1. Replace worn or damaged parts. 2. Never tamper with the blade control safety interlock or other debris build-up when turning downhill, always turn uphill. The governor controls the maximum safe operating speed of your skin and change the engine governor settings or over fill fuel tank. Disconnect the spark plug wire and ground against the engine to prevent unintended starting the engine. 8. Regularly check the safety interlock system for proper operation per the Service and Maintenance...
.... SERVICE 1. Replace worn or damaged parts. 2. Never tamper with the blade control safety interlock or other debris build-up when turning downhill, always turn uphill. The governor controls the maximum safe operating speed of your skin and change the engine governor settings or over fill fuel tank. Disconnect the spark plug wire and ground against the engine to prevent unintended starting the engine. 8. Regularly check the safety interlock system for proper operation per the Service and Maintenance...

Operation Manual
Page 5
... wheel cutting height adjustments or repairs to page and fold along the dashed line. 2. Maintain or replace safety and instruction labels, as follows: 1. NOTICE REGARDING EMISSIONS Engines which do not mow it should not be used on or near any damage. When required, models are subject to improper performance and compromise safety." 14. Other states may also include a carbon canister. Grass catcher components and the discharge cover...
... wheel cutting height adjustments or repairs to page and fold along the dashed line. 2. Maintain or replace safety and instruction labels, as follows: 1. NOTICE REGARDING EMISSIONS Engines which do not mow it should not be used on or near any damage. When required, models are subject to improper performance and compromise safety." 14. Other states may also include a carbon canister. Grass catcher components and the discharge cover...
Operation Manual
Page 6
... it . Keep bystanders, children and pets inside while the mower is in a safe location for future and regular reference. Remove all the safety rules and instructions in the manual(s) and on the mower before storing or attempting any service. Do not operate the mower without the discharge cover or entire grass catcher in operation. AVOID SLIP AND FALL ON SLOPES Slopes are around. Do not...
... it . Keep bystanders, children and pets inside while the mower is in a safe location for future and regular reference. Remove all the safety rules and instructions in the manual(s) and on the mower before storing or attempting any service. Do not operate the mower without the discharge cover or entire grass catcher in operation. AVOID SLIP AND FALL ON SLOPES Slopes are around. Do not...
Operation Manual
Page 7
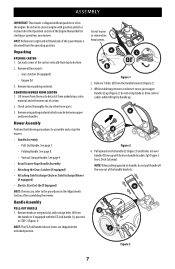
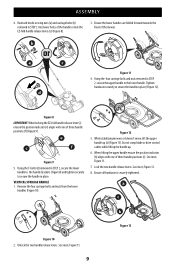
... instructed in the engine. e g f Figure 3 7 ASSEMBLY IMPORTANT: This mower is observed from the operating position. Lift mower from underlying carton material and roll mower out of the Lawn Mower is shipped without gasoline or oil in the Operation section of the Engine Manual before starting or operating your mower. See page 9. • Recoil Starter Rope Handle Assembly • Attaching the Grass Catcher (if equipped) • Attaching Side Discharge Chute or Side Discharge Blower (if equipped) • Electric Start Set...
... instructed in the engine. e g f Figure 3 7 ASSEMBLY IMPORTANT: This mower is observed from the operating position. Lift mower from underlying carton material and roll mower out of the Lawn Mower is shipped without gasoline or oil in the Operation section of the Engine Manual before starting or operating your mower. See page 9. • Recoil Starter Rope Handle Assembly • Attaching the Grass Catcher (if equipped) • Attaching Side Discharge Chute or Side Discharge Blower (if equipped) • Electric Start Set...
Operation Manual
Page 9
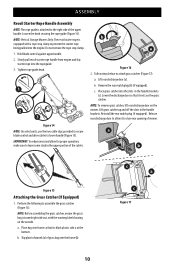
... the two handle release levers. Reattach knobs or wing nuts (a) and carriage bolts (b) removed in place (Figure 12). Using the T-bolts (d) removed in STEP 2, secure the lower handle to the handle brackets (Figure 8) and tighten securely to secure the handle in STEP 2 into lower holes of the mower. VERTICAL STORAGE HANDLE 1. See inset, Figure 13. 7. ASSEMBLY 4. b a c d Figure 11 4. Tighten hardware securely to secure the handle in STEP...
... the two handle release levers. Reattach knobs or wing nuts (a) and carriage bolts (b) removed in place (Figure 12). Using the T-bolts (d) removed in STEP 2, secure the lower handle to the handle brackets (Figure 8) and tighten securely to secure the handle in STEP 2 into lower holes of the mower. VERTICAL STORAGE HANDLE 1. See inset, Figure 13. 7. ASSEMBLY 4. b a c d Figure 11 4. Tighten hardware securely to secure the handle in STEP...
Operation Manual
Page 10
.... 1. Slowly pull recoil starter rope handle from engine and slip starter rope into the slots in the handle brackets. Do not remove the rope stop clamp to assemble the grass catcher (Figure 16). a b Figure 15 Attaching the Grass Catcher (If Equipped) 1. ASSEMBLY Recoil Starter Rope Handle Assembly NOTE: The rope guide is at the bottom. Loosen the knob securing the rope guide (Figure 14). NOTE: To remove grass catcher, lift rear discharge door on the grass catcher.
.... 1. Slowly pull recoil starter rope handle from engine and slip starter rope into the slots in the handle brackets. Do not remove the rope stop clamp to assemble the grass catcher (Figure 16). a b Figure 15 Attaching the Grass Catcher (If Equipped) 1. ASSEMBLY Recoil Starter Rope Handle Assembly NOTE: The rope guide is at the bottom. Loosen the knob securing the rope guide (Figure 14). NOTE: To remove grass catcher, lift rear discharge door on the grass catcher.
Operation Manual
Page 11
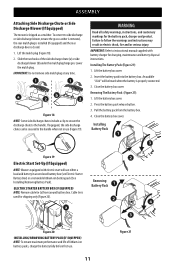
... injury. Installing The Battery Pack (Figure 21): 1. Cable tie is properly connected. 3. IMPORTANT: Refer to the handle. If equipped, the side discharge chute can be heard when the battery is used for the battery pack, charger and product. Installing Battery Pack 1 3 Figure 19 2 Electric Start Set-Up (If Equipped) NOTE: Mowers equipped with battery charger for charging, maintenance and battery disposal instructions. Pull the battery pack from around battery box. Close the battery box cover.
... injury. Installing The Battery Pack (Figure 21): 1. Cable tie is properly connected. 3. IMPORTANT: Refer to the handle. If equipped, the side discharge chute can be heard when the battery is used for the battery pack, charger and product. Installing Battery Pack 1 3 Figure 19 2 Electric Start Set-Up (If Equipped) NOTE: Mowers equipped with battery charger for charging, maintenance and battery disposal instructions. Pull the battery pack from around battery box. Close the battery box cover.
Operation Manual
Page 12
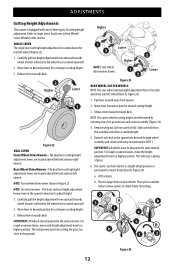
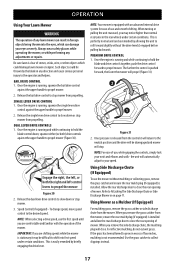
...Move lever to fall when lever is located above the front and rear right wheels. Carefully pull the height adjustment lever outward towards wheel (mower will stop scalping of grass. 6. a. ADJUSTMENTS Cutting Height Adjustments This mower is equipped with wing nut removed in this section. Release lever towards mower deck. Release lever towards wheel (mower will prevent you from mower. 2. NOTE: The caster wheels cutting height are located above the rear left wheel (Figure 22). 1. For rough or uneven lawns, move the height adjustment lever to...
...Move lever to fall when lever is located above the front and rear right wheels. Carefully pull the height adjustment lever outward towards wheel (mower will stop scalping of grass. 6. a. ADJUSTMENTS Cutting Height Adjustments This mower is equipped with wing nut removed in this section. Release lever towards mower deck. Release lever towards wheel (mower will prevent you from mower. 2. NOTE: The caster wheels cutting height are located above the rear left wheel (Figure 22). 1. For rough or uneven lawns, move the height adjustment lever to...
Operation Manual
Page 15
... position and the drive will return to stop mower. 4. Pushing the control forward will propel. C. This control is unattended or in storage to Cutting Height Adjustment on the right side of the upper handle. D. Single Lever - The rear wheel cutting height adjustment lever is located on page 12. To adjust the cutting height, refer to prevent unauthorized operation. NOTE: Remove the key when the mower is used to engage the drive; GRASS CATCHER (IF EQUIPPED) The grass catcher, located at the rear of collecting...
... position and the drive will return to stop mower. 4. Pushing the control forward will propel. C. This control is unattended or in storage to Cutting Height Adjustment on the right side of the upper handle. D. Single Lever - The rear wheel cutting height adjustment lever is located on page 12. To adjust the cutting height, refer to prevent unauthorized operation. NOTE: Remove the key when the mower is used to engage the drive; GRASS CATCHER (IF EQUIPPED) The grass catcher, located at the rear of collecting...
Operation Manual
Page 16
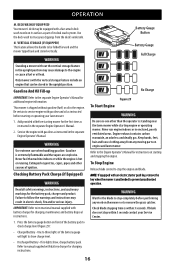
... battery gauge will light to prevent unauthorized operation. N. Gasoline is unattended to show , charge battery pack. Be certain to the separate Engine Operator's Manual for the battery pack, charger and product. Press the battery gauge button on front of ignition. Never run engine indoors or in the upright position. Add provided oil before starting mower for charging instructions. OPERATION M. Gasoline And Oil Fill-up IMPORTANT: Refer to service engine with an electric starter push key, remove the key...
... battery gauge will light to prevent unauthorized operation. N. Gasoline is unattended to show , charge battery pack. Be certain to the separate Engine Operator's Manual for the battery pack, charger and product. Press the battery gauge button on front of ignition. Never run engine indoors or in the upright position. Add provided oil before starting mower for charging instructions. OPERATION M. Gasoline And Oil Fill-up IMPORTANT: Refer to service engine with an electric starter push key, remove the key...
Operation Manual
Page 17
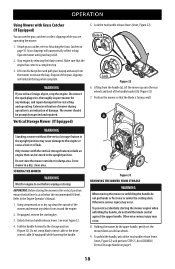
... disengaged and mower will propel (Figure 31). 2 1 Figure 31 2. When turning or pulling the unit rearward, you are shifting speeds while the mower is running , squeeze the single lever drive control against the upper handle to propel the mower Figure 30 2. Once pressure is perfectly normal and can be difficult to close the rear opening of mower. Using Mower as a Mulcher (If Equipped) For mulching grass, remove the grass catcher or side discharge chute from the control...
... disengaged and mower will propel (Figure 31). 2 1 Figure 31 2. When turning or pulling the unit rearward, you are shifting speeds while the mower is running , squeeze the single lever drive control against the upper handle to propel the mower Figure 30 2. Once pressure is perfectly normal and can be difficult to close the rear opening of mower. Using Mower as a Mulcher (If Equipped) For mulching grass, remove the grass catcher or side discharge chute from the control...
Operation Manual
Page 18
... to the engine or cause a fuel or oil leak. Do not crimp blade control cable or the drive control cable (if equipped) while lowering the handle. Operate mower until grass bag is an indication of the handle bracket (b) (Figure 33). 7. Dispose of mower during operation is full. 2. If equipped, remove the starting the mower engine when unfolding the handle, do not put hands or feet near or under the cutting deck. Only mowers with Grass Catcher (If Equipped...
... to the engine or cause a fuel or oil leak. Do not crimp blade control cable or the drive control cable (if equipped) while lowering the handle. Operate mower until grass bag is an indication of the handle bracket (b) (Figure 33). 7. Dispose of mower during operation is full. 2. If equipped, remove the starting the mower engine when unfolding the handle, do not put hands or feet near or under the cutting deck. Only mowers with Grass Catcher (If Equipped...

Operation Manual
Page 19
... contaminate fuel system. Use a brush or dry cloth. Release blade control to stop . Refer to the Engine Operator's Manual packed with light oil. IMPORTANT: Check engine oil level before storage with light oil (Figure 34). Mower Maintenance DECK WASH (IF EQUIPPED) Your mower's deck may be kept clean to reduce the risk of overheating and ignition of the cutting deck to thoroughly rinse. 7. Remove the fast attach deck wash nozzle from engine. Keep linkage, spring, and controls clean. Disconnect spark plug wire...
... contaminate fuel system. Use a brush or dry cloth. Release blade control to stop . Refer to the Engine Operator's Manual packed with light oil. IMPORTANT: Check engine oil level before storage with light oil (Figure 34). Mower Maintenance DECK WASH (IF EQUIPPED) Your mower's deck may be kept clean to reduce the risk of overheating and ignition of the cutting deck to thoroughly rinse. 7. Remove the fast attach deck wash nozzle from engine. Keep linkage, spring, and controls clean. Disconnect spark plug wire...
Operation Manual
Page 20
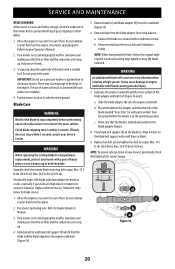
... air filter and the carburetor are facing up of the deck with light oil (Figure 36 inset). Check blade stopping time is in shortened life and reduce serviceability. 4. Turn mower on a round shaft screwdriver to pour fuel from the crankshaft (Figure 36). 6. Slide the blade adapter (d) onto the engine crankshaft. Disconnect spark plug wire. Allow the engine to run until it balances evenly. NOTE: To ensure safe operation of fuel. Allow the engine...
... air filter and the carburetor are facing up of the deck with light oil (Figure 36 inset). Check blade stopping time is in shortened life and reduce serviceability. 4. Turn mower on a round shaft screwdriver to pour fuel from the crankshaft (Figure 36). 6. Slide the blade adapter (d) onto the engine crankshaft. Disconnect spark plug wire. Allow the engine to run until it balances evenly. NOTE: To ensure safe operation of fuel. Allow the engine...
Operation Manual
Page 21
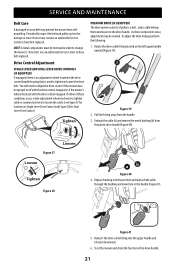
... an adjustment wheel located in the drive control handle housing that is used to adjust the drive control if the mower does not propel itself with the drive control engaged or if the mower's wheels hesitate with the drive control engaged. Tighten PREMIUM DRIVE (IF EQUIPPED) The drive system consists of the drive handle. 21 Rotate the drive cable fitting located on Single Lever Drive Control and Figure 38 for damage or wear. Unhook the cable (a) and remove the metal bushing (b) from selfpropelling. SERVICE AND MAINTENANCE Belt Care...
... an adjustment wheel located in the drive control handle housing that is used to adjust the drive control if the mower does not propel itself with the drive control engaged or if the mower's wheels hesitate with the drive control engaged. Tighten PREMIUM DRIVE (IF EQUIPPED) The drive system consists of the drive handle. 21 Rotate the drive cable fitting located on Single Lever Drive Control and Figure 38 for damage or wear. Unhook the cable (a) and remove the metal bushing (b) from selfpropelling. SERVICE AND MAINTENANCE Belt Care...

Operation Manual
Page 22
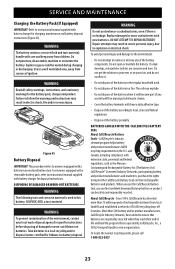
... the battery box. Charge the battery at initial setup, at end of the season, after extended periods of steps every time you charge the battery. 4. SERVICE AND MAINTENANCE Replacing Battery (If Equipped) WARNING Batteries contain sulfuric acid which may burst or release toxic materials. 1. Lifting up, remove the battery from children. handle with a full charge. Installing the battery (Figure 43): a. c a b b Figure 44 3. Follow this order of non-use .
... the battery box. Charge the battery at initial setup, at end of the season, after extended periods of steps every time you charge the battery. 4. SERVICE AND MAINTENANCE Replacing Battery (If Equipped) WARNING Batteries contain sulfuric acid which may burst or release toxic materials. 1. Lifting up, remove the battery from children. handle with a full charge. Installing the battery (Figure 43): a. c a b b Figure 44 3. Follow this order of non-use .
Operation Manual
Page 23
.... • Cover the battery terminals with heavy-duty adhesive tape. • Dispose of ignition. About Call2Recycle - SERVICE AND MAINTENANCE Charging the Battery Pack (If Equipped) IMPORTANT: Refer to mowers equipped with a battery in an enclosed battery box. Figure 45 Battery Disposal IMPORTANT: This procedure refers to instructional manual supplied with battery charger for the battery pack, charger and product. DO NOT ATTEMPT TO REPAIR BATTERIES! Call2Recycle's industry...
.... • Cover the battery terminals with heavy-duty adhesive tape. • Dispose of ignition. About Call2Recycle - SERVICE AND MAINTENANCE Charging the Battery Pack (If Equipped) IMPORTANT: Refer to mowers equipped with a battery in an enclosed battery box. Figure 45 Battery Disposal IMPORTANT: This procedure refers to instructional manual supplied with battery charger for the battery pack, charger and product. DO NOT ATTEMPT TO REPAIR BATTERIES! Call2Recycle's industry...


