Operation Manual
Page 1
... at the rear of California to cause cancer and birth defects or other reproductive harm. Model Number Serial Number WARNING Read and follow all safety rules and instructions in this manual before attempting to comply with a local authorized service dealer. Failure to operate this manual are applicable to the right. NOTE: This Operator's Manual covers several models. Safe Operation Practices • Assembly • Operation • Service And Maintenance Operator's Manual Self Propelled Mower English...
... at the rear of California to cause cancer and birth defects or other reproductive harm. Model Number Serial Number WARNING Read and follow all safety rules and instructions in this manual before attempting to comply with a local authorized service dealer. Failure to operate this manual are applicable to the right. NOTE: This Operator's Manual covers several models. Safe Operation Practices • Assembly • Operation • Service And Maintenance Operator's Manual Self Propelled Mower English...

Operation Manual
Page 2
... close-fitting slacks and shirts. Pull the mower back slowly, no more than 1" (2.5 cm) below bottom of power equipment, carelessness or error on the mower and should read and understand the instructions and safe operation practices in serious injury or death. Children 14 and over should be used. Remove all controls and their ability to operate the mower safely enough to operate this manual in...
... close-fitting slacks and shirts. Pull the mower back slowly, no more than 1" (2.5 cm) below bottom of power equipment, carelessness or error on the mower and should read and understand the instructions and safe operation practices in serious injury or death. Children 14 and over should be used. Remove all controls and their ability to operate the mower safely enough to operate this manual in...

Operation Manual
Page 3
... is felt, then pull rapidly. Never operate mower with an Electric Start Push Key, remove the key when the mower is unattended to operate this mower on that may block your mowing pattern to three seconds after the blade control is released. The cutting blade continues to rotate for at all times. Stop the mower blade when crossing gravel drives, walks, or roads and while not cutting grass. 17. Never run into the path...
... is felt, then pull rapidly. Never operate mower with an Electric Start Push Key, remove the key when the mower is unattended to operate this mower on that may block your mowing pattern to three seconds after the blade control is released. The cutting blade continues to rotate for at all times. Stop the mower blade when crossing gravel drives, walks, or roads and while not cutting grass. 17. Never run into the path...

Operation Manual
Page 4
... the engine and mower. The mower may lead to the Service and Maintenance section in question. Do not operate the mower under any way. Never fuel the mower indoors. 6. Move the mower to prevent unintended starting the engine. 8. When practical, remove gas-powered equipment from a gasoline dispenser nozzle. 14. Replace worn or damaged parts. 2. Before cleaning, repairing, or inspecting, make certain the blade and all times. 6. Regularly check the safety interlock...
... the engine and mower. The mower may lead to the Service and Maintenance section in question. Do not operate the mower under any way. Never fuel the mower indoors. 6. Move the mower to prevent unintended starting the engine. 8. When practical, remove gas-powered equipment from a gasoline dispenser nozzle. 14. Replace worn or damaged parts. 2. Before cleaning, repairing, or inspecting, make certain the blade and all times. 6. Regularly check the safety interlock...

Operation Manual
Page 5
... control. Align either side of California the above is available through your model. Observe proper disposal laws and regulations for any ). After striking a foreign object, stop the engine, disconnect the spark plug wire(s) and ground against the engine. Grass catcher components and the discharge cover are equipped with original equipment manufacturer's (O.E.M.) parts only. Thoroughly inspect the mower for gas, oil, etc. SAFE OPERATION PRACTICES 11. Open manual...
... control. Align either side of California the above is available through your model. Observe proper disposal laws and regulations for any ). After striking a foreign object, stop the engine, disconnect the spark plug wire(s) and ground against the engine. Grass catcher components and the discharge cover are equipped with original equipment manufacturer's (O.E.M.) parts only. Thoroughly inspect the mower for gas, oil, etc. SAFE OPERATION PRACTICES 11. Open manual...
Operation Manual
Page 6
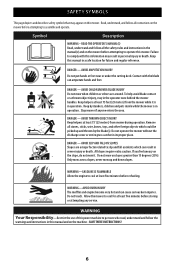
... THESE INSTRUCTIONS! 6 Do not operate the mower without the discharge cover or entire grass catcher in the operator zone behind the mower handles. Do not mow on the slope, do not mow it is in the manual(s) and on this manual and on the mower before refueling. AVOID BURN INJURY The muffler and engine become very hot and can amputate hands and feet. To help avoid blade...
... THESE INSTRUCTIONS! 6 Do not operate the mower without the discharge cover or entire grass catcher in the operator zone behind the mower handles. Do not mow on the slope, do not mow it is in the manual(s) and on this manual and on the mower before refueling. AVOID BURN INJURY The muffler and engine become very hot and can amputate hands and feet. To help avoid blade...
Operation Manual
Page 7
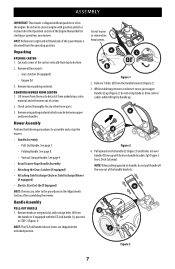
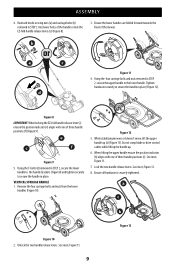
... underlying carton material and roll mower out of the Engine Manual before starting or operating your mower. Pull upward on handle, do not pull handle all loose parts: • Grass Catcher (if equipped) • Engine Oil 3. Cut each corner of the carton vertically from top to right and left hand side of the handle brackets. Remove any other loose parts. 3. Do not crimp blade or drive control cables while lifting the handle up with the EZ-lock...
... underlying carton material and roll mower out of the Engine Manual before starting or operating your mower. Pull upward on handle, do not pull handle all loose parts: • Grass Catcher (if equipped) • Engine Oil 3. Cut each corner of the carton vertically from top to right and left hand side of the handle brackets. Remove any other loose parts. 3. Do not crimp blade or drive control cables while lifting the handle up with the EZ-lock...
Operation Manual
Page 9
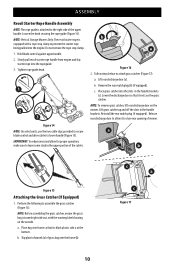
... the two handle release levers. VERTICAL STORAGE HANDLE 1. See inset, Figure 13. 8. Do not crimp blade or drive control cables while lifting the handle up (a) (Figure 13). a c b Figure 13 Figure 10 2. Using the T-bolts (d) removed in STEP 2, secure the lower handle to the handle brackets (Figure 8) and tighten securely to secure the handle in STEP 2 into lower holes of the mower. When lifting the upper handle ensure the...
... the two handle release levers. VERTICAL STORAGE HANDLE 1. See inset, Figure 13. 8. Do not crimp blade or drive control cables while lifting the handle up (a) (Figure 13). a c b Figure 13 Figure 10 2. Using the T-bolts (d) removed in STEP 2, secure the lower handle to the handle brackets (Figure 8) and tighten securely to secure the handle in STEP 2 into lower holes of the mower. When lifting the upper handle ensure the...
Operation Manual
Page 10
... to attach grass catcher (Figure 17): a. NOTE: Before assembling the grass catcher, ensure the grass bag is turned right side out, with a rope stop clamp. 1. ASSEMBLY Recoil Starter Rope Handle Assembly NOTE: The rope guide is attached to the right side of the cables. IMPORTANT: To reduce wear and allow it rests on the outside. Place grass catcher into the engine. a. Slip plastic channels (a) of mower. c. Hold blade control against upper handle. 2. Lift rear discharge...
... to attach grass catcher (Figure 17): a. NOTE: Before assembling the grass catcher, ensure the grass bag is turned right side out, with a rope stop clamp. 1. ASSEMBLY Recoil Starter Rope Handle Assembly NOTE: The rope guide is attached to the right side of the cables. IMPORTANT: To reduce wear and allow it rests on the outside. Place grass catcher into the engine. a. Slip plastic channels (a) of mower. c. Hold blade control against upper handle. 2. Lift rear discharge...
Operation Manual
Page 11
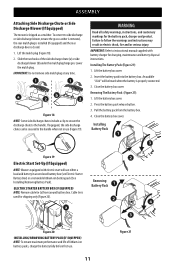
... the battery box cover. Close the battery box cover. Installing Battery Pack 1 3 Figure 19 2 Electric Start Set-Up (If Equipped) NOTE: Mowers equipped with battery charger for charging, maintenance and battery disposal instructions. Cable tie is shipped as a mulcher. Slide the two hooks of lithium-ion battery packs, charge the battery fully before first use. 11 Figure 21 IMPORTANT: Do not remove side mulch plug at any time. 1 1 a b 2 2 Figure 18 NOTE: Some side discharge chutes...
... the battery box cover. Close the battery box cover. Installing Battery Pack 1 3 Figure 19 2 Electric Start Set-Up (If Equipped) NOTE: Mowers equipped with battery charger for charging, maintenance and battery disposal instructions. Cable tie is shipped as a mulcher. Slide the two hooks of lithium-ion battery packs, charge the battery fully before first use. 11 Figure 21 IMPORTANT: Do not remove side mulch plug at any time. 1 1 a b 2 2 Figure 18 NOTE: Some side discharge chutes...
Operation Manual
Page 12
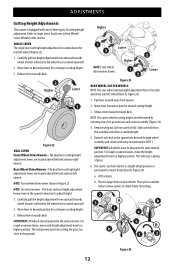
... wheel drive mower shown in cutting height. 3. For rough or uneven lawns, move the height adjustment lever to a higher position. Release lever towards deck. NOTE: The caster wheels cutting height are located above the rear left wheel (Inset A, Figure 24). 1. Reinsert axle bolt in the square hole desired through wheel assembly and secure with one of grass. 6. The casters can be locked in STEP 1. Place in cutting height. 3. NOTE: On select mowers - Release lever towards mower deck. Pull lever out...
... wheel drive mower shown in cutting height. 3. For rough or uneven lawns, move the height adjustment lever to a higher position. Release lever towards deck. NOTE: The caster wheels cutting height are located above the rear left wheel (Inset A, Figure 24). 1. Reinsert axle bolt in the square hole desired through wheel assembly and secure with one of grass. 6. The casters can be locked in STEP 1. Place in cutting height. 3. NOTE: On select mowers - Release lever towards mower deck. Pull lever out...
Operation Manual
Page 15
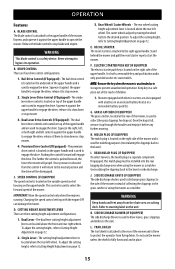
... handle. release it will propel. Squeeze it before any further mowing. The caster wheels adjust by moving the wheel bolts to the lawn) or side discharge. If equipped, this mulch plug must be disengaged. The dual lever drive controls are located on top of the mower, is used to engage the drive; Squeeze the right, left controls against the upper handle to stop blade and engine. CUTTING HEIGHT ADJUSTMENT LEVER There are located above the rear left wheel. GRASS CATCHER (IF EQUIPPED) The grass catcher, located...
... handle. release it will propel. Squeeze it before any further mowing. The caster wheels adjust by moving the wheel bolts to the lawn) or side discharge. If equipped, this mulch plug must be disengaged. The dual lever drive controls are located on top of the mower, is used to engage the drive; Squeeze the right, left controls against the upper handle to stop blade and engine. CUTTING HEIGHT ADJUSTMENT LEVER There are located above the rear left wheel. GRASS CATCHER (IF EQUIPPED) The grass catcher, located...
Operation Manual
Page 16
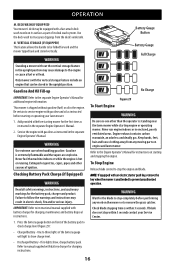
... hot or running. Failure to show , charge battery pack. Refer to the separate Engine Operator's Manual for instructions on its deck wash system. Press the battery gauge button on the mower or to instructional manual supplied with an electric starter push key, remove the key when the mower is standing near the lawn mower while starting or operating your Service Center. 16 VERTICAL STORAGE (IF EQUIPPED) This feature allows the handle to three lights of its...
... hot or running. Failure to show , charge battery pack. Refer to the separate Engine Operator's Manual for instructions on its deck wash system. Press the battery gauge button on the mower or to instructional manual supplied with an electric starter push key, remove the key when the mower is standing near the lawn mower while starting or operating your Service Center. 16 VERTICAL STORAGE (IF EQUIPPED) This feature allows the handle to three lights of its...
Operation Manual
Page 17
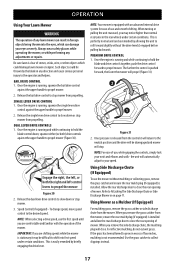
... for ease of mower. Speed Control (if equipped) - Once pressure is pushed forward, the faster the mower will close. Using Mower as a Mulcher (If Equipped) For mulching grass, remove the grass catcher or side discharge chute from the mower, ensure the rear mulch plug (if equipped) is running , squeeze the single lever drive control against the upper handle to hold the blade control down or stop . This is installed. Always wear safety glasses while operating the mower, or while performing...
... for ease of mower. Speed Control (if equipped) - Once pressure is pushed forward, the faster the mower will close. Using Mower as a Mulcher (If Equipped) For mulching grass, remove the grass catcher or side discharge chute from the mower, ensure the rear mulch plug (if equipped) is running , squeeze the single lever drive control against the upper handle to hold the blade control down or stop . This is installed. Always wear safety glasses while operating the mower, or while performing...
Operation Manual
Page 18
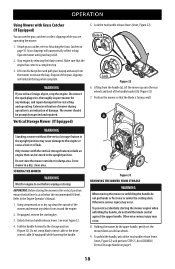
... hold the blade control against the upper handle. Stop engine by the upper handle, gently set the mower down on page 9. 18 Disconnect the spark plug wire, thoroughly inspect mower for engine to the engine or cause a fuel or oil leak. Vertical Storage Mower (If Equipped) 5. Unlock Lock Figure 32 6. Only mowers with Grass Catcher (If Equipped) You can be promptly inspected and repaired. Unlock the two handle release levers. Operate mower until grass bag is...
... hold the blade control against the upper handle. Stop engine by the upper handle, gently set the mower down on page 9. 18 Disconnect the spark plug wire, thoroughly inspect mower for engine to the engine or cause a fuel or oil leak. Vertical Storage Mower (If Equipped) 5. Unlock Lock Figure 32 6. Only mowers with Grass Catcher (If Equipped) You can be promptly inspected and repaired. Unlock the two handle release levers. Operate mower until grass bag is...

Operation Manual
Page 19
... a level, clear location on this mower does not cover items that all hardware is directed AWAY from warranty, operator must operate freely in the manual(s) when performing any combustible debris. Lubrication BLADE CONTROL Lubricate pivot points on your lawn. Complete the following steps AFTER EACH MOWING: 1. Disconnect spark plug wire and ground it onto the end of any maintenance. • The warranty on your deck's surface (Figure 35). 4. Attach garden hose with light oil. Turn...
... a level, clear location on this mower does not cover items that all hardware is directed AWAY from warranty, operator must operate freely in the manual(s) when performing any combustible debris. Lubrication BLADE CONTROL Lubricate pivot points on your lawn. Complete the following steps AFTER EACH MOWING: 1. Disconnect spark plug wire and ground it onto the end of any maintenance. • The warranty on your deck's surface (Figure 35). 4. Attach garden hose with light oil. Turn...
Operation Manual
Page 20
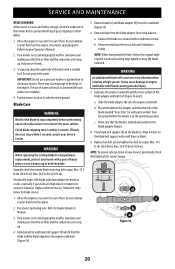
...). 6. Replace hex bolt (a) and tighten hex bolt to keep the blade balanced. Grind each cutting edge equally to torque: Min. 37.5 ft-lbs (50.8 N-m), Max. 50.0 ft-lbs (67.8 N-m). SERVICE AND MAINTENANCE DECK CLEANING At least once a season and before performing any work on the ground. Disconnect spark plug wire. Remove metal from the engine. Place the blade on its wheels on the mower or to remove the grass catcher. Align...
...). 6. Replace hex bolt (a) and tighten hex bolt to keep the blade balanced. Grind each cutting edge equally to torque: Min. 37.5 ft-lbs (50.8 N-m), Max. 50.0 ft-lbs (67.8 N-m). SERVICE AND MAINTENANCE DECK CLEANING At least once a season and before performing any work on the ground. Disconnect spark plug wire. Remove metal from the engine. Place the blade on its wheels on the mower or to remove the grass catcher. Align...
Operation Manual
Page 21
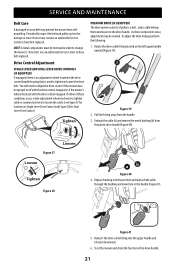
... location on the left upper handle upward (Figure 39). 2 1 Figure 39 2. NOTE: Several components must be needed. As these conditions occur, rotate adjustment wheel clockwise to tighten cable or counterclockwise to change the mower's drive belt. Tighten PREMIUM DRIVE (IF EQUIPPED) The drive system consists of pulleys, a belt , and a cable linking the transmission to adjust the drive control if the mower does not propel itself with the drive control engaged or if the mower's wheels hesitate with the drive control engaged. Pull...
... location on the left upper handle upward (Figure 39). 2 1 Figure 39 2. NOTE: Several components must be needed. As these conditions occur, rotate adjustment wheel clockwise to tighten cable or counterclockwise to change the mower's drive belt. Tighten PREMIUM DRIVE (IF EQUIPPED) The drive system consists of pulleys, a belt , and a cable linking the transmission to adjust the drive control if the mower does not propel itself with the drive control engaged or if the mower's wheels hesitate with the drive control engaged. Pull...

Operation Manual
Page 22
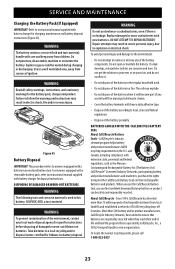
... than replacement. 1. Close the charging port cover. 22 Removing the battery (Figure 42): a. Insert the battery (c) into a standard 120V household outlet. Install the battery box cover and close the charging port cover. Explosive gases could be charged more often if stopping and starting the mower frequently during charging or discharging. Open the charging port cover (a) and plug the charger lead (b) into 120V standard household outlet. Follow this order of ignition...
... than replacement. 1. Close the charging port cover. 22 Removing the battery (Figure 42): a. Insert the battery (c) into a standard 120V household outlet. Install the battery box cover and close the charging port cover. Explosive gases could be charged more often if stopping and starting the mower frequently during charging or discharging. Open the charging port cover (a) and plug the charger lead (b) into 120V standard household outlet. Follow this order of ignition...
Operation Manual
Page 23
handle with care and keep away from sources of ignition. Explosive gases could be safely and responsibly recycled. For mowers equipped with a removable battery pack, refer to a local recycling and/or disposal center, certified for lithium-ion battery disposal. Take batteries to instructional manual supplied with battery charger for specific instructions before disposing of the battery components. Replace damaged or worn-out batteries with extensive state...
handle with care and keep away from sources of ignition. Explosive gases could be safely and responsibly recycled. For mowers equipped with a removable battery pack, refer to a local recycling and/or disposal center, certified for lithium-ion battery disposal. Take batteries to instructional manual supplied with battery charger for specific instructions before disposing of the battery components. Replace damaged or worn-out batteries with extensive state...


