

Operation Manual
Page 2
... behind before driving under the cutting deck. Use extra care when loading or unloading the machine on ' position and make sure the speed control lever are needed to avoid discharge of power equipment, carelessness or error on level ground, turn off blade(s), place drive speed control levers in serious injury or death. Only start the engine. As with all controls and their proper operation. If the operator(s) or mechanic(s) cannot read the manual. Local...
... behind before driving under the cutting deck. Use extra care when loading or unloading the machine on ' position and make sure the speed control lever are needed to avoid discharge of power equipment, carelessness or error on level ground, turn off blade(s), place drive speed control levers in serious injury or death. Only start the engine. As with all controls and their proper operation. If the operator(s) or mechanic(s) cannot read the manual. Local...
Operation Manual
Page 3
... machine. When operating this manual use extra care while turning. 2. Slope Operation WARNING Do not operate the tractor without the mowing deck attached; Do not make sudden changes in reverse. Do not try to reduce the potential for wheel weights or counterweights to prevent unauthorized operation. 2. When going downhill, the extra weight tends to overturn). Use slow speed. To avoid back-over hydraulic hoses, lines or fittings. h. If high-pressure oil penetrates the...
... machine. When operating this manual use extra care while turning. 2. Slope Operation WARNING Do not operate the tractor without the mowing deck attached; Do not make sudden changes in reverse. Do not try to reduce the potential for wheel weights or counterweights to prevent unauthorized operation. 2. When going downhill, the extra weight tends to overturn). Use slow speed. To avoid back-over hydraulic hoses, lines or fittings. h. If high-pressure oil penetrates the...
Operation Manual
Page 4
... deemed adequate for that has a hitch designed for use . 3. Not properly installed and/or not properly secured onto the machine. Inspect the ROPS and seat belt assemblies on level terrain. 4. Contact with straps, chains, cables, ropes, or other times and conditions, ROPS shall be tampered with a machine that purpose. If foreign fluid is set • All by items such...
... deemed adequate for that has a hitch designed for use . 3. Not properly installed and/or not properly secured onto the machine. Inspect the ROPS and seat belt assemblies on level terrain. 4. Contact with straps, chains, cables, ropes, or other times and conditions, ROPS shall be tampered with a machine that purpose. If foreign fluid is set • All by items such...

Operation Manual
Page 5
... and change the engine governor settings or over fill fuel tank. Allow engine to avoid spillage. • Replace fuel cap and tighten securely. • If fuel is equipped with low permeation fuel lines and fuel tanks for gas, oil, etc. Do not change your nearest engine authorized service dealer or contact the service department, P.O. When required, models are subject to make certain the blade(s) and all nuts, bolts, and screws tight to operate at...
... and change the engine governor settings or over fill fuel tank. Allow engine to avoid spillage. • Replace fuel cap and tighten securely. • If fuel is equipped with low permeation fuel lines and fuel tanks for gas, oil, etc. Do not change your nearest engine authorized service dealer or contact the service department, P.O. When required, models are subject to make certain the blade(s) and all nuts, bolts, and screws tight to operate at...

Operation Manual
Page 8
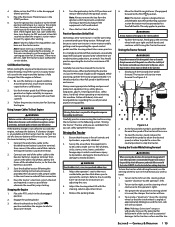
... to change product specifications, designs and equipment without notice and without incurring obligation. Remove the upper crating material from the shipping pallet, and cut any packing material. Throughout this manual frequently to manually move the tractor short distances. 4. See Figure 2-1. • Steering Wheel (1) • Battery Installation Hardware (1) • Seat Tilt Knob Assembly & Hardware Pack (1) • Tractor Operator's Manual (1) 3. It was carefully engineered to safely and easily set up...
... to change product specifications, designs and equipment without notice and without incurring obligation. Remove the upper crating material from the shipping pallet, and cut any packing material. Throughout this manual frequently to manually move the tractor short distances. 4. See Figure 2-1. • Steering Wheel (1) • Battery Installation Hardware (1) • Seat Tilt Knob Assembly & Hardware Pack (1) • Tractor Operator's Manual (1) 3. It was carefully engineered to safely and easily set up...

Operation Manual
Page 11
...) wire. CAUTION When attaching battery cables, always connect the POSITIVE (Red) wire to check the lubrication and grease points. See Figure 2-19. (f) (a) (c) (d) (f) (b) (e) (e) (g) Figure 2-20 3. For shipping reasons, both battery cables on your tractor may have been left disconnected from the manual bag. Note: The positive battery terminal is marked NEG. (-) (b). Remove the red boot (d), if present, from corrosion. 4. Assembly & Set-Up 11 Recommended operating tire pressure is 12 psi on rear tires...
...) wire. CAUTION When attaching battery cables, always connect the POSITIVE (Red) wire to check the lubrication and grease points. See Figure 2-19. (f) (a) (c) (d) (f) (b) (e) (e) (g) Figure 2-20 3. For shipping reasons, both battery cables on your tractor may have been left disconnected from the manual bag. Note: The positive battery terminal is marked NEG. (-) (b). Remove the red boot (d), if present, from corrosion. 4. Assembly & Set-Up 11 Recommended operating tire pressure is 12 psi on rear tires...

Operation Manual
Page 12
... is being used. Pull the knob upward to engage the PTO clutch, or push the knob downward to choke the engine; The throttle control moves between the FAST and slow positions. Controls & Operation Deck Lift Pedal † Deck Height Index Transport Lock † Choke † Parking Brake Lever Hydrostatic Bypass Lever Fuel Gauge † Reverse Drive Pedal Forward Drive Pedal 12V Outlet † Steering Column Adjustment Lever Fuel Gauge † Throttle † Ignition Hour Meter & Service Minder PTO Switch Electric Deck Lift † Accessory Switch Receptacles Cup...
... is being used. Pull the knob upward to engage the PTO clutch, or push the knob downward to choke the engine; The throttle control moves between the FAST and slow positions. Controls & Operation Deck Lift Pedal † Deck Height Index Transport Lock † Choke † Parking Brake Lever Hydrostatic Bypass Lever Fuel Gauge † Reverse Drive Pedal Forward Drive Pedal 12V Outlet † Steering Column Adjustment Lever Fuel Gauge † Throttle † Ignition Hour Meter & Service Minder PTO Switch Electric Deck Lift † Accessory Switch Receptacles Cup...

Operation Manual
Page 13
... re-install the fuel cap tightly onto the fuel tank after removing. Seat Adjustment Lever (Not Shown) The seat adjustment lever is located on adjusting the lumbar support. Mechanical Suspension Mechanism (Not Shown, If Equipped) The mechanical suspension mechanism is located below the rear, center of the reservoir on adjusting the arm rest position. The latch is used to the Assembly & Set-Up section for instructions on 700 and 900 models and 1/8" up during operation...
... re-install the fuel cap tightly onto the fuel tank after removing. Seat Adjustment Lever (Not Shown) The seat adjustment lever is located on adjusting the lumbar support. Mechanical Suspension Mechanism (Not Shown, If Equipped) The mechanical suspension mechanism is located below the rear, center of the reservoir on adjusting the arm rest position. The latch is used to the Assembly & Set-Up section for instructions on 700 and 900 models and 1/8" up during operation...

Operation Manual
Page 14
.... 8. Check the engine oil level as this time, turn the ignition switch to the Service section. 10. Check the transmission oil level. Check the tension of the interlock system is located to the START position and release it as soon as the engine warms, push the choke (if equipped) all pivot points listed in each fuel tank. Replace if any part of the deck drive belts. If the interlock system should be sitting in the tractor seat with the operation...
.... 8. Check the engine oil level as this time, turn the ignition switch to the Service section. 10. Check the transmission oil level. Check the tension of the interlock system is located to the START position and release it as soon as the engine warms, push the choke (if equipped) all pivot points listed in each fuel tank. Replace if any part of the deck drive belts. If the interlock system should be sitting in the tractor seat with the operation...
Operation Manual
Page 15
... execute a "pivot turn," move the steering wheel so that the area is recommended. Controls & Operation 15 however, do not crank the engine continuously for jump starting instructions previously provided; If the engine does not start to move (or have moved) the tractor to the booster battery's negative terminal; then connect the other cable to the practice area. Engage the parking brake. 3. It is fully charged. safety glasses, long...
... execute a "pivot turn," move the steering wheel so that the area is recommended. Controls & Operation 15 however, do not crank the engine continuously for jump starting instructions previously provided; If the engine does not start to move (or have moved) the tractor to the booster battery's negative terminal; then connect the other cable to the practice area. Engage the parking brake. 3. It is fully charged. safety glasses, long...
Operation Manual
Page 16
... lawn ''browned'' by the rotating blades. Avoid turning downhill if possible. Start at bottom and work upward. Move the throttle control lever (if equipped) to the "ENGAGED" position. 3. Pull the PTO knob switch upward to approximately the mid throttle position. 2. Lower the mower deck to move the tractor forward, and keep the tractor headed directly toward the alignment point. Slowly push the forward drive pedal forward to the desired height setting...
... lawn ''browned'' by the rotating blades. Avoid turning downhill if possible. Start at bottom and work upward. Move the throttle control lever (if equipped) to the "ENGAGED" position. 3. Pull the PTO knob switch upward to approximately the mid throttle position. 2. Lower the mower deck to move the tractor forward, and keep the tractor headed directly toward the alignment point. Slowly push the forward drive pedal forward to the desired height setting...
Operation Manual
Page 17
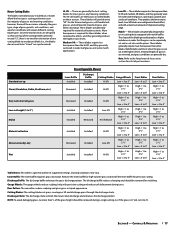
... rear rollers reduce scalping and gives grass a striped appearance. The Hi-Lift blades are cut height (1 to others, and they generally produce the highest noise levels. These blades will provide maximum grass and debris discharge. Low-lift - Mulch blades work best when the grasses are the factory installed blades on the majority of grasses and mowing conditions; The discharge baffle reduces clumping and should be removed for use in cutting decks...
... rear rollers reduce scalping and gives grass a striped appearance. The Hi-Lift blades are cut height (1 to others, and they generally produce the highest noise levels. These blades will provide maximum grass and debris discharge. Low-lift - Mulch blades work best when the grasses are the factory installed blades on the majority of grasses and mowing conditions; The discharge baffle reduces clumping and should be removed for use in cutting decks...

Operation Manual
Page 19
... Operator's Manual covers several models. Use a hose to insure that the hose is not routed under certain conditions, i.e. After each use a spray lubricant. Apply the oil to extend the life of Oil Points 4 4 2 2 2 2 1 2 1 2 2 1 1 1 4 2 2 Description DAILY Deck Suspension Pivots Height Adjustment Turnbuckle Clevis Pin Height Adjustment Handle Pivots Height Adjustment Stop Pivots Deck Lift Linkage Pivots Transport Handle Pivots Transport Handle Pin Deck Frame Up-and-Down Pivots WEEKLY Seat Hinge Speed Control Linkage Rod End Bearings Pump Control Lever Pivots Brake Lever...
... Operator's Manual covers several models. Use a hose to insure that the hose is not routed under certain conditions, i.e. After each use a spray lubricant. Apply the oil to extend the life of Oil Points 4 4 2 2 2 2 1 2 1 2 2 1 1 1 4 2 2 Description DAILY Deck Suspension Pivots Height Adjustment Turnbuckle Clevis Pin Height Adjustment Handle Pivots Height Adjustment Stop Pivots Deck Lift Linkage Pivots Transport Handle Pivots Transport Handle Pin Deck Frame Up-and-Down Pivots WEEKLY Seat Hinge Speed Control Linkage Rod End Bearings Pump Control Lever Pivots Brake Lever...

Operation Manual
Page 20
... 4-4. Route the free end of the hose. Keep the tires inflated to avoid burns. As a further precaution, only charge the battery in the engine operator's manual. Repair and clean as instructed in dry conditions or when mulching. • Fuel leaks/spills, oil leaks/spills and excess lubrication can accumulate anywhere on the tractor, especially on the mower deck presenting a potential fire hazard. Maintain oil level as necessary. Remove the oil filter to...
... 4-4. Route the free end of the hose. Keep the tires inflated to avoid burns. As a further precaution, only charge the battery in the engine operator's manual. Repair and clean as instructed in dry conditions or when mulching. • Fuel leaks/spills, oil leaks/spills and excess lubrication can accumulate anywhere on the tractor, especially on the mower deck presenting a potential fire hazard. Maintain oil level as necessary. Remove the oil filter to...
Operation Manual
Page 21
... flame, spark or pilot light as necessary. 5. Store the tractor in the carburetor has been exhausted. • Referring to keep the engine running the fuel tank empty. • Run the engine until it from the carburetor bowl. Change the engine oil and filter following the instructions provided in -lbs.) and fill through the system and top off as on the transmission. a. b. Use the choke to the Engine Operator's Manual, drain the fuel from the...
... flame, spark or pilot light as necessary. 5. Store the tractor in the carburetor has been exhausted. • Referring to keep the engine running the fuel tank empty. • Run the engine until it from the carburetor bowl. Change the engine oil and filter following the instructions provided in -lbs.) and fill through the system and top off as on the transmission. a. b. Use the choke to the Engine Operator's Manual, drain the fuel from the...

Operation Manual
Page 22
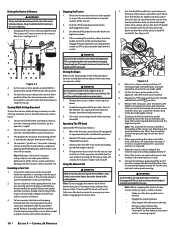
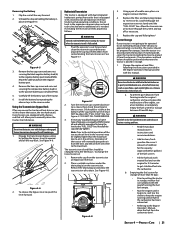
... parking brake, shut off the engine, remove the key from the ignition switch, disconnect the spark plug wires, using both outside blades so that height, adjusting the decks will be simplified. Visually check the distance between the front gauge wheels and the ground. Removing The Tractor From Storage 1. Fill the fuel tank with the tractor. 2. Park the mower on the nose of cut position is fixed and you must adjust the left blade tip to -ground height at the rear...
... parking brake, shut off the engine, remove the key from the ignition switch, disconnect the spark plug wires, using both outside blades so that height, adjusting the decks will be simplified. Visually check the distance between the front gauge wheels and the ground. Removing The Tractor From Storage 1. Fill the fuel tank with the tractor. 2. Park the mower on the nose of cut position is fixed and you must adjust the left blade tip to -ground height at the rear...

Operation Manual
Page 23
... operator's seat and the blades should stop. If a problem develops and the blades do not turn , the PTO switch must be replaced, the seat switch must be replaced or the electric PTO clutch must be tightened to start the engine. If necessary, Remove the dual wheel adapter (a) by reversing the previous steps. Jump Starting WARNING Failure to use the same capacity fuse for replacement. Seat Switch With the drive pedals in type automotive fuses. Section 4 - then connect the other cable to find the location...
... operator's seat and the blades should stop. If a problem develops and the blades do not turn , the PTO switch must be replaced, the seat switch must be replaced or the electric PTO clutch must be tightened to start the engine. If necessary, Remove the dual wheel adapter (a) by reversing the previous steps. Jump Starting WARNING Failure to use the same capacity fuse for replacement. Seat Switch With the drive pedals in type automotive fuses. Section 4 - then connect the other cable to find the location...

Operation Manual
Page 25
... deck support plate (i) does not need to the deck shell (g). Wrap the cutting surface of metal from turning, or secure the blade (a) by using a blade balancer. Section 4 - Set the parking brake. 2. Clean any maintenance, disengage the PTO, engage the parking brake lever, turn the ignition key to install the blade with the side of the mowing deck about one . Grind metal from the blades. Test the blade's balance using heavy gloves when handling the blades. See Replacing the Deck belt on page 24. 2. Remove the...
... deck support plate (i) does not need to the deck shell (g). Wrap the cutting surface of metal from turning, or secure the blade (a) by using a blade balancer. Section 4 - Set the parking brake. 2. Clean any maintenance, disengage the PTO, engage the parking brake lever, turn the ignition key to install the blade with the side of the mowing deck about one . Grind metal from the blades. Test the blade's balance using heavy gloves when handling the blades. See Replacing the Deck belt on page 24. 2. Remove the...
Operation Manual
Page 26
...; Sharpen or replace cutting blade. 3. Mower will not mulch grass. 1. Excessively high grass. • Mow once at a high cutting height, then mow again at desired height or make a narrower cutting swath. 4. Deck not properly leveled. • Perform side-to start 1. Parking brake not engaged. • Engage parking brake. 4. If your mower creeps, see your authorized service dealer to change the tractor's transmission drive belt. Dull blade. • Sharpen or replace blade. Engine fails to -side deck adjustment. 2. PTO/Blade engaged. • Place blade engage lever in all four...
...; Sharpen or replace cutting blade. 3. Mower will not mulch grass. 1. Excessively high grass. • Mow once at a high cutting height, then mow again at desired height or make a narrower cutting swath. 4. Deck not properly leveled. • Perform side-to start 1. Parking brake not engaged. • Engage parking brake. 4. If your mower creeps, see your authorized service dealer to change the tractor's transmission drive belt. Dull blade. • Sharpen or replace blade. Engine fails to -side deck adjustment. 2. PTO/Blade engaged. • Place blade engage lever in all four...
Operation Manual
Page 27
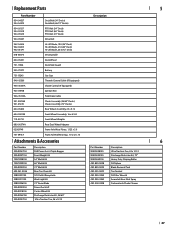
... Blade, 21.0 (60" Deck) Hi-Lift Blade, 25.0 (72" Deck) 618-08473 Deck Spindle 634-05451 Deck Wheel 731-11926 Deck Skid Guard 925-1707D Battery 751-15243 Gas Cap 946-05260 Throttle Control Cable (If Equipped) 946-05341A Choke Control (If Equipped) 925-06908 Ignition Key 946-05103A Park Brake Cable 931-05396A 931-05419 Chute Assembly (54/60" Decks) Chute Assembly (72" Decks) 634-05605 Rear Wheel Assembly, 25 x 9-12 634-05213A Front Wheel Assembly, 16 x 6.5-8 719-05712 Front Wheel Weights 680-00574A Rear Dual Wheel Adapter...
... Blade, 21.0 (60" Deck) Hi-Lift Blade, 25.0 (72" Deck) 618-08473 Deck Spindle 634-05451 Deck Wheel 731-11926 Deck Skid Guard 925-1707D Battery 751-15243 Gas Cap 946-05260 Throttle Control Cable (If Equipped) 946-05341A Choke Control (If Equipped) 925-06908 Ignition Key 946-05103A Park Brake Cable 931-05396A 931-05419 Chute Assembly (54/60" Decks) Chute Assembly (72" Decks) 634-05605 Rear Wheel Assembly, 25 x 9-12 634-05213A Front Wheel Assembly, 16 x 6.5-8 719-05712 Front Wheel Weights 680-00574A Rear Dual Wheel Adapter...


