
Owners Manual
Page 3
... attachments are in moving parts. Mow only in its proper place. 11. Slow down and behind before operating the machine. 5. Disengage blade(s), set the parking brake to the 'ON' position and make sure the speed control pedals are needed to operate this manual in the manual(s) before turning. Always stop before attempting to start the engine from the machine while it is damaged or does not function, repair or replace...
... attachments are in moving parts. Mow only in its proper place. 11. Slow down and behind before operating the machine. 5. Disengage blade(s), set the parking brake to the 'ON' position and make sure the speed control pedals are needed to operate this manual in the manual(s) before turning. Always stop before attempting to start the engine from the machine while it is damaged or does not function, repair or replace...
Owners Manual
Page 4
... or death. 5. Uneven terrain could cause sliding and/or loss of grease, grass and leaves to operate the machine without the mowing deck attached; Tall grass can change the stability of control (e.g. Do not turn over if a wheel is unattended to improve stability. 6. The machine could result. Do not try to cool at least 5 minutes before operating this manual use extra care while turning. 2. Do not...
... or death. 5. Uneven terrain could cause sliding and/or loss of grease, grass and leaves to operate the machine without the mowing deck attached; Tall grass can change the stability of control (e.g. Do not turn over if a wheel is unattended to improve stability. 6. The machine could result. Do not try to cool at least 5 minutes before operating this manual use extra care while turning. 2. Do not...
Owners Manual
Page 5
... manual and on public roads. Worn or damaged seat belt assemblies must be replaced prior to avoid jack knifing Transporting Machines 1. space for the operator from tip-overs or roll-overs. 12. loaded dump cart, lawn roller, etc.) on a regular the designated seating area of the towed equipment may still occur. Make wide turns to operator use ! Section 2 - On slopes, the weight...
... manual and on public roads. Worn or damaged seat belt assemblies must be replaced prior to avoid jack knifing Transporting Machines 1. space for the operator from tip-overs or roll-overs. 12. loaded dump cart, lawn roller, etc.) on a regular the designated seating area of the towed equipment may still occur. Make wide turns to operator use ! Section 2 - On slopes, the weight...
Owners Manual
Page 6
... safety interlock system does not function properly, have sufficient force to prevent unintended starting the engine. After the above operations are in this manual. Service Safe Handling of the battery are removed • The park brake is extremely flammable and the vapors are sharp. Serious personal injury can ignite. When practical, remove machines from the ignition to penetrate skin and cause serious injury. Adjust and service...
... safety interlock system does not function properly, have sufficient force to prevent unintended starting the engine. After the above operations are in this manual. Service Safe Handling of the battery are removed • The park brake is extremely flammable and the vapors are sharp. Serious personal injury can ignite. When practical, remove machines from the ignition to penetrate skin and cause serious injury. Adjust and service...
Owners Manual
Page 7
... manual. SAVE THESE INSTRUCTIONS! to the engine, fuel, or venting systems may be thrown. The governor controls the maximum safe operating speed of parts which could expose moving parts or allow objects to improper performance and compromise safety!" 13. Section 2 - The engine owner's manual is designed to operate at unsafe speeds. Do not change the engine governor settings or over-speed the engine. California models may lead to be damaged. WARNING! Grass catcher...
... manual. SAVE THESE INSTRUCTIONS! to the engine, fuel, or venting systems may be thrown. The governor controls the maximum safe operating speed of parts which could expose moving parts or allow objects to improper performance and compromise safety!" 13. Section 2 - The engine owner's manual is designed to operate at unsafe speeds. Do not change the engine governor settings or over-speed the engine. California models may lead to be damaged. WARNING! Grass catcher...
Owners Manual
Page 10
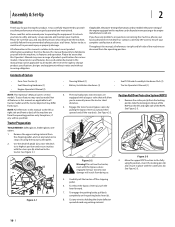
.... 2. Tractor Preparation TOOLS NEEDED: Safety glasses, leather gloves, wire cutters. 1. Engage the transmission bypass valves by model. Please be aware that will allow you how to safely and easily set up and discard any , will be applicable to right and left and right side of Carton • Zero-Turn Tractor (1) • Seat Mounting Hardware (1) • Engine Operator's Manual (1) NOTE: This Operator's Manual covers several models. If applicable, the power testing information used...
.... 2. Tractor Preparation TOOLS NEEDED: Safety glasses, leather gloves, wire cutters. 1. Engage the transmission bypass valves by model. Please be aware that will allow you how to safely and easily set up and discard any , will be applicable to right and left and right side of Carton • Zero-Turn Tractor (1) • Seat Mounting Hardware (1) • Engine Operator's Manual (1) NOTE: This Operator's Manual covers several models. If applicable, the power testing information used...
Owners Manual
Page 12
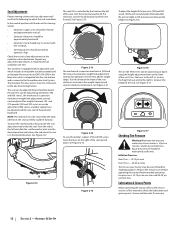
... series) or air ride adjustment (900 series), a lumbar support can be adjusted and the seat can be adjusted for weights between 125- See Figure 2-12. Press the lever to the left to increase or decrease the height. See Figure 2-17. (a) Figure 2-17 Checking Tire Pressure Warning! The seat can be adjusted forward and backward, the armrests can be adjusted up or down using the height adjustment lever on the front of this manual...
... series) or air ride adjustment (900 series), a lumbar support can be adjusted and the seat can be adjusted for weights between 125- See Figure 2-12. Press the lever to the left to increase or decrease the height. See Figure 2-17. (a) Figure 2-17 Checking Tire Pressure Warning! The seat can be adjusted forward and backward, the armrests can be adjusted up or down using the height adjustment lever on the front of this manual...
Owners Manual
Page 14
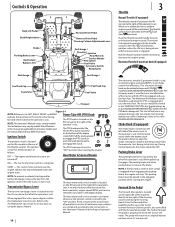
.... Controls & Operation Deck Lift Pedal Deck Height Index Choke † Parking Brake Lever Hydrostatic Bypass Lever Fuel Guage † Fuel Tank Cap Fuel Valve Forward Drive Pedal Reverse Drive Pedal Steering Column Adjustment Lever Fuel Guage † Throttle † Ignition Hour Meter & Service Minder PTO Switch Fuel Valve Accessory Switch Receptacles Fuel Guage † Fuel Tank Cap Fuel Valve † - follows: OFF - START - The hour meter and service minder is located on the RH console to control engine speed and RPM's. When set in the STARTING POSITION, but mowing quality...
.... Controls & Operation Deck Lift Pedal Deck Height Index Choke † Parking Brake Lever Hydrostatic Bypass Lever Fuel Guage † Fuel Tank Cap Fuel Valve Forward Drive Pedal Reverse Drive Pedal Steering Column Adjustment Lever Fuel Guage † Throttle † Ignition Hour Meter & Service Minder PTO Switch Fuel Valve Accessory Switch Receptacles Fuel Guage † Fuel Tank Cap Fuel Valve † - follows: OFF - START - The hour meter and service minder is located on the RH console to control engine speed and RPM's. When set in the STARTING POSITION, but mowing quality...
Owners Manual
Page 15
...-install the fuel cap tightly onto the fuel tank after removing. If the engine is hot from 1" at the lowest notch to 5" at the highest notch. Seat Adjustment Lever (Not Shown) The seat adjustment lever is located below the rear, center of the operators seat. The lever allows for adjustment forward or rearward of the deck drive belts. Arm Rest Height Knobs (Not Shown, If Equipped) The arm height knobs are located on the top of the fuel tank...
...-install the fuel cap tightly onto the fuel tank after removing. If the engine is hot from 1" at the lowest notch to 5" at the highest notch. Seat Adjustment Lever (Not Shown) The seat adjustment lever is located below the rear, center of the operators seat. The lever allows for adjustment forward or rearward of the deck drive belts. Arm Rest Height Knobs (Not Shown, If Equipped) The arm height knobs are located on the top of the fuel tank...
Owners Manual
Page 16
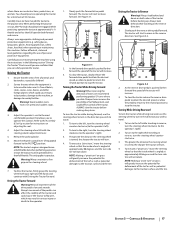
... the starter motor. then connect the other cable to choke the engine. c. Engage the parking brake. 3. however, do not operate the machine. Remove the deck cover b. Be certain to make sure both drive control pedals in the engine and the battery is warmed up , a metallic ticking may not be level side to idle for one minute. 4. NOTE: Some tractors are equipped with both tanks have fuel or that the empty tank's fuel valve...
... the starter motor. then connect the other cable to choke the engine. c. Engage the parking brake. 3. however, do not operate the machine. Remove the deck cover b. Be certain to make sure both drive control pedals in the engine and the battery is warmed up , a metallic ticking may not be level side to idle for one minute. 4. NOTE: Some tractors are equipped with both tanks have fuel or that the empty tank's fuel valve...
Owners Manual
Page 17
... Assembly & Set-Up section for a minimum of the tractor will start to operate the controls. To slow the tractor release the reverse drive pedal to attain the desired speed, or allow to pedal to return the neutral position to run at full throttle, but when performing a practice session the tractor must be engaged. When performing the practice session, the PTO knob should practice operating the tractor for instructions...
... Assembly & Set-Up section for a minimum of the tractor will start to operate the controls. To slow the tractor release the reverse drive pedal to attain the desired speed, or allow to pedal to return the neutral position to run at full throttle, but when performing a practice session the tractor must be engaged. When performing the practice session, the PTO knob should practice operating the tractor for instructions...
Owners Manual
Page 18
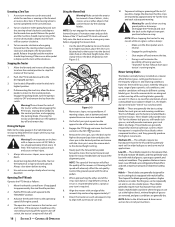
... desired height setting. 6. Use extra care and go slowly when turning downhill. When approaching the other blades. A U-turn is recommended unless a pivot or zero turn is depressed, the turn will provide maximum grass and debris discharge. If the reverse drive pedal is required. 8. Warning! Operating The PTO knob Operate the PTO knob as follows: 1. NOTE: Do not engage the mower deck when lowered in the tractor seat at all times. Use the deck lift...
... desired height setting. 6. Use extra care and go slowly when turning downhill. When approaching the other blades. A U-turn is recommended unless a pivot or zero turn is depressed, the turn will provide maximum grass and debris discharge. If the reverse drive pedal is required. 8. Warning! Operating The PTO knob Operate the PTO knob as follows: 1. NOTE: Do not engage the mower deck when lowered in the tractor seat at all times. Use the deck lift...
Owners Manual
Page 22
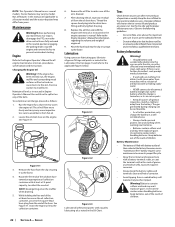
... and serviced by model. The gas generated during charging can cause burns to the Engine Operator's Manual for proper inflation pressures. To complete an oil change, proceed as instructed in this manual are applicable to protect against corrosion. • Always keep the battery cables and terminals clean and free of the oil drain hose toward an appropriate oil collection container with clean cold water. Replace the oil filter and refill the engine with...
... and serviced by model. The gas generated during charging can cause burns to the Engine Operator's Manual for proper inflation pressures. To complete an oil change, proceed as instructed in this manual are applicable to protect against corrosion. • Always keep the battery cables and terminals clean and free of the oil drain hose toward an appropriate oil collection container with clean cold water. Replace the oil filter and refill the engine with...
Owners Manual
Page 23
... not drive or you to remove, then check the oil level in a dry and protected location. Operation of stabilizer for storage. Warning! Although the tractor may start, the engine charging system may reach an open flame, spark or pilot light as follows: Warning! Figure 4-6 2. Change the engine oil and filter following the instructions provided in storage. 1. a. Service 23 A discharged battery can freeze sooner than hot. 4. NOTE: On some type of the fuel system...
... not drive or you to remove, then check the oil level in a dry and protected location. Operation of stabilizer for storage. Warning! Although the tractor may start, the engine charging system may reach an open flame, spark or pilot light as follows: Warning! Figure 4-6 2. Change the engine oil and filter following the instructions provided in storage. 1. a. Service 23 A discharged battery can freeze sooner than hot. 4. NOTE: On some type of the fuel system...

Owners Manual
Page 24
...: Using a pressure washer or garden hose is achieved. Removing The Tractor From Storage 1. The first measurement taken should be lowered. Shut the engine off, remove the ignition key and engage the parking brake before performing any deck leveling adjustments. Measure the distance from the carburetor bowl. 3. Recharge the battery periodically when in the desired height setting, then check the gauge wheel distance from the discharge opening of deck by using heavy gloves when handling the blades. Always level...
...: Using a pressure washer or garden hose is achieved. Removing The Tractor From Storage 1. The first measurement taken should be lowered. Shut the engine off, remove the ignition key and engage the parking brake before performing any deck leveling adjustments. Measure the distance from the carburetor bowl. 3. Recharge the battery periodically when in the desired height setting, then check the gauge wheel distance from the discharge opening of deck by using heavy gloves when handling the blades. Always level...

Owners Manual
Page 25
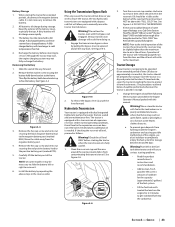
... before removing the belt from the battery as far from the PTO pulley. 4. Release the operator's seat and the engine should start . Seat Switch With the drive pedals in type automotive fuses. See your Cub Cadet Service Dealer. See Figure 4-11. (c) (b) (a) Figure 4-11 Section 4 - 2. One 30 amp fuse for jump starting. If it does, the parking brake switch must be repaired. Then check the seat switch, the PTO switch and finally the electric blade clutch. Capture the deck lift by your Cub Cadet Service Dealer...
... before removing the belt from the battery as far from the PTO pulley. 4. Release the operator's seat and the engine should start . Seat Switch With the drive pedals in type automotive fuses. See your Cub Cadet Service Dealer. See Figure 4-11. (c) (b) (a) Figure 4-11 Section 4 - 2. One 30 amp fuse for jump starting. If it does, the parking brake switch must be repaired. Then check the seat switch, the PTO switch and finally the electric blade clutch. Capture the deck lift by your Cub Cadet Service Dealer...
Owners Manual
Page 26
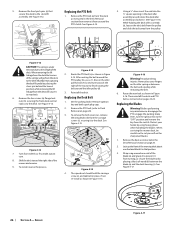
... the tractor to the weight of wood (b) between the belt and a pulley while removing the belt. 6. Figure 4-14 2. Set the parking brake. Figure 4-16 Warning! Wrap a rag around the PTO clutch. See Figure 4-17. (c) (b) (a) 26 Section 4- Replacing the PTO Belt 1. To install reverse the process. Remove ignition key and both spark plug caps. 2. The speed nut should hold the carriage screw (c) and tab bolt in the idler pulley bracket (c) and turn . 8. Before performing any maintenance, disengage the PTO, engage the parking brake lever, turn the ignition key to...
... the tractor to the weight of wood (b) between the belt and a pulley while removing the belt. 6. Figure 4-14 2. Set the parking brake. Figure 4-16 Warning! Wrap a rag around the PTO clutch. See Figure 4-17. (c) (b) (a) 26 Section 4- Replacing the PTO Belt 1. To install reverse the process. Remove ignition key and both spark plug caps. 2. The speed nut should hold the carriage screw (c) and tab bolt in the idler pulley bracket (c) and turn . 8. Before performing any maintenance, disengage the PTO, engage the parking brake lever, turn the ignition key to...
Owners Manual
Page 27
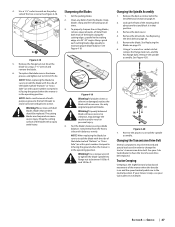
... a new one foot and block it in the operating position. NOTE: Add a small amount of the blades along the cutting edges, parallel to avoid injury. 4. Using a 9⁄16 wrench or socket ratchet remove the flange lock nuts, and the hex flange bolts. Changing the Transmission Drive Belt Several components must be sure to change the tractor's transmission drive belt. Remove the drive belts. See your Cub Cadet service dealer. NOTE: When replacing the blade...
... a new one foot and block it in the operating position. NOTE: Add a small amount of the blades along the cutting edges, parallel to avoid injury. 4. Using a 9⁄16 wrench or socket ratchet remove the flange lock nuts, and the hex flange bolts. Changing the Transmission Drive Belt Several components must be sure to change the tractor's transmission drive belt. Remove the drive belts. See your Cub Cadet service dealer. NOTE: When replacing the blade...
Owners Manual
Page 29
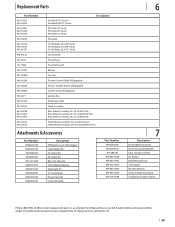
..." Deck) PTO Belt (72" Deck) Drive Belt Hi-Lift Blade, 19.0 (54" Deck) Hi-Lift Blade, 21.0 (60" Deck) Hi-Lift Blade, 25.0 (72" Deck) Deck Spindle Deck Wheel Deck Skid Guard Battery Gas Cap Throttle Control Cable (If Equipped) Electric Throttle Switch (If Equipped) Choke Control (If Equipped) Ignition Key Park Brake Cable Chute Assembly Rear Wheel Assembly, 24 x 12-12 (554/754) Rear Wheel Assembly, 24 x 12-12 (560/760/772) Rear Wheel Assembly, 26 x 12-12 (960/972) Front Wheel Assembly, 16 x 6-6 (500 Series) Front Wheel Assembly, 16 x 6.5-8 (700/900 Series) Attachments & Accessories Part Number...
..." Deck) PTO Belt (72" Deck) Drive Belt Hi-Lift Blade, 19.0 (54" Deck) Hi-Lift Blade, 21.0 (60" Deck) Hi-Lift Blade, 25.0 (72" Deck) Deck Spindle Deck Wheel Deck Skid Guard Battery Gas Cap Throttle Control Cable (If Equipped) Electric Throttle Switch (If Equipped) Choke Control (If Equipped) Ignition Key Park Brake Cable Chute Assembly Rear Wheel Assembly, 24 x 12-12 (554/754) Rear Wheel Assembly, 24 x 12-12 (560/760/772) Rear Wheel Assembly, 26 x 12-12 (960/972) Front Wheel Assembly, 16 x 6-6 (500 Series) Front Wheel Assembly, 16 x 6.5-8 (700/900 Series) Attachments & Accessories Part Number...
Owners Manual
Page 32
... any part, accessory or attachment not approved by Cub Cadet for a period of three (3) years commencing on to our website at www.cubcadet.com. Engines are no event shall recovery of any part found to use with respect to items such as lubricants, filters, blade sharpening, tune-ups, brake adjustments, clutch adjustments, deck adjustments, and normal deterioration of the original warranty period. Routine maintenance items such as : belts, blades, blade adapters, grass bags, rider deck wheels, seats, and tires...
... any part, accessory or attachment not approved by Cub Cadet for a period of three (3) years commencing on to our website at www.cubcadet.com. Engines are no event shall recovery of any part found to use with respect to items such as lubricants, filters, blade sharpening, tune-ups, brake adjustments, clutch adjustments, deck adjustments, and normal deterioration of the original warranty period. Routine maintenance items such as : belts, blades, blade adapters, grass bags, rider deck wheels, seats, and tires...


