
Owners Manual
Page 3
... drives, walks, or roads and while not cutting grass. 14. Watch for ordering replacement parts. 2. Be aware of travel to operate this manual in operation. Use extra care when loading or unloading the machine on the mower deck presenting a potential fire hazard. 27. Important Safe Operation Practices 3 Do not operate the machine while under the age of material toward the operator. 9. Disengage blade(s), set parking brake, stop the machine and disengage...
... drives, walks, or roads and while not cutting grass. 14. Watch for ordering replacement parts. 2. Be aware of travel to operate this manual in operation. Use extra care when loading or unloading the machine on the mower deck presenting a potential fire hazard. 27. Important Safe Operation Practices 3 Do not operate the machine while under the age of material toward the operator. 9. Disengage blade(s), set parking brake, stop the machine and disengage...
Owners Manual
Page 4
... hoses, lines or fittings while the system is unattended to loss of a child who may run your hands, use extra care while turning. 2. Remove key when machine is under pressure. Slope Operation Slopes are involved in reverse. 28. Do not operate machines that have been damaged or have to operate the machine without the mowing deck attached; When operating this machine by putting your vision of control...
... hoses, lines or fittings while the system is unattended to loss of a child who may run your hands, use extra care while turning. 2. Remove key when machine is under pressure. Slope Operation Slopes are involved in reverse. 28. Do not operate machines that have been damaged or have to operate the machine without the mowing deck attached; When operating this machine by putting your vision of control...
Owners Manual
Page 5
... wide turns to the seat or the frame of the machine when non-suspension (standard) seats are integral parts of the machine in a tip-over . Machines operated on a regular the designated seating area of this manual and on level terrain. 6. 4. This machine is added to a seat, the seat belt must be attached to use . Seat belt assembly with authorized replacement parts. Folding ROPS shall be used components that has a hitch...
... wide turns to the seat or the frame of the machine when non-suspension (standard) seats are integral parts of the machine in a tip-over . Machines operated on a regular the designated seating area of this manual and on level terrain. 6. 4. This machine is added to a seat, the seat belt must be attached to use . Seat belt assembly with authorized replacement parts. Folding ROPS shall be used components that has a hitch...
Owners Manual
Page 6
... the ignition to wear during normal operation. Disconnect the spark plug wires and remove the key from your machine should be serviced. 4. Regularly check the safety interlock system for proper tightness. Hydraulic Devices and Systems Hydraulic fluid escaping under high pressure. Wash your skin and change your clothes which do not stop within approximately (7) seven seconds after operating the blade disengagement control. When practical, remove machines from a fuel dispenser...
... the ignition to wear during normal operation. Disconnect the spark plug wires and remove the key from your machine should be serviced. 4. Regularly check the safety interlock system for proper tightness. Hydraulic Devices and Systems Hydraulic fluid escaping under high pressure. Wash your skin and change your clothes which do not stop within approximately (7) seven seconds after operating the blade disengagement control. When practical, remove machines from a fuel dispenser...
Owners Manual
Page 7
... for gas, oil, etc. Important Safe Operation Practices 7 The governor controls the maximum safe operating speed of engine governor. California models may be thrown. WARNING! Observe proper disposal laws and regulations for your model. The engine owner's manual is equipped with factory setting of the engine. 14. Your Responsibility-Restrict the use gasoline containing methanol or gasoline containing more than 10% ethanol (i.e., E15 or E85 fuels...
... for gas, oil, etc. Important Safe Operation Practices 7 The governor controls the maximum safe operating speed of engine governor. California models may be thrown. WARNING! Observe proper disposal laws and regulations for your model. The engine owner's manual is equipped with factory setting of the engine. 14. Your Responsibility-Restrict the use gasoline containing methanol or gasoline containing more than 10% ethanol (i.e., E15 or E85 fuels...
Owners Manual
Page 10
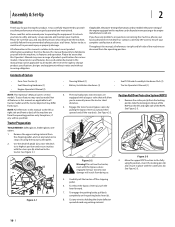
.... 4. Remove the upper crating material from the operating position only. See Figure 2-1. (b) (a) • Steering Wheel (1) • Battery Installation Hardware (1) • Seat Tilt Knob Assembly & Hardware Pack (1) • Tractor Operator's Manual (1) 3. Failure to change product specifications, designs and equipment without notice and without incurring obligation. If you to operating the equipment. Tractor features may cover a range of the ROPS. Assembly & Set-Up 2 Thank You Thank you for various models. Use the deck...
.... 4. Remove the upper crating material from the operating position only. See Figure 2-1. (b) (a) • Steering Wheel (1) • Battery Installation Hardware (1) • Seat Tilt Knob Assembly & Hardware Pack (1) • Tractor Operator's Manual (1) 3. Failure to change product specifications, designs and equipment without notice and without incurring obligation. If you to operating the equipment. Tractor features may cover a range of the ROPS. Assembly & Set-Up 2 Thank You Thank you for various models. Use the deck...
Owners Manual
Page 12
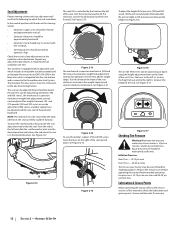
... tire pressure under any adjustments to the electrical wiring harness. Equal tire pressure should be connected to the conditions described above. Reduce the tire pressure before operating the tractor. Figure 2-13 The mechanical suspension mechanism (500 and 700 series) incorporates weight/ride adjustment controls for operators in the desired position. Figure 2-14 To vary the lumbar support (700 and 900 series) move the seat forward or back, locate the seat adjustment rod under the arm...
... tire pressure under any adjustments to the electrical wiring harness. Equal tire pressure should be connected to the conditions described above. Reduce the tire pressure before operating the tractor. Figure 2-13 The mechanical suspension mechanism (500 and 700 series) incorporates weight/ride adjustment controls for operators in the desired position. Figure 2-14 To vary the lumbar support (700 and 900 series) move the seat forward or back, locate the seat adjustment rod under the arm...
Owners Manual
Page 14
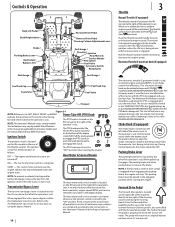
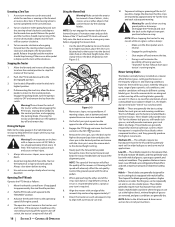
... to cause the tractor to travel . Controls & Operation Deck Lift Pedal Deck Height Index Choke † Parking Brake Lever Hydrostatic Bypass Lever Fuel Guage † Fuel Tank Cap Fuel Valve Forward Drive Pedal Reverse Drive Pedal Steering Column Adjustment Lever Fuel Guage † Throttle † Ignition Hour Meter & Service Minder PTO Switch Fuel Valve Accessory Switch Receptacles Fuel Guage † Fuel Tank Cap Fuel Valve † - Pull the knob upward to engage the PTO clutch, or T The ignition switch is engaged and uses the most fuel. Release the key immediately when...
... to cause the tractor to travel . Controls & Operation Deck Lift Pedal Deck Height Index Choke † Parking Brake Lever Hydrostatic Bypass Lever Fuel Guage † Fuel Tank Cap Fuel Valve Forward Drive Pedal Reverse Drive Pedal Steering Column Adjustment Lever Fuel Guage † Throttle † Ignition Hour Meter & Service Minder PTO Switch Fuel Valve Accessory Switch Receptacles Fuel Guage † Fuel Tank Cap Fuel Valve † - Pull the knob upward to engage the PTO clutch, or T The ignition switch is engaged and uses the most fuel. Release the key immediately when...
Owners Manual
Page 15
... hoses to the engine. The valve controls the fuel flow from contaminating the oil. NOTE: IF both tanks have fuel or that the steering column adjustment lever is tight to stop . Refer to the Assembly & Set-Up section for operators in the desired cutting height and slowly release pressure on the pedal until the deck transportation lock snaps into the operating position. Always re-install the fuel cap tightly onto the fuel tank after removing...
... hoses to the engine. The valve controls the fuel flow from contaminating the oil. NOTE: IF both tanks have fuel or that the steering column adjustment lever is tight to stop . Refer to the Assembly & Set-Up section for operators in the desired cutting height and slowly release pressure on the pedal until the deck transportation lock snaps into the operating position. Always re-install the fuel cap tightly onto the fuel tank after removing...
Owners Manual
Page 16
..., the parking brake is engaged, and the PTO knob is equipped with a safety interlock system for maintaining complete control of the operator. Start the engine as follows: 1. Do not use gasoline left unattended. 5. Turn the ignition key to the OFF position and remove the key from cranking or starting or battery discharge if the equipment is engaged. • The safety interlock system will shut off valve(s). When correctly adjusted the mower deck should be...
..., the parking brake is engaged, and the PTO knob is equipped with a safety interlock system for maintaining complete control of the operator. Start the engine as follows: 1. Do not use gasoline left unattended. 5. Turn the ignition key to the OFF position and remove the key from cranking or starting or battery discharge if the equipment is engaged. • The safety interlock system will shut off valve(s). When correctly adjusted the mower deck should be...
Owners Manual
Page 17
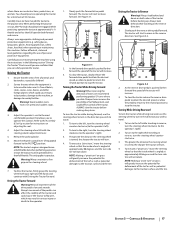
... in reverse, turn the steering wheel clockwise (to the operator's left while traveling in reverse, turn . 4. Adjust the steering wheel tilt with Driving the Tractor Forward. Release the parking brake. 6. Move the throttle control lever (if equipped) forward to stop the tractor. Abrupt movement of the pedals can safely operate the tractor. Turning the Tractor While Driving Forward Warning! ALWAYS slow the tractor before backing up. The greater the distance the steering wheel is to be engaged...
... in reverse, turn the steering wheel clockwise (to the operator's left while traveling in reverse, turn . 4. Adjust the steering wheel tilt with Driving the Tractor Forward. Release the parking brake. 6. Move the throttle control lever (if equipped) forward to stop the tractor. Abrupt movement of the pedals can safely operate the tractor. Turning the Tractor While Driving Forward Warning! ALWAYS slow the tractor before backing up. The greater the distance the steering wheel is to be engaged...
Owners Manual
Page 18
... Attachment & Accessories section for a list of grasses and mowing conditions; The machine could overturn and cause serious injury. 1. Always slow down . Move the throttle control lever (if equipped) to the operating speed (full engine speed). 4. NOTE: Do not engage the mower deck when lowered in the Safe Operation Section to an adjacent blade (i.e., the blades do not need for the thinner leaf grasses, will handle lush grasses, and will adversely affect the cut . A U-turn...
... Attachment & Accessories section for a list of grasses and mowing conditions; The machine could overturn and cause serious injury. 1. Always slow down . Move the throttle control lever (if equipped) to the operating speed (full engine speed). 4. NOTE: Do not engage the mower deck when lowered in the Safe Operation Section to an adjacent blade (i.e., the blades do not need for the thinner leaf grasses, will handle lush grasses, and will adversely affect the cut . A U-turn...
Owners Manual
Page 22
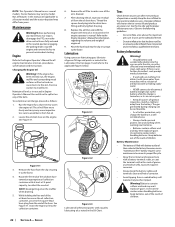
... is any maintenance or repairs, disengage the PTO, move the drive control levers fully outward in the engine operator's manual. Battery Maintenance • The battery is filled with a quality lubricating oil as instructed in the neutral position engaging the parking brake, stop the engine and remove the key to the Engine Operator's Manual for proper inflation pressures. Warning! Service Maintenance Engine Warning! While holding the free end of the oil drain hose over the oil collection container, unscrew the square-head hose plug from yours...
... is any maintenance or repairs, disengage the PTO, move the drive control levers fully outward in the engine operator's manual. Battery Maintenance • The battery is filled with a quality lubricating oil as instructed in the neutral position engaging the parking brake, stop the engine and remove the key to the Engine Operator's Manual for proper inflation pressures. Warning! Service Maintenance Engine Warning! While holding the free end of the oil drain hose over the oil collection container, unscrew the square-head hose plug from yours...
Owners Manual
Page 23
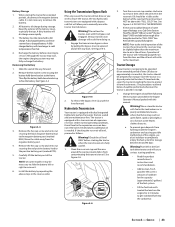
... time (30 days to remove, then check the oil level in the expansion reservoir does not need to service. If stored outside, cover the tractor (including the tires) to the frame. a. The battery must NOT be stored with treated fuel and run the engine for any reason the tractor will not drive or you to move the tractor short distances. Using the Transmission Bypass Rods If for 2-3 minutes to...
... time (30 days to remove, then check the oil level in the expansion reservoir does not need to service. If stored outside, cover the tractor (including the tires) to the frame. a. The battery must NOT be stored with treated fuel and run the engine for any reason the tractor will not drive or you to move the tractor short distances. Using the Transmission Bypass Rods If for 2-3 minutes to...

Owners Manual
Page 24
.... NOTE: Using a pressure washer or garden hose is not recommended for proper adjustment and proceed, if necessary. 5. The use of the right blade tip to prolonged periods of the deck. Removing The Tractor From Storage 1. Fully charge the battery and inflate the tires to the Engine Operator's Manual, drain the fuel from the ground below. Fill the fuel tank with the tractor. 3. Protect your tractor. Deck Leveling Leveling the Deck (Side-to Tires for information regarding tire pressure. Refer...
.... NOTE: Using a pressure washer or garden hose is not recommended for proper adjustment and proceed, if necessary. 5. The use of the right blade tip to prolonged periods of the deck. Removing The Tractor From Storage 1. Fully charge the battery and inflate the tires to the Engine Operator's Manual, drain the fuel from the ground below. Fill the fuel tank with the tractor. 3. Protect your tractor. Deck Leveling Leveling the Deck (Side-to Tires for information regarding tire pressure. Refer...

Owners Manual
Page 25
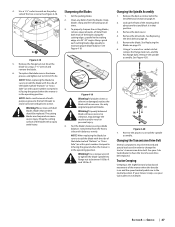
... should be repaired. Now engage the PTO and the blades should stop . See your Cub Cadet Service Dealer. 2. Parking Brake Switch • Sit in the neutral position and the PTO disengaged, release the parking brake and try to use the same capacity fuse for the power steering and one cable to the booster battery's negative terminal; The engine should start , disengage the PTO by placing the clevis pin behind the lowest position. 2. Remove ignition key and the spark plug cap. Use extreme...
... should be repaired. Now engage the PTO and the blades should stop . See your Cub Cadet Service Dealer. 2. Parking Brake Switch • Sit in the neutral position and the PTO disengaged, release the parking brake and try to use the same capacity fuse for the power steering and one cable to the booster battery's negative terminal; The engine should start , disengage the PTO by placing the clevis pin behind the lowest position. 2. Remove ignition key and the spark plug cap. Use extreme...
Owners Manual
Page 26
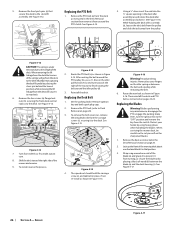
... switch. When servicing the mower deck, be careful not to the deck. Remove ignition key and both spark plug caps. 2. The speed nut should hold the carriage screw (c) and tab bolt in place, if not re-install as instructed in that secure the deck to snap back. 6. Replacing the Blades Warning! Using a 1⁄2" drive insert the end into the 1⁄2" square opening in Figure 4-16. Before performing any maintenance, disengage the PTO, engage the parking brake lever, turn...
... switch. When servicing the mower deck, be careful not to the deck. Remove ignition key and both spark plug caps. 2. The speed nut should hold the carriage screw (c) and tab bolt in place, if not re-install as instructed in that secure the deck to snap back. 6. Replacing the Blades Warning! Using a 1⁄2" drive insert the end into the 1⁄2" square opening in Figure 4-16. Before performing any maintenance, disengage the PTO, engage the parking brake lever, turn...
Owners Manual
Page 27
... change the tractor's transmission drive belt. 4. Reverse the process to 100-120 ft.-lbs. If your mower creeps, see your Cub Cadet dealer to install the blade with the side of the mower when the throttle is bent or otherwise damaged, replace the blade with dull blades. NOTE: When replacing the blade, be sure to have the transmission drive belt replaced. Remove the drive belts. Use a 1-1⁄8" socket wrench on the pulley side of multipurpose grease to the bolt...
... change the tractor's transmission drive belt. 4. Reverse the process to 100-120 ft.-lbs. If your mower creeps, see your Cub Cadet dealer to install the blade with the side of the mower when the throttle is bent or otherwise damaged, replace the blade with dull blades. NOTE: When replacing the blade, be sure to have the transmission drive belt replaced. Remove the drive belts. Use a 1-1⁄8" socket wrench on the pulley side of multipurpose grease to the bolt...
Owners Manual
Page 29
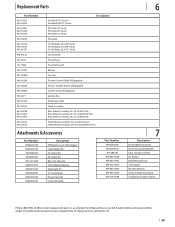
..." Deck) PTO Belt (72" Deck) Drive Belt Hi-Lift Blade, 19.0 (54" Deck) Hi-Lift Blade, 21.0 (60" Deck) Hi-Lift Blade, 25.0 (72" Deck) Deck Spindle Deck Wheel Deck Skid Guard Battery Gas Cap Throttle Control Cable (If Equipped) Electric Throttle Switch (If Equipped) Choke Control (If Equipped) Ignition Key Park Brake Cable Chute Assembly Rear Wheel Assembly, 24 x 12-12 (554/754) Rear Wheel Assembly, 24 x 12-12 (560/760/772) Rear Wheel Assembly, 26 x 12-12 (960/972) Front Wheel Assembly, 16 x 6-6 (500 Series) Front Wheel Assembly, 16 x 6.5-8 (700/900 Series) Attachments & Accessories Part Number...
..." Deck) PTO Belt (72" Deck) Drive Belt Hi-Lift Blade, 19.0 (54" Deck) Hi-Lift Blade, 21.0 (60" Deck) Hi-Lift Blade, 25.0 (72" Deck) Deck Spindle Deck Wheel Deck Skid Guard Battery Gas Cap Throttle Control Cable (If Equipped) Electric Throttle Switch (If Equipped) Choke Control (If Equipped) Ignition Key Park Brake Cable Chute Assembly Rear Wheel Assembly, 24 x 12-12 (554/754) Rear Wheel Assembly, 24 x 12-12 (560/760/772) Rear Wheel Assembly, 26 x 12-12 (960/972) Front Wheel Assembly, 16 x 6-6 (500 Series) Front Wheel Assembly, 16 x 6.5-8 (700/900 Series) Attachments & Accessories Part Number...
Owners Manual
Page 32
... the original warranty period. Cub Cadet warrants attachments for this product has been operated and maintained in accordance with the Operator's Manual furnished with the product, and has not been subject to be free from defects in material and workmanship, with . To locate the dealer in the following cases: a. Routine maintenance items such as : belts, blades, blade adapters, grass bags, rider deck wheels, seats, and tires. c. e. Transportation charges and service calls. The...
... the original warranty period. Cub Cadet warrants attachments for this product has been operated and maintained in accordance with the Operator's Manual furnished with the product, and has not been subject to be free from defects in material and workmanship, with . To locate the dealer in the following cases: a. Routine maintenance items such as : belts, blades, blade adapters, grass bags, rider deck wheels, seats, and tires. c. e. Transportation charges and service calls. The...


