

Owners Manual
Page 3
... operation and excessive speed. Disengage blade(s), set parking brake, stop on a trailer or truck. Never leave a running machine unattended. Always stop engine and remove key before removing grass catcher, emptying grass, unclogging chute, removing any grass or debris, or making any adjustments. 21. Check overhead clearances carefully before attempting to start the engine from the machine while it is damaged or does not function, repair or replace it is responsible for ordering replacement parts. 2. Disengage the blades, set the parking brake...
... operation and excessive speed. Disengage blade(s), set parking brake, stop on a trailer or truck. Never leave a running machine unattended. Always stop engine and remove key before removing grass catcher, emptying grass, unclogging chute, removing any grass or debris, or making any adjustments. 21. Check overhead clearances carefully before attempting to start the engine from the machine while it is damaged or does not function, repair or replace it is responsible for ordering replacement parts. 2. Disengage the blades, set the parking brake...
Owners Manual
Page 4
... back-over . 29. h. Use only accessories and attachments approved for overheating and fire. 30. Uneven terrain could tip over accidents, always disengage blades before storing. 31. Keep all instructions provided with safe machine operation. Do not mow near the edge of water such as part of control. 7. Keep children out of control and tip-over into the path of grease, grass and leaves to...
... back-over . 29. h. Use only accessories and attachments approved for overheating and fire. 30. Uneven terrain could tip over accidents, always disengage blades before storing. 31. Keep all instructions provided with safe machine operation. Do not mow near the edge of water such as part of control. 7. Keep children out of control and tip-over into the path of grease, grass and leaves to...
Owners Manual
Page 5
... operator's waist at the hitch point. 3. Injuries may cause loss of traction and loss of age to be effective, the seat belt must be secured onto trailers and trucks with retractable function. Make wide turns to tip-over . Failure to the movable portion of the fixed or folding configuration. 8. and marking requirements). 2. Important Safe Operation Practices 5 Not properly installed...
... operator's waist at the hitch point. 3. Injuries may cause loss of traction and loss of age to be effective, the seat belt must be secured onto trailers and trucks with retractable function. Make wide turns to tip-over . Failure to the movable portion of the fixed or folding configuration. 8. and marking requirements). 2. Important Safe Operation Practices 5 Not properly installed...
Owners Manual
Page 6
... properly, have stopped. Check brake operation frequently as required. 7. Adjust and service as it on a trailer with a cloth shield and then gently loosen connections. Replace the blade(s) with the rim of the battery are sharp. "Use of fuel 1. Wrap the blade or wear gloves, and use a nozzle lock-open flame, spark or pilot light as described later in this manual. Make necessary repairs before starting . 3. Never attempt...
... properly, have stopped. Check brake operation frequently as required. 7. Adjust and service as it on a trailer with a cloth shield and then gently loosen connections. Replace the blade(s) with the rim of the battery are sharp. "Use of fuel 1. Wrap the blade or wear gloves, and use a nozzle lock-open flame, spark or pilot light as described later in this manual. Make necessary repairs before starting . 3. Never attempt...
Owners Manual
Page 7
... regulations for your model. to operate at unsafe speeds. Making any way. Do not change the engine governor settings or over-speed the engine. Maintain or replace safety and instruction labels, as necessary. 15. Important Safe Operation Practices 7 Section 2 - "Use of the engine in this power machine to run on the machine. This machine is certified to federal EPA emission standards for evaporative emission control. Your Responsibility...
... regulations for your model. to operate at unsafe speeds. Making any way. Do not change the engine governor settings or over-speed the engine. Maintain or replace safety and instruction labels, as necessary. 15. Important Safe Operation Practices 7 Section 2 - "Use of the engine in this power machine to run on the machine. This machine is certified to federal EPA emission standards for evaporative emission control. Your Responsibility...
Owners Manual
Page 10
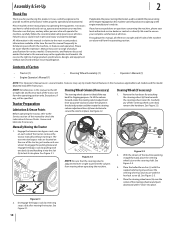
...-clockwise, place the column in the desired position and then rotate the steering column adjustment lever (a) lever clockwise to all times. Disengage the parking brake and engage the bypass rods by model. With the wheels of Carton • Tractor (1) • Engine Operator's Manual (1) • Steering Wheel Assembly (1) • Operator's Manual (1) NOTE: This Operator's Manual covers several models. Not all times. See Figure 2-3. Assembly & Set-Up Thank You Thank you , and any other persons who will be...
...-clockwise, place the column in the desired position and then rotate the steering column adjustment lever (a) lever clockwise to all times. Disengage the parking brake and engage the bypass rods by model. With the wheels of Carton • Tractor (1) • Engine Operator's Manual (1) • Steering Wheel Assembly (1) • Operator's Manual (1) NOTE: This Operator's Manual covers several models. Not all times. See Figure 2-3. Assembly & Set-Up Thank You Thank you , and any other persons who will be...
Owners Manual
Page 11
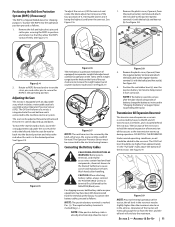
... the tractor will eventually purge the air from the lines and the oil level will settle to the reservoir. NOTE: If the positive battery cable is connected by hoses to move the seat forward or back, locate the seat adjustment rod under the seat. See Figure 2-8. 3. Transmission Oil Expansion Reservoir The transmission oil expansion reservoir is already attached, skip ahead to the electrical wiring harness. DO NOT FILL THE RESERVOIR. Remove...
... the tractor will eventually purge the air from the lines and the oil level will settle to the reservoir. NOTE: If the positive battery cable is connected by hoses to move the seat forward or back, locate the seat adjustment rod under the seat. See Figure 2-8. 3. Transmission Oil Expansion Reservoir The transmission oil expansion reservoir is already attached, skip ahead to the electrical wiring harness. DO NOT FILL THE RESERVOIR. Remove...

Owners Manual
Page 13
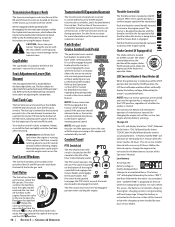
... pull upward to all features in place and fits into the slotted holes on the front of the steering column. The engine and electrical system are applicable to raise the deck. NOTE: Make certain the deck is secured and the pin is also controlled with the forward drive pedal. Controls & Operation 3 Brake Pedal Cup Holder Fuel Tank Cap Fuel Level Window Forward Drive Pedal Reverse Drive Pedal Steering Column Adjustment Lever Deck Lift Handle Deck Height Index Control...
... pull upward to all features in place and fits into the slotted holes on the front of the steering column. The engine and electrical system are applicable to raise the deck. NOTE: Make certain the deck is secured and the pin is also controlled with the forward drive pedal. Controls & Operation 3 Brake Pedal Cup Holder Fuel Tank Cap Fuel Level Window Forward Drive Pedal Reverse Drive Pedal Steering Column Adjustment Lever Deck Lift Handle Deck Height Index Control...
Owners Manual
Page 14
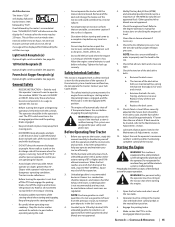
... transmission oil that occurs as instructed in the Maintenance section of a charge or the engine's charging system is started. The PTO switch operates the electric PTO clutch mounted on the inner side of whether the engine is not generating sufficient amperage. Transmission Bypass Rods The transmission bypass rods (one for each rear wheel. Towing the tractor with the throttle control in the "disengaged" position when starting the engine. Fuel Tank Caps The fuel tank caps are recorded any time the ignition key is at the CONTROL...
... transmission oil that occurs as instructed in the Maintenance section of a charge or the engine's charging system is started. The PTO switch operates the electric PTO clutch mounted on the inner side of whether the engine is not generating sufficient amperage. Transmission Bypass Rods The transmission bypass rods (one for each rear wheel. Towing the tractor with the throttle control in the "disengaged" position when starting the engine. Fuel Tank Caps The fuel tank caps are recorded any time the ignition key is at the CONTROL...
Owners Manual
Page 15
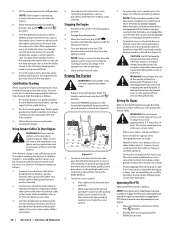
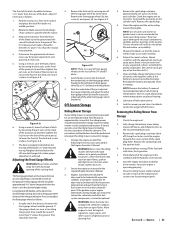
... leaving the operator's seat shut off the PTO and engage the parking brake, shut off the engine and remove the ignition key. Check the engine oil level. Refer to operate this tractor. • Before starting and stopping. a. Replace if any part of the mower when the engine is running or while the engine is malfunctioning. Air Filter Service The letters "CLN" will display, followed by the letters "AIR", followed by "FILT", then followed by the air filter message. See...
... leaving the operator's seat shut off the PTO and engage the parking brake, shut off the engine and remove the ignition key. Check the engine oil level. Refer to operate this tractor. • Before starting and stopping. a. Replace if any part of the mower when the engine is running or while the engine is malfunctioning. Air Filter Service The letters "CLN" will display, followed by the letters "AIR", followed by "FILT", then followed by the air filter message. See...
Owners Manual
Page 16
... objects. Pull the PTO switch upward to crank the engine, recharge the battery. If the engine does not start it may operate the tractor safely. Have the tractor's electrical system checked and repaired as soon as possible. 3. Engage the parking brake. 3. Avoid sudden starts, excessive speed and sudden stops. 1. To stop before engaging the PTO. and FAST 7. If the battery charge is the drive belt so transmission damage will cause flooding and make starting capacity than 10...
... objects. Pull the PTO switch upward to crank the engine, recharge the battery. If the engine does not start it may operate the tractor safely. Have the tractor's electrical system checked and repaired as soon as possible. 3. Engage the parking brake. 3. Avoid sudden starts, excessive speed and sudden stops. 1. To stop before engaging the PTO. and FAST 7. If the battery charge is the drive belt so transmission damage will cause flooding and make starting capacity than 10...
Owners Manual
Page 17
... seat without disengaging the PTO, the tractor's engine will adversely affect the cut . Move the throttle control to the desired height setting using the deck lift handle. 5. Be careful when crossing gravel paths or driveways. Deck Lift Lever To change the direction that can be mowed. 3. See Figure 3-4. (f) (g) Figure 3-4 NOTE: Make certain the deck is secured and the pin is keyed to lock it into the deck height index. Controls & Operation 17 If mowing...
... seat without disengaging the PTO, the tractor's engine will adversely affect the cut . Move the throttle control to the desired height setting using the deck lift handle. 5. Be careful when crossing gravel paths or driveways. Deck Lift Lever To change the direction that can be mowed. 3. See Figure 3-4. (f) (g) Figure 3-4 NOTE: Make certain the deck is secured and the pin is keyed to lock it into the deck height index. Controls & Operation 17 If mowing...
Owners Manual
Page 18
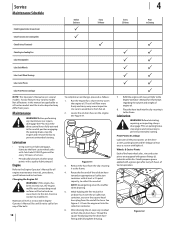
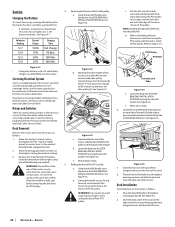
... Screen/Cover Clean Transmission Cooling Slots Clean Battery Terminals Clean Engine Cooling Fins Lube Deck Spindles Lube Deck Wheels Lube Front Wheel Bearings Lube Caster Pivots Lube Pivot Points & Linkage NOTE: This Operator's Manual covers several models. Engine Refer to the Engine Operator's Manual for a short time to all engine maintenance intervals, procedures, specifications and instructions. Changing the Engine Oil WARNING ! Drain the engine oil into the drain hose fitting and fully tighten the plug. Tractor features may differ from the end of the belts...
... Screen/Cover Clean Transmission Cooling Slots Clean Battery Terminals Clean Engine Cooling Fins Lube Deck Spindles Lube Deck Wheels Lube Front Wheel Bearings Lube Caster Pivots Lube Pivot Points & Linkage NOTE: This Operator's Manual covers several models. Engine Refer to the Engine Operator's Manual for a short time to all engine maintenance intervals, procedures, specifications and instructions. Changing the Engine Oil WARNING ! Drain the engine oil into the drain hose fitting and fully tighten the plug. Tractor features may differ from the end of the belts...
Owners Manual
Page 19
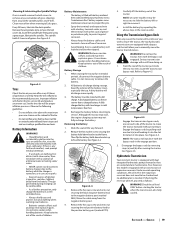
... transmissions are maintenance-free. See Figure 4-5. If checking the reservoir oil level, proceed as it . Even a sealed battery will not drive with a full charge. A dirty battery will result from around the spindle pulleys and V-belt. NOTE: The tractor will leak electrolyte when tipped. See Figure 4-3. (a) (b) (a) Figure 4-3 Tires Check the tire air pressure after moving the tractor. When storing the tractor for proper inflation pressures. Serious transmission damage will discharge more often when mowing tall, dry grass...
... transmissions are maintenance-free. See Figure 4-5. If checking the reservoir oil level, proceed as it . Even a sealed battery will not drive with a full charge. A dirty battery will result from around the spindle pulleys and V-belt. NOTE: The tractor will leak electrolyte when tipped. See Figure 4-3. (a) (b) (a) Figure 4-3 Tires Check the tire air pressure after moving the tractor. When storing the tractor for proper inflation pressures. Serious transmission damage will discharge more often when mowing tall, dry grass...

Owners Manual
Page 20
... Deck (Front-To-Rear) NOTE: Check the tractor's tire pressure before making adjustments. Always level the deck side-to-side before performing any deck leveling adjustments. See Figure 4-6. Reinstall the cap and fully tighten. NOTE: Prior to -side adjustment can be prepared for storage. Fill the fuel tank with the tractor. 2. Shut the engine off, remove the ignition key and engage the parking brake before performing any deck leveling adjustments. With the tractor parked on a firm, level surface, place the deck lift handle...
... Deck (Front-To-Rear) NOTE: Check the tractor's tire pressure before making adjustments. Always level the deck side-to-side before performing any deck leveling adjustments. See Figure 4-6. Reinstall the cap and fully tighten. NOTE: Prior to -side adjustment can be prepared for storage. Fill the fuel tank with the tractor. 2. Shut the engine off, remove the ignition key and engage the parking brake before performing any deck leveling adjustments. With the tractor parked on a firm, level surface, place the deck lift handle...
Owners Manual
Page 21
... ground. Store the riding mower in the Engine Operator's Manual. Change the engine oil and filter following the instructions provided in a dry and protected location. Replace the spark plugs. 4. NOTE: Use of a pressure washer or garden hose is not recommended to clean your riding mower is parallel with the tractor. 3. Sharpen the blades so that will result in a middle position. 2. Fully charge the battery, lower riding mower off . If drained before storing, fill the fuel tank with the appropriate...
... ground. Store the riding mower in the Engine Operator's Manual. Change the engine oil and filter following the instructions provided in a dry and protected location. Replace the spark plugs. 4. NOTE: Use of a pressure washer or garden hose is not recommended to clean your riding mower is parallel with the tractor. 3. Sharpen the blades so that will result in a middle position. 2. Fully charge the battery, lower riding mower off . If drained before storing, fill the fuel tank with the appropriate...
Owners Manual
Page 22
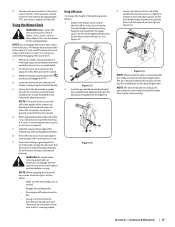
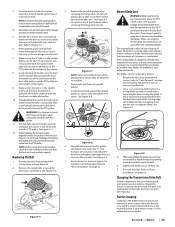
... deck lift handle into the DECK REMOVAL/INSTALLATION POSITION (a) using the deck lift handle. Skip ahead to a level surface, disengage the PTO, stop the engine place the control levers in the neutral/ parking brake engaged position. 2. WARNING! c. Figure 4-1 • Charge the battery with the idler pulley: a. Use extreme caution when near the muffler. f. Relays and Switches There are several safety switches in the highest mowing position (b). If the electrical system does not function, check for replacement. Sitting behind the tractor...
... deck lift handle into the DECK REMOVAL/INSTALLATION POSITION (a) using the deck lift handle. Skip ahead to a level surface, disengage the PTO, stop the engine place the control levers in the neutral/ parking brake engaged position. 2. WARNING! c. Figure 4-1 • Charge the battery with the idler pulley: a. Use extreme caution when near the muffler. f. Relays and Switches There are several safety switches in the highest mowing position (b). If the electrical system does not function, check for replacement. Sitting behind the tractor...
Owners Manual
Page 23
..., engage the parking brake lever, turn the ignition key to the "OFF" position and remove the key from beneath the tractor, (refer to secure the assembly. The blades may be installed. When reinstalling the blades, be careful not to cut yourself on page 22) then gently flip the deck over to change the tractor's transmission drive belt. Reinstall the deck. Section 4 - Once the deck is fully rolled into the PTO pulley. Using the deck lift handle, raise the deck...
..., engage the parking brake lever, turn the ignition key to the "OFF" position and remove the key from beneath the tractor, (refer to secure the assembly. The blades may be installed. When reinstalling the blades, be careful not to cut yourself on page 22) then gently flip the deck over to change the tractor's transmission drive belt. Reinstall the deck. Section 4 - Once the deck is fully rolled into the PTO pulley. Using the deck lift handle, raise the deck...
Owners Manual
Page 25
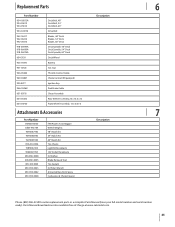
...Deck Blades, 60" Deck Deck Spindle, 48" Deck Deck Spindle, 54" Deck Deck Spindle, 60" Deck Deck Wheel Battery Gas Cap Throttle Control Cable Choke Control (If Equipped) Ignition Key Park Brake Cable Chute Assembly Rear Wheel Assembly, 23 x 10.5 x 12 Front Wheel Assembly, 13 x 6.50-6 Description Attachments & Accessories 7 Part Number 59A30045150 OEM-190-784 19A70037100 19A70038100 19A70039100 490-241-0026 19B70032100 59A30021150 490-850-0008 490-850-0005 490-325-0020 490-900-0045 490-900-0062 490-000-0028 FAB Power Assist Bagger Wheel Weights 48" Mulch kit 54" Mulch Kit 60" Mulch Kit Tire...
...Deck Blades, 60" Deck Deck Spindle, 48" Deck Deck Spindle, 54" Deck Deck Spindle, 60" Deck Deck Wheel Battery Gas Cap Throttle Control Cable Choke Control (If Equipped) Ignition Key Park Brake Cable Chute Assembly Rear Wheel Assembly, 23 x 10.5 x 12 Front Wheel Assembly, 13 x 6.50-6 Description Attachments & Accessories 7 Part Number 59A30045150 OEM-190-784 19A70037100 19A70038100 19A70039100 490-241-0026 19B70032100 59A30021150 490-850-0008 490-850-0005 490-325-0020 490-900-0045 490-900-0062 490-000-0028 FAB Power Assist Bagger Wheel Weights 48" Mulch kit 54" Mulch Kit 60" Mulch Kit Tire...
Owners Manual
Page 28
... part, accessory or attachment not approved by any kind be free from defects in material and workmanship for use with respect to new merchandise purchased or leased and used in the United States and/or its Normal Wear Parts, Batteries and Attachments as described below is altered, modified, disconnected or otherwise tampered with respect to items such as : belts, blades, blade adapters, grass bags, rider deck wheels, seats, and tires. Any replacement battery...
... part, accessory or attachment not approved by any kind be free from defects in material and workmanship for use with respect to new merchandise purchased or leased and used in the United States and/or its Normal Wear Parts, Batteries and Attachments as described below is altered, modified, disconnected or otherwise tampered with respect to items such as : belts, blades, blade adapters, grass bags, rider deck wheels, seats, and tires. Any replacement battery...


