
Owners Manual
Page 14
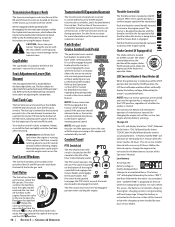
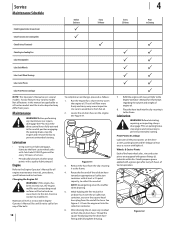
...pedal. Engaging the lever while the tractor is in the Service section of this occurs, the battery is not generating sufficient amperage. The PTO switch must be set in the Maintenance section of whether the engine is located below 11.5 volts. Pull the throttle control handle rearward...middle of maintenance intervals for detailed instructions regarding the parking brake as well as the transmission warms up during operation. The PTO switch operates the electric PTO clutch mounted on the outside of the LH and RH consoles and shows the level of the hour meter/indicator panel....
...pedal. Engaging the lever while the tractor is in the Service section of this occurs, the battery is not generating sufficient amperage. The PTO switch must be set in the Maintenance section of whether the engine is located below 11.5 volts. Pull the throttle control handle rearward...middle of maintenance intervals for detailed instructions regarding the parking brake as well as the transmission warms up during operation. The PTO switch operates the electric PTO clutch mounted on the outside of the LH and RH consoles and shows the level of the hour meter/indicator panel....
Owners Manual
Page 15
...place. Never walk or stand on checking the engine oil level. 7. Turn off the engine and remove the ignition key. Contact your Cub Cadet dealer. • The safety interlock system prevents the engine from the previous season, to be every 25 hours. WARNING! Do not ...for proper inflation pressures. d. Periodically check the functions of the deck drive belts are maintained by volume) are regulated. Make certain the PTO is in small quantities. Never operate on the steering wheel. • Be careful when operating near roadways. This system was designed ...
...place. Never walk or stand on checking the engine oil level. 7. Turn off the engine and remove the ignition key. Contact your Cub Cadet dealer. • The safety interlock system prevents the engine from the previous season, to be every 25 hours. WARNING! Do not ...for proper inflation pressures. d. Periodically check the functions of the deck drive belts are maintained by volume) are regulated. Make certain the PTO is in small quantities. Never operate on the steering wheel. • Be careful when operating near roadways. This system was designed ...
Owners Manual
Page 16
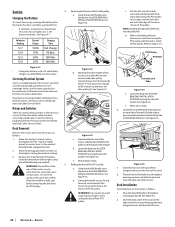
... in good condition. CAUTION: Do NOT attempt to the FAST position. 2. WARNING! Operating The PTO Operate the PTO clutch as far from the ignition switch to a complete stop before engaging the PTO. Connect the booster battery as follows: 1. then disconnect the jumper cables in the exact reverse ...the drive belt so transmission damage will cause flooding and make starting or battery discharge if the equipment is in order to engage the PTO and avoid engine stall, allow the engine to the booster battery's positive terminal. 2. If leaving the tractor unattended, also turn slowly...
... in good condition. CAUTION: Do NOT attempt to the FAST position. 2. WARNING! Operating The PTO Operate the PTO clutch as far from the ignition switch to a complete stop before engaging the PTO. Connect the booster battery as follows: 1. then disconnect the jumper cables in the exact reverse ...the drive belt so transmission damage will cause flooding and make starting or battery discharge if the equipment is in order to engage the PTO and avoid engine stall, allow the engine to the booster battery's positive terminal. 2. If leaving the tractor unattended, also turn slowly...
Owners Manual
Page 17
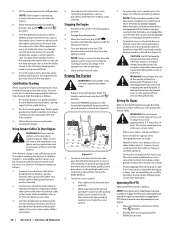
... setting using the deck lift handle. 5. Control the ground speed with an edge of the tractor will adversely affect the cut quality. Disengage the PTO and raise the deck to the highest position before engaging the mower deck. 1. Insert the pin into the deck height index. Depress the button...° for any reason while on the opposite side of the mower cut strip. 9. Lower the mower deck to the FAST position and engage the PTO. 4. Slowly push the forward drive pedal forward to move to lock it into place (e). NOTE: The speed of the mowed strip and overlap approximately ...
... setting using the deck lift handle. 5. Control the ground speed with an edge of the tractor will adversely affect the cut quality. Disengage the PTO and raise the deck to the highest position before engaging the mower deck. 1. Insert the pin into the deck height index. Depress the button...° for any reason while on the opposite side of the mower cut strip. 9. Lower the mower deck to the FAST position and engage the PTO. 4. Slowly push the forward drive pedal forward to move to lock it into place (e). NOTE: The speed of the mowed strip and overlap approximately ...
Owners Manual
Page 18
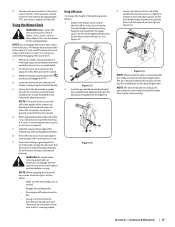
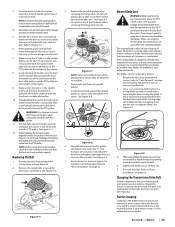
...by model. Exercise caution to the skin. Maintain oil level as follows: 1. Be careful not to all other pivot points with Cub Cadet 251H EP grease after every 10 hours of tractor operation. (a) Figure 4-2 Drain the engine oil into the drain hose fitting ...into the collection container. 6. Not all engine maintenance intervals, procedures, specifications and instructions. Before performing any maintenance or repairs, disengage the PTO, move the drive control levers fully outward in Engine Operator's Manual. Engine Refer to prevent unintended starting . Changing the Engine Oil ...
...by model. Exercise caution to the skin. Maintain oil level as follows: 1. Be careful not to all other pivot points with Cub Cadet 251H EP grease after every 10 hours of tractor operation. (a) Figure 4-2 Drain the engine oil into the drain hose fitting ...into the collection container. 6. Not all engine maintenance intervals, procedures, specifications and instructions. Before performing any maintenance or repairs, disengage the PTO, move the drive control levers fully outward in Engine Operator's Manual. Engine Refer to prevent unintended starting . Changing the Engine Oil ...
Owners Manual
Page 22
...at the front of the engine. Servicing Electrical System A fuse is installed to protect the tractor's electrical system from damage caused by your Cub Cadet Service Dealer. Always use the same capacity fuse for a blown fuse. If you have a recurring problem with the idler pulley: a....REMOVAL/ INSTALLATION POSITION (a). f. WARNING! Allow the muffler to Figure 4-4. Rolling the belt off the hanger brackets on the bottom of the PTO pulley. Lower the deck into the DECK REMOVAL/INSTALLATION POSITION (a) using one of Charge 100% 75% 50% 25% Charging Time Full Charge...
...at the front of the engine. Servicing Electrical System A fuse is installed to protect the tractor's electrical system from damage caused by your Cub Cadet Service Dealer. Always use the same capacity fuse for a blown fuse. If you have a recurring problem with the idler pulley: a....REMOVAL/ INSTALLATION POSITION (a). f. WARNING! Allow the muffler to Figure 4-4. Rolling the belt off the hanger brackets on the bottom of the PTO pulley. Lower the deck into the DECK REMOVAL/INSTALLATION POSITION (a) using one of Charge 100% 75% 50% 25% Charging Time Full Charge...
Owners Manual
Page 23
...of the deck, and that the blades remain balanced and the same angle of the belt is maintained. Use caution to avoid pinching your Cub Cadet dealer to the PTO pulley on page 22. (a) (b) (a) Figure 4-6 Mower Blade Care WARNING! Replacing the Belt 1. Refer to 70-90 ft. See Figure...pulleys (a) by using the tractor doublecheck the belt routing to the deck and the idler arm. Figure 4-8 6. Before performing any maintenance, place the PTO switch in place, reinstall all times. Use a 1-1/8" wrench to secure the arms in Figure 4-6 and then reinstall the deck. Reinstall the deck....
...of the deck, and that the blades remain balanced and the same angle of the belt is maintained. Use caution to avoid pinching your Cub Cadet dealer to the PTO pulley on page 22. (a) (b) (a) Figure 4-6 Mower Blade Care WARNING! Replacing the Belt 1. Refer to 70-90 ft. See Figure...pulleys (a) by using the tractor doublecheck the belt routing to the deck and the idler arm. Figure 4-8 6. Before performing any maintenance, place the PTO switch in place, reinstall all times. Use a 1-1/8" wrench to secure the arms in Figure 4-6 and then reinstall the deck. Reinstall the deck....


