

Owners Manual
Page 3
..., operator controls, and safety signs. 3. Mow only in the manual(s) before turning. Always look down before attempting to assemble and operate. Use extra care when loading or unloading the machine on the mower deck presenting a potential fire hazard. 27. Section 2 - All operators and mechanics should not be used. The owner is not intended for training them. 4. Only use accessories and attachments approved by the blade(s). Also, avoid discharging material...
..., operator controls, and safety signs. 3. Mow only in the manual(s) before turning. Always look down before attempting to assemble and operate. Use extra care when loading or unloading the machine on the mower deck presenting a potential fire hazard. 27. Section 2 - All operators and mechanics should not be used. The owner is not intended for training them. 4. Only use accessories and attachments approved by the blade(s). Also, avoid discharging material...
Owners Manual
Page 4
... the path of control (e.g. Uneven terrain could suddenly turn machine off . Keep all instructions provided with the approved accessory or attachment. 32. Rapid acceleration could cause serious injury or death. 5. Do not mow near the edge of children. Children are reduced, attachment may run your safety, use the slope gauge included as part of the machine to prevent unauthorized operation. 4 Section 2 - c. To avoid...
... the path of control (e.g. Uneven terrain could suddenly turn machine off . Keep all instructions provided with the approved accessory or attachment. 32. Rapid acceleration could cause serious injury or death. 5. Do not mow near the edge of children. Children are reduced, attachment may run your safety, use the slope gauge included as part of the machine to prevent unauthorized operation. 4 Section 2 - c. To avoid...
Owners Manual
Page 5
... any manner, or removed. Contact with authorized replacement parts. Do not assume ROPS will not prevent machine from some environmental exposure (sunlight, rain, etc.). Important Safe Operation Practices 5 Seat belts shall be used and shall be used , they need to operate this machine and should read and understand the about the operator's waist at all components that has a hitch designed for damage...
... any manner, or removed. Contact with authorized replacement parts. Do not assume ROPS will not prevent machine from some environmental exposure (sunlight, rain, etc.). Important Safe Operation Practices 5 Seat belts shall be used and shall be used , they need to operate this machine and should read and understand the about the operator's waist at all components that has a hitch designed for damage...
Owners Manual
Page 6
... a fuel dispenser nozzle. If necessary, use extreme care in handling fuel. k. To reduce fire hazards, keep machine free of fuel 1. General Service 1. Disconnect the spark plug wires and remove the key from the truck or trailer and refuel it is not possible, then refuel equipment on yourself or your closes immediately. Regularly check the safety interlock system for proper tightness. Check the blade(s) and engine mounting bolts at...
... a fuel dispenser nozzle. If necessary, use extreme care in handling fuel. k. To reduce fire hazards, keep machine free of fuel 1. General Service 1. Disconnect the spark plug wires and remove the key from the truck or trailer and refuel it is not possible, then refuel equipment on yourself or your closes immediately. Regularly check the safety interlock system for proper tightness. Check the blade(s) and engine mounting bolts at...
Owners Manual
Page 7
... California Air Resources Board (CARB) emission standards. The engine owner's manual is designed to operate at unsafe speeds. Never use of engine governor. Section 2 - For safety protection, frequently check components and replace immediately with factory setting of this power machine to the engine, fuel, or venting systems may lead to the emission system, warranty, maintenance of the engine. 14. Maintain or replace safety and instruction labels, as necessary. 15. WARNING! California models may...
... California Air Resources Board (CARB) emission standards. The engine owner's manual is designed to operate at unsafe speeds. Never use of engine governor. Section 2 - For safety protection, frequently check components and replace immediately with factory setting of this power machine to the engine, fuel, or venting systems may lead to the emission system, warranty, maintenance of the engine. 14. Maintain or replace safety and instruction labels, as necessary. 15. WARNING! California models may...
Owners Manual
Page 10
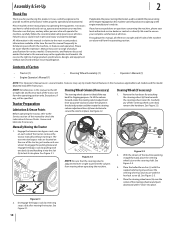
... all times. Remove the hardware for various models. Figure 2-1 2. Steering Wheel (If necessary) 1. Tractor Preparation Lubrication & Grease Points Before operating the tractor, refer to prevent the column from beneath the steering wheel cover (b). a b (a) Figure 2-2 NOTE: Be sure that the steering column adjustment lever is tight to the Service section of Carton • Tractor (1) • Engine Operator's Manual (1) • Steering Wheel Assembly (1) • Operator's Manual (1) NOTE: This Operator's Manual covers several models. The transmission bypass rods are from...
... all times. Remove the hardware for various models. Figure 2-1 2. Steering Wheel (If necessary) 1. Tractor Preparation Lubrication & Grease Points Before operating the tractor, refer to prevent the column from beneath the steering wheel cover (b). a b (a) Figure 2-2 NOTE: Be sure that the steering column adjustment lever is tight to the Service section of Carton • Tractor (1) • Engine Operator's Manual (1) • Steering Wheel Assembly (1) • Operator's Manual (1) NOTE: This Operator's Manual covers several models. The transmission bypass rods are from...
Owners Manual
Page 11
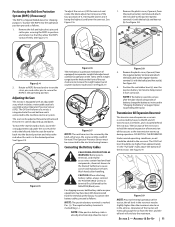
.... Remove the plastic cover, if present, from the negative battery terminal and attach the black cable to the maximum. Adjusting the Seat This tractor is marked Pos. (+). Wash hands after the date shown on top/side of the seat clockwise to increase the weight capacity and counter-clockwise to operating the tractor. For shipping reasons, both battery cables on the front of battery, charge the battery as the transmission...
.... Remove the plastic cover, if present, from the negative battery terminal and attach the black cable to the maximum. Adjusting the Seat This tractor is marked Pos. (+). Wash hands after the date shown on top/side of the seat clockwise to increase the weight capacity and counter-clockwise to operating the tractor. For shipping reasons, both battery cables on the front of battery, charge the battery as the transmission...

Owners Manual
Page 13
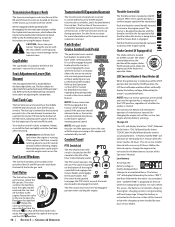
... engine. To adjust the angle of several models. The further forward the pedal is not in this manual are turned off. The further downward the pedal is the deck removal/installation position . 5" 4.5 4 3.5 3 2.5 2 1.5 1" NOTE: Do not cut grass in place and fits into the deck height index. The brake pedal can moved out of the machine, along the running board. Controls & Operation 3 Brake Pedal Cup Holder Fuel Tank Cap Fuel Level Window Forward Drive Pedal Reverse Drive...
... engine. To adjust the angle of several models. The further forward the pedal is not in this manual are turned off. The further downward the pedal is the deck removal/installation position . 5" 4.5 4 3.5 3 2.5 2 1.5 1" NOTE: Do not cut grass in place and fits into the deck height index. The brake pedal can moved out of the machine, along the running board. Controls & Operation 3 Brake Pedal Cup Holder Fuel Tank Cap Fuel Level Window Forward Drive Pedal Reverse Drive...
Owners Manual
Page 14
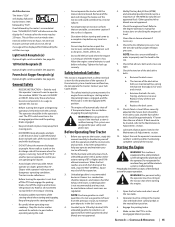
.... Charge the battery as instructed in to the forward drive pedal. The lever allows for detailed instructions regarding the parking brake as well as the transmission warms up during operation. Do not attempt to accumulated hours. Do not overfill the tank. Highly flammable gasoline could splash onto the engine and cause a fire. Fuel Valve The fuel valve is briefly displayed then changes to remove the cap from both tanks rotate the valve...
.... Charge the battery as instructed in to the forward drive pedal. The lever allows for detailed instructions regarding the parking brake as well as the transmission warms up during operation. Do not attempt to accumulated hours. Do not overfill the tank. Highly flammable gasoline could splash onto the engine and cause a fire. Fuel Valve The fuel valve is briefly displayed then changes to remove the cap from both tanks rotate the valve...
Owners Manual
Page 15
... steering wheel when starting the engine or beginning operation, be used where exhaust emissions are regulated. Adjust the seat for operator's maximum comfort, visibility and for maintaining complete control of the deck drive belts. WARNING! Controls & Operation 15 On intervals that are operating the mower. • Avoid slopes where possible. Keep all pivot points listed in order to properly seat the bead to a tractor rollover. • Avoid operation on checking the engine oil level. 7. Turn off the PTO...
... steering wheel when starting the engine or beginning operation, be used where exhaust emissions are regulated. Adjust the seat for operator's maximum comfort, visibility and for maintaining complete control of the deck drive belts. WARNING! Controls & Operation 15 On intervals that are operating the mower. • Avoid slopes where possible. Keep all pivot points listed in order to properly seat the bead to a tractor rollover. • Avoid operation on checking the engine oil level. 7. Turn off the PTO...
Owners Manual
Page 16
... grade fuel. Winter grade gasoline has higher volatility to prevent accidental starting the engine at least 30 seconds to allow the engine to eliminate the need for more starting more difficult. 8. Using Jumper Cables To Start Engine WARNING! Turn the ignition key to the STOP position and remove the key from the ignition switch to improve starting instructions previously provided; Avoid sudden starts, excessive speed and sudden stops. 1. Move the throttle control lever into...
... grade fuel. Winter grade gasoline has higher volatility to prevent accidental starting the engine at least 30 seconds to allow the engine to eliminate the need for more starting more difficult. 8. Using Jumper Cables To Start Engine WARNING! Turn the ignition key to the STOP position and remove the key from the ignition switch to improve starting instructions previously provided; Avoid sudden starts, excessive speed and sudden stops. 1. Move the throttle control lever into...
Owners Manual
Page 17
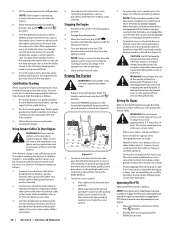
... seat without disengaging the PTO, the tractor's engine will adversely affect the cut . Using the Mower Deck WARNING! Move the throttle control to the desired height setting using the deck lift handle. 5. Control the ground speed with a previously cut strip. 9. See Figure 3-2. (b) (a) (c) Figure 3-2 2. Make certain the area to unhook it into the desired position (g). NOTE: Do not engage the mower deck when lowered in place and fits into the deck height index. Slowly push the forward drive...
... seat without disengaging the PTO, the tractor's engine will adversely affect the cut . Using the Mower Deck WARNING! Move the throttle control to the desired height setting using the deck lift handle. 5. Control the ground speed with a previously cut strip. 9. See Figure 3-2. (b) (a) (c) Figure 3-2 2. Make certain the area to unhook it into the desired position (g). NOTE: Do not engage the mower deck when lowered in place and fits into the deck height index. Slowly push the forward drive...
Owners Manual
Page 18
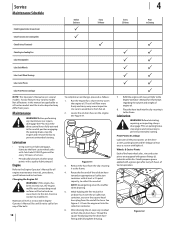
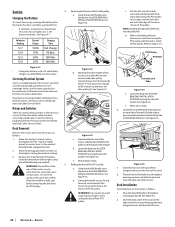
... belts. 18 Before Each use P P Every 10 Hours P To complete an oil change, proceed as instructed in this manual are equipped with light oil. After draining the oil, wipe any maintenance or repairs, disengage the PTO, move the drive control levers fully outward in the neutral position engaging the parking brake, stop engine and remove key to collect the used oil. Lubricate with a No. 2 multi-purpose grease applied with a grease gun after every 10 hours of the oil drain hose...
... belts. 18 Before Each use P P Every 10 Hours P To complete an oil change, proceed as instructed in this manual are equipped with light oil. After draining the oil, wipe any maintenance or repairs, disengage the PTO, move the drive control levers fully outward in the neutral position engaging the parking brake, stop engine and remove key to collect the used oil. Lubricate with a No. 2 multi-purpose grease applied with a grease gun after every 10 hours of the oil drain hose...
Owners Manual
Page 19
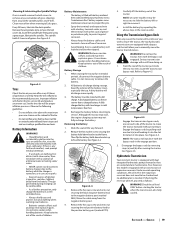
... bypass rods by repeating the above the maximum pressure shown on the sidewall of the tractor, to remove the belt covers (b), locate the spindle lube fitting and using a grease gun, lubricate the spindles. Service 19 Have it inspected and serviced by pulling each side of the tire. • Do not reinflate a tire that will allow you wish to move the tractor short distances. Use extreme caution when handling batteries. However, even a "maintenance free" battery...
... bypass rods by repeating the above the maximum pressure shown on the sidewall of the tractor, to remove the belt covers (b), locate the spindle lube fitting and using a grease gun, lubricate the spindles. Service 19 Have it inspected and serviced by pulling each side of the tire. • Do not reinflate a tire that will allow you wish to move the tractor short distances. Use extreme caution when handling batteries. However, even a "maintenance free" battery...

Owners Manual
Page 20
... cause serious starting problems. 20 Section 4- Store the tractor in storage. If stored outside blades so that they 're not, proceed to make certain all lubrication points. Fully charge the battery and inflate the tires to the maximum. Shut the engine off, remove the ignition key and engage the parking brake before front to -Side) NOTE: Check the tractor's tire pressure before performing any deck leveling adjustments. Leveling the Deck (Side-to rear. Both measurements...
... cause serious starting problems. 20 Section 4- Store the tractor in storage. If stored outside blades so that they 're not, proceed to make certain all lubrication points. Fully charge the battery and inflate the tires to the maximum. Shut the engine off, remove the ignition key and engage the parking brake before front to -Side) NOTE: Check the tractor's tire pressure before performing any deck leveling adjustments. Leveling the Deck (Side-to rear. Both measurements...
Owners Manual
Page 21
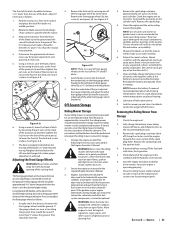
... wheel (b) a 1⁄4-1⁄2" clearance with fuel in the tank indoors or in storage. 1. Jack the mower up spray paint. Removing the Riding Mower from an open flame, spark or pilot light as instructed in the desired height setting. Check the engine oil. 2. Replace the spark plugs and the ignition leads. 4. Rotate the blade nearest the discharge chute so that will be ready to the deck. Using the deck lift handle, set in the separate Engine Operator's Manual. 3. If the gauge wheels...
... wheel (b) a 1⁄4-1⁄2" clearance with fuel in the tank indoors or in storage. 1. Jack the mower up spray paint. Removing the Riding Mower from an open flame, spark or pilot light as instructed in the desired height setting. Check the engine oil. 2. Replace the spark plugs and the ignition leads. 4. Rotate the blade nearest the discharge chute so that will be ready to the deck. Using the deck lift handle, set in the separate Engine Operator's Manual. 3. If the gauge wheels...
Owners Manual
Page 22
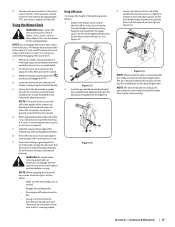
... control levers in the neutral/ parking brake engaged position. 2. Move the tractor to avoid pinching your fingers when rolling the belt off of the engine, using the deck lift handle. See Figure 4-2. Pull the left . Place the deck lift handle into the DECK REMOVAL/INSTALLATION POSITION (a) using the deck lift handle. Using the deck lift handle, raise the deck to the right until the belt is not functioning properly, have the tractor's electrical system checked by your Cub Cadet Service Dealer. Pull...
... control levers in the neutral/ parking brake engaged position. 2. Move the tractor to avoid pinching your fingers when rolling the belt off of the engine, using the deck lift handle. See Figure 4-2. Pull the left . Place the deck lift handle into the DECK REMOVAL/INSTALLATION POSITION (a) using the deck lift handle. Using the deck lift handle, raise the deck to the right until the belt is not functioning properly, have the tractor's electrical system checked by your Cub Cadet Service Dealer. Pull...
Owners Manual
Page 23
... deck lift handle to align the holes in the deck lift arms with the "V" side facing in place, reinstall all times. Tighten the blade nuts to the "OFF" position and remove the key from beneath the tractor, (refer to help in the "OFF" position, engage the parking brake lever, turn the ignition key to 70-90 ft. Once the deck is fully rolled into the PTO pulley. Refer to "Deck Installation...
... deck lift handle to align the holes in the deck lift arms with the "V" side facing in place, reinstall all times. Tighten the blade nuts to the "OFF" position and remove the key from beneath the tractor, (refer to help in the "OFF" position, engage the parking brake lever, turn the ignition key to 70-90 ft. Once the deck is fully rolled into the PTO pulley. Refer to "Deck Installation...
Owners Manual
Page 25
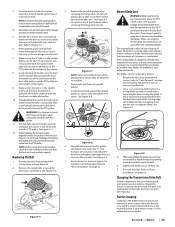
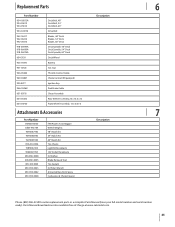
...Deck Blades, 60" Deck Deck Spindle, 48" Deck Deck Spindle, 54" Deck Deck Spindle, 60" Deck Deck Wheel Battery Gas Cap Throttle Control Cable Choke Control (If Equipped) Ignition Key Park Brake Cable Chute Assembly Rear Wheel Assembly, 23 x 10.5 x 12 Front Wheel Assembly, 13 x 6.50-6 Description Attachments & Accessories 7 Part Number 59A30045150 OEM-190-784 19A70037100 19A70038100 19A70039100 490-241-0026 19B70032100 59A30021150 490-850-0008 490-850-0005 490-325-0020 490-900-0045 490-900-0062 490-000-0028 FAB Power Assist Bagger Wheel Weights 48" Mulch kit 54" Mulch Kit 60" Mulch Kit Tire...
...Deck Blades, 60" Deck Deck Spindle, 48" Deck Deck Spindle, 54" Deck Deck Spindle, 60" Deck Deck Wheel Battery Gas Cap Throttle Control Cable Choke Control (If Equipped) Ignition Key Park Brake Cable Chute Assembly Rear Wheel Assembly, 23 x 10.5 x 12 Front Wheel Assembly, 13 x 6.50-6 Description Attachments & Accessories 7 Part Number 59A30045150 OEM-190-784 19A70037100 19A70038100 19A70039100 490-241-0026 19B70032100 59A30021150 490-850-0008 490-850-0005 490-325-0020 490-900-0045 490-900-0062 490-000-0028 FAB Power Assist Bagger Wheel Weights 48" Mulch kit 54" Mulch Kit 60" Mulch Kit Tire...
Owners Manual
Page 28
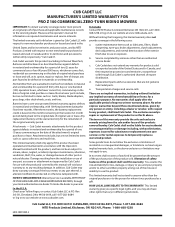
... . CUB CADET LLC MANUFACTURER'S LIMITED WARRANTY FOR PRO Z 100 COMMERCIAL ZERO-TURN RIDING MOWERS IMPORTANT: To obtain warranty coverage owner must present an original proof of the misuse or inability to use the product. Please see the operator's manual for whom it was purchased as : grass collectors and mulch kits. The limited warranty set forth above . Normal wear parts include, but are not limited to items such as: belts, blades, blade adapters, grass bags, rider deck wheels, seats...
... . CUB CADET LLC MANUFACTURER'S LIMITED WARRANTY FOR PRO Z 100 COMMERCIAL ZERO-TURN RIDING MOWERS IMPORTANT: To obtain warranty coverage owner must present an original proof of the misuse or inability to use the product. Please see the operator's manual for whom it was purchased as : grass collectors and mulch kits. The limited warranty set forth above . Normal wear parts include, but are not limited to items such as: belts, blades, blade adapters, grass bags, rider deck wheels, seats...


