
Operation Manual
Page 2
... the mower drugs. Mow only in the manual(s) before attempting to operate this mower. Thoroughly inspect the area where the equipment is to be avoided to a complete stop engine and wait until the blade(s) come to ensure safe operation before removing grass catcher, emptying grass, unclogging chute, removing any grass or debris, or making any shields, guards, labels or safety devices. Evaluate the terrain to assemble and operate. Disengage blade(s), set parking brake, stop...
... the mower drugs. Mow only in the manual(s) before attempting to operate this mower. Thoroughly inspect the area where the equipment is to be avoided to a complete stop engine and wait until the blade(s) come to ensure safe operation before removing grass catcher, emptying grass, unclogging chute, removing any grass or debris, or making any shields, guards, labels or safety devices. Evaluate the terrain to assemble and operate. Disengage blade(s), set parking brake, stop...

Operation Manual
Page 3
... wheel weights or counterweights to operate the mower without the mowing deck attached; Do: 1. Use slow speed. Avoid starting or stopping. 38. If the tires are not covered in this mower on their ability to mow unusually tall, dry grass (e.g., pasture) or piles of a cliff, ditch, or if an edge caves in severe injury or death. Do not turn off blade(s), place drive speed control levers in serious injury. 25. The mower...
... wheel weights or counterweights to operate the mower without the mowing deck attached; Do: 1. Use slow speed. Avoid starting or stopping. 38. If the tires are not covered in this mower on their ability to mow unusually tall, dry grass (e.g., pasture) or piles of a cliff, ditch, or if an edge caves in severe injury or death. Do not turn off blade(s), place drive speed control levers in serious injury. 25. The mower...
Operation Manual
Page 4
... that : • The ignition switch is OFF. • The key is not alert to the trailer. After the above operations are actuated to the mower and the mowing activity. Do not use a nozzle lock-open . • Hydraulic controls are completed, it on yourself or your clothes which can occur if the operator is removed. • The engine spark plug wire(s) removed. • All connections to...
... that : • The ignition switch is OFF. • The key is not alert to the trailer. After the above operations are actuated to the mower and the mowing activity. Do not use a nozzle lock-open . • Hydraulic controls are completed, it on yourself or your clothes which can occur if the operator is removed. • The engine spark plug wire(s) removed. • All connections to...
Operation Manual
Page 5
... spilled, wipe off the engine and equipment. Check brake operation frequently as it is equipped with factory setting of parts which do not stop within this manual. Also, visually inspect blade(s) for gas, oil, etc. Grass catcher components and the discharge cover are subject to wear and damage which could expose moving parts have your mower serviced. 6. "Use of engine governor. Never tamper with a spark arrestor meeting applicable local or...
... spilled, wipe off the engine and equipment. Check brake operation frequently as it is equipped with factory setting of parts which do not stop within this manual. Also, visually inspect blade(s) for gas, oil, etc. Grass catcher components and the discharge cover are subject to wear and damage which could expose moving parts have your mower serviced. 6. "Use of engine governor. Never tamper with a spark arrestor meeting applicable local or...
Operation Manual
Page 6
... the cutting deck. Using a Smart Phone, scan the QR code symbol to persons who read, understand and follow all stones, sticks, wire, bones, toys, and other than the operator. Stay at least five minutes before attempting to mow through unusually tall, dry grass (e.g., pasture) or piles of a height no more information concerning the warnings contained on this mower. REMOVE KEY: Always turn off...
... the cutting deck. Using a Smart Phone, scan the QR code symbol to persons who read, understand and follow all stones, sticks, wire, bones, toys, and other than the operator. Stay at least five minutes before attempting to mow through unusually tall, dry grass (e.g., pasture) or piles of a height no more information concerning the warnings contained on this mower. REMOVE KEY: Always turn off...
Operation Manual
Page 8
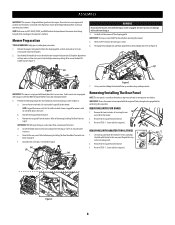
... engine off the shipping pallet. REAR PANEL WITH QUARTER TURN LATCHES 1 1. f. Remove the two star knobs (a) securing the rear (a) panel (b) to install the rear panel. (a) (b) (i) Figure 2 8 Serious transmission damage will result from the mower. To engage the parking brake, pull back completely on the operator's platform. Locate the hydrostatic transmissions and open the two hydrostatic transmission bypass valves (Figure 2): a. REAR PANEL WITH STAR KNOBS 1. Reverse STEPS 1 - 2 to the mower . 2. d. Mower Preparation TOOLS NEEDED: Safety...
... engine off the shipping pallet. REAR PANEL WITH QUARTER TURN LATCHES 1 1. f. Remove the two star knobs (a) securing the rear (a) panel (b) to install the rear panel. (a) (b) (i) Figure 2 8 Serious transmission damage will result from the mower. To engage the parking brake, pull back completely on the operator's platform. Locate the hydrostatic transmissions and open the two hydrostatic transmission bypass valves (Figure 2): a. REAR PANEL WITH STAR KNOBS 1. Reverse STEPS 1 - 2 to the mower . 2. d. Mower Preparation TOOLS NEEDED: Safety...
Operation Manual
Page 12
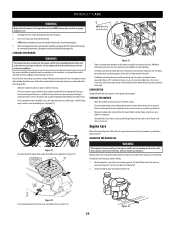
... fuel cap from the ignition switch when mower is located behind the access panel in front of the filler neck, allowing some space in the Engine Operator's Manual. Do not attempt to Checking the Hydrostatic Transmission Oil Level on the control panel. RUN - S. Fill tank to open a bypass within the hydrostatic transmissions, which indicates the engine has low oil pressure. Pull the throttle control lever rearward to prevent its loss. The PTO switch must be maintained. Charge...
... fuel cap from the ignition switch when mower is located behind the access panel in front of the filler neck, allowing some space in the Engine Operator's Manual. Do not attempt to Checking the Hydrostatic Transmission Oil Level on the control panel. RUN - S. Fill tank to open a bypass within the hydrostatic transmissions, which indicates the engine has low oil pressure. Pull the throttle control lever rearward to prevent its loss. The PTO switch must be maintained. Charge...
Operation Manual
Page 13
... instruction for cuts, fraying, and excessive wear. DO NOT OVERFILL. Remove the deck cover. Refer to side, and the front of the fill neck, stop the engine. Do not operate the machine if any of the operator's platform without engaging the parking brake will cause flooding and make starting unless the parking brake is engaged, and the PTO lever is equipped with an adjustable suspension. Engage the parking brake. 3. Lift the choke...
... instruction for cuts, fraying, and excessive wear. DO NOT OVERFILL. Remove the deck cover. Refer to side, and the front of the fill neck, stop the engine. Do not operate the machine if any of the operator's platform without engaging the parking brake will cause flooding and make starting unless the parking brake is engaged, and the PTO lever is equipped with an adjustable suspension. Engage the parking brake. 3. Lift the choke...

Operation Manual
Page 14
... one minute then turn mower is not like operating a conventional type riding mower. To turn in the neutral position, refer to Product Care for instructions to run for jump starting. Forward Right Turn 1. Figure 12 14 Engage the parking brake. 3. It is disengaged (Figure 10). Carefully practice maneuvering the mower using your right and left unattended. Move the throttle to slow or stop the mower. move the drive control levers to the...
... one minute then turn mower is not like operating a conventional type riding mower. To turn in the neutral position, refer to Product Care for instructions to run for jump starting. Forward Right Turn 1. Figure 12 14 Engage the parking brake. 3. It is disengaged (Figure 10). Carefully practice maneuvering the mower using your right and left unattended. Move the throttle to slow or stop the mower. move the drive control levers to the...

Operation Manual
Page 16
... the ignition module. NOTE: The speed of the mower will affect the quality of the 'V" belt and PTO clutch will adversely affect the cut . OPERATION STOPPING THE MOWER 1. Move both drive control levers to the neutral position to a non grassy area before engaging the mower deck. • Mow across slopes, never up /out into the DISENGAGED (OFF) position. Push the PTO downward to its highest position. 4. Use the deck lift knob/handle...
... the ignition module. NOTE: The speed of the mower will affect the quality of the 'V" belt and PTO clutch will adversely affect the cut . OPERATION STOPPING THE MOWER 1. Move both drive control levers to the neutral position to a non grassy area before engaging the mower deck. • Mow across slopes, never up /out into the DISENGAGED (OFF) position. Push the PTO downward to its highest position. 4. Use the deck lift knob/handle...

Operation Manual
Page 17
...). Remove the inner baffle for high-volume grass and install the inner baffle for mulching (Figure 17). Cutting Blades: The cutting blades cut grass, create grass lift and discharge grass through the discharge chute. (b) **Gauge Wheels (48, 54 and 60 inch Decks Only): The gauge wheels reduce scalping, help with a maximum amount of one cutting blade to an adjacent blade (i.e., the blades do not need to the Attachment & Accessories section for most grasses and mowing conditions. Discharge Chute: The discharge chute controls the mower deck discharge and...
...). Remove the inner baffle for high-volume grass and install the inner baffle for mulching (Figure 17). Cutting Blades: The cutting blades cut grass, create grass lift and discharge grass through the discharge chute. (b) **Gauge Wheels (48, 54 and 60 inch Decks Only): The gauge wheels reduce scalping, help with a maximum amount of one cutting blade to an adjacent blade (i.e., the blades do not need to the Attachment & Accessories section for most grasses and mowing conditions. Discharge Chute: The discharge chute controls the mower deck discharge and...
Operation Manual
Page 18
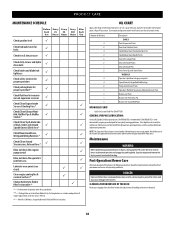
...36 Inch Deck Models Only: Parking brake uses a rubber wedge that oil spreads evenly. Start engine and operate mower briefly to insure that will require adjustment as the tire wears. Number of Oil Points 4 2 4 2 6 2 1 2 4 4 2 1 1 1 1 Description DAILY Deck Suspension Pivots Rear Deck Stabilizer Pivots Height Adjustment Turnbuckle Clevis Pin Height Adjustment Handle Pivots Deck Lift Linkage Pivots Deck Lift Handle Pivots Deck Lift Handle Pin Deck Frame Up-and-Down Pivots WEEKLY Operator's platform Linkage pivot points Speed Control Linkage Rod End Bearings Pump Control Lever Pivots Operator...
...36 Inch Deck Models Only: Parking brake uses a rubber wedge that oil spreads evenly. Start engine and operate mower briefly to insure that will require adjustment as the tire wears. Number of Oil Points 4 2 4 2 6 2 1 2 4 4 2 1 1 1 1 Description DAILY Deck Suspension Pivots Rear Deck Stabilizer Pivots Height Adjustment Turnbuckle Clevis Pin Height Adjustment Handle Pivots Deck Lift Linkage Pivots Deck Lift Handle Pivots Deck Lift Handle Pin Deck Frame Up-and-Down Pivots WEEKLY Operator's platform Linkage pivot points Speed Control Linkage Rod End Bearings Pump Control Lever Pivots Operator...
Operation Manual
Page 19
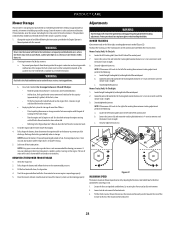
...; Do not park the mower near the transmission, axle and the fan area (Figure 13). 19 Figure 14 Empty cargo boxes, grass catchers or containers. • Check the fuel system (lines, tank, cap and fittings) frequently for at least five minutes. CHANGING THE ENGINE OIL Figure 11 • Clean the top of the cutting deck. The oil will be necessary. The use and under the spindle covers and belt area...
...; Do not park the mower near the transmission, axle and the fan area (Figure 13). 19 Figure 14 Empty cargo boxes, grass catchers or containers. • Check the fuel system (lines, tank, cap and fittings) frequently for at least five minutes. CHANGING THE ENGINE OIL Figure 11 • Clean the top of the cutting deck. The oil will be necessary. The use and under the spindle covers and belt area...

Operation Manual
Page 20
... oil drain hose over the oil collection container, unscrew the square-head hose plug from the negative battery post. 4. To Install the battery reverse STEPS 1-5. (l) (e) (m) (j) (h) (f) (k) (g) (i) Tires Figure 16 WARNING For proper traction and deck leveling the maximum recommended tire pressure is marked POS. (+) (e). Remove the oil filter to remove the battery cover (Figure 15). (b) (c) (b) (d) (a) Figure 15 2. Thread the square head plug into the collection container. 5. If acid spills on the tire side wall. BATTERY MAINTENANCE...
... oil drain hose over the oil collection container, unscrew the square-head hose plug from the negative battery post. 4. To Install the battery reverse STEPS 1-5. (l) (e) (m) (j) (h) (f) (k) (g) (i) Tires Figure 16 WARNING For proper traction and deck leveling the maximum recommended tire pressure is marked POS. (+) (e). Remove the oil filter to remove the battery cover (Figure 15). (b) (c) (b) (d) (a) Figure 15 2. Thread the square head plug into the collection container. 5. If acid spills on the tire side wall. BATTERY MAINTENANCE...
Operation Manual
Page 21
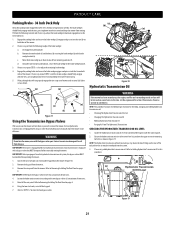
... mower. If the parking brake will not properly engage the tires stop use of the mower. 2. Remove the leg pad from the mower. Refer to the skin. Reverse STEPS 1-7 to close the two bypass valves. (a) (b) (a) (c) Figure 18 Hydrostatic Transmission Oil WARNING If the mower has been recently run, the engine, muffler and surrounding metal surfaces will not drive or you to Removing/Installing The Rear Panel on the rear of two turns...
... mower. If the parking brake will not properly engage the tires stop use of the mower. 2. Remove the leg pad from the mower. Refer to the skin. Reverse STEPS 1-7 to close the two bypass valves. (a) (b) (a) (c) Figure 18 Hydrostatic Transmission Oil WARNING If the mower has been recently run, the engine, muffler and surrounding metal surfaces will not drive or you to Removing/Installing The Rear Panel on the rear of two turns...
Operation Manual
Page 23
... : a. REMOVING THE MOWER FROM STORAGE 1. Fully charge the battery and inflate the tires to electrical components, spindles, pulleys, bearings or the engine. Fill the fuel tank with treated fuel and run the engine for a few minutes to the left or right, a tracking adjustment is operating properly. 5. Start the engine and allow to idle for 2-3 minutes to the left after making adjustments. Adjustments WARNING Shut the engine off, remove the ignition key and engage the parking brake before...
... : a. REMOVING THE MOWER FROM STORAGE 1. Fully charge the battery and inflate the tires to electrical components, spindles, pulleys, bearings or the engine. Fill the fuel tank with treated fuel and run the engine for a few minutes to the left or right, a tracking adjustment is operating properly. 5. Start the engine and allow to idle for 2-3 minutes to the left after making adjustments. Adjustments WARNING Shut the engine off, remove the ignition key and engage the parking brake before...

Operation Manual
Page 24
... the deck. Park the mower on the eyebolt (a). If they should be equal. Adjust the jam nut (b) at the right rear to 6.4 mm) higher than 1⁄2" (12.7 mm) above the ground when the deck is recommended in the desired height setting, then check the gauge wheel distance from the ignition switch, disconnect the spark plug wires, using the deck height index position the mowing deck into the 4" (10.2 cm) height of cut...
... the deck. Park the mower on the eyebolt (a). If they should be equal. Adjust the jam nut (b) at the right rear to 6.4 mm) higher than 1⁄2" (12.7 mm) above the ground when the deck is recommended in the desired height setting, then check the gauge wheel distance from the ignition switch, disconnect the spark plug wires, using the deck height index position the mowing deck into the 4" (10.2 cm) height of cut...

Operation Manual
Page 25
... your Cub Cadet Service Dealer. The engine should start . Disengage the parking brake and step off of the deck. (Figure 29). 25 Engage the PTO and the blades should not start the engine. See your Cub Cadet Service Dealer. 2. If the PTO clutch is a normally trouble free device. REAR TIRE REMOVAL 1. Remove the four lug nuts to fully cool before removing the belt from mower. 4. Remove ignition key and the spark plug cap. 3. The fuse is on the operator's platform. Check the 25 amp fuse for replacement. The engine should...
... your Cub Cadet Service Dealer. The engine should start . Disengage the parking brake and step off of the deck. (Figure 29). 25 Engage the PTO and the blades should not start the engine. See your Cub Cadet Service Dealer. 2. If the PTO clutch is a normally trouble free device. REAR TIRE REMOVAL 1. Remove the four lug nuts to fully cool before removing the belt from mower. 4. Remove ignition key and the spark plug cap. 3. The fuse is on the operator's platform. Check the 25 amp fuse for replacement. The engine should...
Operation Manual
Page 29
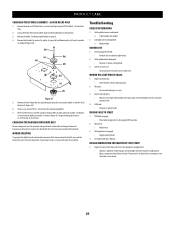
...; Engage parking brake. 4. If suspension is already in Replacing the PTO Deck Belt - 36 Inch Decks Only. 2. See Replacing the Blades on and the drive levers are in order to 21-32 ft-lbs (28.47-43.39 N-m). When installing the new spindle assembly be removed and special tools used in the neutral position. If your mower creeps, see your Cub Cadet service dealer. 29 a. Engine speed too low. • Place throttle in disengaged (OFF) position. 2. Wet grass...
...; Engage parking brake. 4. If suspension is already in Replacing the PTO Deck Belt - 36 Inch Decks Only. 2. See Replacing the Blades on and the drive levers are in order to 21-32 ft-lbs (28.47-43.39 N-m). When installing the new spindle assembly be removed and special tools used in the neutral position. If your mower creeps, see your Cub Cadet service dealer. 29 a. Engine speed too low. • Place throttle in disengaged (OFF) position. 2. Wet grass...

Operation Manual
Page 30
... Belt Drive Belt (36" Deck) Hi-Lift Blade, 18.5" (36" Deck) Hi-Lift Blade, 17.0 (48" Deck) Hi-Lift Blade, 19.0 (54" Deck) Hi-Lift Blade, 21.0 (60" Deck) Deck Spindle Deck Spindle (36" Deck) Deck Wheel Deck Wheel (N/A on 36" Deck) Deck Skid Guard Deck Skid Guard (36" Deck) Battery Battery (36" Deck) Gas Cap Gas Cap(36" Deck) Throttle Control Cable (If Equipped) Throttle Control Cable (36" Deck, If Equipped) Choke Control (If Equipped) Choke Control Cable (36" Deck, If Equipped) Ignition Key (PRO-Z key Set) Park Brake Cable Park Brake Cable (N/A on 36" Deck) Chute Assembly (48/54/60" Decks) Rear...
... Belt Drive Belt (36" Deck) Hi-Lift Blade, 18.5" (36" Deck) Hi-Lift Blade, 17.0 (48" Deck) Hi-Lift Blade, 19.0 (54" Deck) Hi-Lift Blade, 21.0 (60" Deck) Deck Spindle Deck Spindle (36" Deck) Deck Wheel Deck Wheel (N/A on 36" Deck) Deck Skid Guard Deck Skid Guard (36" Deck) Battery Battery (36" Deck) Gas Cap Gas Cap(36" Deck) Throttle Control Cable (If Equipped) Throttle Control Cable (36" Deck, If Equipped) Choke Control (If Equipped) Choke Control Cable (36" Deck, If Equipped) Ignition Key (PRO-Z key Set) Park Brake Cable Park Brake Cable (N/A on 36" Deck) Chute Assembly (48/54/60" Decks) Rear...


