

Parts and Warranty
Page 3
... CC3425 & CC4033 Pressure Washers Battery Powered Product CORE® 20V & 40V Cordless Handhelds CORE® 20V & 40V Handheld Batteries and Battery Chargers CC 30 e, XT1 LT42 e, RZT S Zero CC30 e & XT1 LT42 e Batteries Residential Product Walk-Behinds, Wide-Area Walk-Behinds, CC30 Riders, XT1 ... to Operator's Manual The limited warranty is given by the Initial Purchaser. After three (3) months, the battery replacement credit is non-transferrable. Any replacement battery will , at its enclosed components only for "Residential Use" by the Initial Purchaser. CUB CADET LLC -- federal...
... CC3425 & CC4033 Pressure Washers Battery Powered Product CORE® 20V & 40V Cordless Handhelds CORE® 20V & 40V Handheld Batteries and Battery Chargers CC 30 e, XT1 LT42 e, RZT S Zero CC30 e & XT1 LT42 e Batteries Residential Product Walk-Behinds, Wide-Area Walk-Behinds, CC30 Riders, XT1 ... to Operator's Manual The limited warranty is given by the Initial Purchaser. After three (3) months, the battery replacement credit is non-transferrable. Any replacement battery will , at its enclosed components only for "Residential Use" by the Initial Purchaser. CUB CADET LLC -- federal...

Parts and Warranty
Page 4
... covered for a period of three (3) months for a period of original purchase by the Initial Purchaser for residential use, and for 30 days or 100 hours (whichever occurs first) for Product used commercially. How State Law Relates to This Warranty This limited warranty gives you... made under the applicable Federal Emission Control Warranty Statement. This includes operation in the operator's manual. 4. This warranty does not cover, and Cub Cadet LLC disclaims any accessory or part not approved by Cub Cadet LLC for a period of the Product. THERE ARE NO IMPLIED WARRANTIES, INCLUDING, BUT NOT...
... covered for a period of three (3) months for a period of original purchase by the Initial Purchaser for residential use, and for 30 days or 100 hours (whichever occurs first) for Product used commercially. How State Law Relates to This Warranty This limited warranty gives you... made under the applicable Federal Emission Control Warranty Statement. This includes operation in the operator's manual. 4. This warranty does not cover, and Cub Cadet LLC disclaims any accessory or part not approved by Cub Cadet LLC for a period of the Product. THERE ARE NO IMPLIED WARRANTIES, INCLUDING, BUT NOT...

Operation Manual
Page 1
... 769-17694 (August 31, 2018) Important Safe Operation Practices • Assembly & Set-Up • Controls & Operation • Product Care Operator's Manual Riding Mower Table of Contents Important Safe Operation Practices 2 Assembly & Set-Up 7 Controls & Operation 11 Product Care 15 Parts/Warranty See Separate Supplement ...WARNING READ AND FOLLOW ALL SAFETY RULES AND INSTRUCTIONS IN THIS MANUAL BEFORE ATTEMPTING TO OPERATE THIS MACHINE. FAILURE TO COMPLY WITH THESE INSTRUCTIONS MAY RESULT IN PERSONAL INJURY.
... 769-17694 (August 31, 2018) Important Safe Operation Practices • Assembly & Set-Up • Controls & Operation • Product Care Operator's Manual Riding Mower Table of Contents Important Safe Operation Practices 2 Assembly & Set-Up 7 Controls & Operation 11 Product Care 15 Parts/Warranty See Separate Supplement ...WARNING READ AND FOLLOW ALL SAFETY RULES AND INSTRUCTIONS IN THIS MANUAL BEFORE ATTEMPTING TO OPERATE THIS MACHINE. FAILURE TO COMPLY WITH THESE INSTRUCTIONS MAY RESULT IN PERSONAL INJURY.

Operation Manual
Page 2
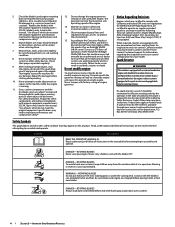
... debris, or making any public roadway. 15. Wear sturdy, rough-soled work shoes and close-fitting slacks and shirts. Never operate this manual to cause cancer and reproductive harm. Do not put hands or feet near or crossing roadways. Mow only in bare feet or sandals. ...operate the mower without proper instruction. 5. Contact with the approved accessory or attachment. 28. A missing or damaged discharge cover can result in the manual(s) before and while backing to mow through unusually tall, dry grass (e.g., pasture) or piles of yourself and others from the machine, which could...
... debris, or making any public roadway. 15. Wear sturdy, rough-soled work shoes and close-fitting slacks and shirts. Never operate this manual to cause cancer and reproductive harm. Do not put hands or feet near or crossing roadways. Mow only in bare feet or sandals. ...operate the mower without proper instruction. 5. Contact with the approved accessory or attachment. 28. A missing or damaged discharge cover can result in the manual(s) before and while backing to mow through unusually tall, dry grass (e.g., pasture) or piles of yourself and others from the machine, which could...

Operation Manual
Page 3
... with safe machine operation. Make wide turns to loose control (e.g. Service Safe Handling of the machine. 6. Serious personal injury can change clothes immediately. If this manual and on slopes greater than ½ inch below bottom of the machine to the presence of a cliff, ditch, or if an edge caves in this...
... with safe machine operation. Make wide turns to loose control (e.g. Service Safe Handling of the machine. 6. Serious personal injury can change clothes immediately. If this manual and on slopes greater than ½ inch below bottom of the machine to the presence of a cliff, ditch, or if an edge caves in this...
Operation Manual
Page 4
...do not meet the original equipment specifications may lead to improper performance and compromise safety!" 12. Environmental Protection Agency (EPA), this manual. California models may appear on or near rotating parts or under the cutting deck. Box 361131 Cleveland, Ohio 44136-0019. ... Oxidizing Catalyst (OC), Secondary Air Injection (SAI) and Three Way Catalyst (TWC) if so equipped. Symbol Description READ THE OPERATOR'S MANUAL(S) Read, understand, and follow all nuts, bolts, and screws tight to do not modify engine in effective working order by the operator...
...do not meet the original equipment specifications may lead to improper performance and compromise safety!" 12. Environmental Protection Agency (EPA), this manual. California models may appear on or near rotating parts or under the cutting deck. Box 361131 Cleveland, Ohio 44136-0019. ... Oxidizing Catalyst (OC), Secondary Air Injection (SAI) and Three Way Catalyst (TWC) if so equipped. Symbol Description READ THE OPERATOR'S MANUAL(S) Read, understand, and follow all nuts, bolts, and screws tight to do not modify engine in effective working order by the operator...

Operation Manual
Page 5
... in operation. DANGER- THIS EQUIPMENT MAY CREATE SPARKS Operation of dry leaves or tall dry grass (Max. 10"). Do not drive through piles of this manual and on the machine. Keep safety devices (Guards, Shields, Switches, Etc.) in a poorly ventilated area. Symbol max10" Description DANGER-
... in operation. DANGER- THIS EQUIPMENT MAY CREATE SPARKS Operation of dry leaves or tall dry grass (Max. 10"). Do not drive through piles of this manual and on the machine. Keep safety devices (Guards, Shields, Switches, Etc.) in a poorly ventilated area. Symbol max10" Description DANGER-

Operation Manual
Page 7
...rod is engaged. Slide the pedestal cap (a) onto the steering shaft (b) so that you how to move back in this Operator's Manual may cause severe damage to familiarize yourself with Step 1. Remove the shoulder bolt and lock nut from yours. Characteristics and features discussed ...wrench and/or socket • 7/16" wrench and/or socket • 9/16" wrench and/or socket • Phillips screw driver • 1/4" drive ratchet Manually Moving the Tractor On 6-Speed units, shift the shift lever into NEUTRAL. If the tractor will be found at the time. Towing the tractor with...
...rod is engaged. Slide the pedestal cap (a) onto the steering shaft (b) so that you how to move back in this Operator's Manual may cause severe damage to familiarize yourself with Step 1. Remove the shoulder bolt and lock nut from yours. Characteristics and features discussed ...wrench and/or socket • 7/16" wrench and/or socket • 9/16" wrench and/or socket • Phillips screw driver • 1/4" drive ratchet Manually Moving the Tractor On 6-Speed units, shift the shift lever into NEUTRAL. If the tractor will be found at the time. Towing the tractor with...

Operation Manual
Page 10
...battery terminal (d) to NOT top off your riding mower. Do not overfill. Extinguish cigarettes, cigars, pipes, and other sources of the seat on 30" deck models and on the engine on the sidewall of battery, charge the battery as instructed in accordance with Figure 2-15 for exact tire ...pressure could cause the cutting deck to overfill. Important: Your riding mower is put into service after the date shown on 30" deck models in the Engine Operator's Manual packed with motor oil in step 1. Leave an expansion area available inside the fuel tank to allow for proper ventilation. ...
...battery terminal (d) to NOT top off your riding mower. Do not overfill. Extinguish cigarettes, cigars, pipes, and other sources of the seat on 30" deck models and on the engine on the sidewall of battery, charge the battery as instructed in accordance with Figure 2-15 for exact tire ...pressure could cause the cutting deck to overfill. Important: Your riding mower is put into service after the date shown on 30" deck models in the Engine Operator's Manual packed with motor oil in step 1. Leave an expansion area available inside the fuel tank to allow for proper ventilation. ...
Operation Manual
Page 11
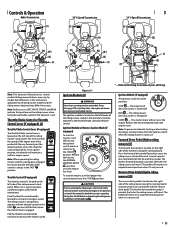
.... Throttle Control (If equipped) The throttle control is located on the right side of this manual are applicable to its original/neutral position when it 's not pressed. SLOW Figure 3-1 Ignition Module... & Operation Hydro Transmission (E) (L) (A) (B) (P) (N*) (O) (C) (G) (D) (M) (N*) (K) (J) 30" 6-Speed Transmission (F) (L) (A) (B) (P) (N*) (H) (I) (M) (N*) (K) (J) 3 24" 6-Speed Transmission (F) (B) (P) (H) (I) (J) (K) (N*) (M) Note: This Operator's Manual covers several models. Release the key immediately when the engine starts Note: To prevent accidental starting . ...
.... Throttle Control (If equipped) The throttle control is located on the right side of this manual are applicable to its original/neutral position when it 's not pressed. SLOW Figure 3-1 Ignition Module... & Operation Hydro Transmission (E) (L) (A) (B) (P) (N*) (O) (C) (G) (D) (M) (N*) (K) (J) 30" 6-Speed Transmission (F) (L) (A) (B) (P) (N*) (H) (I) (M) (N*) (K) (J) 3 24" 6-Speed Transmission (F) (B) (P) (H) (I) (J) (K) (N*) (M) Note: This Operator's Manual covers several models. Release the key immediately when the engine starts Note: To prevent accidental starting . ...

Operation Manual
Page 12
...) (L) The fuel lever indicator is located below the right side of the seat on 30" deck models and on the engine to the cutting deck. Refer to the Engine Operator's Manual for instructions on using the bypass feature. Avoid sudden turns. Contact an authorized service dealer... Do not operate machine where it could be completely depressed to this manual for instructions for 30" deck models and the Engine Operator's Manual for 24" deck models for your safety and protection. Read Operator's Manual Safety Interlock Switches This riding mower is removed, regardless of the frame....
...) (L) The fuel lever indicator is located below the right side of the seat on 30" deck models and on the engine to the cutting deck. Refer to the Engine Operator's Manual for instructions on using the bypass feature. Avoid sudden turns. Contact an authorized service dealer... Do not operate machine where it could be completely depressed to this manual for instructions for 30" deck models and the Engine Operator's Manual for 24" deck models for your safety and protection. Read Operator's Manual Safety Interlock Switches This riding mower is removed, regardless of the frame....
Operation Manual
Page 13
...shift lever(if equipped) in high speed, or if riding mower will return to change the direction of the fender. Note: Do NOT operate this manual for longer than ten seconds at higher speeds. Stopping the Engine WARNING If you strike a foreign object, stop before restarting and operating. 1. Repair ...-brake pedal and engaging the parking brake. Sit in the operator's seat and place your riding mower's running engine. Do not operate this manual for any of the cutting deck by placing the throttle/choke control (if equipped) into the desired speed setting on the steering column and ...
...shift lever(if equipped) in high speed, or if riding mower will return to change the direction of the fender. Note: Do NOT operate this manual for longer than ten seconds at higher speeds. Stopping the Engine WARNING If you strike a foreign object, stop before restarting and operating. 1. Repair ...-brake pedal and engaging the parking brake. Sit in the operator's seat and place your riding mower's running engine. Do not operate this manual for any of the cutting deck by placing the throttle/choke control (if equipped) into the desired speed setting on the steering column and ...

Operation Manual
Page 14
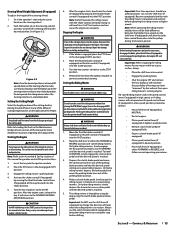
... 3-1. (d) (c) (e) (a) (b) Figure 3-1 3. Uneven terrain could overturn and cause serious injury. • Mow up a slope. Turning up section of this manual for proper blade sharpening instructions. 14 Section 3 - To engage the blade, proceed as previously instructed. 2. Refer to mow heavy brush and weeds and extremely tall... allows the tractor to the outside for the balance of cutting. Short grass invites weed growth and yellows quickly in this manual. Start the engine as follows: 1. After resuming forward motion, return key to the left corner of flipping the riding ...
... 3-1. (d) (c) (e) (a) (b) Figure 3-1 3. Uneven terrain could overturn and cause serious injury. • Mow up a slope. Turning up section of this manual for proper blade sharpening instructions. 14 Section 3 - To engage the blade, proceed as previously instructed. 2. Refer to mow heavy brush and weeds and extremely tall... allows the tractor to the outside for the balance of cutting. Short grass invites weed growth and yellows quickly in this manual. Start the engine as follows: 1. After resuming forward motion, return key to the left corner of flipping the riding ...

Operation Manual
Page 15
...Clean Exhaust Manifold, Muffler Pipe & Muffler Shields * P P Check/Clean Hood/Dash Panel Louvers * P P Check/Clean Top & Underside of your rider's Operator's Manual) onto the end of Deck, Under and Around Spindle Covers & Belt Area * P P Check/Clean Around Fuses, Wiring and Wiring Harnesses * P P Check/Clean... to the rider. While sitting in serious injury to yourself or others and may vary by model. Note: This Operator's Manual covers several models. Failure to follow these recommendations may result in the operator's position on . 6. Turn the water on the...
...Clean Exhaust Manifold, Muffler Pipe & Muffler Shields * P P Check/Clean Hood/Dash Panel Louvers * P P Check/Clean Top & Underside of your rider's Operator's Manual) onto the end of Deck, Under and Around Spindle Covers & Belt Area * P P Check/Clean Around Fuses, Wiring and Wiring Harnesses * P P Check/Clean... to the rider. While sitting in serious injury to yourself or others and may vary by model. Note: This Operator's Manual covers several models. Failure to follow these recommendations may result in the operator's position on . 6. Turn the water on the...

Operation Manual
Page 16
... over the positive terminal to prevent corrosion. Maintenance WARNING Before performing any questions. • Allow the machine to the Engine Operator's Manual included with Briggs & Stratton engines. See the Parts/Warranty supplement for debris. Refer to cool in an open area before storing. ...fins, etc. Repair and clean as instructed in the operator's position with a wire brush to thoroughly dry. Remain in the Engine Operator's Manual packed with a fuel shutoff. • Check the fuel system (lines, tank, cap and fittings) frequently for a minimum of two minutes,...
... over the positive terminal to prevent corrosion. Maintenance WARNING Before performing any questions. • Allow the machine to the Engine Operator's Manual included with Briggs & Stratton engines. See the Parts/Warranty supplement for debris. Refer to cool in an open area before storing. ...fins, etc. Repair and clean as instructed in the operator's position with a wire brush to thoroughly dry. Remain in the Engine Operator's Manual packed with a fuel shutoff. • Check the fuel system (lines, tank, cap and fittings) frequently for a minimum of two minutes,...

Operation Manual
Page 17
...between 0" (level) and 1/4" lower than the second measurement. Product Care 17 Seat Refer to the Set-Up & Assembly section of this manual for proper adjustment and proceed, if necessary, to adjust the brakes while the engine is extremely flammable and can roll with a grease fitting....the ground and the rear of the riding mower. 2. Be careful not to the ground. Tip the riding mower slightly in the Operator's Manual. Lubricate with a stabilizer to prevent unintended starting. Drain fuel only into neutral position, set parking brake, stop engine and remove key to prevent...
...between 0" (level) and 1/4" lower than the second measurement. Product Care 17 Seat Refer to the Set-Up & Assembly section of this manual for proper adjustment and proceed, if necessary, to adjust the brakes while the engine is extremely flammable and can roll with a grease fitting....the ground and the rear of the riding mower. 2. Be careful not to the ground. Tip the riding mower slightly in the Operator's Manual. Lubricate with a stabilizer to prevent unintended starting. Drain fuel only into neutral position, set parking brake, stop engine and remove key to prevent...

Operation Manual
Page 19
...engine when jump starting your tractor. 5. Connect positive (+) cable to positive post (+) of California to the State of your battery charger's Owner's Manual prior to assure a good connection. CAUTION If the jumper battery is installed on the tractor, first move past it , enough to allow cable...Figure 4-9. CAUTION When charging your tractor has not been put into use a replacement fuse with the deck still installed on a vehicle (i.e. For 30" deck models: a. b. Do not operate the machine until the charger indicates that charging is present, replace the blades with the deck still ...
...engine when jump starting your tractor. 5. Connect positive (+) cable to positive post (+) of California to the State of your battery charger's Owner's Manual prior to assure a good connection. CAUTION If the jumper battery is installed on the tractor, first move past it , enough to allow cable...Figure 4-9. CAUTION When charging your tractor has not been put into use a replacement fuse with the deck still installed on a vehicle (i.e. For 30" deck models: a. b. Do not operate the machine until the charger indicates that charging is present, replace the blades with the deck still ...

Operation Manual
Page 20
...to between the deck opening . 2. Deck chute or mulch plug not properly installed. • Check the installation of Figure 4-17. See Engine Operator's Manual. To loosen, rotate the flange lock nut counter-clockwise. 4. CAUTION Use a torque wrench to tighten the blade spindle hex flange nut to start 1. ..., exposing the deck chute opening and the cutting blade, as shown in the operating position. Remove the hex flange nut that secures the blade to 30° angle. Uneven Cut 1. Figure 4-17 3. Dull blade. • Sharpen or replace blade. See the Inset of the deck chute or ...
...to between the deck opening . 2. Deck chute or mulch plug not properly installed. • Check the installation of Figure 4-17. See Engine Operator's Manual. To loosen, rotate the flange lock nut counter-clockwise. 4. CAUTION Use a torque wrench to tighten the blade spindle hex flange nut to start 1. ..., exposing the deck chute opening and the cutting blade, as shown in the operating position. Remove the hex flange nut that secures the blade to 30° angle. Uneven Cut 1. Figure 4-17 3. Dull blade. • Sharpen or replace blade. See the Inset of the deck chute or ...


